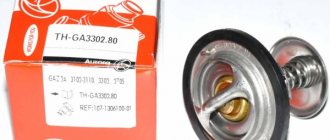
Today I finally finished my plan! and so, I bought: -gazelle stove tap -classic stove pipes -clamps -window lifter button
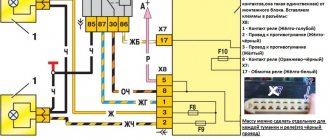
CONNECTION: the electric valve itself: - black wire - minus - - red wire - plus + - white wire - button chip No. 7 - brown wire - button chip No. 1
the button itself: -No. 7 and No. 1, we already know where))) -No. 2 — minus- (ground) - No. 5 — minus- (ground) - No. 4 — button illumination, to the tidy dimensions (plus+) - No. We cut 3 and No. 6 with pliers, they are not needed)
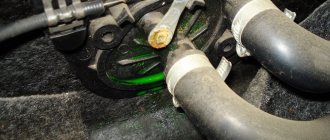
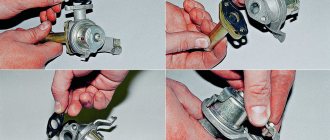
I took off the stove, blew out a bunch of leaves (as is usually the case), threw out the original faucet, put a short pipe in its place, connected a hose, put everything back in place, installed a new faucet under the hood and connected it, stuck a button in the beard, connected everything to the heap, and Oh miracle! works!) Only positive emotions! Now, in order to warm up or, on the contrary, turn off the stove, just a light touch of your finger to the button is enough! it's a thrill) now if the tap leaks, it will leak into the street, and not into the salon) I recommend it to everyone! Thanks to all)
Each car has a cabin heating system connected to the engine cooling system. Electric heater taps are widely used today to control the stove - read about these devices, their types, design, principle of operation, as well as their selection and replacement in this article.
What is an electric heater valve?
Electric heater valve (heater control valve with electric drive, heater valve) is a component of the vehicle interior/cabin heating system; a tap or valve to control the supply of coolant from the engine cooling system to the heater radiator (heat exchanger).
An electrically operated faucet is similar to a mechanical faucet, but is driven by a built-in electric motor or solenoid. This solution made it possible to abandon the cable drive and implement control of the heater using a button. Electric cranes make it possible to implement various schemes for heating the interior and operating the engine cooling system, while they are easy to use, reliable in operation and have a simple design.
Types, design and operating principle of electric heater valve
Electrically controlled faucets existing today are divided into groups according to the type of shut-off element and its drive, and according to the number of circuits (and, accordingly, pipes).
Based on the number of circuits and pipes, heater valves are:
- Single-circuit / 2-pipe - ordinary taps / valves;
- Double-circuit / 3-pipe - three-way valves.
Double-port valves are valves that can only open and close the flow of liquid. In such a faucet, one pipe is inlet, the second is outlet, and between them there is a shut-off element. The dual-port heater valve is used in conventional interior heating systems and is located between the engine cooling system outlet and the heater core inlet to control the flow of hot coolant.
Three-way valves are three-way valves that can direct fluid flow into two different pipelines. This faucet has one inlet and two outlets, and the shut-off element is designed in such a way that it can direct liquid from the inlet to one of the outlets while simultaneously blocking the other. A heater valve with three pipes can be used in various interior heating systems: with bypass, with an additional heater, etc.
According to the type of shut-off element and its drive, taps are:
- Gate valves driven by an electric motor;
- Shut-off valves driven by a solenoid.
The design of gate valves is simple. They are based on a plastic molded body with pipes, inside of which there is a rotating plate in the form of a solid sector or a sector with holes the size of the pipes. A compact electric motor with a simple gear reducer is installed on the housing, with the help of which the plate rotates. In faucets with two nozzles (double-circuit), both nozzles are located opposite each other, with a plate between them. Three-way faucets have an inlet on one side and two outlets on the other.
The heater valve with an electric motor works as follows. When the heater is turned off, the valve plate is located between the pipes, blocking the flow of liquid - in this case, hot liquid does not flow into the heater radiator, and the interior heating system does not work. If it is necessary to turn on the stove, the driver presses a button on the dashboard, current is supplied to the electric motor of the faucet, it turns the plate and opens the path of coolant - the heater radiator heats up, the interior heating system begins to work. To turn off the heater, the driver presses the button again, all processes occur in reverse order, and the heater turns off.
Heater Gazelle business troubleshooting.
What to do if something in the heater does not work? Due to the design of the heater, diagnostics in case of failure of its parts is difficult. Initially, as always, you need to check the fuse.
Checking the heater tap.
When operating the Gazelle Business heater, a problem may arise in the supply of hot air when the ventilation is turned on, or, conversely, cold air when the heater is turned on. The reason is that the heater tap does not work. It does not open or shut off the coolant flow to the heater core. The design of the crane is quite simple and at the same time somewhat more complex than the similar crane installed on the Gazelle restyling. It's all about the built-in crane control unit,
To find the cause of a heater tap failure, you will need a piece of copper wire and a test lamp. No special knowledge or skills are needed to determine the malfunction.
First you need to check the presence of plus and minus on the connector connected to the tap. This is done with a test lamp by connecting its probes (wires) to the black and white wires of the connector. If the warning light does not light, then move the wire connected to the black wire to a metal part of the engine where there is a good minus. If the lamp lights up, repair the break in the black wire or clean its attachment to the body. If the lamp does not light up in this case, then you need to check fuse F13 and the serviceability of the wire from it to the connector.
Read more: KN block on starline keychain
If there is a plus and minus on the connector, use a small piece of copper wire to alternately connect the black wire with the brown and green wires. If the heater valve gearbox is in good working order, the characteristic sound of its operation will be heard. If nothing happens, the tap needs to be replaced.
Checking gearmotors.
Checking the gear motors of the windshield blower dampers and deflectors can be checked without completely removing the panels. It is enough to remove its lower part. The main damper motor is accessible from the driver's side. To check gearmotors, you need to disconnect the connector of its electric motor, the connector with a lock, and connect a tester to it in voltmeter mode or a test lamp. With the ignition and heater on, you must press the button that controls this damper. The control lamp should light up. If the lamp is on and the gearmotor does not work, it must be replaced.
If you are on the road and do not have the opportunity to replace the damper drive with window defroster, you can remove the rod from the damper lever on the driver’s side and turn it manually, locking it in the open position. To open the damper on the passenger side, you will need to unscrew the screws securing the gearmotor and, by turning its housing, secure it in the same way.
Checking the electric motor and speed controller.
To check the heater fan motor and the cause of its failure if the fan does not work, you will need to remove the air intake in the engine compartment. Inside the window that opens, two wires with a connector will be visible. To check the power supply, connect a test lamp to the connector terminals and, with the ignition on, turn the heater speed control toward maximum speed. The control lamp should light brightly. When turning the handle towards the minimum speed, the brightness of the lamp should decrease. This indicates that the speed controller is working properly.
If the control lamp is on and the fan does not rotate, then its electric motor is faulty. To check, measure the resistance between the motor terminals in the connector. Motor malfunction may be caused by stuck brushes. In this case, you can try knocking on the heater body. In this case, the operation of the fan can be restored before the next time it is turned off, possibly longer, but you can still get to the service center in a warm place.
If the control lamp does not light up when checking the power supply, the speed controller is faulty. If the speed controller malfunctions, you can temporarily connect the positive wire on the connector to the fuse near the battery with a wire. This will allow you to get to the garage or service station in winter.
It is not possible to describe how to remove the Gazelle business heater and disassemble it due to its high labor intensity, but you can download detailed instructions with photographs from the “Gazelle Heater” file hosting service.
Below is a schematic electrical diagram for connecting the Gazelle business heater and ventilation.
Questions about choosing and replacing a heater tap
The heater valve is very important for the operation of the interior/cabin heating system, however, selecting and replacing this part in most cases does not cause any problems. To select the right faucet, you must follow several recommendations:
- The power supply voltage of the crane motor must correspond to the voltage of the vehicle’s on-board electrical network - 12 or 24 V;
- The type of tap - 2 or 3 pipes - must correspond to the interior heating system diagram. For conventional systems, a tap with two pipes is required; for systems with bypass, a tap with three pipes is required. Also, a tap with three pipes can be used to create a heating system with an additional heater;
- The diameter of the pipes must correspond to the diameter of the heating system pipelines, but if necessary, adapters can be used;
- The faucet and vehicle must have the same type of electrical connector. If necessary, it is necessary to replace the type of connector on the vehicle;
- The crane must have dimensions suitable for its installation.
The heater valve must be replaced after draining the coolant; metal clamps must be used for installation. It is necessary to ensure that the tap is installed correctly - position its inlet and outlet pipes in accordance with the direction of the liquid. For convenience, there are arrows on the nozzles indicating the direction of fluid flow. If you install a regular 2-pipe valve incorrectly, the system will work, but incorrectly installing a 3-pipe valve will make the system completely inoperable. If the faucet is installed correctly and reliably, the stove will start working immediately, providing warmth and comfort in the car interior.
Diagnostics
If signs of malfunction or malfunction are detected, it is necessary to carry out diagnostics to identify the causes of the breakdown. One of the reasons why the heater begins to heat worse, or when very cold air comes out of it, is the valve of the Gazelle stove. It either does not open completely or is completely closed. If any of these signs occur, you must first check the correct operation of the electric crane.
- With the engine warm, touch the pipes before and after the electric valve. In the extreme hot position of the temperature adjustment handle, the pipe before and after the electric tap should be the same temperature.
- Check the power supply to the electric valve when switching temperatures.
- If there is no power, check the fuse and replace if necessary.
- Check the strainer on the inlet pipe; liquid should flow freely through the holes.
- When the tap is removed and the power is connected, you need to look into it through the light. When changing the position of the temperature regulator (from minimum to maximum), ensure that the shutter is fully opened when the handle is in the hottest position.
Design of the cooling system for UMZ-4213 and UMZ-4216 engines on UAZ and GAZelle vehicles.
To increase energy performance, improve fuel efficiency, reduce toxicity and noise, models with an integrated microprocessor fuel injection and ignition control system were developed on the basis of the UMZ-421 carburetor engine: the UMZ-4213 engine for UAZ cars and the UMZ-4216 engine for GAZelle cars. The design of the cooling system on the UMZ-4213 and UMZ-4216 is somewhat different, since it has differences in the connection diagram of the expansion tanks and heating radiators.
Gazelle stove diagram
How the stove works in Gazelle Business
For correct diagnostics and repairs, it is necessary to know the structure and operating principle of the heater in order to diagnose a breakdown or carry out repairs at the first sign of a malfunction, preventing failure of the entire unit as a whole. Most faults can be predicted by indirect signs and their progression can be prevented. To do this, you need to know and understand what each element is responsible for and what the principle of its operation is.
Car cooling system
In Gazelle Business the stove is an integral part of the engine cooling system. When the engine operates, a large amount of heat is generated that must be removed. Heat is released due to fuel combustion and from rubbing surfaces. If the heat is not removed, the engine will heat up very quickly and fail. The cooling system has two circuits (small and large circle), they are separated by a thermostat. When the liquid is cold, it circulates in a small circle, and when it warms up, it circulates in a large circle. This allows you to quickly reach operating temperature and not overheat. During the warm season, heat is released into the atmosphere, and when cold weather sets in, part of the heat is spent on heating the cabin.
Repair
Repair of the control unit will directly depend on the cause of the malfunction:
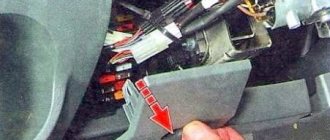
- If the power check shows that there is no “+” on the gear motor, then there is a malfunction in the heater control system. It needs to be dismantled and either repaired or replaced with a new one. For repairs, it is better to use the services of specialists, and if you have experience in this work, you can try to solve the problem yourself. To dismantle it is necessary: remove the top drawer for documents; unscrew the front panel (two screws on top and two on bottom); remove the decorative trim; pull out the entire panel so that all terminals can be numbered; disconnect the terminals; then take out the control element itself. Then reassemble everything in reverse order.
- To replace the resistor, you need to either remove the entire dashboard, or cut a hole under the box for documents, after first removing the box itself. To replace the fan, it is necessary to dismantle the entire instrument panel along with the stove. Then disconnect the stove from the dashboard, “halve” it and remove the resistor. If there is no power to the fan block, then the reason must be sought in the heater control system. To do this, you need to check it with a multimeter. Pinout of contacts of the Gazelle Business heater control unit:
- reserve;
- motor-gearbox (MR) feedback, heat-cold;
- access to the BRS;
- reserve;
- 5V, power supply for external temperature sensor;
- tap closing signal;
- tap opening signal;
- coolant heating sensor input;
- external temperature input;
- interior temperature sensor input;
- reserve;
- external temperature sensor housing;
- feedback, MR, glass - legs;
- MP heat – cold “+”;
- MP heat – cold “-”;
- MP recirculation “+”;
- MP recirculation “-”;
- MR glass – chest “+”;
- MR glass – chest “-”;
- MR glass – legs “+”;
- MR glass – legs “-”;
- feedback MR glass – legs 1;
- output of the heated glass and mirrors relay “+”;
- air conditioning relay output “-”;
- frame;
- feedback MR heat – cold 2;
- on-board network.
- To repair the display, you need to dismantle the entire heater adjustment element (as described in point No. 1) and repair or replace the entire assembly unit. If you repair it yourself, you can change the handle illumination diodes to a different color or change the brightness.
Repair of the Daewoo Nexia heater control unit PART 1 The heater is a very important element in the car. It affects not only the driver’s comfort, but also the safety of driving (since if the windows fog up in cold weather, driving becomes difficult). And it’s better to do all the work in a warm garage or parking lot than to do it on the road.
