Actually the subject is the size of the valve stem seals felicia, 1.3l engine. 58 horses, last time I changed the caps, I bought an analogue from the original number, in the end the size of the caps I bought turned out to be 8 mm by 10.8 mm, of course, now they are lying idle, thank God, after shopping around in the existential store, suitable caps were found, but they Unfortunately I don’t remember the size, it seems to be 7mm by 10mm, if anyone can tell me the exact dimensions I would be grateful... or the size of the caps from the 16-valve ten seems to be identical
Comments 8
If anyone finds it useful, the size of oil removable caps for cars after mid-96 is 7mm and the second size is 9.8mm, but it’s best to check based on the fault of the car. Until mid-96, the valves came with an 8mm diameter.
Dimon don’t give people brains, come to me and I’ll give them to you! YOU ARE THE BRAIN
Vital, it would be better if you told me the size, I want to buy the original. Already ordered a trial batch. You are talking about the brain, but this information is useful so that it doesn’t turn out like I did last time...
I put it from some kind of pelvis
Suitable for VAZ 2112 with 1.5 16 valve engine
Oil scraper cap 6.96-... 7mm - VAG 027109675 Depends on the year of manufacture. Until mid-96, the valves came with an 8mm diameter. If the valve cover is open, then before ordering, it is better to measure the diameter of the valve stem. Here is a list of brands that use exactly the same caps (I mean sizes).
LADA 1.5 [VAZ-2111] 78 ? gasoline engine 01/1995 - up to now 1.5 16V [VAZ-2112] 95 ? gasoline engine 01/1995 - up to now Engine code: VAZ-2112
Only they apparently made a mistake with the original number - 047109675A, and according to your code 027109675 in existential it gives caps with a diameter of 5.5 mm, And what should the lower diameter be if the top is 7, I have a 98 model. 9th month
Number - 047109675A is designed for valve rod diameter - 8 mm. But the free diameter of the cap skirt should be smaller. If you have a valve stem diameter of 7 mm, then the free diameter of the cap skirt should also be smaller, that is, 5.5 mm. If you still have the caps that you bought last time, then measure the inner diameter of the skirt. It should be more than 5.5 mm. I did not measure the lower diameter. In the Czech catalog, numbers are given according to the diameter of the valve stem, and in the existential catalog according to the free diameter of the cap skirt.
You can also put it under this number - 047109675A, but the crimp density will be worse and it will pass less (it will let oil through).
Article: 701.289, additional articles: 2112-1007026
Order code: 097702
- Buy with this product
- show more
- Buy analogues
- show more
- Passenger cars / VAZ / VAZ-21102 drawings
- » href=»/catalog/vaz-3/legkovye_avtomobili-30/vaz_2110-10/mehanizm_gazoraspredelitelnyiy-102/#part40374″>Oil capEngine / Gas distribution mechanism
- » href=»/catalog/vaz-3/legkovye_avtomobili-30/vaz_2110-10/mehanizm_gazoraspredelitelnyiy-102/#part40375″>Oil capEngine / Gas distribution mechanism
Procedure for replacement
If you need to replace VAZ 2110 8 valve stem seals intended for other cars, then the following points must be taken into account:
- The diameters of the valve stem and the guide bushing, the location of which is the seat belt, must match.
- In comparison with the “original” valve, the height should not be exceeded by more than 0.5 millimeters. Otherwise, the valve stroke will be very large and the spring retainer may be damaged.
- The cap should not have a diameter that is too large. This will ensure freedom of passage inside the valve spring. This is most important for those engines whose valve has two springs. In this case, the outer diameter of the cap will be limited by the internal spring.
- The length of the seat on the cap and the guide sleeve should be close in size. If the belt is short, it may be damaged by the edge of the sleeve.
- Pay attention to the internal profile that the surface of the cap has.
- When replacing VAZ 2110 valve stem seals, the year it was produced is taken into account.
Replacing valve stem seals
If on a VAZ 2110 car the valve stem seals
are made from other brands of cars, then you need to consider:
- Coincidence of the diameter of the valve stem and the guide sleeve of the seating belt.
- The height of the new one should not exceed the size of the “original” one by more than 0.5 millimeters, otherwise, with the largest stroke of the valve, the cap may be destroyed by the spring plate.
- The cap must not have a very large diameter in order to ensure free passage inside the valve spring. Replacing slip rings on a VAZ 2110 generator - photo. Body repair of VAZ 2110, 2114, 2115, Kalina, Priora. Replacing the front wing of a VAZ 2110 RUB 1,000.00 Replacing oil seals for Niva, VAZ 2101-2107. Replace the valve cover gasket. This is especially important for engines that have two springs on each valve. Then the outer diameter of the cap is limited by the internal spring.
- The lengths of the seats on the cap and on the guide sleeve should be close in size. The article describes step by step the process of replacing valve stem seals on a VAZ 2107. Replacing the cylinder head gasket on a VAZ 2110 (8 and 16 valves. If the belt on the cap is small, it can be damaged by the edge of the bushing if, when installing it, it is put “deeply” on the bushing, or the latter will press the sealing edge of the cap away from the valve stem, which will break the seal.
- Attention is drawn to the internal profile of the cap surface. Often, caps that do not have a reinforcing sleeve have an annular projection on the inner seating surface. Due to the high tension, when installing the cap on a smooth bushing, it may be damaged or come off the bushing .
- It is necessary to take into account the years of production of the engines whose caps are to be replaced, and the one from which they are planned to be used.
Advice: Modern caps can be installed on an old engine if their seating dimensions match, which will improve sealing properties and increase the durability of the structure.
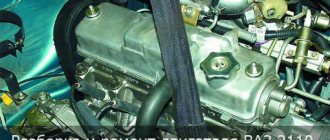
Replacing the valve stem seals of a VAZ 2110 is carried out without removing the engine head from the cylinder block. Replacing oil seals for Niva, VAZ 2101-2107. Replacing thresholds for VAZ 2110 - okuzove.ru. Below are instructions on how to replace the caps yourself.
About the features of oil seals and replacement tools
Even if you have not driven your car for quite a long time, you need to monitor their condition and ability to pass oil in the required amount. The fact is that the reason for non-standard operation and loss of elasticity can be not only the wear of the valve stem seals, but also the “aging” of the rubber. For this reason, they need to be changed and checked not only after a certain mileage, but also after the car has been quietly parked in the garage.
To replace the seals, you will need an accessible specialized tool. For this reason, both preventive inspection and replacement can be done without resorting to the services of a professional technician. For these purposes, prepare:
- desiccant;
- tool for dismantling oil seals;
- tweezers;
- mandrel for pressing seals.
Using these instructions, you can do without removing the head, which requires craftsmanship skills. In this case, you can do without this process and replace it using a simpler method.
Procedure for removing caps
To facilitate the installation of new valve stem seals
you can use the video. So:
- The wire from the negative terminal is disconnected from the battery.
- The toothed pulley is removed from the camshaft.
- The block head cover is removed .
- The “mass” of wires are removed from the studs, and the two nuts securing them are first unscrewed.
- Unscrew the bolt and two nuts securing the rear cover of the cylinder head.
- The rear cover is removed from the cylinder head, along with the sealing ring.
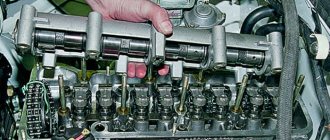
- The nuts securing the front and rear bearing housings mounted on the camshaft are unscrewed evenly.
- Both housings are removable.
Signs of wear on oil seals
The main factor in replacing these caps is their wear, which occurs over time . After a long period of work, they already become unusable, especially if poor quality caps were installed on the car. Among the main signs of cap wear are the following:
- the appearance of bluish smoke when the engine starts or prolonged braking occurs;
- oiling of spark plugs, which occurs constantly;
- very high oil consumption.
To replace oil seals, it is not necessary to remove the head from the block.
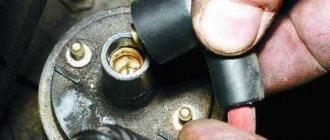
Installation of caps
In order not to damage the new valve stem seals, the springs must be removed from them before installation:
- The cap is inserted into the mandrel; before doing this, it must be dipped in engine oil.
- Carefully press the part into the lower plate until it stops.
- The spring is installed.
- In the same way, replaced
. - Install the springs and valve plate in the reverse order of removing the parts.
- The crackers are inserted into the grooves on the valve stem using a device.
Installation of cotters in the grooves of the valve stem
- The tin rod is removed from the hole for the candle.
- To shrink the crackers into place, you need to hit the ends of the valves with a hammer, through a metal rod.
- Engine oil lubricates the camshaft journals and cams, the supporting surfaces under the journals in the bearing housings and the cylinder head.
- The camshaft is installed in the block head supports so that the cams of the first cylinder are directed away from the valve pushers.
- In the area where the outer camshaft supports are located on the block head, sealant is applied.
- The camshaft bearing housings are installed, the washers are put on the stud, and the fastening nuts are tightened:
- Initially, the nuts are screwed until they touch the plane of the block head of the bearing housings; the guide bushings must fit into the housing holes;
- the nuts are finally tightened.
- The camshaft oil seal is installed.
- The clearances in the valve drive are checked and adjusted if necessary.
- The remaining parts are installed.
Replacement has been completed, valve stem seals have been installed on the VAZ 2110. This will protect the car engine from rapid wear and reduce oil consumption.
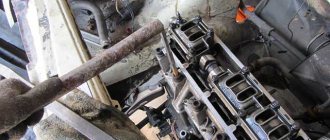
Sectional view of the valve mechanism
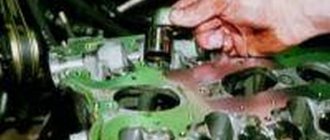
Replacing valves on a VAZ-2112 includes all the actions carried out when replacing hydraulic compensators. Having removed the compensator, you can see the valve stem and the upper plane of the disc. Plate 3 is held by two crackers 2 (see diagram).
Dismantling includes the following steps:
- A “soft stop” (braided rope, etc.) is placed under the valve from below;
- Press down on the plate from above;
- The crackers are removed with tweezers or a magnetized screwdriver;
- Carefully move the plate upward, preventing the spring from rebounding.
Sometimes in “step 2” you have to hit the plate with a hammer, and here you need to be extremely careful. In general, there is special equipment, such as shown in the photo.
The puller works on the principle of a vice. But the force when screwing should be small, otherwise they conclude that the crackers “stick” to the plate. And in this case, take a hammer.
Articles
- 21120-1007010 – inlet valve;
- 21120-1007012 – exhaust valve;
- 21120-1007028 – cracker;
- 21120-1007025 – upper plate;
- 21120-1007300 – hydraulic compensator (about checking them here).
Symptoms of a problem
The malfunction of the valve stem seals can be determined by several symptoms - the engine will begin to consume oil, and the more worn the valve seals are, the more intensively.
A blue tint will appear in the exhaust, indicating oil has entered the cylinders.
If you do not pay attention to these symptoms for a long time, then in the future there may be a drop in engine power due to a decrease in compression.
If all this is observed on the car, then it is worth performing repair work, which boils down to replacing the valve seals.
This can be done at a service station, but it will be expensive, since the process of replacing them is labor-intensive.
But if you have skills in repairing car power units, then it is quite possible to do all the work yourself.
How to organize the replacement of valve stem seals for a VAZ 2110 8-valve car in a garage?
Even an ordinary motorist can easily install new valve seals. If we consider that dismantling the cylinder head is not included in the technological list, then the repair does not present any difficulties at all.
When purchasing spare parts, it is important to pay attention to the internal profile of the seals. Quite often, parts that are not equipped with a reinforcing sleeve have an annular protrusion on the landing plane in their design. During installation it may be damaged, but otherwise the process is no more complicated than changing the damper support on a “ten”.
Preparatory stage
First of all, it is worth noting that replacing valve stem seals on a VAZ 2110 with an 8-valve engine uses the same technology for both carburetor and injection engines. Therefore, the tool set is similar in both cases:
- Set of wrenches and socket wrenches.
- Device for pressing valve springs.
- Mandrel and puller for valve seals.
- Tin rod with a cross section of 7-9 mm.
- Tweezers, hammer, screwdrivers and pliers.
Before starting work, it is advisable to clean the cylinder head with kerosene, after which the air filter, fuel pump and ignition distribution device should be removed. Next, use a No. 5 hexagon to unscrew the screw that secures the auxiliary device drive housing. Be sure to remove the negative terminal from the battery, as well as the toothed pulley from the camshaft.
Preparatory dismantling stage
- Unscrew the nuts securing the cylinder head cover and remove it.
- Unscrew the two nuts securing the ground wires and remove them from the studs.
- Unscrew the two nuts and bolt of the rear cylinder head cover and remove it from the head.
- Alternately loosen the four nuts securing the front camshaft bearing housing and the six rear ones. Remove both housings.
- The key should be removed from the camshaft groove immediately so as not to be lost.
- Dismantle the camshaft and remove the seals from it.
Removing the old seal
This stage of replacing deformed valve stem seals for VAZ 2110 8 valves includes installing the piston where the work is being done to the TDC position. Further actions are performed according to the following scheme:
- Remove the appropriate spark plug and insert a tin rod into the hole to prevent the valve from falling through.
- Using a special tool, compress the valve spring.
- Use tweezers to remove two crackers and remove the device.
- Install a collet to remove the caps and hit the fixture bushing with a hammer. This will allow the seal to be pressed off the bushing.
- Remove the oil seal from the collet. If you don't have a collet, you can use pliers. Do not rotate the seal; this will damage the valve guide.
Installation of a new seal
- Place the cap in the oil and install it in the mandrel.
- Carefully press the oil seal into the lower plate until it stops.
- Install the spring onto the seal. Carry out similar actions with the remaining parts.
- Install the crackers and hit the ends of the valve with a hammer through a metal rod. So the crackers will return to their normal place.
- Lubricate the camshaft cams and journals with oil, and treat the bearing surfaces under the journals in the same way.
- Place the shaft in the supports so that the cams of the first cylinder are directed away from the pushers.
- Treat the area of the outer shaft supports with sealant.
- Install the camshaft bearing housings, then put the washers on the studs and screw the nuts. They need to be tightened in two stages - first until they touch the bearing housings. Then check whether the guide bushings fit into the corresponding holes in the bearing housings. Only then finally tighten the nuts in order.
Final stage
The replacement of oil seals on a VAZ 2110 8-valve car is completed by installing camshaft seals. Be sure to check the clearances in the valve drive assembly. At the end of the process, all hoses and wires are installed in the reverse order.
If there is a suspicion that the car has been driven on faulty seals for quite a long time, then the experts recommend making repairs by dismantling the cylinder head. This will allow you to perform a full repair with thorough cleaning of engine components from carbon deposits.
Purpose and design of valve seals
A worn oil seal allows oil to enter the cylinder along the valve stem, causing it to burn along with the mixture, forming carbon deposits on the valve plates, as well as on the rings and cylinder walls. In advanced cases, coking leads to a drop in compression due to stuck rings and loose valve closure. It is generally accepted that the cost of timely replacement of oil scraper bushings is incommensurate with the repair of the piston group.
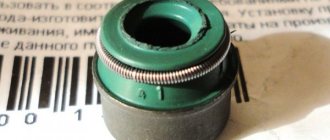
The design of the oil seal is quite elementary, it consists of only three basic elements:
- The base is a steel bushing, which represents the frame of the oil seal and gives it strength.
- Spring – ensures the tightest possible fit of the edge of the rubber seal to the valve stem.
- Oil seal - made of rubber or secondary rubber and serves to remove excess lubricant from the valve stem.
It is important to take into account that to replace valve stem seals on a VAZ 2110 8-valve car, it is better to buy appropriate high-quality consumables. First of all, this will affect the service life of the parts; they will not have to be changed ahead of time.
Device
Oil seals are a modern version of valve seals, which are equipped with a powerful steel sleeve inside and an expander spring. Springs are used to secure the edges of the caps and valve stems.
Actual size of the caps
Gaskets are made primarily of rubber, which becomes harder over time and wear occurs, so the element ceases to properly perform its functions. As a result, oil ends up inside the combustion chamber.
There is only one sign of wear on the valve stem seals - thick blue smoke begins to actively pour out of the exhaust pipe, plus oil consumption increases.
There is only one solution to this situation - replacement.
Valve seal design
MSK is a reinforced rubber bushing with a spring installed near the edge. The function of the compression ring is to press the seal against the valve stem. Excessive demands are placed not only on molds, but also on rubber:
Based on this, acrylate rubber (ACM) or fluorine rubber (FPM) can be used as a rubber material. There is no ideal option. ACM has a weak indicator of residual deformation during compression, while FPM has poor resistance to hot steam and low temperatures.
When to change oil caps
Based on the price that service stations charge for replacing old oil seals with new ones, I would like to change these parts less often. There is a list of main symptoms when intervention is definitely required:
- Increased oil consumption (in the case of BMW, this is more than 400 ml per 1,000 km).
- Blue smoke during cold start-up, and in advanced cases - when revving above 2,500 rpm.
- The exhaust smells like burnt oil.
- Oil rim on spark plugs.
The nature of the oil burn with current oil seals is special. Usually the engine takes lubricant only in the morning, during a cold start. In this case, immediately after starting there is a slightly blue smoke from the exhaust, then everything returns to normal.
What will happen if you do nothing
Oil in the combustion chamber is harmful. The service life of the catalyst is reduced and coke is formed in the working space of the cylinder. Lubricant that gets from under the caps is doubly harmful: the valve stem and plate coke, which is why it does not close tightly and burns out over time. And here decarbonizing the engine with dimexide will not help.
Replacing a burnt-out valve is only possible on a removed cylinder head. You can see the price for this item in the table. If you start work late, you will need to wash the insides. As a detergent, you can choose any piston ring decarbonizer or dimexide.
It is definitely better to detect the problem right away in order to do all the work without removing the “head” and with a minimum of time.