Tuning the interior of the VAZ 2106
All car owners know that tuning the interior means giving it a new look, improving functionality and safety. With its help you can create an individual and unique style.
Interior tuning consists of several stages:
- torpedo tuning;
- instrument panel tuning;
- beard tuning;
- replacement or reupholstery of seats;
- installation of a radio;
- steering wheel tuning;
- tuning the gear knob.
Let's look at each of these points in more detail.
Modernization ideas: headlights and everything else
Headlights are the eyes of the car. Over time, glass becomes dull, turns yellow, or even becomes unusable. But this is not the reason for their modification or complete replacement, but the desire to turn the VAZ into a beast with bright, powerful headlights.
Oddly enough, a simple way to improve is complete replacement. It is worth noting that body parts for the VAZ 2106 are similar to BMW parts, so we will replace the old headlights with new ones from BMW.
The process will not take much time. Open the hood and, having completed the necessary steps, take out the old headlights. We try on the new headlight and drill the holes necessary for installation, after which we install it and tighten the fasteners. All that remains is to properly adjust the light, and the work is completed.
If you have not found spare parts for the VAZ 2106 from foreign brands, but still want to update the headlights, you will need to visit a car store and purchase several diodes that will diversify the appearance of the car.
Angel eyes give 2106 brutality to the domestic auto industry
Working with the dashboard
To shock others and give yourself pleasure, we will tune the instrument panel of the VAZ 2106 using LEDs.
A popular accessory is LED strip. It is not difficult to install it yourself, and the wide range of colors and brightness attracts car owners.
The backlight is connected in two ways: directly to the battery and to the wires leading to the car’s dashboard. The first method attracts with its reliability, while the second captivates with the ability to turn on the backlight immediately during ignition.
Make sure you have two wires, switches and a fuse. When installing the latter, please note that it should be close to the battery. After soldering the first wire, put a protective tube on it, then connect the second wire to the battery.
But the tuning of the VAZ 2106 is not finished yet.
Installation of double glazing
Most car owners dream of installing double windows on their VAZs. Why dream if it’s easy to realize your idea?
Since the second glass is tinted. it is located from inside the car. We cut it from the bottom edge so that during installation the corner of the glass remains visible and there is a distance of about 1 mm between the two glasses, otherwise the surfaces will be scratched against each other. Do not forget that when installing the second glass, the weight of the door will increase.
Brave car enthusiasts will not forget about tuning the VAZ 2106 bumper; it allows you to realize all your ideas and express the character of the car owner with the help of all kinds of drawings or even entire scenes on the bumper. Painting it yourself is not easy, so it’s better to contact a service station.
Don't be afraid to experiment, and then the car will become the most noticeable on the road.
- Airbrush
- Painting defects
- Body repair
- Materials
- Equipment
- Spray booth
- Salon
- Painting theory
- Tuning
- Do you want to know how to remove dents on your car in different ways?
- You don’t know how much material is needed to paint a car: a painter’s secret
- How to remove corrosion and rust from a car
- Removing rust from a car body: a simple solution
- I made and adjusted the air pressure switch for the compressor myself: find out how
- July 2017
- March 2017
- August 2016
- July 2016
- June 2016
- May 2016
- March 2016
- February 2016
© 2015-2016 Any partial or complete copying is permitted provided a link to our website is provided. KrasimAvtomobil.ru
Torpedo tuning
The top front panel of a car is called a torpedo. It is a solid metal structure covered with polymer foam and film. It contains an instrument panel, glove compartment, interior heater, air duct deflectors, and a clock.
The front panel is an important element of the interior, which can be tuned in different ways: replace the dashboard completely with a new one, paint it with liquid rubber, cover the smooth surface of the dashboard with leather, film or flock. Before starting tuning work, you need to remove the panel.
Torpedo dismantling
Removing the console occurs as follows:
- After unscrewing the four fastening screws, we remove the storage shelf.
Tuning options for the VAZ 2106 torpedo
There are several options for tuning a torpedo:
- You can replace the standard torpedo with a new one from domestic or imported cars. It is installed entirely with devices. Since the parts in the “classic” are interchangeable, panels from the VAZ 2105, VAZ 2107 are suitable for the “six” ;
- cover the torpedo with liquid rubber. This option is labor-intensive, and such a coating is short-lived and will begin to crack over time. It will need to be updated periodically. The big advantage of this method is its low cost;
- reupholstering the dashboard with vinyl film, flock, automotive leather or leatherette. This method of improvement is the most effective, but scrupulous and time-consuming. To carry out the work, it is necessary to dismantle the torpedo and take measurements from it. It is best to make a pattern from non-woven fabric. Using the pattern, cut out the component parts. Sew all the pattern pieces together with strong threads. It is advisable to work carefully so that folds do not form on the material, which will spoil the appearance. Then treat the surface of the console with hot glue and pull on the cover. And, using a hair dryer, glue the cover.
Video: do-it-yourself reupholstery of a VAZ 2106 torpedo
Modernization ideas: headlights and everything else
Headlights are the eyes of the car. Over time, glass becomes dull, turns yellow, or even becomes unusable. But this is not the reason for their modification or complete replacement, but the desire to turn the VAZ into a beast with bright, powerful headlights.
Oddly enough, a simple way to improve is complete replacement. It is worth noting that body parts for the VAZ 2106 are similar to BMW parts, so we will replace the old headlights with new ones from BMW.
The process will not take much time. Open the hood and, having completed the necessary steps, take out the old headlights. We try on the new headlight and drill the holes necessary for installation, after which we install it and tighten the fasteners. All that remains is to properly adjust the light, and the work is completed.
If you have not found spare parts for the VAZ 2106 from foreign brands, but still want to update the headlights, you will need to visit a car store and purchase several diodes that will diversify the appearance of the car.
Angel eyes give 2106 brutality to the domestic auto industry
Working with the dashboard
To shock others and give yourself pleasure, we will tune the instrument panel of the VAZ 2106 using LEDs.
A popular accessory is LED strip. It is not difficult to install it yourself, and the wide range of colors and brightness attracts car owners.
The backlight is connected in two ways: directly to the battery and to the wires leading to the car’s dashboard. The first method attracts with its reliability, while the second captivates with the ability to turn on the backlight immediately during ignition.
Make sure you have two wires, switches and a fuse. When installing the latter, please note that it should be close to the battery. After soldering the first wire, put a protective tube on it, then connect the second wire to the battery.
But the tuning of the VAZ 2106 is not finished yet.
Installation of double glazing
Most car owners dream of installing double windows on their VAZs. Why dream if it’s easy to realize your idea?
Since the second glass is tinted, it is placed from the inside of the car. We cut it from the bottom edge so that during installation the corner of the glass remains visible and there is a distance of about 1 mm between the two glasses, otherwise the surfaces will be scratched against each other. Do not forget that when installing the second glass, the weight of the door will increase.
Brave car enthusiasts will not forget about tuning the VAZ 2106 bumper; it allows you to realize all your ideas and express the character of the car owner with the help of all kinds of drawings or even entire scenes on the bumper. Painting it yourself is not easy, so it’s better to contact a service station.
Don't be afraid to experiment, and then the car will become the most noticeable on the road.
Instrument panel tuning
Modernization of the VAZ 2106 dashboard consists of replacing the backlight and decorative parts of the scales.
Replacing instrument panel scales and arrows
This process is quite simple and you can do it yourself:
- At the start of work, we dismantle the instrument panel panel of the “six”
- We gain access to the sensors and remove all indicator arrows, starting with the tachometer.
- After this we remove the scales.
- To remove the speedometer needle, unscrew the bolts and turn the scale to the left. After this, the instrument needle will drop slightly and begin to oscillate. As soon as it finally freezes, this position must be marked with a marker. All this is necessary so that the speedometer then indicates the correct speed.
Installation of the removed parts is carried out in reverse order. After which the panel is mounted in its original place.
Instrument panel lighting
Many car enthusiasts know that the “six” has weak instrument lighting. When upgrading the panel, you can add LED lighting. Before starting electrical work, be sure to disconnect the negative terminal from the battery.
- Having dismantled the panel, we remove the devices one by one.
- We take each of them apart.
- We glue the links of the LED strip into the body. For small devices, one link of three diodes is enough. For larger ones you will need 2 or 3 links, depending on what lighting intensity you like.
Be sure to wipe the inside of the glass of the devices so that there are no fingerprints left.
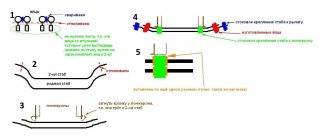
How to create a beard: step-by-step instructions
Creating a beard with your own hands is a rather difficult task that must be performed with extreme precision. After making the frame, you can create bars and then insert them into the designated place. Once their installation is completed, you can begin tightening the frame using self-tapping screws. Since we are creating a VAZ beard with an armrest, it is recommended to steam the plywood in hot boiled water before starting work. This will allow you to achieve better ductility of the material during processing. Steaming the plywood will also make it possible to solve the problem associated with the transition to a narrower part between the front seats and a wider one where the radio is located. As soon as the entire tuning structure is ready, it must be dried. This process usually takes about two days.
Next, the owner must create a bent plywood insert with his own hands, in which there is a small hole. It is used to create free space for placing a lever. The workpiece will have to be boiled to give it the desired shape. Some VAZ owners use a simple kitchen sink wall. Once the part is processed, the element will have to be completely dried.
Beard tuning
The center of the car interior is the console, which is called the beard. It acts as a continuation of the torpedo and attracts the attention of all passengers.
When tuning, you can place in your beard:
- watch;
- radio;
- pocket for small items;
- armrest;
- USB sockets;
- switches;
- backlight
Typically, the beard for “classics” is made from plywood, fiberglass, or from spare parts from foreign cars.
Beard drawings can be found on the Internet or taken measurements from an old console. For the pattern, thick cardboard is used, which holds its shape well. The template is transferred to plywood and, after carefully checking the dimensions, cut out along the contour. Next, the parts are connected with self-tapping screws. The finished frame is covered with leatherette or other material in the color of the upholstery. The material is secured with a furniture stapler and glue.
Making a beard VAZ 2107
Depending on your skills, imagination and personal preferences, you can develop an individual console (beard) design or implement a ready-made solution by copying the product you like. A beard is a complex spatial structure made from flat parts. To make it, you need patterns, which are best made from hard cardboard. Solid material allows for high precision manufacturing of console parts. If you are not entirely confident in your skills, you can first make a cardboard mock-up of the console. This will ensure the drawings are correct and check how well the new beard fits into the installation location.
The design of a do-it-yourself center console can be very diverse. Typically, the design includes a spacious box placed between the driver and front passenger seats (where the gear shift and handbrake levers are located). It can accommodate compartments for small items, appliances, switches or just coasters for glasses.
After the patterns are made and the console parts are marked, they are cut out of plywood with a jigsaw. It is better to connect parts using self-tapping screws and glue. The first will allow you to fix the elements motionlessly while the glue sets. This is the easiest and most reliable way to connect console parts.
The finished beard is covered with leatherette, fabric or carbon fiber. Glue and furniture clips are used to attach finishing materials.
When the glue dries, all that remains is to install the new console in place and secure it. Before mounting it, you should fix some of the instruments and switches, which will be difficult to install if the beard is fixed in its regular place. However, this depends on the design features of the tuned console. Sometimes it is easier to attach switches, instruments and devices after the console is fixed.
Seats
Tuning VAZ 2106 seats can be done in two ways:
- change the upholstery;
- replace the seats by taking them from another car.
Seat reupholstery
To reupholster the upholstery yourself, follow the instructions:
- Remove the seats from the interior. To do this, move the chair back all the way and unscrew the bolts in the runners. Then slide it forward and also remove the bolts. Remove the seats from the interior.
Installing seats from another car
Updated seat upholstery will decorate the interior, but will not make them ergonomic or comfortable. To do this, seats from another car are placed in the “six”. Seats with a distance between the runners of approximately 490 mm are suitable here. Many car owners say that seats from Ford Scorpio, Hyundai Solaris, VAZ 2105, VAZ 2107 fit well into the cabin . But to get a good result, you cannot do without replacing the fasteners.
Replacing seat fastenings
The slides on which the seats in the “six” are located are not located at the same level, so the old fastening requires replacement. To do this you need:
- Move the seat back all the way and unscrew the front bolts. Then move it forward to the dashboard and remove two more screws from the runners.
Materials and interior preparation
Making this unit yourself is usually done from a plywood sheet with a thickness of at least 6 mm. For exterior finishing, a wide variety of materials can be used, mainly leatherette, matched to match the upholstery of other interior parts. Advanced tuning enthusiasts go further; they cover the front panel, the inner surface of the doors, and some other parts with this material.
To make the center console for a VAZ 2107 car from the materials listed above, you use the following tools yourself:
- electric jigsaw;
- battery drill or screwdriver;
- angle grinder;
- tape measure, plumbing corner, pencil;
- assembly gun for glue;
- furniture stapler.
The beard, made by yourself, is installed in place of the standard unit. It must be carefully dismantled in order to free up a platform for a homemade console.
Steering wheel tuning
A comfortable and beautiful steering wheel contributes to comfortable driving. To achieve this, in the “six” you need to update the steering wheel in the following ways:
- install a steering wheel from another VAZ model;
- replace with sports one;
- retighten the steering wheel.
Installing a steering wheel from another VAZ model
The simplicity of the Zhiguli allows you to replace the steering wheel with a steering wheel from other VAZ models. Many car owners believe that it is not worth the work and effort that needs to be put in.
The steering shaft of the chisel is thinner than the classic one, and not by much, that is, it is not very easy to make an adapter for the hub. Plus the steering wheel is higher, normally it won’t engage the turn signal bump stop. In a word, you need to suffer a lot to install it properly. As for me, it’s not worth it, if you really want a normal steering wheel, then you need to go and buy it, the choice is very rich right now, but you need to look at them carefully, there are so many leftists that it’s just terrible.
Kot_01
https://autolada.ru/viewtopic.php?t=26289
Replacing with a sports steering wheel
A sports steering wheel will give the car a beautiful and aggressive look. You just need to know that the “six” is not intended for sudden maneuvers. The sports steering wheel has a smaller diameter and is more difficult to make turns with, so you need to get used to it.
Steering wheel reupholstery
In an auto store you can find braiding on the steering wheel for re-upholstering with your own hands. Such kits include the braid itself made of genuine leather, strong threads for sewing and a special needle.
Video: dismantling the steering wheel
conclusions
The beard of VAZ cars makes it possible to significantly simplify driving comfort. Both the driver and the passenger will not have to reach for the radio. Depending on the design, you can also place additional cells here to store parts or small personal items. It usually takes several days to create a part. You need to be prepared for this right away. Under no circumstances should you start by cutting plywood, as there is a high chance that you will not be able to install it. A cardboard blank will allow you to modernize the design taking into account individual needs. Of course, in addition to creating a beard with your own hands, you can also seek help from a specialized car service. But why, if this method will save a lot of money? Therefore, feel free to take on interior tuning, starting with the console!
Tuning the gear knob
A worn-out gear shift lever can be updated in three ways:
- replace the gearshift knob cover with a new cover;
- install the short-stroke lever;
- change the knob.
A new leather cover for the gearshift lever can be purchased at a car store. This is a ready-made product that needs to be put on a lever and secured in the floor or under the rug with a special ring.
Or you can sew the cover yourself using a pattern.
Most owners of “sixes” shorten the gearshift lever. To do this, unscrew the lever, clamp it in a vice and saw off about 6-7 cm with a hacksaw.
The simplest and most affordable way to tune the gearshift knob is to replace the knob. A new accessory is screwed onto the lever, which will decorate the interior of the car.
The main advantage of tuning is its uniqueness. For owners who are in love with their cars, the possibility of tuning brings trepidation to the soul. In addition, a tuned car reflects the character of the owner. An unprepossessing car turns into a dream car and attracts the admiring glances of passers-by. Tuning is beautiful, so go ahead and realize your ideas.