Causes of piston group wear
Constant operation of the machine inevitably leads to damage to the steam generator. Like any other element of the power unit, pistons wear out due to obsolescence or due to overheating caused by a disruption in the combustion process.
What causes piston crown wear?
Seizures on the piston bottom are formed due to clogging or deformation of the oil nozzle, installation of elements with different sizes, or a malfunction in the cooling system.
Pistons on used cars often show impact marks. They are caused by an overly large piston protrusion or improper adjustment of the end side of the cylinder head. This also happens due to engine oil deposits on the head of the element, an unusually narrow gap in the valve drive and incorrect installation of the gas valve phases.
Damage is also determined by metal deposits on the elements. This happens when the injector is faulty - in this case, the injection quantity is determined incorrectly by the system. This will also indicate insufficient compression, late or early ignition.
If cracks are observed on the piston crown and in the combustion chamber cavity, this is evidence of a faulty injector or insufficient compression. This is also possible if the engine is not properly chipped, when they try to increase the power of the unit through modernization.
checking the piston for wear
Causes of ring damage
As a rule, this happens due to erosion of the material in the ring area caused by improper installation, excess fuel in the combustion chamber, or violation of the thermal gap between the piston and its cylinder. The same thing happens with strong axial wear of the piston grooves and vibrations.
Another reason is radial wear associated with mixing. Any disturbance in the fuel combustion process, as well as insufficient compression pressure, lead to such a malfunction.
Axial wear is also possible as a result of simple contamination, when soot particles stick in the groove due to insufficient filtration. This could be sawdust, blast residue, or any other abrasion product.
Why is the piston skirt damaged?
Several reasons contribute to this - deformation of the connecting rod, crookedly installed cylinders, excessive play of the connecting rod bearing. In these cases, an asymmetrical, clearly visible spot forms on the skirt.
There may also be 45-degree burrs and other friction marks caused by an overly tight pin fit or an error in the installation of the hot-pressed connecting rod. The reason is also called a low compression percentage, misfires, and dilution of the oil with gasoline.
The main signs indicating resource depletion:
- blue exhaust color;
- active carbon deposits on spark plugs;
- drop in engine power;
- unstable operation of the unit at neutral speed - quickly determined by strong vibrations of the gearshift knob.
And, of course, the most important sign is increased engine oil consumption.
When should you check oil rings?
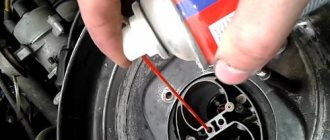
As you know, the use of low-quality fuel and lubricants is a direct road to problems with a car engine. The fact is that the use of such liquids is accompanied by the formation of strong carbon deposits on the walls of the combustion chamber, which also “overgrows” the valves and piston heads. The oil scraper rings become coked and lose their former mobility, and “fouling” of the walls of the combustion chamber with soot leads to a deterioration in heat removal. To clean parts from carbon deposits, various methods are used, including decoking of oil scraper rings.
Decarbonization of oil scraper rings
Today, there are two main ways to decarbonize the elements of a car engine. Conventionally, they are called “soft” and “hard” cleaning. The “soft” option involves removing carbon deposits only from the piston rings, since the cleaning composition (special flushing of the oil system) is added to the engine oil approximately 100 km before its scheduled replacement. It should be noted that from this moment until the replacement itself, it is necessary to operate the engine in a gentle mode, avoiding its operation at high speeds.
The essence of using such “flushes” is to carefully influence the lower oil scraper rings, which are most susceptible to “sticking”. As a rule, 100-200 km after using the decarbonizing fluid, it is imperative to change the engine oil, however, some compounds interact well with the “new” lubricating fluid, and its replacement is carried out as planned.
An obvious disadvantage of the “soft” type is that special liquids cannot completely clean the combustion chamber itself and engine valves from carbon deposits, since most often such preparations are presented in the form of traditional flushing liquids, supplemented with cleaning components to remove carbon deposits from the piston rings. This cleaning option is best suited for light preventative maintenance at each engine oil change.
“Hard” decarbonization (“old-fashioned method”) is a more common option for removing carbon deposits. The algorithm for performing the actions of this technique is as follows:
1. The car engine is warmed up to operating temperature (not lower than 70°), which is necessary to increase the efficiency of the cleaning procedure, since in this way a kind of “steam bath” is created, and the carbon deposits “acidify” better;
2. The ignition system is turned off (for example, you can remove the connector from the ignition coil or from the Hall sensor). This action allows you to avoid ignition of the vapors of the composition and prevent failure of system elements;
3. Next, it is necessary to dismantle the spark plugs, and on diesel engines - injectors or glow plugs;
4. The pistons are set to a position close to the middle, which is done by turning the crankshaft by the pulley nut or by means of the drive wheel when the gear is engaged. You can determine the position of the piston using a long feeler gauge using the technological hole;
5. Now an equal amount of decoking liquid is poured into each engine cylinder (it is best to stock up on a syringe to complete the task);
6. If the use of the product involves easy cleaning, then the composition should be left inside for an hour, but in the case of more serious contamination, the exposure time increases to 12 hours. In order for the liquid to better seep into the lower part of the cylinders, it is recommended to periodically move the pistons up and down;
7. The next step is to remove any remaining liquid with a syringe and blow out the cylinders with compressed air. It is also necessary to fully depress the accelerator pedal and turn the engine shaft several times with the starter. Often, the spark plug holes are covered with a rag, which protects the engine compartment from dirt flying out of them;
8. All dismantled components and parts are returned to their places, and, making sure that everything is installed correctly, you can start the engine, letting it idle for several minutes until it reaches operating temperature. You may notice unusual plumes of smoke escaping from the exhaust pipe, but if this phenomenon is short-lived, then there is no need to worry - it is the remains of the cleaning agent and dirt deposits that are burning off.
After completing the cleaning procedure, do not forget that after 100 km you will need to change the engine oil. Nowadays, “hard” cleaning is used not only by amateur car owners, but also by specialists from various service stations, and the cause of decarbonization is usually increased oil consumption at high speeds, to the point that after several thousand kilometers it has to be topped up.
Some experienced mechanics also use another recipe for restoring oil scraper rings. To do this, a mixture of kerosene and acetone is used as a flushing liquid, which is poured into the cylinder immediately after removing the spark plugs. The poured decoking agent is left for 9 hours, and then, having installed the spark plugs in place, operate the car at maximum speed for 10-15 kilometers, after which it is very advisable to replace the filter and oil.
How to properly check oil scraper rings
If you look at the operating conditions of the oil scraper rings, it immediately becomes clear how difficult it is for these parts. Often, a standard kit is enough for about 150,000 km, although some motorists claim that their cars have traveled 500 km without any replacement. Who knows, maybe this is so, because the life expectancy of these parts depends on the operating conditions of the vehicle. If the machine is forced to work almost at the limits of its capabilities, then it is clear that engine failure should be expected much earlier.
The “health” of oil scraper rings is also significantly affected by untimely oil changes, especially if the lubricant used is classified as “low-quality”. Most often, the use of such oil is manifested in the occurrence of rings. You should also monitor the condition of the air and fuel filters.
The need to replace oil scraper rings can be determined by several characteristic signs of wear. Firstly, oil consumption increases significantly, and secondly, at the beginning of movement or after short stops (for example, in traffic jams or at traffic lights), clouds of bluish smoke may appear from the exhaust pipe.
Moreover, alarming signs of wear include evaporation and oil leaks, and if the “new” fluid also darkens quickly, then it will definitely not be possible to avoid replacing the rings. It would be a good idea to check the spark plugs: in normal condition they should be clean, but if this is not the case, then most likely you will have to visit a service center or do the repairs yourself.
If any of the above signs of wear are detected, it is necessary to immediately diagnose the oil scraper rings. Performing this procedure will not take much time and does not require any special knowledge. All that is required of you is to disconnect the ventilation system hose, and if the crankcase gas pressure is increased, it means that the rings are no longer coping with their duties.
What you need to check oil scraper rings
In the case of oil scraper rings, the required set of tools is determined by the method of diagnosing these elements. If you carry out express diagnostics, that is, check the oil scraper rings “here and now,” then you will not need virtually any special tools to implement your plans. A standard set will be sufficient, including screwdrivers, vices, pliers and other elements available in the motorist’s arsenal. But if you decide to verify the malfunction of the oil scraper rings in practice, then you will additionally have to prepare a piece of a transparent tube and a transparent filter (precisely transparent, since only with its help we can see whether dirt is flying from the engine or not).
Having disconnected the crankcase gas suction tube, you should connect the filter along with a piece of hose into the gap. After a week of active driving, you will notice how oil accumulates in the filter jar, and if there really is something wrong with the oil scraper rings, then it can fill to the top in just a few days.
Subscribe to our feeds on Facebook, Vkontakte and Instagram: all the most interesting automotive events in one place.
Was this article helpful?
auto.today
How to choose new pistons when purchasing?
There is a wide range of these products on the domestic market. It is usually difficult to choose between pistons manufacturing technology - forged or cast. The first varieties are much more expensive. The second ones are more common. Before making a choice, you need to understand whether the car requires an increase in standard power. If yes, then definitely give preference to forged analogues.
Pistons are regularly subjected to high loads, so the performance of the internal combustion engine directly depends on their quality. An important parameter is also the weight of the product. Manufacturers try to make them light, but at the same time durable.
When choosing, it is recommended to pay attention to the German brands Kolbenschmidt, Mahle, Prima . The Russian Motordetal-Kostroma and STK have proven themselves to be quite good at producing such products.
Piston 6D16 ME072549 (set of 6 pcs.) for 6D16 engine on Mitsubishi
What tools are needed to replace pistons
The following set of tools is required to replace a piston engine:
- spanners;
- heavy hammer;
- a piston ring remover, which is a pliers - if there is no such device, you can use a regular thin flat-blade screwdriver;
- vice;
- burner;
- micrometric bore gauge;
- torque wrench;
- a guide sleeve and a mandrel with a handle and a threaded hole at the end of a special or homemade design - can be turned on a lathe;
- a drift to the size of the piston pin - must go inside the hole;
- file;
- wooden blocks;
- ratchet with heads of different sizes.
Of course, you need to prepare a new set of pistons. It is recommended to pay attention to the quality of the rings and the appearance of the packaging - manufacturer’s name, material. The rings should be marked to indicate the top side. In order to maximize the service life of the pistons, an anti-friction coating is applied to the skirts of the products. For example, a suitable option is Modengy solid lubricant.
Piston rings, their types and purpose
By design, each piston ring is an elastic spring part in the form of an open ring, made of durable, wear-resistant metal, which is installed with a slight gap in special grooves on the piston heads.
Piston rings solve three main problems:
There are two types of piston rings:
Almost all modern gasoline and high-speed diesel automobile engines have only 3 rings on one piston - 2 compression rings and 1 oil scraper ring, which is installed below the compression rings.
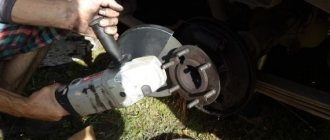
Replacing pistons yourself
It all starts with preparatory work. First you need to disconnect the battery, drain the antifreeze and engine oil from the oil pan. Then carry out the stage of qualified diagnostics. This is done in two ways: without removal and with removal of the motor unit.
To get by with little cost, only the cylinder head and pan are dismantled. Carbon deposits are removed from the top of the cylinders with a file. Following actions:
- measure the diameter between the cylinder walls with a bore gauge and compare it with the passport data;
- Make sure by turning the crankshaft that there are bores on the liners - if the condition of the liners is beyond doubt, the engine does not need to be removed;
- inspect the bottom of the pan - metal shavings in an oil film should alert you, indicating wear of the rings and liners;
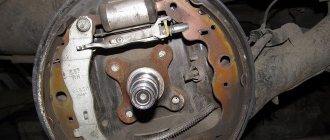
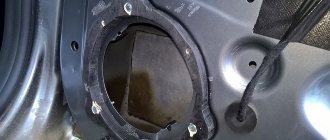
- check the condition of the pistons by carefully removing them along with the connecting rods and rings - normally there should be no deep scuffs on the skirt, burnout of the bottom, or wear of the upper groove beyond the permissible value.
checking engine pistons
How to replace piston rings on an engine is described in detail below.
How to install a new piston instead of the old one?
If the damage is significant, the piston must be replaced. To do this, it should be separated from the connecting rod by removing the retaining rings from the holes in the bosses. The finger is removed using a drift.
More information on how to separate (knock out) the piston from the connecting rod:
- place the piston on two wooden blocks;
- insert a drift into the hole under the cylindrical rod on the piston;
- hit the top of the drift with a hammer several times until the finger pops out.
To install a new piston, you first need to insert your finger into it. It is also recommended to replace this element. The finger should enter the hole with little effort. If it falls out, it definitely does not fit in size. In this case, a different rod is selected for the articulated movable joint.
The pin is pressed in “hot” using a special mandrel or a homemade device with a guide bushing. It should be a few microns thicker in diameter than the hinge element. The “fixture” is assembled before inserting the pin onto the connecting rod and piston like this: first, the pin is put on the mandrel, then a drift is placed on top. The whole thing is tightened at the end of the rod with a holding screw.
It is highly advisable to carry out the fitting step before pressing. The finger is threaded into the piston hole, without a connecting rod. Then it checks how he entered. If it is uneven, then a washer is added to the device.
Further:
- clamp the connecting rod in a vice;
- Heat the inside of the connecting rod journal with a hand burner for 1.5-2 minutes;
- place the piston on top, with the arrow pointing towards the connecting rod locks - indicated by the manufacturer on the head of the element;
- insert the mandrel with the pin into the piston and connecting rod until it stops;
- Unscrew the lock, remove all excess, leaving the finger inside the piston.
pressing the piston into the connecting rod
After cooling, the piston movement is checked. Its minimal mobility will indicate that the work is being carried out correctly.
How to replace piston rings?
The oil pan must be removed. Additionally, the oil pump is also removed - it is recommended to check its condition. Next, the connecting rod caps are unscrewed, the latter are pushed upward with the pistons.
Attention! The connecting rod caps cannot be swapped. At the final stage, each is screwed to the “native” connecting rod.
Replacement of piston rings is carried out with special removable pliers. After removing the worn rings, all carbon deposits are removed from the grooves. This can be done with a piece of rigid wire or a piece of an old ring. Deposits should also be removed from the piston crowns. For convenience, the surface can be moistened with kerosene.
Ring pliers
Installation of new oil scraper rings is carried out according to the instructions. The oil scraper ring is installed first, then both compression rings. During installation, extreme care is taken, since the elements are extremely fragile and break easily. The exception is the first compression ring - it is durable.
Particular attention is paid to the location of the piston ring locks. It is better to place them at an angle of 120°. If the locking pattern is incorrect, gases may escape from the combustion chamber into the crankcase.
Watch the piston replacement video for a complete picture https://www.youtube.com/watch?v=iOhU9w1e8Ow
Oil scraper rings
Oil scraper rings and caps are one of the most important components of a car engine. To carry out competent repairs, it is important to know what these parts are, how to find and replace them.
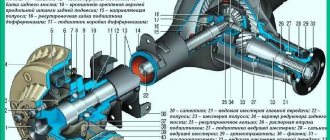
Oil scraper (or piston) rings are considered the most important elements of an internal combustion engine. The entire set usually consists of three types of rings: upper compression, compression-oil scraper and lower oil scraper. All of them are responsible for a large number of parameters. These include: oil and fuel consumption, vehicle power, its starting ability and exhaust toxicity.
The main function of piston rings is to remove heat from the piston. If this does not happen, various defects or even jamming may appear on the piston. In addition, the rings ensure maximum tightness of the combustion chamber: they prevent gases from entering the engine crankcase and minimize the entry of oil into the chamber.
Rings can consist of two or three components. The first include the ring itself and the spring, made in the form of a spiral. Due to this, maximum flexibility of the elements and the tightest fit of the ring are achieved. The structure, consisting of three elements, contains a spacer spring and two plates made of steel. This design makes it possible to achieve maximum tightness along the entire perimeter of the contact of the rings and has found application in gasoline engines.
Operating principle of oil scraper rings
The compression ring experiences the heaviest loads, since it experiences the highest gas pressure and high temperature. Such rings are made of alloy steel, and a wear-resistant coating is applied to their surface.
a - appearance, b - arrangement of rings on the piston, c - composite oil scraper ring; 1 - compression ring, 2 - oil scraper ring, 3 - flat steel discs, 4 - axial expander, 5 - radial expander
As the critical point is approached, the amount of oil in the upper part decreases, and the pressure and temperature increase. The speed of movement decreases, and stopping leads to complete rupture of the lubricant film. All this means that the compression ring experiences dry friction, which means it wears out quite quickly.
Compression oil scraper rings are subject to less stress, but perform two functions at once: draining engine oil into the crankcase and maintaining compression in the cylinder. In this regard, they have a conical shape with a certain angle of inclination.
Oil scraper rings experience the least load and are responsible only for draining oil into the engine crankcase. To do this, they are equipped with two belts, between which the remaining oil is collected and through a special edge in the lower part it is discharged into the engine sump.
Checking the condition of the piston rings
As you already understand, the operating mode of the rings is extremely difficult. This is due to enormous pressure, friction and increased temperature. In this regard, their natural wear occurs, which usually occurs after 150,000 kilometers. However, many drivers claim that their engine withstood 500,000 kilometers. Such results can only be obtained with very correct operation of the car; in other cases, wear of the rings occurs quite early.
Failure of piston rings ahead of schedule usually occurs when using low-quality oil or mixing it with another. It is also important to monitor the condition of the air and fuel filters, especially when driving on a very dusty road. Above all, do not overload or overheat the engine. The formation of carbon deposits due to elevated temperatures contributes to the formation of rings.
How do you know if your piston rings need repair? To do this, you need to pay attention to oil consumption. Increased lubricant consumption is the very first sign of piston ring failure. Oil enters the combustion chamber and bluish smoke appears from the exhaust pipe.
In addition, the malfunction of the piston rings can be judged by contamination of the spark plugs and oil leakage and evaporation in the places where gaskets and seals are installed.
Decarbonization of piston rings - what is it for?
If carbon deposits are detected, it is not necessary to replace the piston rings. Experienced drivers have long found a proven way to quickly get rid of carbon deposits and bring stuck rings back to life. For this, a special mixture is prepared, which contains kerosene and acetone in equal quantities. The spark plugs are unscrewed and the prepared mixture is poured into the holes. After 9 hours, tighten the spark plugs and start the engine. After this, you need to drive about 15 kilometers at maximum speed. At the end of the procedure, be sure to change the oil and air filter.
In addition to using folk recipes, you can purchase a special oil ring decarbonizer in the store. Its effect is usually limited to 15 minutes.
Raise the part of the car whose wheels are driving (for example, front-wheel drive - the front part is hanging out). Set the last gear, unscrew the spark plugs and turn the wheel until the pistons are in the middle position. For control, you can use the marks located on the flywheel of the crankshaft and block. After this, pour the decarbonizer into the spark plug holes and wait for the time according to the instructions on the label. To achieve a better effect, you can turn the wheel from time to time.
The last step is to crank the engine with a crooked starter in neutral gear. This action is necessary in order to squeeze out the remaining fluid and carbon deposits from the engine. Then screw back the spark plugs and start the engine and let it idle for 15 minutes.
Do not be alarmed if the engine does not start immediately and suspicious smoke appears from the exhaust pipe. All this is absolutely normal.
Replacing piston rings with your own hands - Video
Decarbonization can only help get rid of the appearance of carbon deposits. If the rings are heavily worn, they must be replaced immediately.
When purchasing a new set of rings, give preference only to quality parts. Do not be afraid of the high price, since cheap analogues can make the engine work normally for only a few thousand kilometers. Please ensure that the material used to make the rings matches the material of the engine. This is one of the main criteria.
The next step is to drain the oil and remove all components that prevent the pistons from being pulled out of the block. Remove the air filter, fuel pump and unscrew the ignition distributor mounting bolts. Then remove the camshaft gear, unscrew the cylinder head cover and remove it. After this, unscrew the housings securing the camshaft bearings.
As soon as access to the camshaft is opened, it is pulled out along with the oil seal. The part is installed so that the piston is at top dead center. The candle is turned out, and a special rod is inserted into the hole, which will prevent the valve from falling down. Using a special puller, the valve spring is compressed and two crackers are pulled out with tweezers. To pull out the rings, you also need to use a special device.
Installation of new rings is carried out in reverse order, however, before pressing them in, be sure to lubricate them with engine oil. It is extremely important not to mix up the sides, as this may cause increased oil consumption.
VipWash.ru
Replacement cost
Here are approximate prices for replacing piston rings in services:
- domestically produced passenger cars - from 7-8 thousand rubles;
- Japanese foreign cars in sedan, hatchback, station wagon bodies - from 10 thousand rubles;
- jeeps, crossovers, minibuses - from 15 thousand rubles.
And the price for replacing a piston is usually high. This is explained by the fact that the procedure is included in the list of engine overhauls. Therefore, the cost is appropriate - from 20 to 40 thousand rubles.
What is the expression “the rings are stuck”?
First, let's figure out how the cylinder-piston group works. While the engine is running, the piston moves back and forth inside the cylinder. There must be a gap between these parts so that friction does not interfere with movement.
At the same time, the contact between the piston/cylinder parts should be as tight as possible in order to:
To meet these conditions, in most cases of passenger cars, three rings are installed on each piston: two compression rings and one oil scraper ring. Compression rings are usually “solid” in cross-section, while oil scraper rings have a slot in which a spring is installed, and on the outside they have a removal edge and slits for removing oil. Thanks to this design, the rings are springy and fit tightly to the cylinder walls.
The piston has three grooves, the width of which is hundredths of a millimeter greater than the thickness of the piston rings. Therefore, the rings are always fixed and have freedom of movement, tightly closing the gap.
When carbon or coke accumulates in the piston grooves, it acts as glue. The rings simply stick to the grooves, lose mobility and cannot elastically press against the cylinder walls, resulting in a violation of the tightness of the piston/cylinder pair. This phenomenon is called bedding or coking. We figured out why the rings lie, now we’ll find out how to diagnose it all.
Engine oil additive "Suprotek Active Standard"
For naturally aspirated petrol engines up to 1.6 litres. Restores and equalizes compression, reduces fuel and oil consumption due to waste, protects friction surfaces in the CPG and gas distribution mechanism from wear during startup and overheating.
Running in the engine after replacing the piston
Replacing a piston group is always accompanied by running in or checking the performance of the engine. This is done simply - the engine starts at idle. If within 5-10 minutes of operation there is no drop in speed or other signs of instability, a run-in is carried out for 2-3 thousand kilometers (diesel units are run in for at least 8-10 thousand km). It is advisable to carry it out at third speed. Before running in, it is recommended to check the condition of the battery - it should be 90-100% charged. And most importantly, it is recommended to cover the first 300 km in one race along a country road!
Advice on how to avoid problems during your first race. After replacing the piston, the car engine needs to be warmed up well, and for this it is better to do this. First let it idle to 80 degrees. Then stop the engine and let it cool to 40 degrees. Start it again at idle, allowing it to warm up to 80°. Repeat the procedure 8-10 times.
During the run-in it is prohibited:
- heavily load the car - for example, seating passengers or towing;
- accelerate sharply;
- go uphill;
- increase speed above 3000/min;
- engine braking;
- drive at lower speeds;
- drive on an engine that is not warm enough.
What does running in give you? It allows new engine parts to run in without unnecessary overload after replacing the piston. At a service station, running-in is often carried out using a stand. After replacing the piston, an electric motor is connected to the machine’s engine, which “grinds” it. At home, this is done directly on the machine, using the method described above.
How to find out the wear level of a car engine
Let's start with the fact that the total mileage of a car does not always indicate the actual condition of the most important components and assemblies (engine, transmission, steering elements, attachments, etc.). As for the power plant, in some cases it becomes necessary to determine engine wear, for example, when buying a used car. It is important to understand that a motor that is heavily worn is not always necessarily bad, but also noisy, knocking, etc.
It happens that there are no obvious problems with starting, the thrust at first glance is quite acceptable, the unit runs smoothly. However, after several thousand or even hundreds of kilometers, such an engine still ends up in expensive repairs due to severe wear and tear.
In this article we will talk about what signs you should pay attention to during a superficial check of the internal combustion engine, as well as how you can find out engine wear without disassembling it.
Determining the degree of engine wear by indirect signs
First of all, checking the internal combustion engine must begin with an analysis of engine operation. As already mentioned, normally, difficulty starting, tripping during operation, knocking, noise and other extraneous sounds, vibrations, etc. are not allowed. However, even the presence of certain deviations does not necessarily indicate that the engine is worn out.
For example, starting may be difficult due to malfunctions of the ignition system, a problematic starter, or an undercharged battery. Hydraulic compensators can also knock when cold; it is quite possible that the noise comes from rollers and bearings of drives, attachments, etc.
If experience is not enough to accurately determine the source of noise or other causes of failures, then, first of all, you should pay attention to technical fluids and their condition. The check should begin with engine oil. An important indicator is lubricant consumption. If the engine begins to “eat” oil, and you need to add about 1.0 liters per thousand kilometers, then severe wear of the CPG is quite likely (taking into account that the engine is dry, there are no oil seals or gaskets leaking).
Additionally, you should check the exhaust, since the presence of gray or blue oil smoke from the exhaust pipe will also indicate the cause of increased lubricant consumption. At the same time, unscrew the oil filler cap with the engine running. If smoke is clearly visible, then this is another sign of problems with the piston group and cylinders.
You should also unscrew the spark plugs to analyze the carbon deposits on the electrodes. In this case, checking the engine and its condition using the spark plugs comes down to the fact that if there are serious problems with the CPG, the carbon deposits will be black, traces of oil may be visible, etc.
All of the above signs may indicate that the engine has problems with the piston rings, and the cylinder walls may be worn out. It is also possible that oil is consumed as a result of the need to replace valve seals (valve seals).
At the same time, it becomes clear that in some cases the engine can still be “revived” in the future with minimal investment (spacing the rings or replacing them, installing new valve stem seals, switching to a more viscous lubricant), while in others the power unit must be disassembled and overhauled (boring/lining the block, replacing pistons, etc.).
Checking the engine piston and connecting rod group
Naturally, without special equipment, that is, “by eye”, it is difficult to determine engine wear using the methods described above. It is possible to detect that there is a problem, but it may be difficult to determine the exact cause. Taking these features into account, the next step in checking is the most common actions:
- compression measurement;
- measuring engine oil pressure;
Compression is a conditional indicator of the condition of the piston group (pistons, piston rings and cylinders); measuring oil pressure allows you to assess the condition of connecting rod bearings, crankshaft journals, etc.)
It is important to understand that engine compression depends on many factors and conditions. For example, a decrease in the indicator can occur not only due to problems with the CPG, but also as a result of problems associated with the timing belt. More precisely, compression drops when a valve burnout occurs; problems with the valve seats lead to a decrease in compression.
For this reason, it is only possible to assess the condition of the CPG based on the compression indicator only approximately. However, there is another way to get more reliable data. To do this, it is necessary to measure the pressure of the exhaust gases that break through the leaks between the pistons and cylinder walls into the engine sump.
To measure, the pressure gauge is connected to the exhaust pipe in the pan. At the same time, it is very important to seal as tightly as possible the remaining holes and cracks both in the pan and in the engine. You will also need to have a special attachment for a pressure gauge, as well as technical documentation for a specific internal combustion engine model.
Naturally, many small service stations will not perform such an operation. If we are talking about checking a used car before purchasing, most likely the seller will also refuse the request to carry out diagnostics using the specified method. In the end, all that remains is to measure the compression, taking into account all possible errors and various nuances to obtain the most accurate results.
- If we talk about measuring the oil pressure in the engine, this is somewhat simpler, and the method itself allows you to determine the approximate condition of the connecting rod bearings, crankshaft journals, etc. To solve the problem, the oil pressure sensor is unscrewed, after which a pressure gauge is connected to this place through an adapter.
It is important to take into account that before carrying out the procedure, the engine oil must be replaced with fresh one, taking into account all the tolerances and recommendations of the engine manufacturer (SAE viscosity, etc.). It is also necessary to install a new oil filter. Before taking measurements, the engine must be warmed up to operating temperature. After the engine warms up, measurements are taken at different crankshaft speeds.
The obtained oil pressure results are then compared with those indicated in the technical documentation for a particular engine. At the same time, the most accurate data is not so important; a certain error on the pressure gauge is quite acceptable. The fact is that wear of the engine and its connecting rod group is indicated by a fairly significant deviation from the norm (about 15-20%). If this is the case, then the power unit will soon need expensive repairs.
What's the result?
So, now you don't know how to determine engine wear. Moreover, it is optimal to use not one, but several methods described above. You can even perform a number of checks simultaneously (for example, measuring compression is combined with checking the spark plugs). The main thing is that all operations are performed correctly.