How it works?
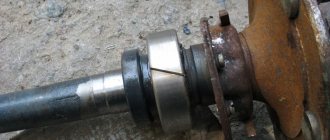
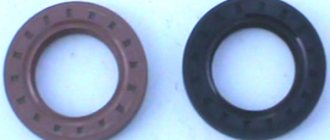
The oil seal consists of a rigid (outer) surface that is mounted in a hole. Often the kit includes a metal ring that is hermetically connected to the rubber seal. It fits tightly into the landing niche.
The inner part is softer, it seems to envelop the rotating shaft. The oil seal leaks from the inside of the circle. Manufacturers are constantly looking for compromise:
- hard material is more durable, but does not fit tightly around a rotating object;
- soft, elastic rubber provides excellent sealing, but wears out quickly.
To enhance the girth, a ring spring is often installed on the inner side. If it comes off, the grenade seal will leak.
Replacing box seals: subtleties and tricks
Issues discussed in the material:
Many car owners have encountered a situation where gearbox oil leaks. This problem happens in cars with both “mechanics” and automatic transmission, robot or variator. The most common cause of oil leaks in cars with manual transmission is leaking oil seals. In our article we will tell you how to replace gearbox seals.
Signs of a leaking oil seal
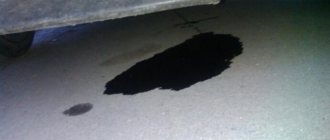
If a puddle of oil forms under the car, this is a clinical case. The cause of the malfunction is clearly visible to the naked eye. The seal of the inner CV joint does not leak so clearly. Oil droplets may appear after sitting in the garage, especially in winter, when the tires become tanned. Don't be lazy to regularly look under the bottom. When the oil seal is “snotty”, there will be a dirty oil stain around the junction of the CV joint with the box.
Lubricant leaks, splashing onto the muffler, give off an unpleasant burnt smell. This is also an indirect sign of a leaky seal. In general, make it a rule to inspect all places of potential oil leakage at every maintenance or transition to the summer (winter) operating season.
Replacing the automatic transmission oil seal of the right drive VW Passat B6 KGV
The automatic transmission oil seal began to leak, oil leaves the box through it. The oil seal needs to be replaced with a new one. The process is described and posted with photographs here.
The work was carried out for right-hand drive on an automatic transmission 09G with the letter designation KGV.
A similar replacement is made on boxes with the letter designation:
Reason for replacement: damage to the right drive oil seal.
Consequences: with partially leaked oil from the automatic transmission, gears began to shift poorly, and shifting into gears was accompanied by strong shocks.
Work to eliminate the consequences of a damaged oil seal in this article:
Do-it-yourself oil seal replacement
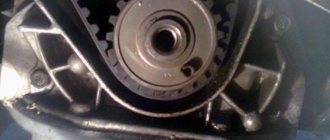
The complexity of the procedure depends on the design of the drives. If the internal CV joint grenade has a flange connection, it will be enough to just unscrew the drive and move it to the side. All work is performed on the flange. But most often on compact front-wheel drive cars, a floating spline connection is used on both sides of the drive. In this case, replacing the CV joint seals entails dismantling the wheel knuckle.
- We jack up the car body, allowing the suspension arms of the front wheel (on which the repair is being carried out) to move freely;
- After removing the wheel, unscrew the brake caliper and hang it on a wire;
- We unscrew the stabilizer links (if necessary, we change them, since we disassembled the suspension anyway);
- We release the steering knuckle from the steering rod, unscrew the CV joint hub nut;
- We remove the hub with the steering knuckle, disengaging the splined connection of the outer grenade. Check the instructions to see if the transmission oil needs to be drained. If the seal leaks, dirt and moisture can get inside. Therefore, it is advisable to replace the fluid in any case;
- We pry up the inner grenade with a puller (with a pry bar or a nail puller, if there is no puller), and with a sharp movement we pull out the splined joint, overcoming the resistance of the locking ring;
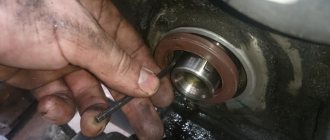
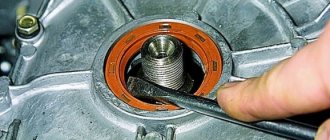
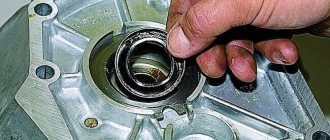
- We remove the damaged oil seal and thoroughly clean all surfaces of dirt and old oil. There are special pullers; you can use a wide flat-head screwdriver. Important! Before changing the oil seal, it is necessary to wash the adjacent surface with any means. We start work only after the unit has dried;
- Inspect the seal. If there are no signs of wear, then there is another reason for the leaks. Often the ventilation breather on the gearbox or transfer case becomes clogged. The heated air squeezes the oil through a working oil seal. Therefore, check the fitting and breather tube. If this is the reason, you will still have to replace the oil seal; it is not recommended to reinstall it;
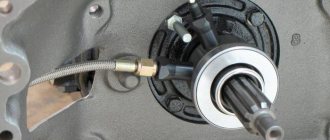
- Install a new oil seal, first moistening the installation site with lubricant. Shrinkage is carried out using a mandrel, which you can make yourself from a pipe of a suitable diameter;
- Carefully insert the splined connection of the inner CV joint into the gearbox (transfer case);
- Check the free longitudinal movement and rotation of the shaft in the oil seal;
- Place the outer axle shaft into the hub and assemble the steering knuckle in reverse order;
- Fill the gearbox with oil and test drive;
- Check for oil seal leaks.
This procedure is performed by one driver within several hours. Whether to entrust the work to a service or to save on paying for standard hours is up to the owner of the car to decide. But in any case, you should not delay the replacement. Today you leak a couple of drops overnight, and tomorrow on the road you can be left without any oil at all and hello to replacing the unit.
If you have any questions, leave them in the comments below the article. We or our visitors will be happy to answer them
Reasons for failure
The spare part is a consumable part: if it fails, as indicated by an oil leak, it cannot be restored or repaired. If the part no longer copes with its assigned tasks, the drive seal must be replaced.
The main causes of failure are:
- Natural wear and tear. The parts are made using rubber elements. Modern material has an increased safety margin, but its service life is still limited. As a result of operation, exposure to an aggressive environment and high temperatures, the rubber parts dry out, lose elasticity, and are not able to fit tightly to the parts of the assembly.
- Mechanical damage. More often they happen due to accidents, but low-quality repairs should not be ruled out. The use of improvised tools and non-compliance with installation technology leads to the fact that the new element is damaged even at the installation stage.
- Replacement of main parts. When planning to update CV joints, craftsmen recommend purchasing a set of new drive seals. Reason: the dismantled element cannot be reinstalled, as it will not be able to perform its functions efficiently due to a loose fit.
Selecting a new drive oil seal to replace
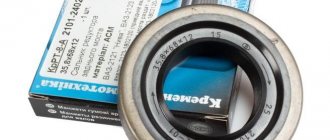
Many manufacturers make good, high-quality parts. Three points are important in the oil seal, which can be checked when purchasing:
- Like all oil seals with a metal fit, the metal cage must be made of good material, soft enough, but at the same time, with a high class of processing, otherwise the oil seal will not fit tightly into its seat;
- The quality of the rubber, including the absence of nicks, casting seams, and other visible defects;
- The quality of the articulation of metal and rubber. The thin edge of the transition between the rubber part and the metal part.
All these parameters are very indirect, but still speak about the manufacturing technology of this important part. It is clear that it is difficult to determine the hardness of rubber and its performance properties by eye, but sometimes indirect parameters allow you to compare two parts and choose the best one. Therefore, it is better to look at it carefully before installing it in your car.
| Attention Bearing Buyers Dear customers, send your questions and requests for the purchase of bearings and components by email or call now: Delivery of bearings throughout the Russian Federation and abroad. Bearing catalog on the website |
Attention Bearing Buyers
Dear customers, send your questions and requests for the purchase of bearings and components by mail or call now: tel: +7 (495) 646 00 12 [email protected] Delivery of bearings in the Russian Federation and abroad. Bearing catalog on the website
themechanic.ru
Comments from car owners about replacing gearbox seals
Need advice on replacing the seal on a manual transmission...
There is a leak on the left side of the manual transmission, where the three gear shift levers enter into it.
The box is located in a niche, it is difficult to get there... The question is, how to do this? Should I hang the box or ask a girl with thin hands to help?
You need to unscrew the rear gearbox bracket and lower it as low as possible. Then unscrew the lever bolt and carefully remove the lever. There is a rubber ring inserted at the very edge of the box opening. Take it out, pick up another one, for example, I have from a universal set, insert it into the groove. Carefully insert the lever into the same position, in advance with the bolt, to catch the threads of the clutch fork inside the gearbox.
The driveshaft does not need to be unscrewed; at most, the outboard shaft can be removed. The muffler will need to be disconnected, most likely. Here you need to look at availability. Great if there is a lot of space.
Everything... changed...)) Regarding unscrewing the outboard - it depends on the specific car, it’s different for everyone. I had to twist it. I changed it in the garage in a pit. Unscrewed 6 bolts and nuts of the elastic coupling. I unscrewed the 4 bolts securing the silencer, removed the fastenings from 4 rubber bands (and for some reason my silencer consists of only 2 parts). It was not very convenient to remove the silencer. It is better to first remove one fastening in the middle, then both fastenings of the rear can, supporting the can with a jack, and then the last fastening in the middle of the car. After this, 6 bolts for fastening the thermal protection, using the same wrench, 2 bolts for the outboard bearing. I pulled the cardan aside and it came out of the tail of the box.
Next, the wrench is 30, but you need a very deep socket, because a long rod sticks out of the nut. The standard one didn't fit. Or move the carob. The secondary shaft flange is jammed with a large bolt. I drained the oil by unscrewing the drain plug from the bottom with a 17 hexagon socket (for some reason, 17, although the manual says 19. I first bought it with a 19, then I had to go change it). The filler on the side is also 17. I unscrewed the nut, pulled off the secondary shaft flange, and there was the oil seal. The seal had to be torn out; it was a bit tight. The new one also had to be hammered in, but lightly and through a piece of wood. The whole procedure with analysis takes about 2 hours, but this takes into account the fact that 50% of the time it took me personally to unscrew the 4 bolts of the silencer at the junction of the knees. As a result, I had to saw the bolts. Therefore, if there is no particular need to film the second half, it’s better not to!! )))) All nuts and bolts are quite accessible and can be unscrewed normally. Along the way, I discovered two holes in the silencer and removed the gear shift rod joint, since there was excellent access. Now I'm looking for how to eliminate the play in the hinge.
It is not necessary to remove the box to replace the seals. You need to remove the drives, pull them out, pry the seal with a screwdriver and pull it out, then clean the hole. Then take the sealant, lubricate the new element and carefully press it into the hole (tapping it slowly with something).
I don’t know about you, but, for example, on a figure eight, the oil seals of the right and left drives differ in the direction of the oil drain notches: on the right, the arrow points clockwise, on the left, counterclockwise.
You only need to install the original element. The non-original one lasted me a week.
We recommend
It depends on which seal: rear or front. If it is rear, then a wrench is not needed, since the nut is splined. A light chipper (you can use a flat screwdriver instead) to pry out the deformed part (driven into the slots), and then a flat screwdriver to turn the nut and unscrew the shank. In this case, it is advisable to change the spline nut as well. If you need to change the front element, then there should be, like, a 17th socket wrench under the clutch housing. 8 bolts if I counted correctly.
Source