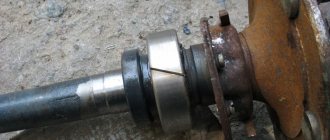
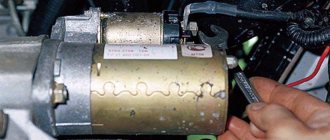
I know cases when, due to a damaged internal grenade seal, oil gradually leaked out of the box, after which the box jammed. The first sign of replacing the oil seal is that an oil film forms around the internal grenade on the gearbox, although there are no obvious oil leaks. But once an oil film has appeared, the oil seal will soon begin to leak even more oil, forming droplets on the asphalt under the car.
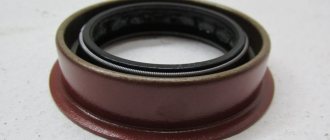
Grenade seals are divided into left and right, so when changing the seal, be sure to place the left seal on the left side, and the right seal on the right side. The left oil seal is brown (it is on the driver's side), the right oil seal is black (the passenger's side).
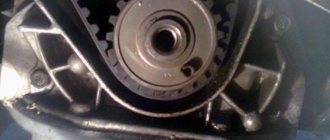
Photo. Internal grenade seals.
The first thing to do is to lift the front wheel on a jack; on the side on which you are going to change the oil seal, be sure to place a stump or bricks next to the jack for insurance. Remove the wheel and unscrew the hub from the ball.
Photo. The arrow shows which bolts need to be unscrewed to disconnect the hub from the ball, there are two of them with a wrench head, seventeen.
All that remains is to pull the grenade out of the box, here’s the most interesting thing, you can pull directly on the brake disc, trying to pull the grenade out of the box, if the grenade pops out well, or the drive may pop out from the internal or external grenade, then it’s an extra hassle to put the drive in place.
Photo. Removing the internal grenade using a pry bar and tube.
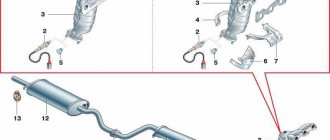
Replacing the cuff
Replacing gearbox seals on a VAZ 2110
In order to replace the front wheel drive seal, you must be able to do the job correctly. When it is not possible to replace it yourself, you need to contact special workshops. The local specialists will do this work in a matter of hours, or maybe even less.
Removing the drive seal
Replacing the gearbox cuff
So, to replace the front wheel drive seals, you need to do the following:
Note: When replacing seals, there is no need to remove and disassemble the entire gearbox. The oil seals for the right and left drives are not interchangeable.
- The first step is to drain the oil from the gearbox.
- Once the oil is in the container, remove the drive.
- After opening access to the oil seal, it is necessary to carefully remove the damaged or worn-out oil seal with a sharp tool, taking the utmost care.
Installing a new cuff
The oil seal removal process is completed. But, it is necessary to install a new part in place of the damaged one. To perform these actions, several simple rules are used:
- The oil seal surface is lubricated with special transmission oil.
- To install a new oil seal, it is necessary to apply a used cuff to its surface (from the inside).
- By lightly tapping the used oil seal with a hammer, we place the second new one in its original place.
- We assemble the mechanism.
The oil seal installation work has been completed. Assembly steps must be performed in exactly the opposite order. The left drive oil seal is replaced using the same technology as for the right one.
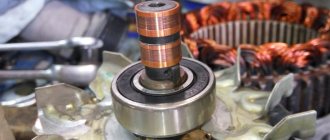
Input shaft cuff and its replacement
The input shaft seal may need to be replaced. The job won't seem too difficult if you do specific steps in a specific order:
- The gearbox is removed.
- The crankcase has several clutch parts. They must be carefully removed.
- The oil seal is pierced with a special tool. The center punch is ideal. The work should be carried out very carefully, since damage to the input shaft of the gearbox is unacceptable.
- Using thin-nose pliers, the old oil seal is removed and a new one is installed in its place.
How to change the oil seal on a VAZ 2110
- The working surface of the new oil seal must be lubricated with transmission oil.
- The old seal is installed on the outer surface of the new seal and, with careful blows of a hammer, the new seal is installed in place of the old one.
Mechanism rod oil seal and its replacement
During vehicle maintenance, it may be necessary to replace the gear selector rod cuff. To install this part, it is necessary to disassemble the gearbox housing. To complete this work you need to do a few simple steps:
- Using a tool (socket wrench) with the number “17”, unscrew the bolt securing the power unit support bracket.
- To remove the two nuts securing the rear cover of the gearbox housing, you must use a 17 mm spanner.
- The bracket is removed.
Note. The word “removed” means careful removal of the part and careful storage until the mechanism is assembled.
- There are several parts on the gearbox that relate to the clutch release drive. They need to be removed.
- The speed sensor mounted on the gearbox is disconnected and separated from the device.
- There is a rubber plug in the crankcase that must be removed.
- Using a tool, a 10 mm wrench, unscrew the nut securing the speed sensor drive.
- Next, you need to carefully remove the drive.
Note: many mechanics recommend turning out the crankcase mounting stud. It must be moved as much as possible towards the engine cylinders. There are two nuts on it, which, when rotated, allow this operation to be performed.
- For the next job you must use a key with the number “13”. Use it to remove the four nuts that secure the rear crankcase cover.
- To separate the lid, lightly tap it. The tapping continues until the lid is released.
Note: for this work it is better to use a hammer with a rubber on the heel or a regular hammer, but tap through a wooden block.
- The mechanism cover is removed.
- Without any turns or changes, third gear is engaged.
- Using a key with the number “10”, unscrew the fifth gear fork bolt.
- It is necessary to install fifth gear.
- The bent sides of the primary and secondary shaft fastening nuts must be carefully pressed out.
Dismantling
To replace the problematic oil seal, you will have to perform several disassembly steps. As a result, you will need to do the following:
- Remove the front protective cover, and then remove the timing belt;
- Remove the camshaft pulley mounting bolts. To do this, hold the element with a screwdriver to prevent it from turning, and perform the removal procedure itself using a 17 mm wrench;
- Remove the toothed pulley;
- Remove the oil seal. For this operation, you will need a flat-head screwdriver or needle-nose pliers.
This set of measures will allow you to remove and replace the oil seal. But we advise you to check the condition of the camshaft and, if necessary, replace it.
To get to the camshaft you need:
- Remove the oil pressure sensor completely. If you don’t want to dismantle it, then at least disconnect the wires from the device;
- Unscrew the camshaft bearing housing mounting bolts. There are as many as 20 of them there. After this you can easily remove the case;
- Do not forget about the plugs that are located in each technological hole. Take them out;
- Disassemble the potentially problematic camshaft and determine the need for repair or replacement.
Reassembly
When reassembling the assembly, be sure to take into account the position of each dismantled element. Be careful with the plugs. Make sure that each of them is strictly in its place.
Press-in
Before installing the oil seal and additional elements, do not forget to lubricate them thoroughly. The seal can be pressed into place using a hammer. Just not metal, but rubber or plastic. Make sure the edges are flush with where the component will be installed.
How to prevent premature wear of the inner CV joint oil seal
It is almost impossible to effectively extend the service life of a seal already installed in a gearbox. However, this can be taken care of when replacing it, which must be done at the first signs of wear. First of all, it is necessary to thoroughly clean the installation site and the drive shaft from dirt and other foreign particles. The inside of the oil seal is lubricated with transmission oil before installation. Installation of a new oil seal must be carried out using a special mandrel or through the body of the replaced part.
Final points
Due to the simplicity of the design of most components in Renault Logan, owners are given the opportunity to independently replace system elements that have become unusable. As you can see, the process of replacing axle shaft seals is not characterized by special labor costs and can be done by any Loganovod. This approach inevitably leads to cost savings.
During work, we take effective measures to preserve the integrity of the anthers of the internal hinges.
We select new spare parts taking into account their article numbers.
You should not neglect the opportunity to change the oil in the Renault Logan gearbox, which will only extend the “life” of this complex unit.
We use rags in sufficient quantities to ensure thorough cleaning of the surfaces requiring this manipulation. This will save the transmission unit from foreign particles entering the crankcase.
- Like
What parts to choose for replacement
It is better to immediately change the boot along with the oil seal.
Before you begin repair work, you need to purchase the necessary parts for replacement.
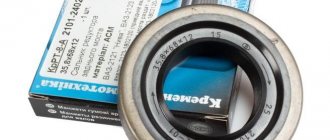
As for the oil seal, Balakovo products are very popular. You need an oil seal with article number 2110–1701043 and 21100-1701043-00 .
Manufacturers offer two options for oil seals - simple and reinforced.
In addition, it is recommended to immediately purchase a cardan boot, as there is a high probability that it is also worn out. Even if this is not the case, it may break during the repair process. Therefore, it is better to spend a small amount on anther than to bother with disassembly again.
Recently, reinforced oil seals have appeared on sale, which are called that way. If you believe the assurances of sellers, their service life is significantly higher than that of standard products.
Front SC
We recommend starting with the front one, since this oil seal is the easiest to replace. Even a car owner without much experience can handle it. Once you learn how to change it, you will most likely be able to replace the rear crankshaft oil seal yourself. But it is better to act according to the circumstances.
Retrieving an element
The steps for replacing the front oil seal are as follows:
- Remove the protective cover located on the timing belt;
- Remove your engine protection. You will have to get under the bottom and unscrew the corresponding fasteners;
- Set the piston of the first cylinder to top dead center on the compression stroke;
- Slightly loosen the timing belt tension, after which it can be easily removed;
- Remove the front right wheel;
- Remove the generator drive belt, and also do not forget to remove the pulley;
- Now we dismantle the fasteners of the crankshaft pulley and take it out. Here you will need to first remove the key;
Front SC
- Be sure to drain the engine oil from the system. To do this, prepare an appropriate container in advance. If you plan to refill the oil, be sure to keep the container clean and dry;
- Remove the oil pump. It is on this that the desired crankshaft oil seal is located;
- To remove the SC, you will need a flathead screwdriver;
- At the same time, check the condition of the oil filter. Replace it if necessary;
- Having dismantled the old front crankshaft oil seal, you can now install a new one in its place;
- Installation of the SC is carried out with a 27 mm nozzle or head;
- Assembly of the unit is carried out exactly in the reverse order.
Pulling out the internal grenade from the gearbox. Video
Therefore, it is better not to try to tear the grenade out of the box by pulling the brake disc, but to insert a prybar under the grenade and a tube under the prybar, try to squeeze the grenade out of the box if it was squeezed out perfectly. It happens that a grenade cannot be squeezed out, then it is knocked down with hammer blows.
Photo. Removed grenade from the gearbox.
But before squeezing out the grenade, place a container to collect the oil; it can be made from an old canister by cutting a hole. If the oil in the box is normal, then it will definitely flow out of the box.
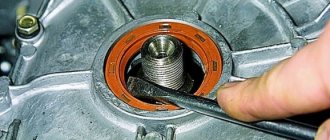
Photo. It is shown how you can use a pry bar to squeeze the oil seal out of the gearbox.
The grenade has been removed, squeeze out the old oil seal from the gearbox.
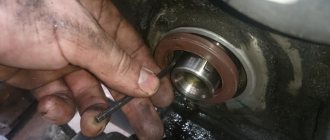
Photo. Grenade seal location.
Remove the old oil seal, wait until the oil is gone, and wipe the oil seal installation area clean with a cloth. For greater confidence, the new oil seal can be coated with sealants, and with light blows of a hammer on the oil seal circle, it can be seated in place.
Photo. Clogging of the oil seal into the gearbox.
The seal was hammered in, all that remained was to insert the grenade into place. Aim the grenade at the box and push it into place. Then assemble in reverse order.
Necessary tools and accessories
Next, using the example of a VAZ-2110 car with an 8-valve engine, we will consider how to replace valve stem seals.
Let us immediately note that, although the work is labor-intensive, it does not require removing the cylinder head.
Before starting work, you should stock up on all the necessary tools and equipment.
In addition to the standard sets of keys (open-end, socket, screwdrivers, hexagons, hammer, etc.), you will also need:
- Rod with a diameter of 8 mm (tin);
- Devices for desiccation of valves;
- Tweezers;
- Collets for removing oil seals;
- There are enough new caps.
For desiccation of valves.
Two ways to replace the gearbox seal on a VAZ-2110
It is easier to change the oil seal with the gearbox removed.
Replacing an element that has become unusable can be done in two ways.
- The first of them is very labor-intensive , since it will be necessary to remove the gearbox. But replacing the oil seal will be much easier.
- The second method seems less time-consuming and labor-intensive , but in practice it is very difficult to carry out this procedure. Only experienced motorists who have repeatedly had to repair their cars can replace the oil seal directly on the car without removing the gearbox.
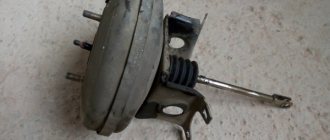
Troubleshooting
Experienced car owners know the visual reasons why they can determine the failure of the rocker seal. Naturally, for such reasons it is impossible to accurately determine the cause of the leak, but this gives a signal to carry out diagnostics, in which the cause of the oil leak can be accurately identified.
The most important sign is oil stains under the car, especially in the gearbox area.
An oily rubber boot indicates a malfunction of the rocker seal.
But these spots do not always indicate oil seal failure. It happens that this is due to the oil filter, which sometimes does not tighten properly. In any case, the driver is obliged to monitor for any oil leaks in the checkpoint area . To do this, you need to monitor the oil level. This is the only way to save the box from damage, which will certainly happen if it operates with a minimum amount of oil.
Another way that indicates the oil seal is worn out is a characteristic crunch that is heard when changing gears . But only an experienced VAZ-2110 owner can diagnose this crunch. In any case, if you hear unusual sounds when shifting into gear, it is better to diagnose the gearbox.
Set of tools required for replacement
A minimum set of tools for replacing the oil seal without removing the gearbox.
In order for the replacement of a part to take place without problems, you need to prepare the place and the necessary set of tools in advance. You will need:
- A set of keys and sockets, and for 13 you need two keys and there must be a key for 10. There must also be a socket head for 22.
- A chisel or screwdriver will be needed to knock out the oil seal.
- The hammer is small so you can get under it.
- Silicone sealant.
- Awl and hook.
Additional accessories
A regular self-tapping screw will allow you to do without a special puller.
For those who decide to replace the gearbox seal without removing it from the car, you will need additional equipment:
- Several long screws.
- A piece of pipe for pressing in a new oil seal.
It should be noted that the replacement process without removing the gearbox is much more complicated. In addition, there is a possibility of damaging the part being replaced during pressing.
see also
Replacing the gear selector rod oil seal Opel Zafira A
- 12 0 5k
How to determine the knock of the connecting rod bearing?
- 0 2 5k
Is it possible to install the main crankshaft cover from another engine?
- 0 1 1k
Replacing the crankshaft VAZ 2110
- 9 0 9k
Which is the best crankshaft pulley for VAZ 2110
- 0 1 2k
Oil stains under a car are quite a serious cause for concern. If the cause of the leaks is in the crankcase housing gasket or oil filter, then everything is not so bad - replacing them is relatively easy and they do not create additional problems.
The situation is different if there are oil stains under the hood, in particular on the generator belt. In addition to the fact that you will have to change the belt, this may indicate leaky crankshaft or camshaft seals, which are much more difficult to change.