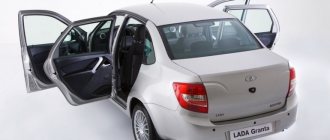
Communities › Lada Priora Club › Blog › How to fold the back of the rear seats?
Friends! Can you please tell me whether the rear seat backrest folds down on all Prior sedans? Maybe it depends on the configuration or something else? Where do you need to press or what do you pull to make it fold? Thank you in advance!
Comments 21
yeah, only these ropes tend to fall to the bottom and have to be pulled out of the trunk with a screwdriver. They really couldn’t come up with anything more serious.
yes yes, they wrote about it. Apparently I didn't have enough imagination =)
To be honest, it’s better not to touch the backrest unless absolutely necessary, the rear backrest locks are made of such rubbish that after opening the closures a few times they will stop latching…
To be honest, it’s better not to touch the backrest unless absolutely necessary, the rear backrest locks are made of such rubbish that after opening the closures a few times they will stop latching…
I'll keep that in mind, thanks!
If the straps fall, then pass a thin wire into the trunk and hook it to the straps there. Pull them into the cabin and open it. But it doesn’t fold up, it can be removed (the back) You’ll shoot it when you fold back the 2 buttons of the trim and see 2 hooks at the bottom
Thank you! I'll keep it on mind. but I would like to hope that they still didn’t fail =)
The only catch is that the trunk upholstery is riveted to the backrests.
This is how... it turns out that they will need to be “unriveted?” Are they holding tightly?
To be honest, I don’t even know, but I reclined the seats a couple of times and 3-4 rivets vomited out. I didn't try to fasten them back.
Are they reusable or not, these rivets? or just pulled it out and that’s it...
There is a rope behind the headrest that you pull and the backrest opens. When I wanted to remove my backs, to my surprise, I didn’t find them. I had to open them from the trunk with a screwdriver. The trick was that these straps just fell into the gap between the back of the seat and the rear parcel shelf.
Ok, if I can’t find it behind the headrest, I’ll look in the trunk) Thanks!
Tip 4: How to remove roof trim in Priora
Fans of the Lada Priora like everything about the car, but they also notice that the car’s ceiling lining is rapidly wearing out. In order to update the ceiling by covering it with a different covering, you must first remove the dilapidated roof. But how to do that?
You will need
- -screwdriver;
- -wrench.
Instructions
1. In order to remove the inner headliner , remove all interior parts that are in one way or another in contact with the roof. Pay attention to the order in which the parts are disassembled. Pre-prepare a place where you will then neatly place the fasteners and the parts themselves.
2. Start with the ceiling light. It is best not to drop the lampshade, because it is made of a very fragile material. All ceiling lighting fixtures must be unscrewed in order. After this, proceed to dismantling the sun visors and handles in the car interior. They also need to be removed with caution.
3. Pay attention to the soiling of the ceiling material. Before you begin the process of dismantling the interior of the ceiling of a Lada Priora, stock up on two liters of water and detergent.
How to open the rear seats on a Priora
nik_bel72, I had a metal creaking in the place where the backrest clings to the body from below, I wrapped this place with electrical tape, the sound disappeared, then it appeared again, there was already a problem in the shelf: the body plays on bumps and the shelf creaks, I screwed it in with self-tapping screws, now it’s quiet
Same symptoms. The creaking at the bottom of the backrest disappeared after removal, now it creaks in the area of the shelf on large bumps. We will treat...
There are 2 options: 1, try to snap it firmly or press harder; 2 cut a little splen around the fastening.
I also glued it with 8mm splenium, everything turned out fine for me, just like my own :)
and tried this way and that: on one side it closes, but on the other it doesn’t work. I'm already stuttering)))) what other options??
Hm. Does your seat not reach the mount or does it not fit into it? Is the seat screwed down well and level? Alternatively, look at the lock on the seat.
Has anyone ever had this happen? The ribbon has come off and you have to pull it so that the hook will come off :))) How can I recline the seat now?
Try unscrewing the two front hinges under the seat (they are covered with plastic covers). Approach the nuts on the side with a 10mm wrench. Unscrew it, lift the seat, and then reach the hook.
It didn’t come off for me, but it happened that I fastened the back and there was a ribbon inside)) well, nothing came out of the trunk, something like an electrode, only a thin one (the knitting needle was opened))
You can try this too.
Then it is not a “loop”, but a handle for the back lock. If the T-shaped plastic handle is not lost, then it is put in place and secured through the hole with a new cotter pin or piece of wire. I've already had this happen. If it is lost, then you buy a new one in the store, complete. I think if you look in stores, you will find it.
How to remove the rear seats on a VAZ 2110 and 2112? When you really need it
Before removing the rear seats on the VAZ 2110 and 2112, check all the nuances of this work.
This is not difficult to do, but it has its own peculiarities. Although this model is the progenitor of several models, from 2111 to Lada Priora, it still differs from its brothers in some elements. True, not too much. At one time, the Ten was positioned as a completely modern car. For the first time, a carburetor with automatic choke and many other new products were used on domestic cars. How to remove the rear seats on a VAZ 2110 and 2112 is a question often asked by the owners of this car. The design of the seats and their fastenings is as simple as possible, but at the same time reliable. This allows you to remove the seats at the right time. At one time, entrepreneurs who used the car for work pulled out the seats when they needed to travel for goods. After which they were easily and quickly put back.
Heated seats LADA Priora - breakdowns, installation instructions
In frosty weather, it’s not very pleasant to sit on an icy car seat to start the engine, so heated seats help out. Inventive owners of the LADA Priora car almost immediately began installing seat heating in their Priora. Naturally, the seat does not warm up instantly, but it significantly helps against frostbite. While the stove is not heating up (because the engine has not yet warmed up!) is it necessary to sit in complete cold? Factory seat heating is installed exclusively in luxury versions of the Priora car. Installing it is not very difficult, the main thing is to connect everything well. Seat heating, like “Emelya”, does not need to be installed, the seat upholstery is not removed, since it is just a cover for the seats - it is inserted into the cigarette lighter - although for some reason, over time, they cause the cigarette lighter fuse to burn.
You can install heated seats on a Priora without the help of others; it will cost relatively little (if you compare the Niva with the fact that your health can suffer greatly from warming up a frozen car). The seat heating control unit can be installed in Priora where it is comfortable: the main thing to keep in mind is that this is not the most suitable button when driving a car, it should not interfere with pressing other levers and buttons. Read the article to the end and your car will be warm even at minus 45.
Removal
Disassembly should begin by loosening the backrest upholstery.
. It is secured using buttons located on the side of the trunk. Next, pay attention to the seat. First, the pillow lock handle is moved to the right. After this, you need to raise the seat on the right side. They do the same on the left. Next, move the seat cushion forward and remove it. Half the work is already done.
The head restraints are removed from the clamps. To do this, press the fastening buttons and pull the headrest up. The second section is treated similarly. Don't lose the release buttons. Next, the upholstery is completely removed, otherwise it will not be possible to remove the seat. The seat lock is pulled out through the loop. It is located behind the backrest. The right side of the backrest is raised, and its fastening loops are removed from the hooks located on the floor of the car. The left side is removed in the same way.
After this, remove the armrest. To do this you will need a 10mm socket wrench. Using a wrench, unscrew the two fastening nuts. The armrest is then removed. If necessary, you can also remove the seat belts. Installation is carried out in reverse order.
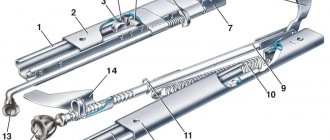
Installation of torsion bars for the front seats of Priora
We place the taller plastic bracket (No. 1) closer to the threshold, and the less tall one (No. 5) to the floor tunnel. In this case, the hooks (No. 2) of the brackets should be directed towards the front of the car. We insert the short end of the torsion bar (No. 3) into the hole in the bracket (No. 5) and insert the torsion bar (No. 3) into the hook (No. 2) of the bracket (No. 1). Then use a mounting spatula or a powerful screwdriver to place the long end of the torsion bar (No. 3) behind the hook (No. 6) of the pillow base post. We install the torsion bar (No. 4) in the same way. The long ends of the torsion bars should be directed towards the front of the car.
Other models
On the VAZ 2111 and VAZ 2112, the seat mountings are slightly different in design. Therefore, their dismantling is slightly different from similar work for dozens. Here both the seat and back are divided in half. Each part can be folded independently of the other half. This makes the hatchback and station wagon more comfortable. They can also be removed separately. The seats are equipped with headrests, this increases the safety of the car. In addition, it is simply much more convenient for passengers.
By pulling a specially designed loop, we lift the left seat, after which it tilts forward. Using a spanner wrench (10 mm), unscrew the two hinged nuts. After this, you can remove the seat from the car. The right side is dismantled in the same way.
Using a 13 mm socket wrench, unscrew the nuts located at the bottom of the left seat fastening hinges. There are only two nuts. Next, the backrest fastening clamp rises up. After this, the backrest folds forward. Unscrew the nut and bolt located at the top of the fastening hinges. The right side is removed in the same way.
Tuning
Modifications to the rear seat of the VAZ 2110 are not that common. In this case, these structural elements are most often heated. This is quite easy to do. It turns out that such a modification is not too expensive in terms of money. And it becomes much more comfortable for passengers to travel. This thing will seem especially useful to drivers with large families living in the northern regions of the country.
For installation, you can use a commercially available heating kit - “Emelya”. You can also use a heater removed from another car. This element from Priora is best suited. The heating should have two parts (for the seat and backrest). To install, it is not necessary to completely remove the seats; partial dismantling is sufficient.
Heating is installed under the casing. The connection is made in the same way as on the front ones. The power buttons are located on the rear doors. It is best to display the power indicators on the dashboard. This will allow you to control the operation of the device. You also need to monitor the position of the device. It should not touch the seat springs.
Conclusion
. For various reasons, any driver has to deal with the need to remove seats. Therefore, it is important to know how to remove the rear seats on a VAZ 2110 and 2112. This will make your task much easier. Like any seat assembly, they can break; this happens rarely, but it does happen. You can always fix the problem yourself.
Priora - analogues of heated seats. Installation of standard seat heating on LADA Priora
The set of standard seat heating for Priora should include:
- Heating elements (4 in total, two for each seat);
- Block for the control unit with wires;
- Priora seat heating unit.
With all this, the article number for heated seats for LADA Priora must certainly contain the numbers 2170 - this, as any Priora owner understands, is the model number. It is worth distinguishing the standard heating set for Priora 2 by catalog number - they are different in comparison with the set for Priora 1. It is better to outline the entire installation of heated seats on a Priora using a detailed step-by-step method, which has been tested by time and by other car owners:
- We remove the front seats. Remove the factory covers from the seats, which are secured with an iron spoke and 3 plastic latches. You can disassemble the seats without dismantling them, removing only the covers, but then the process will be a little more complicated - it will be awkward to deal with the wiring and laying out the heating parts;
- We attach heating elements to the seats - one on the lower part, the second on the backs, in the lumbar area. Some people recommend strengthening it with double-sided tape, but over time it can come off. It would be safer to sew the heating element to the pillow so that it does not move out of its place;
- Pull the wires from the heating parts through the hole in the mount under the cushion (run the wires from the lumbar heating parts to the place where the seat upholstery is attached). The piece of wire that passes through the hole can be protected from chafing using some kind of plastic tube. The power plugs for all 4 parts are out, all that remains is to connect them;
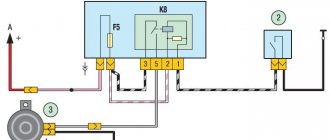
- Disassemble the central tunnel. Buttons for heated seats will be in place of the plug near the handbrake;
- The wiring is connected strictly according to the seat heating connection diagram. Before doing this, it is recommended to disconnect the battery from the network. We install a terminal block to the heating control unit. The dark-colored (-) wire is attached under the bolt near the handbrake. A gray-red wire (for aesthetes, it is responsible for illuminating the buttons) is connected to the lighting of the cigarette lighter rim. A reddish 12V wire is pulled to the mounting block. You can't do without a fuse. Then everything goes strictly “by the numbers”. Connect pin 87 to the reddish wire, pin 86 to the black wire. Connect the blue-black 12 V wire to pin 85, the pink wire to pin 30. You can connect to the mounting block through cut-in clamps so that the wires are held tighter;
- Assemble the tunnel back, install covers on the seats.
READ How to remove the rear drum of a VAZ 2107
The standard seat heating on Priora is guaranteed to last for several seasons if it is connected correctly. And if the heating does not work immediately after installation, it means the wiring connection was incorrect.
how to fold the rear seat back,
#1 a27.85
- New
- 2 messages
- Car make: VAZ21154
- From: Saransk
#2 max52
I'm kind and fluffy, but if something happens, I'll kill you.
- Car make: crocodile 21312 / Gazelle 330232
- From: Nizhny Novgorod
View Garage
Does anyone know how the so-called “sofa” folds into 99 or 15? I just once encountered the fact that I had to spend the night in the car, I decided to fold out the seats, but after futile attempts to fold down the back seat, I had to huddle in the front.
- a27.85 like this
#3 a27.85
- Car make: VAZ21154
- From: Saransk
We remove the rear seat on a Renault Logan ourselves
A very popular model of the French automobile industry, Renault Logan, rightfully occupies a leading position in the Russian market. Despite its economy class, the car is very reliable and practical to use. The Niva Logan has a solid ground clearance and a trunk of sufficient capacity. But what if you need to transport large cargo by car? After all, the rear seats on this car do not fold down!
In the video there is a moment on how to remove the back seat and raise the backrest!