Purpose
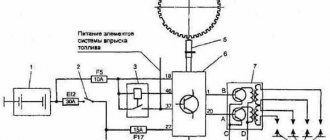
The ignition module is used to generate a spark and serves as a kind of step-up transformer that raises the voltage from 12 to 40,000 volts. Such a high voltage is necessary to form a powerful spark in the combustion chamber and effectively ignite the fuel mixture.
There is a Lada Super Auto car built on the basis of 2114 with a Priora engine; this engine does not have an ignition module, and instead uses an individual ignition coil, which is installed on each cylinder.
The ignition module, unlike the IKZ, is responsible for 4 cylinders at once.
Version of the module on the 8-valve VAZ-2112
Two 8-valve engines of different volumes were installed on the twelve-wheeler - 1.5 and 1.6 liters. The ignition modules for these engines are different. The one and a half liter engine has a module with article number 2112-3705010, and the 1600 cc engine is equipped with a module 2111-3705010. A module for a 1.5 liter engine costs about 1500-2100, and the second one is 500 rubles cheaper.
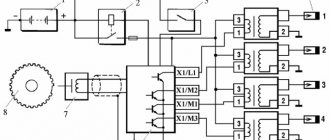
Module structure
It consists of two ignition coils and two high-voltage switch switches. The coils are designed to create high-voltage pulses.
In essence, it is a simple transformer that has two windings: a primary winding, with an induction voltage of approximately five hundred Volts, and a secondary winding, with an inductive voltage of at least twenty kiloVolts. Everything is placed in one housing with one connector for signal wires and four for high-voltage.
Structure of the ignition coil module of the VAZ 2112
The operation of the ignition module is based on the “idle spark principle”. The module is capable of distributing a spark in pairs: to the first and fourth, second and third cylinders when transmitting pulses from the electronic control unit.
Symptoms of a problem
A large number of symptoms can be attributed to MH malfunctions, most often they are similar to a faulty spark plug and a malfunction of high-voltage wires.
If the following problems appear on your car, then most likely the ignition module is faulty:
- The engine is dual (two cylinders do not work at once) either 1-4 or 2-3. This is one of the reliable signs of a breakdown of the MH.
- The engine loses power and traction;
- When you press the gas pedal, jerks appear and the engine stutters;
- Difficulty starting the internal combustion engine when hot;
If such symptoms are detected on the car, it is necessary to check all the parts responsible for supplying the spark, spark plugs, wires and module.
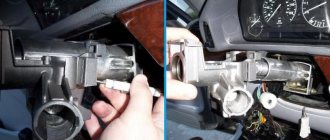
Checking the ignition module
Checking the module consists of two stages: visual check and using a device. Let's start with the visual one.
Visual inspection
It is necessary to dismantle the module and during dismantling pay attention to the contact of the high-voltage wires with the MC, as well as to the contact of the low-side connector. The wires must be fixed securely, there should be no moisture or traces of oxidation.
Next, the removed MH must be inspected for chips and breakdowns. A breakdown of the coil causes signs of damage on the epoxy part of the module, namely on its lower part.
Checking with a tester
To carry out such a test, you need a multimeter that can operate in ohmmeter and voltmeter modes. Both of these parameters show what state the MH is currently in and whether its control circuit is working properly. It happens that the breakdown is not the fault of the MZ, but its control circuit, and then it is necessary to involve an experienced electrician in the repair, who can find the cause.
Checking the power circuit
- We switch the multimeter switch to the DC voltage measurement mode with a limit of 20 Volts.
- Remove the power connector from the module and turn on the ignition of the car.
- We connect one multimeter probe to the connector, namely to pin 15 (there is a number on the connector), connect the second probe to the engine housing (ground). The voltage between these two points should be 12 Volts. If the readings on the device are different and the voltage is much less or completely absent, then this indicates a breakdown in the power circuit.
Module check
- We switch the multimeter switch to the resistance measurement mode with a limit of 200 Ohms. This test consists of measuring the resistance of the primary and secondary windings.
- We connect the probes to the terminals of the secondary winding, namely 1-4, 2-3. The reading on the meter between these two points should be about 5 ohms.
- Then we measure the resistance of the primary winding. To do this, connect one probe to the central contact, and the second to any of the outer contacts. The resistance between the two contacts must be at least 5 ohms.
Substitution
One of the most proven methods for checking a multimeter is to replace it with a working one. This method is used by most car owners. You need to find a VAZ 2114 with the same engine and remove it, install the MZ from this car on your own and start the internal combustion engine. If no previous problems are observed on the ignition module from another car, you can safely buy a new MZ and continue to operate the car.
Causes of ignition coil malfunction
- Internal short circuits.
Overheating of the coil caused by the aging process, a faulty ignition module or a faulty output stage in the electronic control unit. - Malfunction in the supply voltage circuit. The coil charging time is increased due to the supply voltage being too low, which can lead to premature wear or overload of the ignition control unit or ECU output stages. This may be caused by faulty wiring or a dead battery.
- Mechanical damage. Damaged ignition cables, faulty valve cover gaskets, and oil leaks can damage the insulation of the coils. This leads to short circuits and therefore premature wear.
- Bad contacts. Contact resistance may increase due to moisture penetration into the primary and secondary circuits. This often happens after washing the engine.
Why does the MH fail?
The cause of failure of the ignition module is aging and insulation breakdown. Most often, the MZ fails along a vein of broken high-voltage wires, which causes a spark from the module to hit the housing, thereby exposing it to excessive currents.
Old spark plugs have high resistance due to carbon deposits, which can cause a breakdown in the housing, which leads to failure of the ignition module.
You should change spark plugs every 30-40 thousand kilometers, and also inspect high-voltage wires for breakdown.
Module replacement
Replacing the module is quite simple; this work does not require much effort or skill in car repair. To carry out the replacement, you only need to prepare a ratchet with a 10mm head.
- We remove the high-voltage wires from the MH;
- We take out the connector from the MZ;
- Unscrew the 4 nuts securing the module to the bracket;
- Remove the module and install in reverse order;
It is necessary to connect high-voltage wires strictly in a certain sequence.
Connecting and replacing VAZ short circuit
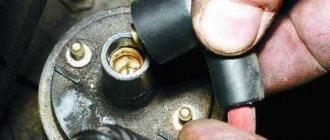
The procedure for removing and installing the ignition coil on old VAZ models:
- First, disconnect the central high-voltage wire leading to the distributor (ignition distributor).
- Disconnect all power wires from the coil contacts. Since they are fastened with nuts, you will need an 8 wrench for this.
- If you don’t know which wires to connect to which connector later, it’s better to immediately remember or mark them somehow, so that later during installation you can connect them correctly.
- Unscrew the coil housing. It is attached to a clamp (clamp), which is pressed to the car body with two nuts.
- After the work has been done, you can remove the ignition coil and replace it if necessary.
For new type VAZ cars:
- We remove the “minus terminal” from the battery.
- Remove the top protective cover of the engine. If the engine volume is 1.5 liters, then this part is missing and this step is skipped.
- We remove the high-voltage wires from the coil.
- Now, using a 13mm wrench, unscrew the two fasteners.
- Using a 17mm wrench, loosen one bolt securing the coil.
- We take out the module.
- Use a hexagon to unscrew the coil from the holder.
- Assembly is carried out in reverse order.
Particular attention should be paid to the connection, since high-voltage wires must be located in the strict order provided for by the design. If this is not done, the car will stall or the engine may not start at all.
Replacing the ignition coil on a VAZ is quite simple. Even a novice motorist can do this in his garage, and if everything seems too complicated, contact a car service center. Particular attention should be paid to the choice of product, since this will determine how well the engine and ignition system will work.
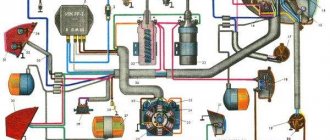
Connection diagram for high voltage wires
The wires must be connected in a certain sequence; rearranging the wires is not allowed. If the wires are mixed up, the spark will be supplied to the wrong cylinder in which the compression stroke of the fuel mixture occurs, which will make it impossible to start the internal combustion engine.
The numbering of the VAZ 2114 cylinders starts from the timing belt from left to right.
Cylinder counting sequence
The connector number is responsible for the operation of a specific cylinder
Connecting the ignition coil
If during dismantling you did not remember and did not mark which wire went to which terminal, the ignition coil connection diagram is as follows. The terminal with the + sign or the letter B (battery) is supplied with power from the battery, and the switch is connected to the letter K. The colors of the wires in cars may vary, so it is easiest to track which goes where.
» alt=»»>
The correct connection is important, and if the polarity is incorrect, the bobbin itself, the distributor, or the switch can be damaged.