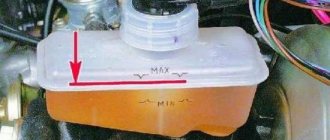
Among the models of domestic manufacturers, the Priora is the most popular. It is equipped with the most technically modern parameters and has a high level of safety. Modern design delights with the solidity and size of the body, and manufacturers took into account different operating purposes when creating the model, so the car body is different: sedan, station wagon or sport. This car model has won the trust and love of consumers in a very short time.
Many motorists who prefer the Lada Priora have information that domestic manufacturers install a disc brake system on the front wheels, and use a drum brake system on the rear wheels. But drum brakes have long failed to meet the standards and requirements for modern cars.
For those who care about their safety and comfort, it’s time to think about whether they need to install disc brakes on the Priora.
On a note! In addition to convenience, safety increases several times when operating a car equipped with a rear disc brake system; this is an important factor, taking into account the quality of Russian roads. A guide to selecting and installing rear disc brakes on a Priora will help you decide.
pros
Let's look at why disc brakes are better than drum brakes:
- Braking becomes more reliable, braking distance is reduced;
- Braking forces are distributed more evenly, given that the VAZ 2110 is a front-wheel drive car;
- There is an effect of faster response after pressing the pedal;
- Unsprung masses are reduced;
- Heat dissipation occurs better, which is especially important when driving on a mountain road or during active acceleration/braking. For this reason, the brake system is cooled better;
- Disk ones are much easier to dismantle and replace;
- There is no need to adjust the handbrake after each repair of the rear brakes, although this will have to be done the first time;
- They do not freeze in winter after washing, like drum ones;
- Rear disc brakes installed on the VAZ 2110 are much more convenient to control and promptly notice pad wear.
This article will help you replace the rear brake pads if they are worn out:
Minuses
Replacing brakes with disc brakes was not without the famous “fly in the ointment,” although it rather concerns precisely those problems that their installation can cause.
Firstly, our law enforcement agencies consider their installation on a VAZ 2110 as a design change.
What might this entail?
Following:
- Fine when passing a technical inspection;
- You can be simply wrong in a controversial accident if traffic police officers emphasize that you have “wrong” brakes;
- And the insurance company may also consider this a reason for non-payment of insurance.
Secondly, the handbrake will additionally need to be modified - or replaced with a hydraulic handbrake, although the latter weakens over time.
An article containing step-by-step instructions for replacing the handbrake cable can be found here:
Thirdly, it is necessary to refine or carefully adjust the sorcerer so that on the VAZ 2110 the rear wheels do not brake more than the front ones, as this will certainly cause a skid, especially on ice or wet asphalt. To do this, sometimes you even have to grind down the pads by a quarter, or even more.
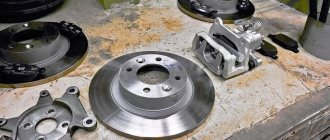
What front brake discs can be installed on the Lada Priora?
It should be noted that the front brake discs constantly heat up and are subject to greater loads than the rear ones. That is why their replacement is necessary more often than the rear ones. But it is important to familiarize yourself with all the dimensions in advance. Before you make a purchase, you need to decide on your budget. Original disks are usually slightly more expensive than analogues.
ATTENTION! A completely simple way to reduce fuel consumption has been found! Don't believe me? An auto mechanic with 15 years of experience also didn’t believe it until he tried it. And now he saves 35,000 rubles a year on gasoline! Read more"
At the same time, it is important to remember that the latter are sometimes in no way inferior in quality to the originals. Some famous brands have the status of official suppliers. Therefore, the quality of the products they supply is satisfactory. The price fluctuates depending on various factors. It is necessary to take into account all the nuances. If the car has ABS, discs are required, which require connecting the corresponding sensors.
The price also varies depending on the brand. Such as TRW and Ferodo will cost slightly more than noname products. The cost of ventilated and conventional ones varies. The latter are suitable for drivers practicing an aggressive driving style. They cool down much faster. Moreover, the pedal will be more responsive. But the cost of such disks is much higher.
Original
Many drivers choose original parts. Moreover, there is a certain logic in this. Since such components are 100% likely to fit. It is only important to study all offers in advance. Counterfeits of original components and parts are often found on sale. There is a hologram on AvtoVAZ boxes; the box itself is made of high-quality cardboard.
| Name | vendor code | Cost, rubles |
| LADA | 21120-3501070-02 | From 1 thousand rubles |
Substitutes
Purchasing analogues does not cause problems. It is only necessary not to confuse the article. The minimum cost of such components will be 800 rubles. Having installed such items, it is important for the owner to constantly monitor their condition. This will avoid many difficulties. It is better to replace the disks in advance.
| Name | vendor code | Cost, rubles |
| BREMBO Brake disc VAZ 2110-2112 R14 front ventilated | 09.8903.14 | From 1.2 thousand rubles |
| BOSCH Brake disc VAZ 2110-2112 R14 front ventilated | 0 986 479 346 | From 1.4 thousand rubles |
| MILES Brake disc VAZ 2110-2112 R14 front ventilated | K000075 | From 1 thousand rubles |
Design Features
It is better to purchase rear disc brakes as a complete set. The VAZ 2110 fits 13 or 14 inch brake discs (ventilated or non-ventilated). Try to purchase certified discs so that they do not have to be modified.
Rear disc brake kit with necessary components
You also need a caliper, which comes in three types, so you need to select it to match the disc. The caliper comes with a hose and brake pads. The kit includes a universal clamp suitable for all calipers - a faceplate.
HOW TO CHOOSE GOOD DISC BRAKES FOR THE REAR AXLE
If, after weighing all the pros and cons, the owner decides to install the automatic transmission on the Priora with his own hands, then it is worth getting acquainted with such systems in order to choose the best option for himself. You will have a large number of options to choose from, from imported products from leading manufacturers to proposals for installing front brake systems from the same Priora. If frequent trips at high speeds are practiced. It is worth considering installing ventilated or drilled brake discs.
Let me dwell on this option in more detail. When driving in extreme conditions, when frequent and sudden braking is possible, ventilated brake discs are cooled by oncoming air flow. For this purpose, they have special channels, through which the air flow carries away excess heat, while cooling the rubbing vapors. This eliminates the occurrence of smoke in the braking zone, and, as is known, the presence of a gas layer between the disc and the pad reduces the braking effect.
Perforated brake discs are also much better than standard ones. The presence of longitudinal grooves from the center of the disc to its periphery also helps to ventilate the friction zone of the pad and disc. Excess heat and wear products of rubbing pairs are removed through the existing grooves. They wear out more evenly.
This was a small digression, but on topic, let’s continue to consider the available systems for sale on the Priora. The systems of the Italian company Brembo, which were issued a certificate of conformity by the German Federal Bureau, have become very popular in the regions of Russia and other countries. Quality products have an appropriate price. The price of a disc alone can range from 9,000 to 11,000 rubles.
Very high quality product on the market
The Tornado brake kits have also proven themselves well; their prices range from 15 to 18 thousand rubles, the LUCAS kit can be found at a price of 12-13 thousand rubles, and the Darbis system will cost approximately 14-16 thousand rubles.
Once the choice of kit has been made, you can begin work on dismantling the old mechanism and installing a new kit. Below we will look at how the installation of the automatic transmission on the Priora is carried out.
Dismantling
Before installing disc brakes, you need to dismantle the old rear brake mechanisms of the VAZ 2110.
This is done like this:
- Remove the wheel;
- Remove the brake drum;
- Remove the pads;
- Remove the hub from the wheel, having first unscrewed the brake pipe.
You should prepare for the fact that dismantling will not be easy. Not only do the brakes have the unpleasant tendency to stick during operation, but the bolts are also “welded” by corrosion. Therefore, it is advisable to treat the nuts and bolts themselves with a special agent (for example WD 40) so as not to tear off their edges.
It is important to plug the removed pipe with something so that brake fluid does not leak out and air is not sucked into the system. After that, knock down the hub. This works best if you attach a board or lath to the back of the support disk and hit it with a hammer, moving the blows: one from below, the other from above. This will prevent you from causing serious damage to the disk.
Installation
It's time to install disc brakes instead of the removed rear drum brakes.
Having knocked off the hub, we will put it back, but in a different way:
- It should be installed through the plate into which the caliper is already mounted. Carefully ensure that all holes line up. Particular attention to alignment;
- Next, use a hammer to straighten the corner of the beam so that the caliper does not rest against it;
- Now you can put the brake disc on the hub, placing spacers between these parts, and secure the disc with a bracket;
- We install brake pads from VAZ 2110;
- First, carefully and securely attach the brake hose to the caliper, and then to the tube;
- To reduce the braking force of the rear brakes compared to the front, you need to partially grind off the friction material of the pads.
Rear beam
Grindable tab on the hub
Grindable tab on the hub
Grindable tab on the hub
Grindable tab on the hub
Grindable tab on the hub
Axle with dumbass
Adjustment plate on axle with hub
Hub installation
Grind down the corner of the beam that prevents the caliper from getting into place
Installing the brake disc using 2 washers and attaching the caliper to the special. plate
Rear disc brakes installed
Installation of the HTD on Priora
- Stage 1
The rear drum brakes need to be removed. If you have any difficulties, you can refer to the Lada Priora service manual. Carefully remove the hub from the lever while still assembled. The brakes on a Priora with ABS are removed by first removing a special sensor with a clip from the supporting panel. Disconnect the connector and prepare the necessary spare parts for installation along with the ABS sensor fasteners.
Clean the pressure controller, its spare parts, the disc release ring journal and the hub axle. The presence of dirt on the coating can affect incorrect balancing. Unscrew the screw that holds the cable brackets and remove it.
Installing new brakes
- Stage 2
Proceed with the installation of a special adapter plate, a cover with protection against dirt and the hub axle. It is necessary to connect the adapter plate to the housing right in the middle of the beam and the hub axle. There is no need to remove the hub from the axle. The bolts are attached to the flanges using screws with groovers. The bolts must be tightened using a torque wrench, which is designed to regulate the tightening torque. It should be 5.6 kgf/cm. If the tightening is less than necessary, this will eventually lead to deformation or even complete destruction of the disks, making it difficult to unscrew the bolts.
- Stage 3 (brakes on Priora with ABS)
Attach the 9 mm plastic sensor spacer. Install the ABS bracket and the sensor required for its operation using the standard fasteners and screws. Install the ABS sensor into the trigger connector and connect it. Check whether the sensor is touching the rotor coating; to do this, simply spin the disk. The gap should be about 1 mm.
- Stage 4
The guide caliper bracket is installed on the adapter plate using screws with groovers and washers. The tightening moment should be 5.6 kgf/cm.
- Stage 5
Attach the brake disc to the hub using two guide rods and begin installing the caliper. It must be installed with the fitting facing up. Apply glue to the rod bolts, insert the first one into the armhole and tighten thoroughly. Adjust the cylinder and attach the brake pads. Tighten the second bolt taking into account a tightening torque of 2.5 kgf/cm.
- Stage 6
Apply lubricant to the handbrake cable spring and insert it into the armhole of the bracket. Attach the bracket and cable to the beam using a screw clamp, first disconnecting it and threading it into the bracket itself.
- Stage 7
It is necessary to disconnect the cable from the handbrake and remove the mudguard. Remove the cable from the caliper and dismantle it by unscrewing the fastening hardware. The brake cylinder must be carefully brought in by turning it with a wrench and thus checking whether the pads pass freely between the caliper and the brake disc. It is worth taking a closer look to see if the protrusion on the block fits into the opening on the caliper piston. Pass the cable through the armhole of the holder and secure the protective rubber cover.
The cable loop is put on the handbrake trigger. The brake hose is attached parallel to the surface of the beam arm flange, and the hose tip is screwed into the caliper using a hydraulic rod.
Installed unit
- Stage 8
Finally, you need to connect the brake line. Bend the brake pipe so that the tip can be positioned at the hole in the handbrake cable bracket. Insert the tip of the hose into the opening of the bracket, fasten the brake pipe to it and securely fix the structure.
Check again to make sure everything is securely fastened and screwed down. All elements must be connected correctly.
Examination
Having carried out all the above operations - first on one wheel, and then on the second, you also need to check the system for leaks. The first phase is to simply press the pedal.
The fact that everything is done normally is indicated by the fact that the pedal is pressed with force, quite tightly.
But this is not enough. Have someone else press the brake pedal while you try to rotate the parts that make up your new rear disc brakes.
If nothing moves, it means that your VAZ 2110 now has new rear disc brake systems - better and more reliable than the previous ones.
To minimize the braking distance, it is recommended to install a vacuum booster. Details: https://vazweb.ru/desyatka/tormoza/vakuumnyi-usilitel-tormozov.html
Disadvantages of drum mechanisms
Drum brakes
Despite the fact that drum brakes are correctly designed, mounted and adjusted at the factory, which is why intervention is not required, they have certain disadvantages:
- This is an outdated solution that is practically never found on new cars from leading European manufacturers;
- When compared with disk mechanisms, drums are significantly inferior in efficiency;
- There is no cooling or ventilation on the drums, which leads to overheating under heavy loads on the car;
- The drums have a closed space, so it is not possible to remove dirt and wear products in the form of black dust, leaks of fuel oil and trapped moisture naturally. This is done by cleaning.