This work is not particularly difficult and is quite feasible for the average car enthusiast.
Those who thought that today we will install “little blue light bulbs” that glow coolly, I will say that this is not so, no pseudo-xenon. We will install original full xenon lamps. I won’t delve into the history of the origin of xenon lamps; there are search engines for that; whoever needs it will find it. Today we will talk about how to install this miracle of technology on our VAZ 2110.
Installing xenon on a VAZ 2110 - step-by-step instructions
1. First of all, you need to remove the headlight. To do this you need:
- Disconnect the car from power; to do this, remove the negative terminal from the battery.
- After this, disconnect the power connector of the headlight unit.
- Using a wrench, unscrew the two upper headlight mounting bolts.
- Remove the decorative radiator grille and unscrew the lower mounting bolt.
- Using a screwdriver, pry up the decorative trim, move it closer to the middle, then pull it out completely so that it does not interfere.
- Using the socket at “10”, unscrew the nut securing the headlight to the bracket, then remove the headlight itself.
- Using a screwdriver, pry the hydraulic corrector cylinder lock, turn it, and then remove it from the headlight housing.
- Remove the “turn”; to do this you need to unscrew two bolts.
- Now that nothing is stopping you, you can get the lamp and install xenon on the VAZ 2110.
Installation requires some parts, for example, you will need 4 female connectors (2 with simple fastening, 2 with fasteners for thick wire).
Necessary tools and elements
Ready-made fog lights for installation in a VAZ 2110 car
Before purchasing everything you need, decide on the color. Today, white optics are most popular among VAZ 2110 owners, but you can also find classic yellow. Now to the purchase: some people prefer to take a ready-made kit, which includes wiring, while others choose the parts separately. The second option is not only cheaper, but also provides more installation options.
To work we will need:
- Headlight kit;
- Key as well as indication;
- Relay;
- Plastic pads;
- Headlight frames;
- Terminals called “male/female.” Recommended to be purchased separately, no wiring included;
- The terminal that will go to ground;
- Wiring.
Electronics and wiring for connecting fog lights to a VAZ 2110.
The wires of the VAZ 2110 need to be given special attention. It is recommended to go to a specialized electronics store to get them. We need an option with two copper cores, as well as double insulation. As for the cross section, here you need to build on the power of the lamp. If the power indicator is high, then it is better to take 0.75 millimeters. At normal power, 0.5 mm wires are used.
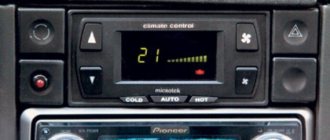
How to install xenon on a VAZ 2110 - installation and connection
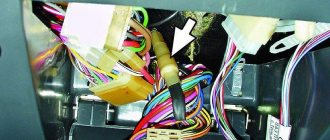
1. With the headlight removed and the bulb removed, cut off the yellow and brown wires with a knife. The yellow wire is “plus”, the brown wire is “minus”. You need to use a knife or pliers to strip these wires.
2. Using pliers you need to crimp two brown wires and the “mother” under the thick wire, then insulate everything properly.
3. Repeat the same steps for the yellow wires. Only now you will need a “mother” for a thin wire.
4. I installed my xenon in the Kirzhach headlights, they came on without any problems. If you have Boshovsky installed, you will have to suffer. Using available materials and tools, you will need to widen the hole to accommodate a xenon lamp. Be careful, a hole that is too large can ruin everything.
5. Use a drill to drill a hole with a diameter of ~23 mm, then pull the wiring through it.
6. Install the xenon lamp in the base, in the hole prepared for this. Then secure the lamp itself.
7. Connect the “mothers”. Be vigilant and extremely careful, if you confuse “plus” with “minus”, you can damage xenon lamps, as well as ignition units.
8. It’s not enough to install xenon lamps; you also need to connect them to the ignition unit. Detailed instructions are located in the photo below.
9. Now you can connect the “negative” terminal and check how your “homemade” xenon works.
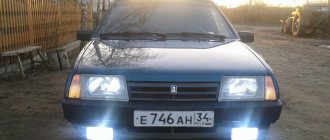
I don’t know about you, but for me personally everything went like clockwork. Turning on the low beam, I saw the long-awaited bright blue light. The joy knew no bounds, I hope everything worked out for you too.
When the xenon installation is completed, repeat all the above steps for the second headlight. Assembly is carried out in reverse order. Secure the ignition units in a dry and clean place.
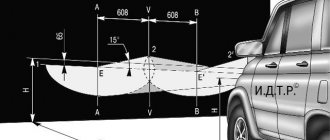
Attention!!! After you install xenon lamps, BE SURE to adjust the headlights, as described here. Respect other road users who may be blinded by bright, blinding lights that are shining directly into their eyes rather than onto the road. Remember, blindness can cause a serious accident.
Content
Quite often you can notice that VAZ 2114 owners prefer to install xenon on their car. Xenon on the VAZ 2114 is the best solution for those who often drive in the dark. Which xenon headlights should I install on a VAZ 2114 and how should they be mounted?
Xenon for VAZ 2114
What is the difference
Bixenon VAZ 2109
Having become widespread, headlights with xenon bulbs, or gas-charged ones as they are also called, today show off even in the optics of fairly budget car models. And what about budget ones, even a used car, the most used one, can be easily equipped with these light bulbs. First of all, such lamps ensure safety on the roads, because for normal traffic, not only at night, you need good and clear light. Imbued with the idea of creating something unusual, xenon manufacturers came up with a way to increase the brightness of luminosity indicators in gas-charging lamps by as much as 3 times. As a result, xenon finds application immediately, eliminating all “competitors” and remaining a sales leader until bi-xenon comes out with its own characteristics.
Bi-xenon lenses VAZ 2109
Although the principle of glow in these two types of lamps is identical, they have differences that will be useful for the reader to know about. Let's first look at the features of xenon and then bi-xenon to understand the difference between them.
Xenon Features
So:
- Fog lamp VAZ 2110: how to choose the VAZ PTF correctly
- The set of xenon headlights includes high-power gas-charging lamps. They are also called HIDs.
Bi-xenon lenses for VAZ 2109
Note. Despite this, many drivers today prefer a symbiosis of halogen and xenon. As a result, the owner of a car with such headlights feels calm on any road at any time of the day. Good visibility even of the roadsides is provided to him.
- A striking example of such a symbiosis is the installation of xenon for low beam and halogen for high beam. As a result, high beams, which are more often used on deserted intercity highways at night, will solve problems with visibility 100 percent. There is a good amount of cost savings - you don’t have to fork out money for xenon for long-range headlights, but only for low-beam headlights.
Bi-xenon lenses for VAZ 2109 BOSH
Bi-xenon and its features
So:
- The complete opposite of halogen bulbs is bi-xenon. This type combines many advantages, including performing one function instead of two.
Note. Some cars have only one lamp for lighting (high/low). In this case, using bi-xenon will be the right decision.
- Bi-xenon lamps use one gas-charging lamp, which works for both low and high beam.
- The low/high beam control in bi-xenon occurs due to the displacement of the lamp screen. In other words, the luminous bulb in the lamp itself moves.
- Bi-xenon, or rather its kit, costs more than xenon.
As a result, we draw the following conclusions:
- Both of these lamps (xenon and bi-xenon) have the same principle.
Difference between xenon and halogen lighting
- Xenon lamps can be installed on both beams (high/low).
- Bi-xenon, on the contrary, is capable of combining both lights (high/low) in one housing.
- The bi-xenon is controlled mechanically, due to a moving element inside the bulb.
- Bixenon is more expensive than xenon, but is considered more versatile.
Installing xenon on a VAZ 2114. Installing the ignition unit
Before starting the process of installing bi-xenon on a VAZ, you need to study the grounding polarity of the car. If we are talking about positive polarity, it is necessary to eliminate contact between the housing and the block as soon as possible. It would not be superfluous to analyze the polarity of the so-called “control veins”. This is required to prevent short circuits. If you forget about this, the consequences can be depressing.
Self-installation of xenon
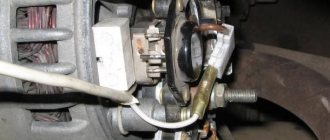
Also, before starting installation work, you should think about where exactly the xenon control unit will be located. The location for installing this unit directly depends on the position of the wires for powering the ballast and lamps.
How to install ballast
- At the very beginning, you need to arrange special holes. The diameter of each of them should be approximately 3 mm. It should be remembered that the block should be fastened in such a way that its fixation is sufficiently rigid.
- Only after the wiring harness has been laid in the prepared place can you try to fix it with the ties that were taken from the installation kit.
You should also remember that getting to the lamps themselves (during installation) is extremely difficult.
Another nuance that should be taken into account during xenon installation concerns problems associated with dirt. The place where the xenon control system will be installed must be protected from any dirt. It is unacceptable for the system to be located in a place where there are sudden temperature changes.
- To do this you need to get rid of the lid. Only after this can you try to disconnect the lamp wires. Then it needs to be removed.
- Next, you need to make a small hole in the headlight protective cover. It will be needed so that the conductors can be pulled through it. Only after this can you begin installing the rubber band into the hole in the lid. The lid is needed to provide as complete protection from moisture as possible.
- It is also worth remembering that before this you need to treat the lamp bulb. To do this, you should use alcohol. Only after this can you begin installing the xenon lamp in the most suitable location. Don’t forget how important it is to secure it correctly. If this is not done, it may fly off while the car is moving.
Connection diagram
Problems with law
Today there is no fine for installing bi-xenon if you meet a number of requirements in accordance with the law. The times of “free” xenon are over. What needs to be done for the installation of bi-xenon to be considered legal? The rules are given below:
- If xenon or bi-xenon is installed at the factory, then there will be no problems. The manufacturer provides for certification in advance in such cases, bringing all norms and rules into compliance.
- Installing bi-xenon on a VAZ 2109 is, in any case, an independent intervention in the design of the car, so it is necessary, first of all, to equip the device with automatic adjustment of the tilt angle adjustment.
Note. The automatic corrector is capable of maintaining a constant tilt of the headlight beam relative to the road. You can install an autocorrector on a VAZ 2109, either imported or domestically developed.
- It is also necessary to equip the bi-xenon with a washer, which is a necessary attribute today. When the glass is dirty, according to legal experts, the headlights give a less clear picture and are capable of blinding oncoming vehicle drivers.
After the front optics are in order, you need to resolve issues with documents:
- Contact the traffic police at the place where the car is registered with a statement indicating that changes have been made to the design of the car.
- Then you need to send an appeal to NAMI-PTIA-FUND, from where you will receive the appropriate conclusion.
- Next, we take the car to check its technical condition, in accordance with what is written in the application.
- We receive new documents.
Add a commentAdd a comment We advise you to read Xenon in the fog lights of the VAZ 2109 with your own handsWe make lens headlights for the VAZ 2109 ourselvesHydraulic corrector for the VAZ 2110 and its installationLamp for illuminating the license plate on the VAZ 2110 and its installation
This work is not particularly difficult and is quite feasible for the average car enthusiast.
Those who thought that today we will install “little blue light bulbs” that glow coolly, I will say that this is not so, no pseudo-xenon. We will install original full xenon lamps. I won’t delve into the history of the origin of xenon lamps; there are search engines for that; whoever needs it will find it. Today we will talk about how to install this miracle of technology on our VAZ 2110.
Do I need to take precautions when installing xenon?
It should be remembered that installing xenon is by no means the safest activity. As many precautions as possible should be taken during this process. If any damage to the kit is noticed during installation, you must stop all work as soon as possible and consult your dealer.
Xenon installation
Another reason to stop installation work is numerous damage to ballasts and lamps.
Experienced craftsmen advise not to try to do the work with hands that have recently been stained with oil or any other liquid. In this case, you may get an electric shock.
During use, try to keep the headlights as clean as possible. Dirty headlights scatter the light and can blind oncoming drivers.
Xenon lamp
In addition, it is recommended to additionally install a high-pressure cleaner. It will make using headlights even easier.
Alternative to xenon
It is also important to note the fact that tuning using xenon and LED lamps should include a study of the individual characteristics of the vehicle’s headlights. For example, some optics glasses can be made corrugated, which in turn will require preliminary preparation of the structure for the subsequent installation of LED elements. The preparatory process includes preliminary polishing of the surface, or if it is not possible to perform this operation, you can choose an alternative solution, namely the search for a smooth structure, which is relevant in the case when the decision to install bi-xenon lamps is chosen.
Conclusion
Bi-xenon on the VAZ 2114 will be an excellent solution for those who would like to slightly improve their own car. Such headlights will come in handy if the driver travels frequently and therefore has to be on the road even at night.
Those who are still wondering how to install xenon on a VAZ 2114 should be advised to take safety measures as carefully as possible. Many car enthusiasts ignore them, but if xenon is installed, this can lead to the most serious consequences for human health.
Published April 07, 2018
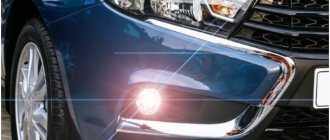
Many motorists want to have fog lights in their arsenal, and even more want them to be xenon. So, you can replace the lamps with halogen ones or those marked H1, but we are talking about xenon and its advantages. So, you can install xenon PTFs yourself, without resorting to the services of a car service. We will tell you how to do this in this article.
Advantages and possible disadvantages
Actually, bi-xenon lenses illuminate the road perfectly - this applies to both conventional headlights and PTF. They produce bright white and blue light.
Another thing is that the PTF light should be low-directional, “piercing” the fog, but not blinding oncoming drivers. For example, in Boshevsky PTF there is no lens, there is only a reflector, which is why a low beam of light is not created.
This is why you need to install a focusing lens, then the bi-xenon lamps will behave in the best way - the driver can clearly see the road, and oncoming drivers do not feel the desire to take a brick and break your bi-xenon PTFs.
The process of installing xenon in PTF
Xenon fog lights in working order
If we don’t take the tuning option, where xenon-type fog lights are an integral attribute, then consider installing PTF on a standard standard bumper, as most motorists do.
Options
Fog lamp housings
There are several options for installing fog lights, among which the motorist must choose the one that best suits him.
- Buying a bumper with installed fog lights.
- Purchase of individual PTF elements and their installation.
Algorithm and necessary tool
So, to complete the process you will need the following tools: a xenon kit (the selection of this product is described below), a drill, drill bits, a jigsaw. Is everything collected? Then we proceed directly to the consideration of the sequential process of installing xenon fog lights on the VAZ-2114:
- First you need to remove the front bumper.
For the convenience of the work, remove the front bumper - Now, we clean it from dirt, dust and other objects. The best thing to do is wash it and clean it.
- We carry out markings for future fog lights.
- Using a drill and jigsaw, we cut out holes for installing fog lights.
We cut and grind holes for future fog lights - Using a file, emery and other grinding devices, we process the edges.
- We fasten the fog lights into the holes using the bolts.
We install headlights on seats - The headlights themselves are installed, now you need to secure the xenon ignition units.
- We do this in the engine compartment, away from water.
- Wires with light bulbs extend from the blocks, which need to be installed as fog lights.
We fix the xenon ignition blocks on the metal mudguards on the right and left - Now, we connect the PTF and xenon to the electrical circuit.
Connection diagram of PTF to the general on-board network - At the last stage, performance testing is carried out.
As most motorists and experts recommend, xenon installation should be trusted to a professional. Thus, if a motorist is not sure that he is able to do everything himself and correctly, the best option is to contact a car service center or an auto electrician.
Selection of xenon lamps for VAZ-2114
With the installation process covered, it's worth considering what's included in the xenon fog light kit and where it can be purchased. To begin with, let’s look at what the entire xenon kit in the PTF consists of:
- Headlights;
- Light bulbs;
- Switching relay;
- Set of wires;
- Connection diagram;
- Button to turn on/off PTF.
Xenon kit for fog lights
Where to buy
Now that it’s clear what elements the kit consists of, it’s worth talking about purchasing options:
- Usually, as practice shows, most motorists trust the automotive spare parts market . It is worth noting that this is not the best option, since in fact the prices are too high, and an inexperienced or novice car enthusiast, under the guise of a well-known quality brand, can be sold a cheap Chinese fake. You should be vigilant and careful. It is advisable to explore the Internet before going and find the most suitable option for purchase, as well as information on how to distinguish the original from the fake.
- The second option is an auto store , preferably one that specializes in the sale of automotive optics. As practice shows, sellers can advise options that best suit the price-quality requirements. But this is also not the most optimal purchase option.
- The third and most common option for purchasing xenon fog lights is the Internet . A large assortment and reasonable prices make the offer more than tempting. But you shouldn’t relax here either, because there are a lot of scammers. So, before purchasing a product you like, you should read about the online store on the forums and look through customer reviews.
Chinese xenon, or?
Cheap Chinese xenon shines anywhere, but not on the road
You should not take the Chinese version of xenon, it is better to add a little and buy, albeit cheap, but high-quality branded goods.
As a rule, it has a guarantee, and the quality is certified by certificates. But, as practice shows, China is different from China and you can come across some pretty good and high-quality parts even made in China.
Module installation
If you want the installation of xenon on a VAZ 2110 to be carried out within the law, buy a new approved module.
Of course, the cars are structurally different, so the installation will have to be slightly adjusted.
To get started, purchase the necessary materials. Just two pieces:
If you take used lenses rather than new ones, purchasing the entire set will cost you about 3.5 thousand rubles. Since you will install them yourself, there should be no additional financial costs.
The revision process looks like this.
conclusions
Installing xenon fog lights on the VAZ-2114 is quite easy and simple. A more difficult task remains the choice of product, since the market for automobile spare parts is saturated with them, and therefore it is possible to find the most suitable option for any motorist.
Very often, dozens of owners are not satisfied with the standard headlights. Firstly, it does not illuminate the road well enough, and secondly, visually it gives off a yellowish tint, which does not look very nice.
Therefore, in this article I will tell you how to install xenon in a VAZ 2110. Moreover, we will not consider here ordinary light bulbs that simply shine white (a kind of pseudo-xenon), but we will install real xenon with ignition units.
Note
When the owner of a VAZ-2110 car decides to carry out tuning and install xenon in the foglights, it is important to first understand the desired effect obtained from this operation. It should be warned that if you need to change both the high and low beams, it is important to take into account that these bi-xenon lamps are quite long and may not fit into the headlights of all vehicles, which in turn will require the selection of alternative solutions. As part of their design, the main element of lensed headlights has a special cap, through which the direct light of the lamp is covered. It is this cap that can interfere with the process of installing xenon in the fog lights of a VAZ-2110 car, making tuning the optics sometimes simply impossible.
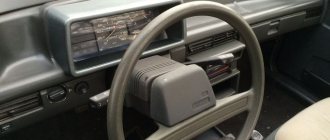
Preparation. I'll remove the headlights.
- At the very beginning of this modification, you need to remove the headlight, for this:
- Remove the negative from the battery.
- Disconnect power from the headlight. (disconnecting the chip from the wires)
- We unscrew a couple of bolts on top of the headlight, which secure it to the body.
- Now you need to remove the plastic radiator grille, as it covers another bolt.
- Using a screwdriver, pry the decorative trim towards the center and pull it out.
- Here it is, the nut that secures the headlight to the bracket. Using a key set to “10”, unscrew it.
- Now turn off the hydraulic corrector. Using a screwdriver, pry up the retainer, turn the corrector and remove it from the headlight.
- At this stage you need to remove the turn signal; this is done simply by unscrewing a couple of bolts.
Preparations for installing xenon are completed, now we begin the process itself.
It is advisable to purchase 4 “mothers” (at the ends of the wires) for ease of connection, so as not to make twists.
Benefits and Potential Problems
Bi-xenon does an excellent job of illuminating the roadway and adjacent areas. This applies to both headlights and fog lights. A characteristic feature of xenon is that it emits bright white light with a blue tint.
Xenon in headlights and PTF
Fog lights from Bosch, which are installed on the VAZ 2110, do not have lenses. Instead, reflectors are provided here. This makes the beam of light not low enough.
A few words about what xenon is and “what it is eaten with.”
The xenon lamp was created by the German company Osram in the 1940s and presented to the public in 1951. Xenon became very popular and found widespread use in the auto and film industries, and managed to retire carbon arc lamps. A characteristic feature of xenon lamps is their bright, almost white light with a bluish tint. Almost all modern film projectors, both film and digital, are equipped with xenon lamps, the power of which varies from 900 W to 12 kW.
Dismantling
Before installing xenon on a VAZ 2110, you need to dismantle the old headlight unit. It happens like this:
- We de-energize the car by removing the negative from the battery;
- Disconnect all connectors from the headlights;
- Unscrew the mounting bolts from the upper mount;
- Remove the grille from the radiator;
- Unscrew one bolt securing the headlight unit from below;
- Use a screwdriver to pry up the cover and remove it;
- Using a 10mm wrench, unscrew the nut securing it to the bracket;
- We take out the headlight unit;
- We pry it with a screwdriver, turn the hydraulic corrector cylinder lock, and remove it;
- Remove the turn signal by unscrewing a couple of bolts.
Advantages and disadvantages of xenon
The main advantage of xenon lamps is their high power. A similar halogen lamp produces light with significantly lower intensity than a xenon lamp. High intensity of luminous flux can provide significant advantages to the owner of xenon headlights in speed capabilities, maneuvering and safety in conditions of poor visibility. In addition, the color spectrum of xenon lamps is as close as possible to daylight, which reduces eye fatigue for the motorist.
Another important advantage of xenon lamps is the absence of filament in their design. Xenon lamps can last up to three thousand hours, while halogen lamps provide a maximum of one thousand hours of operation. Also, do not discount the more economical energy consumption of xenon lamps, which is 35 W versus 55 W for halogen lamps.
This significantly saves battery power and reduces the load on the generator. In addition to everything else, xenon optics are more protected from melting, since their heating during operation is no more than 60 percent of the temperature of halogen optics.