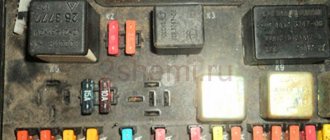
Fuse and relay box
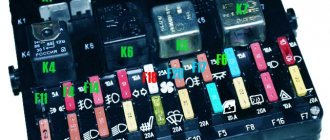
The fuse and relay box is located on the left, lower part of the instrument panel. It is accessible by pressing the button and folding the lid down. To remove fuses, there are special non-conductive pliers in the upper left part of the mounting block.
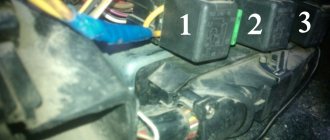
1 - K5 - high beam relay. If the high beams in two headlights do not work, check this relay. If one of the high beam headlights does not work, check fuses F3 and F13, as well as the lamps and the high beam switch.
2 - K4 - low beam relay . If the low beam in both headlights does not work, check this relay. If only one low beam headlight does not work, check fuses F2 and F12, as well as the lamps themselves and the light switch.
3 - K1 - lamp health control relay.
4 - non-conductive tweezers for removing fuses.
5 - power window relay . If your power windows stop working, check this relay. It could also be in fuse F5, or in the window lift drive system itself. To get to the mechanism, you need to remove the door trim. Check the electric motor, the appearance of the gears and the absence of binding of the mechanism.
6 - K3 - turn signal and hazard warning relay . If your turn signals or hazard lights do not work, check this relay and fuse F16, as well as the turn signal lamps themselves and their switch.
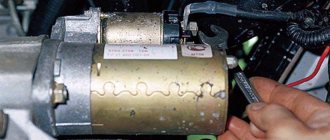
7 - starter relay . If the car does not start and the starter does not turn, check this relay. It could also be a dead battery, as well as the starter mechanism itself.
8 - backup fuses.
9 - fog lamp relay . If the fog lights do not work, check this relay and fuses F4 and F14. Also check their connection diagram, the serviceability of the wiring and connectors, as well as the lamps in the headlights and the power button.
10 - K2 - windshield wiper and washer relay . If your windshield wipers or windshield washer are not working, check this relay. Also check the wiper motor, washer pump and washer fluid level in the washer reservoir.
11 - K7 - rear window heating relay . If the heating does not work and the rear window fogs up, check this relay and fuses F8 and F9. Also check the connection contacts to the terminal points of the heating elements (at the edges of the glass at the rear pillars). If everything is in order, but the heating does not work, the issue may be in the wiring (the wires are frayed or something else).
12 - K6 - add. relay, ignition relay . If your ignition does not turn on or is having problems with it, check this relay. This relay protects the ignition switch contacts from burning. Also check the ignition switch itself and the contact group.
13 - row of fuses F1-F1014 - row of fuses F11-F20
PTF service
At the same time, many owners of the first ten cars do not know where the fog lamp fuse is located. And if it malfunctions, they don’t know how to replace it.
To get to the PTF fuse, you need to remove the mounting block from the instrument panel niche with your own hands
On models after 2000. fuses are grouped in a single block.
Their technical parameters are as follows:
- The rear PTF fuse is marked F20 and is designed for a current of 7.5A;
- Fuse F4 at 10A is responsible for protecting the front right fog lamp;
- Fuse F 14 at 10A is responsible for protecting the front left fog lamp.
Side of VAZ fuses of the tenth family
The algorithm for the operation of fog lights has also been changed.
In particular :
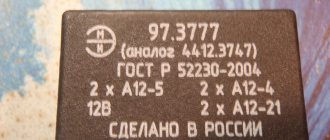
- The headlights are turned on by pressing a button that supplies power to a relay type 113.3747 installed in the mounting block;
- Turning on the PTF on VAZ 2110 cars is only possible if the headlight switch is set to the exterior lighting position.
In other words, PTFs are activated only with side lights or low beam headlights. At the same time, the activation is indicated to the driver using a light indicator on the button and on the instrument panel.
There are no particular problems with replacing lamps in the headlights, since they were installed in an open position for service. But with the rear lamps we had to struggle a little, since the entire structure of the headlight unit was located in the trunk lid.
To replace a burnt-out lamp, you must remove the entire unit
Circuit breakers
Now let's see which fuses are responsible for what in the same mounting block. I will also give the main reasons for troubleshooting.
F1 (5 A) - license plate lighting lamps, dashboard lighting, side lights on the panel, trunk lamp, left side lights . If any of the listed lamps do not work, check this fuse, as well as the lamps themselves and their contacts. If everything is in order, check the headlight switch button.
F2 (7.5 A) - low beam in the left headlight . If both low beam headlights do not work, also check relay K4 and the lamps themselves. It could also be the light switch and its contacts.
F3 (10 A) - high beam in the left headlight . If both high beam headlights do not work, check the K5 relay, the lamps themselves and the high beam switch knob.
F4 (10 A) - front fog lamp on the right side . If both fog lights do not work, check relay 9 and the headlight bulbs themselves, as well as the switch and its contacts.
F5 (30 A) - window lift motors . If the power windows do not work, check this fuse and relay 5. In winter, check if the windows are frozen, warm them up and clear them of ice if necessary. It could also be the window lift motor, its mechanism and gears; in order to get to it, you need to remove the trim of the desired door.
F6 (15 A) - portable lamp fuse.
There may also be problems with the cigarette lighter. To check, unplug the cigarette lighter from the connector. If this fuse stops burning, then the problem is in the cigarette lighter.
F7 (20 A) - engine cooling fan, sound signal . If the cooling fan does not turn on and the engine overheats, check this fuse. Also check the operation of the fan motor by connecting it directly to the battery. It could also be the coolant temperature sensor or thermostat.
F8 (20 A) - heated rear window (element) . If the heating does not work and the rear window fogs up, check this fuse, fuse F9 and relay K7. Also check the contacts on the terminals of the heating elements, check the wiring, sometimes the wire frays. It could also be the heating switch and its contacts.
F9 (20 A) - recirculation valve, windshield wipers and washer, headlight washer, rear window heating relay coil . If the heating does not work, similar to the previous one.
If the windshield wipers or washer do not work, also check relay K2, the fluid level in the washer reservoir, the washer pump, and the wiper motor. Another issue may be their switching handle, its wiring and contacts. The wires may be squashed or frayed and shorted to the housing.
F10 (20 A) - backup fuse. F11 (5 A) - right side dimensions. If the left side does not work, check fuse F1.
If none of the side lights work, check the light switch and its contacts. Also check the dimensions of the lamps themselves.
F12 (7.5 A) - low beam in the right headlight . Similar to fuse F2 for the left headlight.
F13 (10 A) - high beam in the right headlight, high beam lamp on the dashboard . Similar to fuse F3 for the right headlight.
If the blue lamp on the panel does not light up when you turn on the high beams, check this fuse, as well as the lamp itself and the wiring to it. F14 (10 A) - front fog lamp on the left side.
Similar to fuse F4 for the right fog light. F15 (20 A) - seat heating, trunk locking. If the heated seats do not work, check this fuse and the power button on the dashboard, its contacts and wiring.
F16 (10 A) - direction indicators and hazard warning lights, hazard warning lamp . If the turn signals or hazard lights do not work, also check relay K3 and the lamps in the turn signals themselves, as well as the hazard light switch button.
F17 (7.5 A) - interior lighting, lighting, ignition switch lighting, brake lights, clock, on-board computer . If the brake lights do not work, check this fuse, the lamps themselves, and also the switch installed in the pedal unit.
F18 (25 A) - glove box lighting, heater controller, cigarette lighter . If the cigarette lighter does not work, check this fuse, disassemble the cigarette lighter and check for a short circuit in it, especially on the washer and contacts. Bend them if necessary or replace the entire cigarette lighter. Do not insert non-standard size connectors into it.
F19 (10 A) - door locks, control relay for brake lights and parking lights, turn signals and lamps for turning them on on the panel, reverse lamp, generator winding, control indication of the on-board system, dashboard, clock, on-board computer.
F20 (7.5 A) - rear fog lights.
If the rear fog lights do not work, check this fuse and relay 9. Also check the lamps themselves, wiring, connectors and the switch on the panel.
Never replace blown fuses with fuses of a higher rating (current), this can cause burnout of tracks on the mounting block, failure of devices, etc. In this case, repairs will cost more, so it is better to deal with the problem immediately and fix the problem. If you cannot find what’s wrong on your own, contact a car service; usually such problems are dealt with by electricians, who will not have any difficulty identifying the problem and fixing it.
Fuses and relays in Lada Kalina
Fuses and relays Niva Chevrolet.
In case of any problems with car electrical systems, many owners give up and entrust the repairs to specialists. In some cases, indeed, this may be the only way out. But not when the fog lights on the VAZ-2110 do not work. We will try to solve this problem right now.
Fuses and relays VAZ 2110 - 2112, electrical diagrams
If some devices on your VAZ 2110 or VAZ 2112 car have stopped working, fuses or relays may be to blame. At the very least, the first thing you need to do is check them, and then draw some conclusions regarding the malfunctions.
Correct diagnosis of many electrical problems will allow you to accurately determine the cause of the inoperability of a particular unit. To find out what the fuses and relays of the VAZ 2110 - 2112 are responsible for and how to find the right one, read this article.
As in many other cars, in the VAZ-2112 and VAZ-2110, when the engine is turned off, the devices are powered directly from the battery. When the engine is running, voltage is supplied to the devices from the generator, which simultaneously charges the battery. If the current exceeds the permissible value or a short circuit occurs, the circuit fuse will blow. Powerful electrical appliances are connected via relays.
This is interesting: What is the polarity of the battery on the VAZ-2110 - let’s look into it in detail
Unexpected reasons for non-working PTFs on the VAZ-2110
The most common cause is a blown fuse. But we will return to it later. There is still a lot that is still unknown in the design of foglights, relays, switches and lamps. For example, a possible reason for the failure of fog lights could be a completely unexpected breakdown.
First of all, we check the bulbs themselves; you can get to the left one through the hood. On some versions of the VAZ-2110, a PTF from the Avtosvet plant (Kirzhach) was installed with a socket for the H1 lamp. Stock lamps are not the best quality and they do not like sudden changes in temperature.
It is quite difficult to get to the right fog lamp through the hood; it is easier to remove the headlight itself by unscrewing the screws.
During sudden cooling, when leaving the garage in winter, for example, or after turning off the headlights, the contact leg of the lamp bulb simply fell off the conductor . At the same time, visually the halogen lamp looked absolutely intact. It was enough to apply a plus directly to the leg itself, and the lamp would light up. The fault was due to poor-quality resistance welding, and it is almost impossible to detect the cause without a detailed examination of the lamp itself and its dismantling.
Of course, it is impossible to provide for all failure options, but we will consider the most common ones.
One fog light on VAZ-2110 does not light up
There may be plenty of options here. Apart from damage to the lamp itself or its filament, the picture is as follows:
- Fuse . When correctly installing PTF on the ten, as a rule, they use the scheme presented above. F4 or F14, is responsible for the operation of each lamp .
They are located in the mounting block, which is located in the niche of the front panel to the left of the driver. When replacing a fuse, we do not use bugs or jumpers, but only new fuses. Fuse location. The front right fog light is fuse F4, the left one is F14, both are 10A. - Ground contacts . In the case when, when installing the PTF, each of the headlights was connected to the negative separately, the loss of ground contact for each of the headlights threatens failure. We diagnose the lack of contact with ground either with a multimeter or by visually inspecting each of the contacts. If it is oxidized, we clean it and the place where it is attached and restore contact.
- Lamp power contacts .
In this case, you will have to check the integrity and condition of the contacts on the connection block both to the lamp itself and in connector Ш1 on pins 6 or 1. We find the wires with blocks coming from the headlights and check their condition.
Instructions for connecting fog lights on a VAZ 2110
In order to correctly install the PTF on the VAZ 2110, we have compiled a diagram that will help you understand the intricacies of the installation.
Tools you will need:
- fog lights with H1 socket;
- PTF installation kit;
Check the kit for a light operation indicator. Useful during installation.
- rim (frame) of lights (2 pieces, right and left);
- emitters (2 pcs);
- M6x45 bolts - 4 pcs;
- M6 nuts - 4 pcs.
Preparation, what we do:
- If the bumper has sockets for PTF stamped in it, then you need to focus on their shape and size.
- If there is no such stamping, then we first mark the location.
- Next, use a drill or jigsaw to make a hole. Moreover, you need to take into account the shape of the bumper (its curves) and the material from which it is made (fragile, hard).
Installing fog lights on a VAZ 2110, what we do:
- We install emitters in the headlights. If the lights are white, the lens can be covered with yellow film.
- We protect the base at the place where the lamp is mounted with auto sealant. This will prevent moisture and dust from entering the headlight.
- If plugs are installed at the PTF locations in the bumper, remove them. They are secured with bolts from the inside. Therefore, you will have to unscrew them through the hood of the car.
If older models do not have holes for mounting lights. Therefore, you will have to do them yourself.
- We fix the lights on the rims (frames) with bolts.
- We mount the headlights into the sockets and secure them with bolts.
Connecting PTF, What we do:
- The cables (+) are additionally insulated with corrugated tubes. If they are too long, cut them off.
- We bring them out through the socket for the hydraulic corrector. You can route them through the clutch cable outlet, but this may cause damage to the wires and, as a result, a short circuit.
- We connect the wires to the mounting block according to the diagram attached to it.
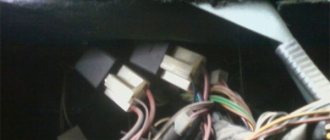
- Disconnect the (+) terminal and release the mounting relay block.
- We find fuses F4 (for the right lamp) and F14 (for the left).
- We put copper connectors on the wires and insert them into the input according to the attached diagram.
- We bring out the switch. European-style panels have standard factory cables for PTF installation.
- We supply power to the switch on the dashboard from the fuse for the right side lights.
If you remove power from the ignition or main light, the fog lights will turn on when you start the car.
- We connect the plugs to the emitters.
- We check the performance of the fog lights.
- We calibrate the beam direction by the position of the adjusting screw.
Useful video on the topic:
https://youtube.com/watch?v=1blkkgGJwZg
Two fog lights do not light up at once
If this happens, it is impossible to allow two lamps or two fuses to burn out at once. Most likely, the reason should be looked for elsewhere:
- Oxidation of contacts on connector Ш1 in the mounting block .
We remove the connector and evaluate the condition of the contacts. Just in case, check fuses F1, F14, F4. The connectors are located on the reverse side of the mounting block. - PTF switching relay .
We check the relay by pressing the fog light switch button. If we hear a click, the relay is working properly. If the relay does not click, it has failed or contacts 85, 86, 87 or 30 have oxidized. The relay can be installed normally in the mounting block, or in another place, at the discretion of the owner or the electrician who carried out the installation. The PTF relay can simply hang on the wires. - PTF power button . You can simply check it by closing contacts 6 and 7. If the relay works, the warning light and fog lights come on, change the button.
- Oxidation of the ground contact of the PTF relay or the lights themselves.
General recommendations
Schematic diagram of the mounting block. Connection diagram for PTF via side light switch.
In addition, we check the presence of voltage in the fog light circuit, finding out where the plus is connected.
And the power can be taken either from the ignition switch or from the side lights switch, which is undesirable, since you can leave the PTF on along with the lights on, and this will lead to battery discharge. Good luck with your search, bright and smooth roads!
Basic Rules
To ensure good visibility in heavy fog, it is important to follow the following rules:
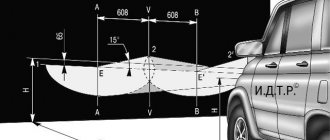
- Adjust the edge of the light beam so that the light beam is above the horizontal plane.
- Install the lamp at a minimum distance from the road. This is necessary in order to simplify the adjustment of the light beam boundary.
If the headlights are well adjusted, they guarantee excellent visibility on the road, even in difficult road conditions. To prevent deterioration in the quality of the glow, it is important to monitor the condition of the lampshade. If necessary, polish the surface and remove scratches, as they impair the performance of the flashlight.
Adjusting the fog lights
Causes of breakdowns and solutions
Now let's look at why fog lights don't work, and what are the possible causes of such problems. As a rule, malfunctions of fog lights are caused by corrosive and oxidative processes. In addition, the reasons for PTF failure include:
- Fuse blown.
- No contact in the relay.
- Deterioration of contact to the “minus” of the body.
- Burnout of lamps.
- Oxidation of contacts.
- Incorrect connection.
- Deterioration of contact on fog lights.
To diagnose and fix the problem, you need a set of tools and a multimeter. The first thing to check is the integrity of the fuses that power the fog lights. If they are burnt out, replace them.
If the circuit fuses are good, check that the headlight bulbs are working. The simplest reason why the fog lights do not light up is that the lamps have burned out due to a short circuit or natural wear and tear. To test lamp integrity, use a known-good light source.
It is important that the lamp base is of the same type and dimensions as the failed part. After purchasing the required light bulb, replace it (this can be done without removing the headlight).
If all the work considered is completed, but there is no result, pay attention to the power button. Perhaps the reason why the fog lights don't work is hidden there. If the button is defective, replace it.
If the contacts become oxidized, clean them. In a situation where problems with the PTF appeared after self-connection, the causes of the malfunction may lie in incorrect connection of the circuit.
To repair the fog lamp, you may need to perform the following work:
- Glass replacement.
- Installing a new light bulb.
- Replacing the fog lamp frame after removing the bracket. Such work may be required if the cladding is damaged.
Wiring diagram for fog lights on VAZ 2110, 2111, 2112 Before performing repairs, it is advisable to remove the fog light, for which you need to unscrew the screws securing it to the bracket. After this, disassemble the PTF to repair or install a new lamp.
The headlights on the VAZ-2110 do not work. Fuses are intact
When the headlights on any car simply do not work, this is an ordinary case. The cause could be the light switch, fuses, or other common things. The “ten” has a feature, without knowing which you can check everything you can to the point of stupor, but still not find the fault.
Usually everything looks like this: the headlights or side lights of the “ten” do not work, and randomly, for example, the left side headlight does not work, the side lights on the right front and left rear do not work. The fuses are intact and many owners of the “ten” are very surprised. It's no wonder if you don't know one secret.
This secret is located in the fuse box, which on the VAZ-2110 even looks like a black box. Once you open it, you will see fuses and relays, with one relay being larger than all the others. It is called a lamp monitoring relay and ensures that the lamps in the headlights and side lights are intact. When a light bulb burns out in the indicated places, the relay sends a signal to the display unit of the on-board control system, the pictogram lights up in it and a typical decimal “ding-ding” is heard.
Inside this relay there are four spirals - these are resistors and the point is that one of these spirals can burn out. This happens, of course, for a reason, but as a result of a short circuit, but the main “trick” is that the resistors of this relay burn out faster than the fuses in the block! That is, absolutely all the fuses are intact, everything is great, but some light bulbs do not work. What is also confusing is that the failure occurs according to an illogical pattern (which may not work, described above), which is why many people think about a bad “ground” in some connection.
If you know about this feature of the “tens”, then identifying a burnt-out relay is a couple of trifles. It can be freely pulled out of the block and disassembled. To disassemble this relay, you need to carefully pry off the bottom cover with a screwdriver, from which the contacts come out, and remove it. Resistors will be visible immediately, and a burnt one even more so. Then it is better, of course, to buy a new relay, but it is not a fact that it will not burn out the first time you turn on the headlights - most likely there is a short circuit in the network.
Therefore, to diagnose a short circuit, it is better to make sure that the fuses are reliable.
, use a soldering iron to fuse a wire onto the burnt resistor to restore it and put the relay in place.
If the fuse does not blow, there is a chance that the relay has simply died due to, for example, old age. If the fuse also fails, you need to look for a short circuit
.
Unexpected reasons for non-working PTFs on the VAZ-2110
The most common cause is a blown fuse. But we will return to it later. There is still a lot that is still unknown in the design of foglights, relays, switches and lamps. For example, a possible reason for the failure of fog lights could be a completely unexpected breakdown.
First of all, we check the bulbs themselves; you can get to the left one through the hood.
On some versions of the VAZ-2110, a PTF from the Avtosvet plant (Kirzhach) was installed with a socket for the H1 lamp. Stock lamps are not the best quality and they do not like sudden changes in temperature. It is quite difficult to get to the right fog lamp through the hood; it is easier to remove the headlight itself by unscrewing the screws.
During sudden cooling, when leaving the garage in winter, for example, or after turning off the headlights, the contact leg of the lamp bulb simply fell off the conductor . At the same time, visually the halogen lamp looked absolutely intact. It was enough to apply a plus directly to the leg itself, and the lamp would light up. The fault was due to poor-quality resistance welding, and it is almost impossible to detect the cause without a detailed examination of the lamp itself and its dismantling.
Of course, it is impossible to provide for all failure options, but we will consider the most common ones.
One fog light on VAZ-2110 does not light up
There may be plenty of options here. Apart from damage to the lamp itself or its filament, the picture is as follows:
- Fuse . When correctly installing PTF on the ten, as a rule, they use the scheme presented above. F4 or F14, is responsible for the operation of each lamp . They are located in the mounting block, which is located in the niche of the front panel to the left of the driver. When replacing a fuse, we do not use bugs or jumpers, but only new fuses.
None We find the wires with connectors coming from the headlights and check their condition.
How to connect fog lights on a VAZ 2110 with your own hands (why they may not light up)
If you install fog lights on a VAZ 2110, you can kill two birds with one stone. Namely, to transform the appearance of the car, and increase the level of your own safety, and add comfort to driving at night.
Kirzhach with lamp H1
Therefore, today we will talk about how to connect fog lights on a VAZ 2110, what is required for this and what result you will ultimately be able to achieve.
Video on how to replace fog lights yourself
The decision to install high-quality fog lights for your VAZ 2110 is strategically important, since it provides several advantages at once. Firstly, it transforms the appearance of the vehicle towards improvement. And secondly, it improves visibility, safety and gives confidence when driving in the dark.
The very name of the headlights – “fog” – succinctly reveals their true purpose. Their light is able to penetrate thick layers of fog and rain, which significantly improves visibility while moving. There are three key features that exclusively PTFs have:
- The possibility of timely maneuver, which under normal conditions simply does not seem feasible. Often, drivers who do not have a PTF find themselves off the road. The secret lies in the width of the light beam, which opens up a full view of the markings and the roadside.
- Increased illumination range (and, as a result, visibility). This property is ensured by a flatter luminous flux, which spreads to a greater extent in width. Given the higher temperature of the road surface compared to that of fog, it does not fall directly to the ground. Therefore, PTF owners have visibility that is on average ten meters further compared to standard optics.
- When professionally installed, fog lights do not dazzle passing vehicles, allowing them to better observe you. This greatly improves safety by reducing the risk of accidents.
Why are fog lights needed?
The very name “fog” lights already speaks about their essence. Their light penetrates fog, a wall of rain, and contributes to more efficient illumination of the road.
The presence of PTF provides three important advantages.
- PTF or fog lights are characterized by a flatter luminous flux, which literally spreads above the ground, spreading more in width than in height. This was done on purpose, since the temperature of the road surface is higher than the temperature of the air and fog, so it does not fall to the ground itself. Consequently, fog lights provide a certain range of illumination compared to conventional headlights. You will see approximately 10 meters further than with low beam.
- The width of the PTF light beam allows you to see the markings and the side of the road, which will allow you to make a maneuver in time and not end up outside the road surface. Unfortunately, this is a common occurrence in foggy conditions. Moreover, those who do not have fog lights suffer much more often. It is a fact.
- PTF does not blind oncoming cars, but allows them to see you. Only if the headlights are adjusted correctly, of course. Therefore, fog lights on your car have a big impact on safety by signaling oncoming cars that you are approaching.
What glass color to choose for the fog light
Experienced drivers remember the time when PTF glass was painted yellow. Since then, there has been a very strange, but erroneous stereotype that yellow headlights are the most effective and optimal color. However, this opinion is completely erroneous, since today the largest car and component manufacturers equip fog lights with transparent glass. And this is not an accident, because transparent glasses are more preferable.
For the VAZ 2110 model, modern models of fog lights are available in only two variations: transparent and corrugated.
It’s paradoxical, but the lion’s share of buyers choose transparent ones, although for a number of objective reasons the corrugated ones are better suited for installation. They not only make the appearance of the car more modern, but also ensure clarity and directionality of the beam itself, and ultimately better visibility in adverse weather conditions, and ultimately safety, as well as checking the VAZ 2110 speed sensor, timely replacement of tires and others precautionary measures.
Question about glass color for fog lights
On old cars, the glass of fog lights was yellow , so many people think that it should be like this now, it is more correct and more efficient.
In reality, everything is different. Today, auto industry leaders use exclusively clear glass for fog lights, which are superior to yellow ones in many components.
The current fog lights on the VAZ 2110 are available in two versions - transparent and corrugated. Most people choose transparent glass, although in fact, corrugated glass is better. They provide a clear directional beam that can show its best side during fog or rain.
Tools and materials
Before you connect the fog lights to the VAZ 2110, you need to stock up on a set of tools.
In principle, there cannot be any problems regarding the choice of tools and materials when purchasing ready-made PTF kits. Manufacturers in the vast majority of cases provide their kits with everything necessary. However, purchasing spare parts separately will provide the opportunity to significantly diversify installation options, and will also save a lot of money in your budget.
For a complete installation, you need to purchase the following spare parts and elements:
- two sets of headlights and frames for them;
- relay;
- plastic pads;
- ground terminals;
- a button with a special yellow indicator;
- wiring with double insulation and copper conductors (with a cross-section of 0.5-0.75 mm);
- narrow and wide terminals (mother/father).
It is worth noting that it is not advisable to purchase a mother and father complete with wires. The best option is to crimp them using pliers at the moment when all the wiring is connected.
It's worth paying attention to your dashboard. If it is an old model, then you should buy a kit designed for a VAZ 2110, and if it is new, you need to purchase a kit from a VAZ 2115. If we talk about the lamp power, then 55V will be the optimal solution.
Materials and tools
You can easily buy a ready-made PTF kit with all the wires, and then you won’t have to figure out where the fog light relay is located on a VAZ 2110. However, if you purchase spare parts separately, this will diversify the installation options, plus it will allow you to save money.
Connection kit
Therefore, you need to purchase the following:
- Two sets of headlights;
- Plastic pads;
- Headlight frames;
- A key with a yellow indicator for it;
- Relay;
- Wiring. Choose an option with two copper conductors and double insulation, for example ShVVP2. A cross section of 0.5 mm is suitable, but if the lamps are powerful, 0.75 mm is better;
- Ground terminals;
- Female/male terminals - wide and narrow terminals.


