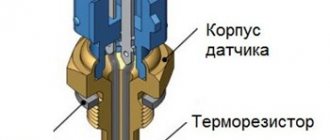
Purpose and principle of operation of the oil pump
An internal combustion engine is a complex mechanism consisting of many metal parts that interact with each other during operation. The result of this interaction is the friction force that arises at the points of contact of the rubbing mechanisms.
To reduce it, the car is equipped with a lubrication system, the main element of which is the oil pump.
The pump consists of a casing, inside of which a pair of gears is installed. One gear is pressed onto the drive rod, and the second is loosely mounted on the central axis. The mechanism operates via a gear mounted on the engine crankshaft.
When the drive device rotates, the contacting teeth capture fluid from the oil receiver, move it along the walls of the housing and feed it into the oil filter, from where the purified emulsion enters the channels of the vehicle's lubrication system.
The oil pump is designed to ensure uninterrupted circulation of oil fluid and maintain constant pressure in the system.
FAQs:
What is the function of an oil pump?
The oil pump is the part of an internal combustion engine that circulates pressurized engine oil to the engine's camshaft, sliding pistons, and rotating bearings. This lubricates the bearings, helps cool the engine, and also allows for the use of more powerful bearings with fluid.
How much does it cost to replace an oil pump?
The average cost of replacing an oil pump is between $500 and $1,500, but can vary from vehicle to vehicle.
We hope the above information will help you clearly understand what happens when your oil pump fails. If you have any questions related to the symptoms of a bad oil pump, feel free to leave them in the comments section and we will get back to you later. And keep following us for more helpful maintenance tips updated by our automotive experts every day.
You can buy a new replacement oil pump for your car in the online store of spare parts and accessories for foreign cars “PEC: Mall” with the possibility of delivery throughout Russia.
Location of the oil pump in VAZ cars
The oil pump in VAZ cars is part of the engine, so you won’t be able to see it just by opening the hood. To get to the oil pump, you need to place the car on an inspection hole, remove the crankcase protection from it, and then remove the pan.
To get to the oil pump, you will have to remove the pan and crankcase from the VAZ car
Signs of a broken oil pump
It is not difficult to understand that the oil pump has failed. We list the symptoms that clearly indicate a breakdown of this device:
- The oil pressure light on the dashboard is constantly on. This usually occurs due to a clogged or broken pressure relief valve in the pump. As soon as this element breaks, the oil pressure in the lubrication system increases sharply, which is indicated by a light that lights up even at idle;
Constant burning of this light indicates a breakdown of the oil pump.
- engine knock. If for some reason the driver does not pay attention to the light bulb, the engine begins to knock. The characteristic knocking noise becomes louder as the rubbing parts of the engine that are not supplied with oil wear out. Repairing a motor after such a breakdown is very difficult.
Checking the oil pump for wear using dipsticks
- The oil pump is removed from the car and disassembled. The pressure reducing valve and the inlet pipe are separated. All pump parts are thoroughly washed in kerosene.
- After washing, it is necessary to inspect each part for cracks or deformation. Damaged parts will have to be replaced. If no damage is detected, measurements can begin.
- First, using a feeler gauge, the gaps between the pump housing and the gear teeth are measured. The gap should not exceed 0.2 mm.
The distance between the teeth and the oil pump body is measured with a special feeler gauge
- Next, the distances between the gear teeth are measured. They should not exceed 0.5 mm with a permissible error of 0.05 mm. If this condition is not met between any pair of teeth, the gear is worn out and should be replaced.
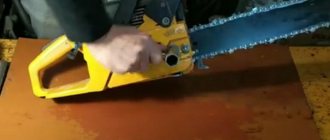
Video: how to check the oil pump
Diagnostics of the oil pump on the stand
Large car repair shops have universal stands for quickly checking almost any type of oil pump. The procedure for checking oil pumps of VAZ cars, as a rule, consists of two stages:
- checking the pressure relief valve;
- checking the assembled oil pump.
The first stage of testing is as follows: the pressure reducing valve, previously removed from the pump, is installed on a stand and kerosene is supplied to it through a system of pipes. The kerosene pressure is gradually increased with the help of special regulators.
How to determine if an oil pump is faulty
There are two types of pump testing - without dismantling it and with dismantling it. Without removing the pump, you can verify its malfunction only when it is already in a “dying” state, so it is better to remove it to perform detailed diagnostics.
How to check the oil pump without removing it
Before directly testing the pump, it makes sense to check the oil pressure in the system using a pressure gauge. This way you can make sure that the oil pressure light is working correctly and did not light up in vain. To do this, a pressure gauge is screwed in instead of the emergency lamp pressure sensor.
Please note that the pressure value often drops precisely “when it’s hot,” that is, when the engine is warm. Therefore, the test must be carried out on a warm engine and at idle speed. The minimum and maximum pressure values will differ for different machines. For example, for a VAZ “classic” (VAZ 2101-2107) the minimum emergency pressure value is 0.35...0.45 kgf/cm². It is under such conditions that the emergency lamp on the instrument panel is activated. The normal pressure value is 3.5…4.5 kgf/cm² at a rotation speed of 5600 rpm.
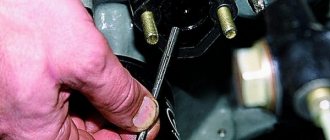
On the same “classic” you can check the oil pump without removing it from its seat. To do this, you need to dismantle the distributor and remove the pump drive gear. Next, evaluate her condition. If there are numerous scuffs on its surface on the blades or on the gear axis, then the pump must be dismantled. It is also worth paying attention to the gear splines. If they are knocked down, it means the pump is jammed. This is usually due to debris and/or sludge in the oil.
Another check without dismantling the pump is to check the play of its rod. This is done in the same way, with the distributor removed and the gear removed. You need to take a long screwdriver and simply move the rod with it. If there is play, it means the pump has failed. On a normal working pump, the gap between the surfaces of the rod and the housing should be 0.1 mm, respectively, and there is practically no play.
Oil receiver mesh
For further inspection it is necessary to dismantle and disassemble the pump. This is also done in order to subsequently flush out any accumulated debris. First you need to unscrew the oil receiver. In this case, it is necessary to check the condition of the sealing ring present at the joint. If it has hardened significantly, it is advisable to change it. Pay special attention to the oil receiver mesh, since most often it is the reason that the pump does not pump oil well. Accordingly, if it is clogged, it needs to be cleaned, or even the entire oil receiver complete with mesh must be changed.
Checking the pressure relief valve
The next item to check is the pressure relief valve. The task of this element is to relieve excess pressure in the system. The main components are a piston and a spring. When the extreme pressure value is reached, the spring is activated and the oil is poured back into the system through the piston, thereby equalizing the pressure. Most often, the malfunction of the oil pump pressure reducing valve is due to the failure of the spring. It either loses its rigidity or bursts.
Depending on the design of the pump, the valve can be dismantled (flared). Next you need to evaluate piston wear. It is advisable to clean it with very fine sandpaper and spray it with an aerosol cleaner for further normal operation.
It is imperative to inspect the place where the valve fits onto the body. There should be no risks or scratches. These defects can lead to a decrease in system pressure (reduced pump efficiency). As for the valve spring for the same VAZ “classic”, its size at rest should be 38 mm.
How to check the oil pump
Before troubleshooting the unit, it must be checked. The simplest method is on-site diagnosis (without removing the part). This method is similar for all types of cars, with the exception of operating pressure (each engine has unique indicators). The sequence of actions looks like this.
- Unscrew the oil pressure sensor from its socket.
- Using an adapter, install a liquid pressure gauge, ideally a mechanical one, into the hole.
- The first stage of testing takes place cold. The pressure is measured at idle speed and when the load increases to 5000-5600 rpm. The obtained results are compared with the standard.
- The second part is performed after the lubricant has been warmed to a temperature of +90 degrees Celsius. The measuring sequence remains the same.
Recommended thresholds and values for different modifications of internal combustion engines differ. However, if the difference is more than 10%, the mechanism is definitely subject to repair.
Important! It is not recommended to use the pressure standards of other cars as a standard. Exact information and tolerances can be found inside the vehicle's service manual or technical documentation.
Checking with a pressure gauge
Every car owner should know how to check the pressure of the oil pump on a car - this will allow it to avoid dangerous consequences for the engine in case of malfunctions.
A pressure gauge is installed instead of an oil pressure sensor. This is the only way that allows you to reliably verify the serviceability or malfunction of oil pumps. In this case, the pump itself does not need to be removed from the engine. You can purchase ready-made kits for measuring pressure in the lubrication system or make the device yourself.
Troubleshooting Methods
To understand how to check the hydraulic pump for serviceability and perform diagnostics yourself, you first need to disassemble it. It is also necessary to inspect all functional components of the device, check the integrity of parts, and measure wear areas. If:
- The pump began to operate unstably; the bearing seat may have become worn out or damaged. Failures may also be caused by clogging of the channel connecting the control spool and the piston, external damage to the piston, failure of the pressure compensator in the circuit, increased hydraulic resistance of the line between the elements of the pressure compensator and the remote control, or insufficient pressure in the system. In this case, it is necessary to conduct an external inspection of the equipment, adjust it if necessary, remove blockages, check the operation of the hydraulic line and normalize the pressure.
- The device produces insignificant flow; most likely, the cylinder and valve disc are damaged, the pistons or splines of the drive shaft are worn, the bearings or piston holes in the cylinder block require replacement. To eliminate such problems, you will need to replace functional elements of the equipment.
- The hydraulic pump oscillates at low pressure; perhaps, when setting up the equipment, you incorrectly set the maximum volume of the device. Then you will have to carefully read the instructions and adjust the maximum flow rate of the equipment. If this does not help, you should pay attention to the integrity of the spool in the control mechanism and its springs, and the condition of the springs in the control cylinder. It is also important to check the level of compensator pressure and the presence of faults in remote structures of the compensator itself.
- When the device is operating, the pressure fluctuates too much, it is worth checking the installation height of the compensator, the correctness of the installation of the smallest volume of equipment, and the degree of wear of the main surfaces of the hydraulic pump cradle. It is also possible that the channel between the spool and the control piston, the spool and the outlet channel is clogged.
- Overheating of the equipment is often observed; it is likely that the piston bearings and cylinder blocks are worn out, and the connection of the cylinder assembly with the distributor is damaged.
After identifying faults and eliminating them, it is necessary to correctly assemble the pump and re-adjust it.
Types of Oil Pumps
Depending on the control method, pumps come in adjustable and unregulated designs. Unregulated ones control the operation of the lubrication system using a pressure reducing valve.
In adjustable ones, the pressure of the oil fluid is regulated by changing the productivity of the device. Depending on the internal structure, they are divided into rotary and gear type pumps.
Gear oil pump
Gear pumps are non-adjustable devices based on their operating principle. Based on the type of gear placement and the method of oil supply, they are divided into 2 types:
- With external gear connection.
- With internal clutch.
The external gear design consists of a housing that houses the driven and driving gears. The liquid from the sump is fed through the suction valve into the working chamber of the device, from where it is pressed into the filter and then enters the oil line.
The performance of the mechanism depends on the crankshaft speed. When the speed increases above the set value, the pressure reducing valve opens, which dumps some of the oil into the engine crankcase. According to this scheme, the lubricant pressure in the system is regulated.
An internal gear pump is a mechanism consisting of a metal casing, inside which a pair of gears rotate, located one above the other and offset relative to the central axis.
The diameter of the driven gear is smaller than that of the drive gear. Due to this, a cavity is formed between them, inside which a vacuum is created. The liquid is sucked into the working chamber and, using a gear transmission, rises into the oil channels.
Rotary oil pump
Rotary-type devices, according to their design features, can be divided into adjustable and non-adjustable mechanisms. The principle of operation of a rotary unregulated pump resembles the operation of a gear device, only instead of gears there are two rotors with a small number of blades.
The liquid is pumped into the working cavity, captured by the blades and supplied to the outlet. At the right moment, the pressure reducing valve is activated and regulates the pressure in the channels of the cylinder block.
The most advanced mechanism is considered to be an adjustable type of oil pump, which maintains constant pressure at any crankshaft rotation speed. The rotary pump received this advantage by adding a movable stator with a variable spring to the design.
Pressure control is carried out by changing the size of the free space between the driven and driving element by turning the movable rotor.
As the engine speed increases, the oil pressure in the system decreases. The adjusting spring straightens and takes the stator along with it. At the same time, the size of the working cavity increases, and the amount of captured liquid increases proportionally, and at the same time the productivity of the device increases.
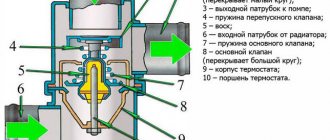
Operating principle and main functions of the pressure reducing valve
Motor oil continuously circulating in the engine exerts a certain pressure on all its elements. Constant monitoring of this indicator within the limits established by the manufacturer is a prerequisite for normal operation of the power unit .
Purpose and functions
Any deviation in oil pressure can cause failure of individual components or the engine as a whole. In this case, a major overhaul of the engine may be required, which will involve large financial costs. To prevent such situations, a pressure reducing valve was invented, which is responsible for oil pressure. Despite the importance of the functions it performs, it has a simple design and is easy to repair and replace.
The pressure reducing valve is the most important element of the oil pump
An oil pump, the design element of which is a pressure relief valve, circulates lubricant throughout the engine. Oil pressure is adjusted precisely with the help of a valve that opens or closes the inlet. Excess oil goes into the reserve channel, which, in turn, allows the pressure in the system to be stabilized.
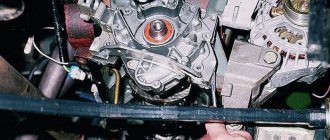
Location
In modern cars, the pressure relief valve is located together with the oil pump. The pump itself is usually installed behind the generator. Depending on the car model and the type of valve, the latter is located either on the oil filter or on the pump cover.
Location of the pressure reducing valve in the oil pump
Pressure-reducing valves come in two types: collapsible and built-in. In the first case, the device can be disassembled and individual parts that have failed can be replaced. In the event of a breakdown, built-in models are replaced entirely, and sometimes together with the oil pump or its cover.
Principle of operation
The engine oil pressure in the engine system depends on the crankshaft rotation speed. By pressing the accelerator pedal, the pump gears are activated. Moreover, the stronger the pressure, the faster the gears rotate. As the rotation speed increases, the volume of oil pumped from the crankcase increases, and, as a result, the pressure increases. When a certain pressure is reached, a working pressure reducing valve opens and returns the oil back to the crankcase.
Near the inlet of the device there is a piston or metal ball on a spring attached to a thrust screw. Under the pressure created by the oil, the valve is recessed into the body and actuates the spring. Excess oil goes back into the engine crankcase through the opening hole and the spare channel of the pump.
A piston or metal ball on a spring is located near the valve inlet
When the oil pressure decreases, its value is no longer sufficient to maintain the valve open and it closes. The spring moves the piston or ball to its original position, closing the hole.
How to measure correctly?
How to check the engine oil pump? The technology is the same for all motors. But, if you lack some equipment for the service station, then it is better to buy it in advance. There is a slight difference only in the values of the threshold pressure level - it is different for different engines. You can find out about the minimum permissible pressure and its level for the valve to operate in the instructions for the car.
Using a classic VAZ as an example, we will look at how to check whether the oil pump is working. Measurements should be made in two modes - on a cold and hot engine.
Purpose and types of automobile oil pumps
The purpose of the oil pump is to create the necessary pressure in the engine lubrication system. Under high pressure, oil flows through special channels to all rubbing parts of the engine, intensively reducing their friction against each other, thereby preventing premature wear.
Oil pump for VAZ car, adjustable, with pressure reducing valve
Advantages of adjustable rotary oil pumps
Almost all modern VAZ cars (starting from VAZ 2114 and higher) are equipped with adjustable rotary-type oil pumps.
Main design elements of the VAZ adjustable rotary oil pump
Here are the main advantages of these devices:
- When using an adjustable oil pump, engine power increases by 30%. This occurs due to a decrease in the power factor taken from the motor by third-party devices;
- with an adjustable oil pump, the oil has to be changed less frequently, since the crankshaft speed decreases, which means the number of revolutions decreases;
- The adjustable oil pump practically does not foam the oil. The problem that is relevant for unregulated gear pumps has been successfully solved in rotary pumps.
Unusual noise
Now, even if you use common sense and don't understand the mechanics of any vehicle, friction between parts can still seem like an understandable problem. This causes them to rub against each other and causes an unusual oil pump sound, just like rustling pine trees.
Now, mechanically speaking, a faulty (or semi-functional) pump can cause hydraulic lifters to make noise. This leaves them rubbing against other parts without lubrication. These lifters are a vital part of a vehicle's valve train. Low oil pressure coming from the pump prevents the oil from reaching the hydraulic lifters. This causes as much friction as a noise that is loud enough to be clearly heard when the vehicle is moving. They are also starting to wear them. Eventually, if left unattended, unevenness will appear. Then it's time to think about replacing your oil pump to avoid unexpected damage to your car.
Cold engine measurements
In order to measure the pressure, before starting the engine, you need to make sure that the oil temperature is equal to the ambient temperature. The emergency sensor in the VAZ is configured to trigger at a pressure of 0.33 kgf per square centimeter. If the measurement result turns out to be like this, then it is necessary to dismantle the pump and troubleshoot it. With a gradual increase in the crankshaft speed, the pressure should increase to 4.5 kgf per square centimeter. The pressure relief valve should work, so the pressure will not increase further.
On a hot engine
As the oil temperature drops, its viscosity rises. This is good for efficient pump operation. To obtain adequate measurement results, it is best to measure pressure on a warm engine. Since the oil heats up much more slowly than the coolant, the engine is allowed to run a little longer after reaching operating temperatures.
In the lubrication system of a working engine with a working pump, the pressure should be in the range of 3.5-4.5 kgf per square centimeter at a crankshaft speed of 5600. If the measurement values differ from the nominal value, then the engine will experience a lack of lubrication in some modes.
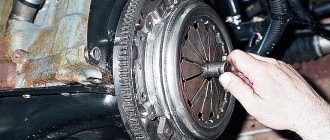
Troubleshooting and repair of a removed element
Let's look at how to test a removed oil pump. The check consists of visual inspection, measurements and comparison of the measurement result with the nominal dimensions.
Unscrew the oil receiver cap together with the pressure reducing valve. It is worth making an effort so that the spring thrust washer does not get lost. Next, note that some bolts will be smaller than others. This bolt should then snap back into place.
Use a caliper to measure the spring. At rest, it should be at least 38 millimeters in length. Then remove the cover, which will have marks from the wear of the gears. If the scoring is deep, then the oil pump has a lot of wear. The cover can be repaired - its plane should be leveled.
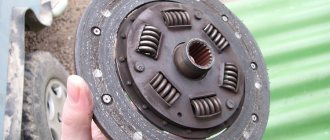
Next, remove the drive gear and visually check the condition of its teeth. If there are abrasions and burrs on the teeth, this indicates a lot of wear. The driven gear should also be checked. The main thing about it is the hole in which the fixation axis is located.
Then check the walls of the device housing and the axis of the driven gear. Potholes, grooves, and various defects indicate that debris has entered the working area inside the pump.
Removal from engine for disassembly
The video demonstrates the process of checking the VAZ 2104 oil pump. But measuring the gap between the housing and the gears, assessing the output of the drive and driven gears, the oil pump housing cover and many other subtleties are relevant for all types of oil pumps. Before disassembling, we recommend studying the structure and operating principle of the oil pump.
For a preliminary check, remove the distributor and remove the oil pump drive gear. If you find deep scuffs on the axle, you will most likely encounter knocked-down splines. Wedging of the drive gear is extremely dangerous, as the splines can be licked off. The consequence of a breakdown will be oil starvation, which for the engine ends at least with the crankshaft liners turned. You can also visually assess the play of the oil pump rod. On a working pump, the gap between the rod and housing pair should not exceed 0.1 mm.
The oil pump on classic VAZ cars is unscrewed from the crankcase. Therefore, to check, you will have to drain the oil and remove the pan, having first loosened the engine mounts (the engine needs to be raised a little).
To fully check the oil pump, arm yourself with a set of dipsticks. Don’t just try to judge by eye the production of parts with pretentious fitting requirements.
Troubleshooting
- Unscrew the oil receiver cap with pressure reducing valve. Be careful not to lose the original spring thrust washer. Also note that one of the bolts will be shorter. Therefore, be sure to remember the location of its seat.
- Using a caliper, measure the length of the spring at rest (should be at least 38 mm).
- Remove the cover on which you can remove the wear marks left by the gears. Deep scoring is a clear sign that the oil pump is worn out. Repairing the cover involves leveling the mating plane.
- Remove the oil pump drive gear from the housing. Check the condition of the teeth and shaft. Scratches and abrasions indicate wear. In the driven gear, additionally evaluate the condition of the fixation axis hole.
- Check the walls of the oil pump housing and the driven gear axis. Furrows and potholes indicate that debris has entered the work area.
Clearance tolerances
- The gap between the housing plane and the gears. To measure, apply a caliper and insert a suitable feeler gauge into the gap formed. The norm is 0.066-0.161 mm. A gap of 0.2 mm is considered critical.
- Gap between gear teeth. At extreme wear, the gap is 0.25 mm. If you get values of no more than 0.15 mm, the gears are still in good condition.
- The gap between the walls of the working area of the oil pump housing and the gears should not exceed 0.25 mm; A range of 0.11-0.18 mm is considered normal.
- The optimal gap between the hole in the housing and the gear shaft is 0.016-0.055 mm. When checking the VAZ oil pump without removing it from the engine, we said that the play should not be more than 0.1 mm. As for the gap between the axle and the driven gear, it should be in the range of 0.017-0.057 mm; critical limit – 0.1 mm.
Pressure reducing valve
There are practically no methods that allow you to check the oil pump pressure relief valve without the need for dismantling. But you can check it with your mouth - even experts recommend using this method. A cloth is applied to the valve fitting, through which air passes well. Next, take a sharp breath. If there is strong resistance, then the valve is working.
Bottom line
Self-repair of a car is allowed only after studying the mechanism. Having learned how to check the oil pump, you can independently determine the cause of the pressure drop inside the system. However, it is better to entrust complete repairs and troubleshooting of the device to a qualified specialist.
Sources
- https://autoexpert174.ru/vidy-ustrojstvo-masljanogo-nasosa-dvigatelja-diagnostika/
- https://FB.ru/article/402092/kak-proverit-maslyanyiy-nasos-sposobyi-proverki-remont-sovetyi-spetsialistov
- https://masladvig.ru/kak-proverit-maslyanyy-nasos-diagnostika-i-sovety/
- https://carnovato.ru/zamena-maslyanogo-nasosa/
- https://autolirika.ru/soveti/kak-proverit-maslyanyj-nasos.html
[collapse]