Causes of joint wear
During operation, the working pair of the tip (plastic insert and ball pin) experiences loads from the steering rack, which pulls or pushes the steering knuckle depending on the direction of movement of the car.
Another type of load affects the element from the side of the wheel falling on uneven road surfaces. In the first case, the force is applied perpendicular to the axis of the ball pin and acts on the fracture; in the second, the forces tend to pull the part out of the socket. There is a third type of load - the friction force that arises in the unit when the wheels turn. Since the finger is rigidly fixed in the eye of the fist with a nut, it rotates inside the plastic bushing and rubs against its walls.
Due to the impact of these loads, the hinge joint wears out as follows:
- Over time, the walls of the liner wear out, a gap forms between them and the ball, which is why a quiet knock is heard when moving over small uneven surfaces.
- Abrasion of the side walls of the bushing leads to loosening of the pin, because it is pressed by the spring only from below.
- When the spring and heel are unable to remove the play resulting from wear of the plastic, the ball pin moves easily in the bushing, causing the steering tip to knock heavily.
Such defects must be identified in a timely manner, otherwise the damaged tip will quickly become unusable.
In cars equipped with a double-wishbone front suspension, sometimes a breakdown occurs that is not related to the operation of the hinge. Since the rod is located low, if you drive carelessly on bad roads, the metal rod can bend when it hits a stone or other obstacle. In this case, knocking does not occur, but other symptoms are observed, described below.
Trapezium VAZ 2107, replacement of steering rods and ends (Video)
Tie rod end
The steering linkage of the VAZ 2107 (a combination of tie rods and ends) ensures the rotation of the front wheels, transmitting force from the steering gearbox to the steering knuckles. Breakage of steering tips and trapezoid rods can lead to an accident, so it is necessary to monitor their condition and replace them in a timely manner. To do this, you can contact a specialized service station or do the work yourself. How to determine whether the steering tips are in good condition and how to replace them? This article is devoted to these issues.
Where is the VAZ 2107 trapezoid located?
Steering rods and ends are located at the bottom of the engine compartment (rather under it), closer to the partition between the car interior and the engine compartment. To see the tie rod ends connected to the steering knuckle, you need to turn the steering wheel all the way.
The steering linkage consists of a middle and two side steering rods, as well as six steering tips (hinges).
Signs of malfunction of the VAZ 2107 steering linkage
You can determine that the steering ends of a VAZ 2107 are worn out by the following signs:
- increased steering play;
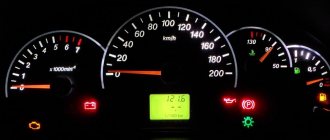
- knocking in the steering;
- accelerated or uneven tire wear.
The latter can also be caused by bent steering rods. In addition, their deformation leads to the car moving away from the straight path.
Similar phenomena are observed when other elements of the front suspension are worn out and the wheel camber and toe angles are incorrectly adjusted. Therefore, before changing rods and tips, you need to make sure that the reason lies in them. To check the ends and tie rods of the VAZ 2107, it is necessary to provide access to the car from below - lift it on a lift or install it above the inspection hole.
It is better to start your inspection with the steering tips. Check the condition of the anthers, which should not have ruptures or cracks. The permissible play of the tip hinges is 1.5 mm. If you hear a knocking sound when the tip is pulled up and down, it should be replaced.
Unlike the tips, tie rods practically do not wear out. They can only bend as a result of an accident or due to strong impacts on the suspension (for example, when a car hits a pothole at high speed).
Required Tools
To change the steering rods or linkage assembly, you will need the following tools:
- a set of spanners or open-end wrenches;
- pliers;
- puller for steering rods.
The last point is extremely important. Without a puller, dismantling the steering rods is, if not impossible, then extremely difficult. There are several types of pullers that allow you to remove tie rod ends. It is better to purchase a universal puller that allows you to remove steering and ball joints on cars of various brands.
Replacing steering rods VAZ 2107
Depending on the number of tips and rods to be replaced, you should decide whether to buy and replace parts separately or replace the steering linkage assembly. The assembled VAZ 2107 trapezium is easier to install and costs less than purchasing parts separately.
The work must be carried out by lifting the machine on a lift or placing it on an inspection hole. The thrusts on the left and right sides change approximately equally. The replacement procedure is as follows:
- Raise the car with a jack (if the work is being done on a lift) and remove the front wheel located on the side from which the traction will be replaced.
- Straighten and remove the cotter pin that prevents the steering end nut from unscrewing.
- Using a 22mm wrench, unscrew the nut securing the steering pin.
- Install the steering wheel end remover.
- By turning the nut or bolt of the puller (depending on the design), press the steering tip pin out of the steering knuckle.
- Unscrew and unscrew the nut of the second finger of the tip.
- Using a puller or hammer, press the second pin out of the intermediate joint.
- Remove the steering rod.
- Install a new rod.
- Tighten and cotter the nuts on the rod pins.
This is how the steering rods of a VAZ 2107 are replaced. When replacing the trapezoid assembly, it is enough to disconnect the rods from the steering knuckles of the wheels and the steering gear lever, which will take less time and require less effort.
The steering ends are attached to the rods through special bushings that allow you to adjust their length. This sets the toe angle of the front wheels. When replacing steering rods or trapezoids, this angle will certainly be disrupted. When installing new rods and ends, care must be taken to ensure that their length matches the old ones. To do this, it is necessary to measure their parameters before dismantling. This will allow you to minimize the violation of the wheel toe angle and safely get to the service station, where specialists using special equipment will carry out a thorough adjustment.
semerkavaz.ru
Removing the steering tip
When it comes to repairing the front suspension, one way or another you will have to remove the steering tip : it also wears out and requires either repair or replacement. How to do this correctly? We read and comprehend all the intricacies of the process. So!
To get started, you will need the bare minimum of tools: a jack, a standard set of open-end and socket wrenches, any penetrating lubricant, a gas torch, a wire brush, a ball joint remover and a bottle of water.
Steering end. Let's start withdrawing
Place the car on a level surface and jack up the front wheel. Remove the front wheel, carefully placing the fasteners in a jar. To increase the insurance, we place the removed wheel under the spar beam of the jack.
Take penetrating lubricant and generously lubricate the steering wheel nuts. By the way, it is very advisable to use lubricant-liquid for automatic transmissions. Wait a few minutes - the lubricant should soak up any possible dirt and rust.
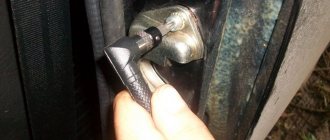
Then we take a metal brush and clean the dirt from the tie rod threads, as well as from the ball joint rod. This is necessary so that you can easily remove the nut that holds the steering mechanism of the tip.
After removing the nut, you should remove the cotter pin, which, in turn, holds the fastener (the same nut) of the tip rod. Attention: the cotter pin is quite fragile and often breaks during removal. And if this happens, then take a regular nail, place it near the piece of the cotter pin and lightly knock it out. If this does not work, then you can bend the protruding antennae of the cotter pin so that you can put a socket wrench on the nut. In general, you'll figure it out, it's not difficult.
Regardless of the situation, the broken antennae of the cotter pin can be cut off by the nut itself when you twist it.
Using an open-end wrench, unscrew the locknut that holds the tie rod end. If this does not work right away, then use the lever method: put a piece of pipe on the key and try to unscrew it. As a rule, this method works great.
But if there is a risk of cutting off the edges of the nut, then take a gas burner and heat the nut. The secret is simple: according to the law of physics, metal expands when heated, which means the nut can be unscrewed without any problems. We apply a little penetrating lubricant to the loose nut, the threads of the steering rod and the rod end: this will increase the smooth movement of the nut along the threads.
Using a ball joint remover, we release the conical part of the rod: from its seat in the “lead” of the steering “knuckle”. If something happens, you can heat the seat using a burner. But keep in mind: when using a torch in this case, do not overdo it and do not burn the tip boot! This is where a bottle of water comes in handy: you will use water to extinguish an accidentally caught fire.
After heating, the metal steering tip can be easily removed: the conical connection of the rod can be easily separated.
So you pulled out the steering tip, for which I congratulate you!
Kolodiychuk Andrey
, especially for
What are tie rods and tie rods for?
How to replace the tie rod end and boot
In the vehicle control system, a steering rod is necessary to transmit the force (rotation) of the steering wheel to the steering knuckles of the wheels. The tie rod end joints ensure free rotation of all moving drive parts. The force on the wheels corresponding to a given angle of rotation is transmitted directly by the drive.
The complex mechanism of the steering system design is explained by the fact that when turning, each wheel must be set to a different angle. If the angle of rotation were the same, then during maneuvers the inner wheel would slip, leading to wear of the rubber itself and a decrease in the controllability of the car.
Different angles of rotation are achieved thanks to the special design of the steering part of the car, which includes rods, hinges and swing arms. The angle of rotation directly depends on the angle of inclination of the levers.
Steering rod and rod end: purpose
The main task performed by the steering linkage is to transfer force from the steering mechanism to the wheels. However, additional difficulties arise due to the fact that the wheels are movable and the steering mechanism is rigidly fixed. The tie rod end solves the problem.
To put it simply:
- the rod itself is attached to the steering rack rod by means of an internal tip;
- the middle rod of the trapezoid is attached using a swivel joint;
- The connection of the rod with the steering knuckle lever is carried out through the outer steering tip.
In this design, the internal tips and ball joints are responsible for the mobility of the rod in the vertical plane (the rods do not break when driving over uneven surfaces).
In turn, the external tip allows for mobility of the rod and wheel in any plane. As a result, the drive works normally when cornering, when driving over uneven surfaces, etc.
Tie rod and tip device
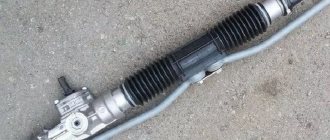
As for the device, the rod itself resembles a steel rod.
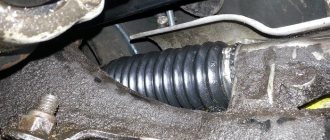
The design of the steering tip is more complex, since it serves to connect moving and fixed elements. In fact, it is a hinge joint where the pin sphere rotates inside a hemispherical body. A bushing is installed in the housing and lubricant is filled to avoid friction and allow the pin to deflect at a given angle. The hinge is protected by a rubber boot.
How to remove a tie rod without a puller
How the steering cardan works, a review of faults and instructions for replacing it
Let's first look at the stages of removing the steering tip:
The first stage is lifting the front of the car on a jack. For the safety of the car and the owner, we place reliable stands under the thresholds. We remove the wheel. To do this, unscrew the mounting bolts. Next, you need to clean the steering column. We do this with a stiff brush - we remove dirt, rust, dust. We treat the stand with a small amount of diesel fuel, kerosene or WD-40 and wait a few minutes. Thanks to this we will be able to unscrew the nuts more easily. After the preparatory procedures, we first loosen the tie rod end nut. Only after this action do we move on to the nut securing the ball pin of the steering tip. Unscrew the steering tip nut. In this case, it is advisable to turn the steering wheel in the opposite direction of the rack that you are pulling out - this will make the work process easier. Using a caliper, we measure the distance from the center of the steering tip to any mark on the tie rod (we ourselves put a mark on it somewhere). This is necessary in order to correctly align the new steering tip. This event must be approached as responsibly as possible. If you don't have a caliper, use the method from step 8.
Now we need to knock out the steering tip itself. If you don’t have a special puller, you can get by with a hammer and some kind of strong lever (for example, a crowbar). We insert the lever between the rod and the protrusion of the stand connecting to it. We press the lever and at the same time hit the end of the steering tip. After the tie rod is knocked out, simply unscrew it from the tie rod
At the same time, if we want to maintain an approximate camber, but, for example, we don’t have a caliper, or we just want to play it safe, we need to accurately count the number of revolutions when unscrewing and write down this number. We have removed the steering end, what should we do now? We put the new one, very important, on the right side, since they come in right and left ones. It is installed in the reverse order as we removed the old one
We screw it into the steering rod, and be sure to check the data from the caliper or the number of turns that was originally. When everything is screwed on, we install the entire structure in its original position and tighten all the nuts and bolts. After all the purging manipulations, we be sure to check whether the elements converge everywhere - this is very important for the safety of the car.
You can watch the video for more details on how to remove the steering tip without a puller:
https://youtube.com/watch?v=IO%2520
There are times when everything does not go according to a good scenario, but, so to speak, with difficulties. This can be for many reasons, such as: broken threads on the nut, various types of rust, bending of an element due to external influences and other not very pleasant things. What to do in such cases?
Removal instructions without a puller
After preparing the necessary tools, you need to do the following work:
- Place the car on a level surface and place a shoe under the rear wheel to prevent it from rolling while jacking it up.
- Loosen the wheel bolts and use a jack to raise the front wheel of the car. To be safe, place a reliable stand under the threshold and release the jack a little so that the threshold rests on the stand.
- Unscrew the wheel mounting bolts and remove it. Using a metal brush, clean the steering tip from dirt, rust and dust. Treat the threaded connections with WD-40 and wait 10 minutes for the stuck nuts to loosen.
- Using an open-end wrench, loosen the locknut of the steering tip. Turn the steering wheel in the opposite direction and use a wrench or socket to unscrew the steering ball pin.
- Using a special tool, remove the steering tip. If a puller is not available, use a crowbar or pry bar by inserting the tool between the rod and the stand. Focusing on the lever, strike the end of the steering tip with sharp movements with a hammer.
- When removing the tip, use a caliper to measure the distance from the middle of the part to the steering rack mark in order to correctly install the new part and maintain wheel alignment. If a caliper is not available, you can count the revolutions when unscrewing the tip or thread turns.
- Unscrew the spare part and replace it with a new one.
Assembly is carried out in reverse order. In this case, you need to lubricate all threaded connections with graphite lubricant.
What to do if the thread on the nut is broken
If the thread on the old nut is stripped, you need to insert a pry bar so as to firmly press the steering nut against the eye, and use an open-end wrench to unscrew it. If the attempt is unsuccessful, you need to lubricate the nut with WD-40, tap it and try again.
If the edges on the nut are licked, you must use an adjustable or gas wrench.
If it is still impossible to unscrew the nut, an incision should be made on the edges with a grinder or a hacksaw.
Actions when parts are deformed
During operation, steering parts quickly wear out and become deformed. For traffic safety, they can only be replaced. If the deformed part cannot be dismantled, it can be cut off with a grinder and replaced with a new one.
There are times when there is no access to cut a part. In this case, it can be heated with a torch and, with light blows of a hammer, leveled to its original position, after which it must be removed and replaced.
Replacing the tip
If the tie rod is equipped with two ends, then it is advisable to change both of them - as a rule, they fail at the same time. The process for replacing tips is generally as follows.
- It is necessary to lift the wheel, the steering tip of which is planned to be replaced, using a jack. You need to install a stand (“goat”) under the machine for the safety of the procedure. Under the rear wheel, opposite to where the tip is being changed, you need to install a shoe. Then you need to remove the front wheel.
- Using pliers and a screwdriver, you need to remove the cotter pin securing the tip nut. Then you need to unscrew it with a wrench. If the cotter pin is rusty and cannot be removed, you can try unscrewing the nut with a socket wrench.
- The tip needs to be removed. It will be easier to do this by using WD-40. It will remove dirt and rust and lubricate the mount for a short period. It is necessary to lubricate the tip fixing pin with grease and wait 10-20 minutes.
- Install the tie rod puller and, after tightening the nut, hit the puller's swing arm with a hammer. A few blows are usually enough to loosen the fastening. Next, the crown nut is unscrewed.
- Finally remove the tip. If problems arise with this, WD-40 is used again.
- Next, a new tip is installed, assembly occurs in the reverse order. All nuts must be cottered to prevent them from falling out due to vibration during subsequent operation of the vehicle.
If there is no puller, then you will have to use a hammer and a pry bar to dismantle it. First you need to loosen the crown nut using a wrench, then you should hit it with a heavy hammer 2-3 times. The blows will loosen the nut and it can be completely unscrewed. In this case, you need to be very careful when making impacts, since a miss can damage other steering parts. And the vibrations themselves due to impacts are harmful to the steering rack. Therefore, before replacing the tips, it is better to splurge on a puller - it will cost less than subsequent replacement of the steering rack.
Sequence for replacing tie rod ends
To do this, you need a minimum set of tools, a jack, and a special device for removing the steering pins. But, you can do without a puller by using a hammer and a small pry bar, although you will have to suffer a little. There is also a risk of damage to nearby steering components. The main thing is to do everything carefully and slowly.
Replacement of tips is carried out as follows:
- it is necessary to jack up the front of the car and remove the wheel;
- The junction between the steering knuckle and the tie rod end should be cleaned of dirt. To facilitate the dismantling process, the threaded connection can be treated with WD-40;
- remove the cotter pin that secures the nut. To do this you will need pliers;
- Unscrew the nut, then use a puller to remove the pin securing the rod end. If such a device is missing, the finger can be knocked out with a hammer. True, this requires a swing, which is not always possible. You will have to adapt, spend a lot of effort and time to release the rod with the tip;
- the tip is screwed to the steering rod with a bolt that needs to be unscrewed;
- Before dismantling the worn tip, you should measure the distance between it and the squeegee. This will help you install the new part correctly;
- the new tip is installed in the reverse order;
- after replacing the part, install the wheel in place and remove the jack;
- The tie rod end on the opposite side is changed in the same way.
Important! After replacing the tie rod ends, it is necessary to visit the nearest service station and carry out a wheel alignment procedure, since any repair work on the steering system will certainly disrupt these settings. The cost of parts depends solely on the manufacturer. It is impossible to say with certainty which of the parts will last longer: the original or its analogue? In any case, you should not neglect annual maintenance and promptly change consumables and parts whose service life is approaching completion.
Steering rod device
What is a tie rod used for? This is a component of the steering mechanism of every car that connects the steering column and wheels (or steering knuckles). Without steering rods, driving a car would be impossible.
However, this is not the only function of the steering gear. It is also needed to prevent lateral slip of the steered wheelset. For this purpose, the wheels have different rotation angles. The outer wheel should be turned slightly less than the inner wheel. This possibility is provided by a mechanism called “steering linkage”. It, in turn, consists of rods: right, middle and left. Rods are also divided into transverse and longitudinal, which is determined by their location.
Why are longitudinal tie rods needed?
They are connected by means of a hinge with a swing arm. This is a common steering device for all vehicles. By rotating the steering wheel bipod, the middle rod of the trapezoid moves to the right or left. At the same time, the angle of rotation of the wheels also changes through the lateral rods. If the mechanism becomes unusable, it must be replaced immediately. However, this is technically difficult to implement, since the location of this part makes it much more difficult to dismantle.
Due to the transverse steering rods, the driver has a better feel for the vehicle control system. The inner tip of this rod connects the outer joint and the control system. Thanks to the complete freedom of movement of the hinges in any plane, excellent and precise controllability of the machine is achieved.
There is also a threaded connection on the cross rod for adjustment. Thanks to this design solution, it is possible to adjust the position of the front pair of wheels. The articulated ends of the transverse links must meet more stringent requirements, since the safety of the vehicle while driving depends on them.
The steering rack is designed quite simply. It consists of two rods connected to swing arms. The joint end is a consumable item that wears out depending on the driving style and frequency of use of the vehicle. Repairing the ball end is impractical, so it is replaced entirely. According to the manufacturer's regulations, a new part must be installed at intervals of 35–45 thousand km. But very often, critical wear, manifested in the form of knocking on the tie rod ends, occurs much earlier than this.
When choosing new rods, you need to focus on the requirements of the instruction manual and the design features of a particular car model. Not only original components, but also those produced by third-party companies have proven themselves well.
REPLACING THE TIE ROD END - TECHNOLOGY AND PROCEDURE
Considering that each part of the steering system bears a huge responsibility, if signs of malfunction appear, repairs should be started immediately.
Steering ends are considered consumables, which simply need to be replaced when play occurs. For some car models, tips have been developed that can be repaired. They need to replace the worn out liner with a new one. For both replacement and repair, the tip must be removed.
Removing the steering tip is carried out as follows:
The whole procedure takes 15-20 minutes, but it can guarantee that the steering will not fail on the road and will not cause an accident. It is important to remember that after replacing the steering tips, it is mandatory to carry out a wheel alignment. Although, some masters do not insist on this.
Steering rod puller and other features of the replacement process
After a thorough diagnosis, if necessary, you should proceed directly to dismantling the old rod and installing a new one. Before starting work, be sure to put your car on the hand brake and install thrust blocks under the rear wheels. If you need to dismantle the right link, then the front wheels are turned to the left; when dismantling the left, respectively, to the right.
Next, the front part of the car must be installed on supports. The ball joint is attached to the swing arm using a nut; it should be unscrewed after first removing the lock. For the next step, you will need a steering rod puller; use it to press the ball joint pin out of the strut swing arm.
Use a screwdriver to unscrew the ends of the locking plate, this way you will loosen the bolts that secure the tie rods, then unscrew them altogether. It is necessary to rotate the connecting plate so that you can disconnect the rod from the steering mechanism. Now you can remove it. If it is necessary to replace the tie rod end, then it must be clamped by the hexagon of the coupling in a vice and loosen the lock nut of the tip.
When unscrewing the tip itself, do not forget to count the number of revolutions completed. It is best to record this number on paper so as not to forget. When installing a new tip, screw it in exactly the same number of turns. If it is necessary to replace the cover, you need to remove the old one, then lubricate the surface with sealant, and only then install a new one. You need to reassemble the steering linkage in exactly the reverse order, so don’t get distracted when you disassemble your car.
Expert opinion Ruslan Konstantinov Expert on automotive topics. Graduated from Izhevsk State Technical University named after M.T. Kalashnikov, specializing in “Operation of transport and technological machines and complexes.” More than 10 years of professional car repair experience.
You can remove the steering rod without a special puller. To do this, you first need to jack up the car and be sure to place reliable stands under the bottom, thereby protecting the car from falling. The steering tip finger must be moistened with WD-40 or any other penetrating lubricant before starting any work.
Since the work is performed without a puller, this procedure is important, because
Lubricant will help you remove the part faster. In order not to go to a service station after repairs to carry out wheel alignment, you must measure the length of the tip. Now you can proceed to removing the tip. In most cases, a castle nut and a locking pin are used for fastening. First of all, you need to remove the cotter pin, and then use a socket head or a spanner to remove the nut from its place; you do not need to unscrew it completely. The main problem with dismantling is sticking of the steering knuckle fastener to the pin. To remove it, you need a heavy hammer, which you need to hit the nut hard several times so that the tip comes off. After this, you can completely unscrew the nut and remove the tip. It seems that the method is very simple and there is no need to buy a puller for this, but you can use a hammer and brute physical force only as a last resort. If the car is equipped with a steering rack, this part may fail due to vibration due to strong impacts. It will not break right away, but each such repair sharply reduces the service life of the rack. In addition, you can damage the thread of the tip; just hit your finger once and you are almost guaranteed to have to go to the store for a new part.
Home →
Device → Chassis → Steering wheel →
Replacement procedure
Since there are many brands of cars, we will analyze the procedure for replacing the tie rod end on the most popular popular cars VAZ 2108, 09, 099.
Preparation.
- To stop the car, use the handbrake. For reliability, install chocks under the rear wheels;
- Using a jack, lift the front wheel and support it for safety;
- Remove the wheel;
- If necessary, clean everything from dirt;
- If it is impossible to unscrew the tie rod nut, use WD-40 or similar auto chemicals.
Replacing the tie rod end.
Loosen the nut that secures the ball joint to the tie rod from the retaining cotter pin.
Unscrew the nut shown above.
Using a special puller, press the ball pin out of the steering knuckle.
The steering rods are attached to the steering mechanism using bolts. The bolts are not immediately noticeable, since they are secured with special locking plates. To get to them, bend these plates with any tool that allows you to do this.
In other car models, bolts may be locked differently.
The bolt that secures the steering rod is turned out completely, but the second bolt is only loosened.
By loosening the second bolt, you can now turn the locking plate to the side and completely disconnect the tie rod.
You can see a hexagon on the tie rod. Clamp it in a vice and loosen the locknut.
The tie rod end can be unscrewed, but before that, take a piece of paper and a pen to write down the number of revolutions or remember them, and also put a mark where it was located, this is important.
Install the new tip by tightening it the same number of turns that you remembered. For precise installation, use the mark.
There are three options for getting out of this situation
The first option is to cut off the nut with a grinder.
The second is to place a second jack under the tip itself and press the steering tip pin to the steering knuckle.
Since it is conical, it will clamp and you can further unscrew the nut.
If you don’t have a grinder or a second jack, you can place a stump or some kind of stand under the steering tip and slightly lower the jack on which the car is currently standing.
Since I have a second jack, I will use it, try to press the steering pin a little against the steering knuckle and unscrew the nut.
There is no need to lift the car too much. The spring is pressed in a little and this will be enough for the nut to unscrew.
How to check tie rod ends?
The first method is for an assistant to sit behind the wheel and turn the steering wheel left and right.
And at this moment you crawl under the car and look from under the car to see if there is play on the steering tips.
If there is no assistant, you can crawl under the car yourself and pull all the steering ends, rods - everything you can.
If the play of the steering tip is already significant, then it will be impossible not to notice it.
Look how my tie rod is hanging out. It can be seen that it is broken and dangling very much.
While driving, a strong roar can be heard from inside the car.
If you have neither a pit nor an assistant, then this is not a problem.
The steering tip can be checked by simply jacking up the front wheel and shaking it from side to side.
We take the suspended wheel with both hands and push it first with one hand, then with the other. With these movements we check the backlash.
As you can see, there is a huge gap here, you also saw it from the pit. If you talk too much, you can even hear the tapping of the steering tip.
After you have discovered the play, remove the wheel and get to the very tip.
It is necessary to find out what specific type of tip is installed on your car, since there are two types of steering tips on the Chevrolet Aveo in the T250 body.
After dismantling the wheel, you can clearly see how the steering tip dangles. The play is already quite significant, which means that it needs to be changed urgently.
You cannot drive with such a tip, because it may even tear off. If you suddenly fall into a hole, the wheel will jerk and the impact may cause the steering wheel ball to fall off.
That is why you should never drive for a long time and severely break the steering tips. If you hear something rattling, go immediately and check where it’s rattling.
So that after replacing the steering tip there are no problems with toe-in and camber - by the way, there is no camber here.
It is factory-made and not adjustable, but the toe-in is adjusted using the same steering tip and tie rod - we take a tape measure and measure from some fixed part.
In this case, I measure from the boot clamp to the center of the bolt, or to the edge of the bolt, if convenient, I measure along the edge of the bolt on this side.
Here I get 25 cm and 8 mm. I write down this value so as not to forget, and remove the steering tip.
How to unscrew the steering wheel nut
If there is a broken thread that cannot be unscrewed, there are three ways:
- You shouldn’t immediately take a radical approach to this matter; perhaps not everything is as bad as you think and just simple manipulations are enough. First, let's clean the entire surface on which we will work with a wire brush and drop a little penetrating lubricant. If you do everything described above, then there is a chance that a regular spanner will help you to unscrew a bolt or nut with torn edges. If not, there are other ways. You can try to simply tap the ill-fated object (but not too hard!).
Lubricating a soured nut with WD-40
Cutting the nut thread with a grinder
Replacing tie rod ends without a puller
It was mentioned earlier that a set of a hammer and a pry bar can replace a specialized puller. In this case, the whole process consists of the following steps.
- We jack up the car, install bricks under the rear wheels, dismantling the front ones.
- Clean and lubricate the joint between the tie rod end and the steering knuckle with WD-40.
- Remove the cotter pin and nut.
- We knock out the finger using a pry bar and/or a hammer.
- Unscrew the bolt securing the tip to the rod.
- We measure the distance between the worn part and the squeegee.
- According to the available data, we install a new tip.
- We carry out the assembly procedures in reverse order.
- We mount the wheel and remove the car from the jack.
- Check the wheel alignment.
The cost of replacing steering wheel ends at a car service center is quite affordable, and in order to save your nerves and effort, it is best to trust the professionals. This is quite simple to do by filling out the form below.
Recovery
- Emery or grinder.
- Extruder.
- An electric drill with a large chuck (so you can hold your finger in it to sand the ball with sandpaper).
- Metalwork yews.
- Welding machine (preferably semi-automatic).
- Compressor.
Restoration of supports can occur in two ways:
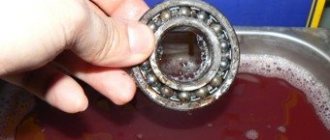
- Converting a non-separable hinge into a collapsible one, grinding the pin ball and replacing the liners.
- Repair by injecting softened plastic into the gap between the ball and the body using an extruder.
Of course, you shouldn’t buy equipment for a one-time repair, but you can quickly make a simple extruder with your own hands from an old brake master cylinder by attaching a lever to it to press the piston. You can heat it to soften the plastic with a torch or blowtorch.
Carrying out work
Repair and restoration in the first way begins with dismantling the supports. To disassemble a body welded from two cups, you need to drill out welding points on one of the cups and separate the cups using a chisel and hammer. On a body with an inserted bottom, grind off the flared edges using emery or a grinder, and knock out the bottom with a hammer to the end of the finger. An insert with a finger is inserted into the body of two cups, the halves are pressed against each other and several tack welds are made, trying not to overheat the insert. For a case with the bottom removed, measure the outer and inner diameters and make a steel ring in accordance with these dimensions, about 10 mm high with a thread inside and a plug screwed into it. Weld the ring to the body, cool, insert the insert with the pin into the body, screw in the plug, press the liner with it, drill a Ø 2 mm hole in the ring close to the plug and secure it with a cotter pin.
Do-it-yourself repair and restoration using the second method usually takes place without disassembling the unit.
A hole with a diameter of about 6 mm is drilled in the bottom of the body, its size depends on which extruder is available to you. The gap between the ball and the liners is cleared of dirt and blown with compressed air to remove sand and chips. Through a hole drilled in the bottom, using an extruder, softened plastic is injected into the gap between the pin ball and the body. Let it cool and the repair is ready. The disadvantage of this method is that you cannot see whether the geometry of the ball has been preserved and you cannot polish it to remove traces of corrosion, so the restoration results will be short-lived.