PROCEDURE FOR ADJUSTING VAZ 2107 VALVES - STEP-BY-STEP INSTRUCTIONS
When everything is ready, you can begin direct regulation. Before mastering the procedure, you should understand the structure of the gas distribution mechanism and find out where the thermal gap is located that should be adjusted. The valves on the VAZ 2107, in fact, like on the vast majority of automobile engines, are located at the top, that is, the valve closes the hole located above the piston.
For each cylinder there are two valves: an inlet for supplying a combustible mixture and an outlet for removing exhaust gases. The clearance in the cylinder head opens due to the action of the camshaft cams. The camshaft is located above the valves and has its own eccentric cam for each of them, which transmits movement to the valve stem through a special lever. The gap between the cam (the point opposite the eccentric) and the lever should be adjusted.
Now you need to take two open-end wrenches for “13” and “17”, as well as a dipstick. The valves are regulated in accordance with a certain order, for which they are numbered from the front of the engine.
The VAZ 2107 valves are adjusted as follows:
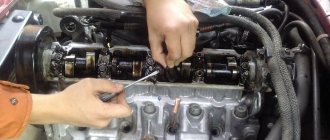
1. insert the probe between the cam and the lever of the 8th and 6th valves alternately; 2. if the probe passes with little effort, then the gap corresponds to the norm; 3.unimpeded passage or sticking of the probe indicates the need for adjustment; 4. fix the head of the adjusting bolt with a wrench set to “13”, release the lock nut using a wrench set to “17” and turn the bolt in the desired direction to increase or decrease the gap, tighten the lock nut and check the gap. It is necessary to proceed in this way with each valve, each time turning the crankshaft 180° from the previous point. This operation corresponds to turning the camshaft by 90°. With each turn it is necessary to adjust the following numbered valves:
1) 180° - 4th and 7th; 2) 360° - 1st and 3rd; 3) 540° - 5th and 2nd. The procedure for adjusting the valves of the VAZ 2107 must be strictly followed, otherwise the settings of the gas distribution system can be completely disrupted. After each valve has been checked, it is necessary to turn the crankshaft several times and check the clearances again. It is necessary to ensure that the probe enters each of the gaps with absolutely the same force.
The procedure for adjusting valves on a VAZ 2107 with your own hands
The 8-valve engines that were installed on the Zhiguli Classic from time immemorial until they left the assembly line in 2012 were not equipped with hydraulic compensators. Therefore, adjusting the valves of the VAZ 2107 is part of the routine maintenance of these cars. You can do it yourself. Compliance with this requirement does not depend on the injection system (carburetor or injector).
Normal operation of the timing belt is impossible without observing the gas distribution phases. Violation of the factory clearances even on one pair of valves leads to inefficient combustion and poor removal of crankcase exhaust. The engine begins to chug, rev and make strange sounds (metallic knocking) during operation. If these symptoms occur, it is time to adjust the valves.
What will happen if you do nothing?
Improper combustion causes increased wear on almost all engine parts.
If the valve clearance is greater than desired, the camshaft cam will hit the actuator arm and valve stem. And as a result, they all wear out quickly.
If the gap is small, the valve does not sit entirely on the seat. Hot gases from the combustion chamber penetrate into the resulting gap. As a result, the exhaust valve burns out, the seals wear out, oil starts to burn and other joys begin. Therefore, if symptoms appear, do not waste time. Adjusting the valves of the VAZ 2107 is a must.
Symptoms
The engine reports any malfunctions in advance by uneven operation. Among the main signs of valve clearance violations:
- metallic knocking when the engine is running;
- deterioration of acceleration dynamics;
- tripping at idle;
- increased fuel and oil consumption;
- “breathing” effect on carburetor cars.
First of all, pay attention to the knock. Other signs often indicate simpler malfunctions: incorrect ignition, a carburetor that requires adjustment, failure of one of the sensors (on the injector), etc.
Do-it-yourself valve adjustment
Adjustment sequence table
Adjusting the valves is a simple procedure; you can easily do it yourself at home. The order of setting the gaps depends on the injection system: a carburetor is installed or an injector.
Please note that on a hot engine, the valves can be adjusted in pairs: 1st cylinder with the 4th, and the 3rd with the 2nd. At this point, the valves are in overlap, the nose of the cam faces sideways and not up, intake and exhaust can be adjusted simultaneously
Carburetor cars
- remove the air filter housing, disconnect the choke and gas hoses, do not remove the carburetor;
- remove the cylinder head cover (you will need a “ten” key);
- use a 0.15 mm calibration feeler to check the current gaps: according to factory specifications, the feeler gauge should fit between the cam and the lever with little effort;
- if the gap on some valves is different (the dipstick does not fit in or, on the contrary, hangs out), make an adjustment.
Using a feeler gauge to adjust gaps
Valve adjustment order: 8-6 (set TDC for cylinder 4 according to the mark on the crankshaft pulley), 4-7 (rotate 180 degrees), 1-3 (rotate another 180 degrees), 5-2 (and another 180 degrees ).
To facilitate the procedure in the future, when disassembling the engine, it is recommended to mark the TDC position marks for each cylinder on the camshaft pulley.
Injector
The process of adjusting the valves on the “seven” with an injector is similar. It is also easy to do it yourself. The only difference is that you need to disassemble or disconnect to access the cylinder head cover:
- hoses going to the fuel rail;
- air filter tubes;
- accelerator cable.
Further actions are similar.
Adjusting the valve clearances on a VAZ-2107 with a carburetor or injector can be done not with a feeler gauge, but with the help of a special adjustment rail and a micrometric indicator. In this way, you can set the gaps with factory accuracy without “dancing with a tambourine.” After carrying out these measures, the engine should run like a clock. Do not forget to check the compression in the cylinders after finishing the work. This will help assess the condition of the engine.
Adjusting the valves should be combined with replacing the cylinder head cover gasket. This is the weak point of VAZ cars. It rarely lasts long after removal.
Do-it-yourself adjustment of VAZ 2106 valves - step-by-step instructions.
Step 1: Prepare your tool.
This includes:
- open-end wrenches for 17 and 13;
- 0.15 mm feeler gauge (can be replaced with a micrometer);
- flat screwdriver;
- socket set and ratchet.
Step 2. Make sure that all the necessary conditions are met:
- the engine temperature is as close as possible to the temperature in the garage (outside);
- The timing belt has normal tension.
We recommend: Functions and purpose of engine oil in an engine
Step 3: Remove the valve cover.
- Unscrew the fastening nuts (3 pcs.) of the air filter cover and remove it.
- Remove the filter itself.
- Having loosened the 4 fastening nuts, disconnected the breather hose, the choke cable and the carburetor damper drive rod, remove the remaining part of the air filter housing.
- Unscrew the mounting nuts (8 pcs.) of the valve cover - here you will need a 10mm socket and a ratchet - and remove it.
Step 4. Align the crankshaft and camshaft pulley to the marks.
Essentially, if the timing chain tension was correct, the marks will align on their own - without adjustment. However, to be on the safe side, it is still better to double-check whether the crankshaft pulley mark and the longest mark on the carburetor front cover match, as well as the camshaft sprocket mark and the protrusion on the cover.
The procedure for adjusting the valves of the VAZ 2106.
Step 5: Adjust valves #6 and #8.
If the marks are correctly set, the piston of the 4th cylinder of the engine is at TDC (top dead center), which means it’s time to adjust valves No. 6 and No. 8. The valve number is counted from the front of the engine, that is, to your left.
So, take a dipstick and insert it between the camshaft and the rocker. This procedure should be carried out with noticeable difficulty. If this is not the case: the dipstick goes in very easily or, conversely, does not insert at all - by acting on the adjusting bolt and control nut, the valves must be adjusted.
- Using a 17-mm open-end wrench, loosen the locknut clamp.
- Without releasing the latter, use a 13mm wrench to rotate the upper adjusting nut until the optimal clearance is obtained.
- Tighten the locknut to its original position.
- Take control measurements with a probe.
- If necessary, repeat all the above steps.
Step 6.
Turn the crankshaft 180 degrees and adjust valves No. 4 and No. 7 in the same way as step 5.
Step 7
Adjust valves No. 1 and No. 3, after first rotating the crankshaft 180 degrees (360 degrees from the initial position).
Step 8
Again, rotate the crankshaft 180 degrees (540 degrees from the original position) and adjust valves No. 2 and No. 5. The actions are the same.
Step 9
Complete the work on adjusting the valves on the VAZ 2106 by assembling all the removed parts in the reverse order.
Adjusting valves on VAZ 2107
“Classic” engines do not have hydraulic compensators in the timing belt, so adjusting the valves of the VAZ 2107 is a mandatory element of regular vehicle maintenance. The work is simple and can be done independently. The special tool required for adjustment is quite accessible and does not require special qualifications to use.
Specifications
| OPTIONS | MEANING |
| Engine weight, kg | 930 |
| Dimensions (length/width), mm | 1425/827 |
| Cylinder block material | cast iron |
| Supply system | Direct injection |
| Engine operating order (counting from the fan side) | 1 — 3 — 4 — 2 |
| Cylinder displacement, l | 7.43 |
| Power, l. With. | 90 |
| Nominal speed, rpm. | 1750 |
| Number of cylinders | 4 |
| Cylinder arrangement | vertical |
| Piston stroke, mm | 140 |
| Cylinder diameter, mm | 130 |
| Compression ratio | 16 |
| Maximum torque at 1200 - 1300 rpm, Nm | 412 |
| Fuel | diesel |
| Minimum specific fuel consumption, kWh | 1.62 |
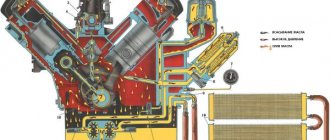
| Cooling system | Liquid, with forced circulation of coolant |
| Oil | In summer, diesel oil DS-11 (M12V) or M10V; in winter - DS-8 (M8V). |
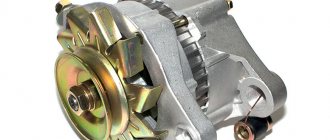
| Generator | DC 214A1 or G304. |
| Hydraulic pumps | 2 gear type pumps NSh10DL and NSh46UL; driven by a gear transmission from the crankshaft. |
Adjusting valves VAZ 2106; video
The engine is installed on tractors DT-75M, T-4A, T-4, excavators, rollers, motor graders, pumping units, power plants.
Why adjustment is needed
When heated, engine parts, like any physical body, expand. This is especially true for elements of the gas distribution mechanism. The main timing parts - the valves - are in direct contact with the hot gases in the cylinder, opening and closing the intake and exhaust ports. The tightness of valve closure affects engine compression, efficiency and power.
The valves close under the influence of special springs, and to open they are pressed by rockers - levers driven by camshaft cams. When the rocker is not pressing on the valve stem, there should be a thermal gap between it and the camshaft. Why is valve clearance needed on VAZ 2107?
This is interesting: How to apply varnish to a car after painting
When the engine heats up, the length of the valve stems increases especially strongly (the larger the linear dimension, the greater the absolute value of thermal deformation). If in a cold state the parts fit tightly, when heated the rod will be constantly pressed, the valve will not close the window, which will lead to gas breakthrough. This threatens, in addition to reducing efficiency, burnout of the valve plates and engine breakdown. Therefore, there should be a gap of 0.15 mm between the rocker and the camshaft of a cold engine.
If the gap is greater than what is provided, the valves do not open well and the mechanism knocks; if it is less, the valves remain slightly open when this is unacceptable.
Over time, parts wear out and wear appears on the camshaft cams, rockers and valve stems. Therefore, owners of cars that are not equipped with hydraulic valve clearance compensators have to regularly check and adjust the timing belt clearances.
How to set the correct gap
There are special instructions for adjusting the valves of front-wheel drive and rear-wheel drive cars.
Yes, the valve head should fit tightly into the seat, but there should be a micro gap. It is required so that the valve stem does not rest tightly and rigidly on the upper part.
There are clearances strictly calculated and set by the engine manufacturer. So, the gap should not be more than 0.15 mm. The maximum permissible deviation from this value is 0.05 mm. This must be checked when the internal combustion engine is cold.
Correct valve adjustment means high engine power (thrust) and low fuel consumption.
Preparatory work
Before starting the adjustment, you should perform the following operations:
- remove the air filter housing from the carburetor;
- remove the pipes and wires that prevent the dismantling of the timing cover;
- unscrew the nuts securing the timing cover;
- remove the timing cover.
When access to the valves is ensured, you can begin adjusting the thermal clearances. It should be remembered that the gap value of 0.15 mm was set by the designers for a cold engine. Therefore, before carrying out work, you must wait until the engine has cooled down. In addition, working on a hot engine can cause burns.
Adjusting the valves on a VAZ 2107 carburetor and on an injection model is absolutely no different. The only exceptions are engines on which hydraulic clearance compensators are installed. In this case, no adjustment is required.
Adjusting valve thermal clearances using a feeler gauge
- First you need to unhook all the tubes from the valve covers, the cables leading to the damper actuators, and dismantle the air filter housing. To make the crankshaft rotate easier, the spark plugs can also be unscrewed.
- Unscrew the two nuts and remove the cover, after which any remaining oil is removed from the top of the cylinder head.
- The front timing belt cover is removed.
- The piston of the cylinder, from which the clearance adjustment will begin, is set to the top dead center of compression. All valves in this position will be closed. During the process, for the most accurate result, you can rely on the marks applied by the manufacturer.
- Next, the crankshaft should be turned clockwise along the sprocket. For optimal valve adjustment, the marks on the crankshaft and the bearing housing must match. For greater convenience, you can add your own marks. Then in the future the position of each cylinder can be determined by the teeth of the sprocket.
- The locknut on the screw used to set the gap is pressed out. The gap is set so that the flat feeler gauge is the limit for turning the bolt. After which the locknut is tightened. At the same time, it is necessary to monitor the tightening force of the locknut, otherwise the obtained parameters can be lost.
- Having finished tightening, you need to check the set gap again with a feeler gauge. The latter should be done with light effort. If the result differs from the desired one, carry out the adjustment again.
- Repeat the process with all subsequent valves.
Above is a method for adjusting valves using a feeler gauge. On many modern cars, special shims are used for this procedure. The entire scope of work is perfectly demonstrated in the video below.
An example of valve adjustment on a VAZ 2108–2115
How to adjust a 6-cylinder in-line engine: video
How to adjust valves on a VAZ 2107
The procedure is as follows:
- Check the chain tension and tighten it if necessary. If the chain is loose, the valve clearances will not be adjusted correctly.
- Turn the crankshaft with a wrench so that the mark on the pulley aligns with the long mark on the front engine cover. Make sure that the timing phase is not shifted (the marks on the sprocket and the camshaft cover match).
When the timing belt and crankshaft are aligned to the marks, you can begin adjusting the thermal clearances of valves 6 and 8.
Adjusting the gap is done as follows:
- Using a 17mm wrench, loosen the tightening nut (locknut) of the valve adjusting bolt;
- insert a dipstick (0.15 - intake valves, 0.20 - exhaust valves) between the camshaft and the valve pusher;
- set the required gap by turning the adjusting bolt with a key to 13;
- While continuing to hold the adjusting bolt, tighten the locknut;
- check the gap with a feeler gauge;
- If the gap is broken when tightening the locknut, the adjustment must be repeated.
After adjusting the valves, all that remains is to reinstall the timing cover and other parts. The machine is ready for use.
Checking and adjusting thermal clearances of VAZ 2101-2107 valves
To complete the work, you will need a special flat feeler gauge 0.15 mm, open-end wrenches 13 and 17, a key for turning the crankshaft using a ratchet.
Before checking and adjusting the thermal clearances of the valves, it is necessary to remove the distributor cover and the valve cover of the car engine, and adjust the tension of the chain (engines 2101, 21011, 2103, 2106) or belt (engine 2105). Checking and adjustment should be carried out on a cold engine.
On engines of rear-wheel drive VAZ 2101, 21011, 2103, 2105, 2106 cars, the thermal gap between the rear part of the camshaft cam and the working surface of the valve lever is measured. It is 0.14-0.17 mm for intake and exhaust valves.
The procedure for checking and adjusting thermal valve clearances on engines of VAZ 2101, 2102, 2103, 2104, 2105, 2106 cars
— Check and adjust the clearance at the 8th and 6th valves
We turn the crankshaft by the ratchet with a special wrench clockwise until the installation mark on the camshaft sprocket (pulley) coincides with the mark protrusion on the camshaft bearing housing. The contact of the distributor “runner” looks at the socket of the high-voltage wire of the fourth cylinder in its cover (to determine the location of the required socket with the distributor cover removed, we focus on the screws on four sides of the distributor body; they coincide with the location of the sockets).
When the marks coincide, a compression stroke occurs in the fourth cylinder, and an intake stroke occurs in the third. Accordingly, the 8th exhaust valve in the fourth and the 6th intake valve in the third cylinder will be closed, and there will be a certain gap between the working surface of their levers and the back side of the camshaft cams. This is what should be checked and regulated.
We check the thermal gap - insert the probe between the cam and the lever, it should enter with a slight pinch and not “bite”.
If the gap is too small or too large, loosen the locknut of the adjusting bolt with a 17 wrench, hold it from turning, and use another 13 wrench to rotate the adjusting bolt, decreasing or increasing the gap. We check the gap with a feeler gauge and if it is normal, tighten the locknut, holding the adjusting bolt with a 13mm wrench.
Checking and adjusting valves VAZ 2101-2107
— Check and adjust the thermal gap at the 4th and 7th valves
To do this, turn the crankshaft 180º using the ratchet. The “runner” contact rotates 90º and looks at the second cylinder. We check and, if necessary, adjust the thermal gap.
— We check and adjust the thermal clearances at the 1st and 3rd valves
Again we turn the crankshaft 180º using the ratchet. The contact rotates another 90º and looks at the 1st cylinder.
— Check and adjust the thermal gap at the 5th and 2nd valves
Again, turn the crankshaft 180º using the ratchet. The contact rotates another 90º and faces the 3rd cylinder. We check and adjust in the same way.
All checking and adjustment of thermal clearances of engine valves has been completed. After this, you may have to slightly adjust the engine idle speed using the carburetor adjusting screws.
Table of the sequence of adjusting the thermal clearances of the valves of engines 2101, 21011, 2103, 2105, 2106, 2107
Valve adjustment table for classic VAZ
Notes and additions
— Thermal clearances in the valve actuator are necessary to compensate for the thermal expansion of its elements during engine warm-up and operation. If the gaps are small or absent at all, the valves do not close tightly, their edges burn, the combustion process of the fuel mixture in the combustion chambers is disrupted, and the power and throttle response of the engine are accordingly reduced. Fuel consumption increases. If, on the contrary. The gaps are too large, a metallic clatter is heard under the valve cover at idle, the valves do not open enough, the filling of the combustion chambers and their subsequent ventilation are disrupted. Again, this leads to a drop in engine power and throttle response, increased fuel consumption, and uneven idling.
Twokarburators VK - More information on the topic in our VKontakte group, on Facebook Twokarburators FS and on Odnoklassniki - Twokarburators OK
More articles on VAZ 2101, 2102, 2103, 2104, 2105, 2106, 2107 engines
— Signs of wear on valve stem seals on VAZ car engines
— In-place check of the serviceability of the engine valve mechanism
— Burnt out valve, signs, causes
— Checking the VAZ 2101-2107 engine circuit
— VAZ 2101-2107 engine chain length
The procedure for adjusting the valves of the VAZ 2107
As mentioned above, with the marks on the crankshaft pulley and the front engine cover aligned, you can adjust the clearances of the 6th and 8th valves installed on the 3rd and 4th cylinders. Next, you need to rotate the crankshaft with a special key to change the position of the camshaft. The camshaft rotates twice as fast as the crankshaft, so the latter must be rotated a maximum of 540 degrees, which corresponds to a camshaft rotation of 270 degrees. Each pair of valves is adjusted after turning the camshaft 90 degrees:
- 0 degrees - 6 and 8 valves;
- 90 degrees - 4 and 7 valves;
- 180 degrees - 1 and 3 valves;
- 270 degrees - 5 and 2 valves.
The valve adjustment tables for all “classics” are similar.
Adjusting valves on a VAZ 2107 by micrometer
Instead of a feeler gauge, a micrometer mounted on a special rail is used to adjust the valve clearance. With its help you can control the amount of free play of the rockers. A gap of 0.15 millimeters corresponds to a rocker free play of 0.52 millimeters.
The rack has special nuts that allow it to be screwed onto the camshaft mounting studs. This allows it to be installed sequentially over each pair of valves. It is necessary to tighten the rack fastening nuts well so that it does not swing during measurements. After this, you need to fix the micrometer (indicator) on the rail so that it rests against the edge of the rocker that presses the adjustable valve.
To check the clearance, you need to lift the rocker cam with a special grip or finger and check the amount of free play using the arrow of the device. If it is not equal to 0.52 mm, then it should be set in the same way as when adjusting using a feeler gauge.
This adjustment method is more accurate and reliable. The feeler gauge, passing between the rocker and the camshaft, ignores the possible gap that appears as a result of wear on the parts.
The micrometer determines the actual amount of free play of the rocker; in addition, it is easier and more reliable to navigate by the indicator readings than by the free movement of the feeler gauge. This allows you to adjust the clearances in the valve mechanism as accurately as possible.
Adjusting the performance of the float mechanism
The level in the float chamber affects the quality of the fuel mixture. When it increases, an enriched mixture will be supplied to the system, which will increase gasoline consumption and add toxicity, but will not add dynamic qualities to the car.
Without checking the functionality of this unit, it will not be possible to correctly adjust the carburetor.
The procedure includes the following operations:
- Control of the position of the float
in relation to the walls and lid of the chamber. This eliminates possible deformation of the bracket fixing the float, helping it to sink evenly. This is done manually, placing the bracket in an equilibrium state relative to the body. - Adjustment must be made when the needle valve
is closed. We place the lid vertically, remove the float, and use a screwdriver to slightly bend the tongue of the bracket. It is used to move the locking needle. You will need to install a small gap of 8±0.5 mm between the float and the cover gasket. If the ball is recessed, then the gap should remain no more than 2 mm. - process with the valve open
begins when the float is retracted. Then the distance between it and the needle should be 15 mm.
Adjusting valves VAZ 2107 carburetor
Volzhsky auto has reliable and easy-to-maintain gasoline engines with a displacement of 1500 cm 3 . On such power units, after reaching a certain mileage, the thermal gap is checked and adjusted. This process is usually accompanied by replacement of the gasket and repair of individual engine components, within the framework of the routine maintenance provided for in the service book.
During operation of the power unit, its parts heat up, but if there is no gap between the valve lever and the cam, they knock on the seat. This malfunction does not allow the carburetor to be adjusted correctly and leads to increased fuel consumption. Careful adjustment and, if necessary, replacement of failed parts will help eliminate the problem.
Adjusting valve thermal clearances on imported cars
Timely installation of the correct gap size is also necessary for engines of imported cars. As a rule, the adjustment process differs little from carrying out these operations on domestic engines. So, for example, on Honda cars, valve clearances can be set manually, without the help of a specialist, using only a screwdriver and a wrench. As an exception, we can name several rare power units from the manufacturer that use a hydraulic compensation system (C32A engines). In other engines of various series (B16-18-20; D13-14-15-16-17; R18-20; ZC and others), repairs are carried out quite simply and without the use of additional equipment and equipment.
Regulation of the gas distribution mechanism
To perform service work, you will need an equipped garage box, a set of plumbing tools and a calibrated one. Maintenance and repair of the timing belt is also carried out if the valves knock with a sharp increase in engine speed. In this case, it is not necessary to dismantle the carburetor; it does not interfere with checking and setting the correct gap in the gas distribution mechanism.
Repair and adjustment of valves is carried out on a cold engine at an ambient temperature of about 20 °C. This will require replacing the head cover gasket. The work is performed in the following sequence:
- The carburetor and other units are inspected, and the air filter housing is removed from it.
- Using a “10” wrench, the fastening bolts are unscrewed and the heads are dismantled.
- We set the gearbox to the neutral position and, using a special key, set the piston of the first cylinder to the top dead center position.
- Using a calibrated feeler gauge 0.15 mm thick, check the gap between the cam and the lever in accordance with the table.
- If the indicator does not correspond to the standard, then adjustment is made using two keys, one is released and the lock nut is held, the other is screwed in or the stop is unscrewed.
- Rotate the crankshaft 180° and check the gap in the next pair of parts.
This is interesting: Which carburetor is better for the UAZ engine 417
The operation is repeated four times for all eight valves, further repairs include replacement and installation of a new gasket. When attaching the cover, the bolts are tightened in a certain order. At the end of this process, the air filter housing is installed on the carburetor.
Compression check and troubleshooting
This procedure allows you to assess the condition of the parts of the cylinder-piston group. It shows quite accurately whether engine repair, replacement of worn parts, tuning and adjustment of the gas distribution mechanism is required. In some cases, the situation can be corrected by grinding in the VAZ 2107 valves, which restores the tightness of the joint between the parts.
The measurement is carried out with a special pressure gauge with the spark plugs turned out, and it is advisable to disconnect the carburetor from the fuel pump. This will prevent it from flooding with fuel and make starting easier. The test is carried out with the throttle valve fully open, so that the carburetor creates minimal resistance to air flow. The lowest indicator demonstrates the degree of maximum wear of the cylinders.
If the difference in compression values for different cylinders is above a certain value, which means a large gap between the cylinder wall and the piston.
Engine repair and subsequent valve adjustment will be required. During the work, compression and oil scraper rings are usually replaced.
VAZ valve: operating features
Let's start with the fact that for stable operation of a car engine both at low and high speeds, in addition to the adjustments themselves, the heating and wear of the timing belt in an engine without hydraulic compensators (HC) should be taken into account separately.
To put it simply, over time, valve clearances change, and the mechanism itself wears out. If on a car with a hydraulic valve the required clearance is set automatically, in engines without compensators the changes are eliminated and adjusted by manually adjusting the valves. In this case, it is recommended to adjust the valves every 15-20 thousand kilometers.
- Let's move on. The VAZ 2107 valve is a cylindrical plate with a steel rod or leg. The valve is located in the cylinder head and, when closed, is adjacent to the valve seat.
During operation, the element is subjected to large thermal and mechanical loads, so the material from which it is made is a special type of steel. This steel must be resistant to various operating loads.
In operating condition, that is, after the internal combustion engine has warmed up, the valve expands and its rod lengthens. The result is that the gap between the end and the pushing cam (rocker arm) also changes.
Gradually, during the operation of the vehicle, a strong increase in the gap occurs (exceeding the permissible values). It is for this reason that there is a need to adjust the valves. A number of signs indicate that it is necessary to carry out adjustment work and adjust the VAZ valves:
- when the engine is running, the appearance of extraneous noise is noticeable (loud clicks or clattering sounds in the engine compartment, especially when the gas pedal is sharply pressed);
- decreased dynamics during acceleration;
- reduction or disappearance of compression, engine trouble;
- significant increase in fuel consumption.
Purpose of valves in an engine
During operation, the engine consumes air and fuel and emits exhaust gases. The valves allow air-fuel mixture to enter the cylinder (through the intake valve) and exhaust gases to be removed (through the exhaust valve). The alternation of intake and exhaust cycles is called the engine duty cycle. It consists of four measures.
- Inlet. Inlet valve is open. The piston moves downwards and, due to the vacuum created in the cylinder, carries with it the air-fuel mixture, which enters through the open intake valve.
- Compression. Both valves are closed. The piston moves upward (toward the spark plug) and compresses the air-fuel mixture.
- Working progress. Both valves are closed. The spark plug produces a spark that ignites the air-fuel mixture. During combustion of the air-fuel mixture, a lot of gas is formed, which pushes the piston down.
- Release. The exhaust valve is open. The piston moves up and pushes exhaust gases out of the cylinder through the open exhaust valve.
The engine operating cycle consists of four strokes, during which the working mixture enters, is compressed and burns, then the exhaust gases are removed
Video: how the engine works and the purpose of the valves
The meaning of valve adjustment
The opening of the valve is controlled by the camshaft cam. When the engine is running, the valve heats up and elongates, which can cause it to not close completely. To compensate for this elongation, there is a gap between the valve and the camshaft cam . The point of adjusting the valves is to set the required value of this gap.
Signs of improper valve adjustment
Signs of improperly adjusted valves include:
- Extraneous metallic knocking noise from under the valve cover.
- Reduced engine power.
- The smell of pure gasoline in the exhaust gases.
Adjusting the valves on VAZ 2107 cars is mandatory after repairing the gas distribution mechanism, as well as after a mileage of 10–15 thousand kilometers.
Video: operating principle of the gas distribution mechanism
Adjusting valves on a VAZ 2107
Adjusting the valves on the VAZ 2107 is not difficult. However, you will need some spare parts and materials, as well as detailed instructions.
Required tools and materials
Before you begin adjusting the valves, you must acquire the following tools and materials:
- A set of feeler gauges for adjusting gaps (or a micrometer and a rod). This is the main tool in the work. It must be of good quality; you should not buy probes from a dubious manufacturer.
- Set of medium-sized open-end wrenches (10–19 mm).
- Valve cover gasket. It is better to choose a good gasket manufacturer: Corteco or Elring.
- Clean rags or paper towels.
A feeler gauge set is the main tool for adjusting valve clearances.
Adjustment using indicator
For more precise adjustment, a special device is used, which includes a metal rod with an indicator in the form of a micrometer. The rack is attached with nuts to the camshaft housing, then an indicator is installed on it so that its needle tip comes into contact with the rocker plane. Next, using a special grip, you need to pull the rocker up without much effort, the micrometer needle at this moment should deviate by no more than 52 divisions. Otherwise, adjustments will need to be made. Judging by driver reviews, using this device you can achieve higher accuracy in adjusting the valve mechanism of the VAZ 2106.
At the end of the maintenance process, all parts should be installed in their places; it is better to replace the deformed valve cover gasket to avoid oil leakage.