The exhaust manifold is a component of the exhaust system that carries out the process of removing exhaust gases from the cylinders of the power unit into the exhaust pipe.
If the collector malfunctions, the culprit may be either the element itself or its gasket. Replacing the exhaust manifold (exhaust manifold) gasket is a common procedure when repairing a VAZ 2109.
Appearance of the unit
Preparation stages
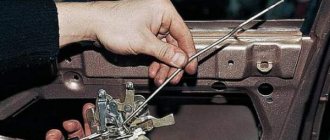
To replace the manifold or its gasket, in any case you will have to dismantle the VK. But before you get to the element you are looking for, you will first need to go through some preparatory steps. Namely, tighten the fasteners, and then remove the air filter and carburetor if the first stage does not help.
Dismantling the unit
Dismantling of collectors
Now comes the turn to remove the intake and exhaust manifolds. Having dismantled them, you can understand whether it is possible to get by with replacing the gasket, or whether the collectors themselves will need to be completely replaced.
The gasket is a consumable item, the purchase of which will literally cost you 50-250 rubles, depending on the manufacturer and region. Services for replacing the gasket at a service station cost more than 1,500 rubles. Add to this the cost of a high-quality gasket and you will get quite a lot of money. Such costs can be avoided if you do everything yourself.
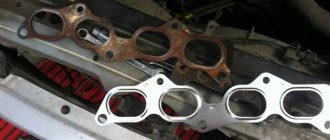
Dismantled unit
Intake manifold
By removing the air filter and carburetor, you will gain access to the intake manifold.
To dismantle it you will need a certain set of tools:
- Ratchet with 10mm head;
- Collar;
- Ratchet;
- Deep head 13;
- Regular head 13;
- Open-end wrench 13.
When everything is ready, you can start working.
- Unscrew a couple of mounting nuts to bend back the platform located under the carburetor.
- Disconnect the hoses that are connected to the intake manifold.
- Remove the six mounting nuts located on the intake manifold.
- Remove the manifold itself from the studs. To do this, simply rock the knot to the sides. It often sticks to the gasket, which causes problems with removal.
- Inspect the condition of the unit. If there is damage, the collector must be replaced.
- If the problem is only with the gasket, put the intake manifold aside for now and start removing the outlet.
An exhaust manifold
To dismantle a graduate you will need:
- Ratchet;
- Open-end wrench 13;
- Socket wrench 13;
- Deep head for 13.
All is ready? Then let's get started.
- Unscrew the four exhaust pipe mounting nuts from our exhaust manifold.
- Pull the so-called pants off the heels and take them to the side. Now you can unscrew three more fastening nuts securing the VK.
- Carefully, without sudden movements or jerks, pull the graduate off the stiletto heels.
- It is not uncommon that during the process of dismantling this unit, the manifold or its mounting nuts become stuck to the seats. To prevent this, treat the assembly with WD40 in advance, let it react, after which there will be no problems with dismantling work.
- If the studs break off during removal, you will need to drill out the old element, make a new thread and install a fresh stud.
Pad
Well, the check showed that the burnt gasket was to blame. Therefore, only it will have to be changed.
Pad
Alas, to get to a simple gasket, it was necessary to remove the air filter, carburetor, exhaust, and intake manifolds. But there is no way without this.
To replace an old, used gasket, you will need:
- Remove the old gasket. Here you may face certain difficulties, since most likely the gasket has become properly stuck and burned to the cylinder head;
- Arm yourself with a thin screwdriver, sharp knives, aerosol solvents;
- Spray the surfaces first, then let it react. It’s better to take your time in order to make your work easier;
- When the product takes effect, begin to gradually remove the old gasket from the surface of the block;
- Do not forget to remove carbon deposits from the mating surface of the cylinder block. Here you will no longer need an aerosol, but full-fledged sandpaper. Do not use coarse-grain sheets;
- Install a new gasket for the exhaust and intake manifolds of your VAZ 2109;
- Assembly of the unit is performed in reverse order. That is, first, both manifolds are installed in place, then the carburetor and air filter are returned to their homeland, the fastenings are tightened properly and the result of the work done is checked in practice;
- Of course, don’t forget about the coolant that was drained in the first stages. By the way, this is a great reason to change it to a fresh one.
Installing a new gasket
It is up to you to ensure that the new gasket has a long service life. To do this, before installation, treat the gaskets on both sides with graphite lubricant. This way you will increase the product’s resistance to temperature changes that it regularly encounters. Similarly, coat the cylinder head studs with graphite lubricant for the same purpose.
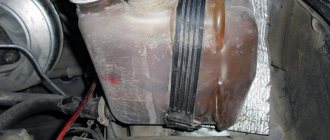
A gasket consisting of several layers is installed under the VAZ 2109 exhaust manifold. For various reasons (uneven tightening of nuts, aging), it fails and requires replacement. The first sign of burnout is the appearance of a characteristic noise. Yes, you can drive if you don’t spare your ears. But it is better to replace it in a timely manner, since ignition in the engine compartment is possible.
The gasket is made of pressed asbestos, which is reinforced with steel thread. The price of such a gasket, depending on the store and manufacturer, ranges from 50-200 rubles. The cost of replacement in car services is not less than 1000 rubles. And this does not take into account the cost of gaskets, nuts, and other components that may require replacement. Therefore, it will be much more effective to do the repairs yourself, saving a decent amount.
Preparation for repair
Before replacing the manifold gasket, it is necessary to understand how the process itself proceeds. You don't need special tools or the experience of a great 80-level mechanic. A standard set of tools that are found in every garage is sufficient. And you shouldn’t immediately blame the fact that a breakthrough has appeared in the gasket. Try tightening the nuts first. It is possible that they have weakened a little. But if it is not possible to get rid of the passage of gases, you need to start repairs. The work order can be briefly divided into several stages:
- removing the air filter;
- dismantling the air filter housing;
- removing the carburetor;
- removing the intake manifold;
- replacing the manifold gasket;
- assembly of units.
Once you have decided on the order, get to work. The simplest thing is to remove the air filter and its housing. First, unscrew the nut in the middle with a “10” wrench and unfasten the latches. Then, removing the cover, take out the filter element. Using a key “8”, unscrew the nuts from the studs and use a screwdriver to loosen the clamp of the pipe fitting to the cylinder head cover. Then remove the air filter housing. And now about how to remove the manifold on a VAZ 2109 with your own hands.
Removing the carburetor and intake manifold
You need to have the following tool on hand:
- Flathead and Phillips screwdrivers.
- 8" socket or tubular wrench.
- Open-end or socket wrench set to “13”.
- Ratchet (if necessary).
To remove the VAZ 2109 manifold (carburetor), you must first dismantle the injection system. The disassembly process looks like this:
- Disconnect the hose that supplies antifreeze from the cooling system to the carburetor starter. To do this, loosen the clamps and carefully drain the liquid. Work must be carried out on a cold engine.
- Remove the exhaust pipe. To do this, unbend the fixing plate and unscrew the nuts with a “13” wrench. Using the same wrench, unscrew the nuts that secure the pipe to the bracket.
- Remove the throttle valve drive cable mounting bracket. Remove the spring and loosen the nut, disengaging the cable.
- Disconnect the idle air solenoid valve.
- Disconnect the vacuum tube and carburetor heating hoses.
- Remove the crankcase ventilation pipe.
- Unscrew all four nuts that secure the carburetor body to the intake manifold.
- Carefully lift the carburetor body, being careful not to damage the studs.
The next step is to dismantle the intake manifold. You will need the same tools as in the previous step. The procedure consists of the following steps:
- Unscrew the two fastening nuts and bend the platform under the carburetor back.
- Remove the hoses that connect to the intake manifold.
- Unscrew all the nuts (there are 7 of them) that secure the manifold.
- Remove the intake manifold of the VAZ 2109, slightly rocking it to the sides.
How is the intake manifold of a VAZ 2109 replaced?
In general, replacing the intake manifold of a VAZ 2109 is very, very rarely required, so think several times before performing such a procedure.
But there are situations when you need to remove the manifold yourself due to complete disassembly of the engine or some other parts.
So one VAZ 2109 intake manifold must be removed if you need to replace the gasket between the manifolds or in other cases.
To complete this task, you need clear instructions, without which you can do something wrong, and then not put everything back together at all.
In some cases, it’s even better to look at some photos or videos.
Preliminary work
Regardless of the purpose for which it was necessary to replace the intake manifold on a VAZ 2109, you will need to perform the same steps.
- Remove the air filter.
- Remove the carburetor.
Let's look at everything in order, starting with how to remove the filter.
Removing the air filter
In general, this car spare part needs to be changed every few years, so this information will be useful for everyone who recently became the proud owner of a VAZ 2109. The sequence of actions when replacing the filter is as follows:
- release three latches;
- remove the filter cover - if possible, then do it simply with your hands, otherwise take a key for 10;
- lift the cover of the filter housing and take out the air filter, this will not be difficult to do and no special effort will be required;
- wipe the inside of the case with a dry, clean cloth.
To put the filter back in place later, you must perform all the above steps in reverse order. But for even novice drivers, this procedure is unlikely to cause many difficulties. Now we need to consider how to remove the carburetor, because in order to replace the intake manifold of the VAZ 2109, you need to do this too.
Removing the carburetor
To perform this procedure you need to take:
- two screwdrivers of different configurations;
- head for 8;
- open-end wrench 13;
- ratchet handle.
After the filter is removed, all the holes in the carburetor that previously connected it to the filter should be covered with a rag - not wet, not dirty. After this you need to do the following.
- Unscrew the nuts on the filter housing and completely remove it.
- Disconnect the wire from the forced idle economizer.
- Unscrew the clamps and disconnect the fuel hoses (there are only two of them).
- Loosen the choke cable bolts and also remove this device. Remove the spring.
- Loosen the nut from the bracket and remove the cables on the damper from their engagement.
- Pry up the bracket that secures this cable and remove it completely.
- Disconnect the plugs from the forced idle economizer sensor.
- Disconnect the hoses from the carburetor heating system and the vacuum pipe.
- Remove the hose that belongs to the ventilation system.
- Finally, remove the nuts that connect the carburetor and the intake manifold (there are four in total - one on each side). Carefully remove the carburetor.
And now you can proceed to the main part of this whole action and remove the manifold on the VAZ 2109.
To replace the manifold in a VAZ 2109, you should take almost the same tools that were needed to remove the carburetor. In addition to them, we will also need a head for 13, 10 and a knob.
To change the VAZ 2109 manifold, you will also need to remove the battery, as well as the reservoir in which the glass washer is stored. In this case, it is not necessary to disconnect the wire tips from the electric pump terminals.
There is also no need to remove the hose from the pump nozzle.
In addition, you will need to remove the receiver and fuel rail. This will not be difficult to do; for most drivers everything will be clear even purely intuitively. After this, it is already necessary to carry out actions aimed at removing the collector itself.
- Remove the bolt that secures the pipe to the front bracket. This can be done with a 13mm wrench. Next, you need to loosen the nut that secures this bracket to the support bracket.
- Remove this support bracket.
- Using the same tool, unscrew the bolt that secures the rear bracket to the same pipe.
- Loosen the bolt that is located on the starter and is located at the very top and simply remove the pipe from the bracket.
- Disconnect the pipe that goes to the exhaust manifold.
- Unscrew the nut that secures the largest wire and the front eye of the unit itself.
- Remove the wire and ring from the cylinder block.
- Unscrew the nuts that secure the inlet pipe on top, and there are only two of them, and the same number of nuts that secure the pipe and exhaust manifold. This can be done with a key of 13.
- Unscrew the nuts of exactly the same lower fastening of the intake pipe and manifold. Here it’s better to take the head, but also at 13.
- Remove all nuts and bolts that secure the starter shield and remove it from the exhaust manifold.
- Remove the bracket that holds the coolant drain pipe from the exhaust manifold. This must be done extremely carefully so as not to damage or touch anything.
- Unscrew the nut that secures the exhaust manifold at the front. This is best done with a 13 mm head.
- Using the same tool, unscrew the nut that secures the exhaust manifold at the back.
- Remove the washers from the mounting studs, and there are only 10 of them here. There are the same, only slightly thicker washers where the intake pipe meets the exhaust manifold.
- Carefully move this manifold away from the cylinder block, remove the intake pipe from the cylinder block and remove the manifold itself. Along with it, you should immediately remove the gasket on the inlet pipe, which serves as a seal.
That's all - the manifold has been removed and you can safely proceed to the reverse procedure, that is, installing a new spare part. Or, if you only needed to clean the intake manifold on a VAZ 2109, then install the old one. In any case, it’s better to buy a new one, especially since its price has now, although not much, decreased.
Before installation, all mating surfaces on the cylinder head should be thoroughly cleaned. This must be done to ensure that no debris or oil residue remains there.
The same should be done with the intake pipe and exhaust manifold. In many cases, these parts may still have old gasket and carbon deposits on them.
And this is very dangerous, because, in the end, all this will clog the system and will not allow the car to drive smoothly.
After this, you need to install a new gasket and perform installation in the reverse order. There is only one note - a little graphite lubricant should be applied to the cylinder head studs. This must be done, again, for good operation of the entire device for many years.
This completes the manifold replacement procedure. The price for such services in car dealerships is usually quite high, so it’s better to do everything yourself. Moreover, doing all this is not so difficult; the main thing in this matter is accuracy and leisurelyness. Of course, you still shouldn’t be afraid of getting dirty, although there won’t be too much dirt here, you just need to wear gloves.
Removing the exhaust manifold and replacing the gasket
The tools you will need are 13" wrenches of all types. The removal procedure consists of the following steps:
- If you have not yet removed the nuts that secure the pants, do so.
- Move the exhaust pipe to the side, unscrew the remaining nuts that secure the manifold.
- Carefully dismantle it, try to do it without jerking. If the studs are stuck to the nuts, it is necessary to use WD-40 pre-penetrating lubricant.
It also happens that the studs break off. If one of them is missing, the gasket will burn out very quickly and you will have to do all the work again. And it is possible that you will have to install a new exhaust manifold on the VAZ 2109, since the old one cannot be restored.
Well, that's all, now you can remove the old gasket. If it is burnt and strongly adheres to the metal, you can use a thin knife to remove it. But even better is to buy a solvent. With its help, you can painlessly remove the old gasket. Be careful not to damage the metal. If necessary, remove any remaining gasket using sandpaper. Install a new gasket and reassemble in reverse order. For convenience, coat the gasket and the cylinder head studs with a thin layer of graphite grease before installation. This will improve the tightness and prevent the gasket from sticking to the metal.
A short video about dismantling collectors on a VAZ 2109
The exhaust system of a VAZ-2114 car with an injection engine is not particularly complex, however, sometimes you have to spend a lot of time, and maybe money (if the work is done at a service station) to bring it to normal condition. Today we will look at the exhaust manifold of the VAZ-2114, with the features of its dismantling and installation.
How to replace a collector
It is worth noting that the procedure for modifying the exhaust manifold can be significantly simplified. To do this, it is necessary to replace the VAZ 2109 exhaust manifold installed on the car with a new device used in modern sports cars, or buy a ready-made, tuned manifold in a specialized store or workshop. This option will be the best solution for those who do not want to waste their time and tinker with the original Nine manifold.
Today, there are many car stores offering the VAZ 2109 exhaust manifold and the VAZ 21093 exhaust manifold. All the driver needs is the best price and high quality. Among many car enthusiasts, manifolds from the manufacturer of automotive components RaseMotors are very popular.
The process of installing a VAZ 2109 exhaust manifold allows you to significantly increase the engine power, the rotation frequency of which will vary from 3500 to 8000 rpm. In order for the VAZ 2109 to remove the exhaust manifold without problems, special instructions are needed. RaseMotors uses only innovative developments, computer modeling and high-quality materials in the production of its manifolds. In addition, high efficiency of collectors is achieved by optimizing the length of the pipes and the internal volume of the device, which allows minimizing output losses.
However, it must be taken into account that in order to install the RaseMotors manifold in a VAZ 2109 car, it is necessary to first bore the diameter of the thrust collar of the bushing to 37 mm.
Another interesting option is the spider from the Sport company, which produces manifolds for eight-valve power units. As you can guess from the name, these devices were developed specifically for sports cars. In the Sport spiders, an ideal ratio of the length and diameter of the pipes has been achieved, which has made it possible to achieve a significant increase in the maximum power of the engines.
In addition, these manifolds are very versatile and will fit most front-wheel drive car models. The manifold is made of first-class steel, which increases the performance characteristics of the device several times, and the low resistance of the spider allows the engine to reach maximum speed much faster.
Finally, it should be noted that this type of tuning does not require large financial and physical costs. Therefore, with a little patience and effort, your car's engine will become much more powerful.
150, 180 hp at the basin - it’s just a tuning engine (city). You can wear 2-3 of these “clones” in Kazan per day. For me, driving a 9k with a rotary engine, it’s hopeless to compete with a well-prepared high-volume piston engine. What pedigree does Rpd have? ….
133 hp as standard
with a modified output of 150 hp.
moment 18-19 kg
In all respects, the tuning pistons we built are superior in power to a rotary engine. Not in order! The status of the KVO must be restored. This is what we did. Moreover, the business is Sneeze-Puff, One-Two
I didn’t describe myself above, replacing the standard exhaust system with a direct-flow one gives the rotor an increase of 15 forces (±). The rotor initially has a compressed power potential, a lightweight exhaust helps to unlock this potential... (don’t think that your 100 horsepower 12ka with a 16-valve engine will add that many horses after installing the exhaust.)
Drive more air into the combustion chamber, optimally add the required portion of gasoline, ignite on time - simple things... and if you have achieved this, then a bright option awaits you.
When is it necessary to replace and remove the exhaust manifold on a VAZ-2114
Huge temperature changes are the main problem faced by the exhaust manifold and the gasket, for which it is removed. The collector itself is made of a special grade of cast iron; it can withstand high temperatures (up to 800-900 degrees) , however, these are critical values, after which the collector may warp or crack.
Its main task is to collect exhaust gases and distribute them into the exhaust pipe of the muffler.
Replacing or dismantling the VAZ-2114 exhaust manifold is necessary in the following cases:
- Mechanical damage to the collector.
- Warping and loss of tightness at the junction with the cylinder head.
- Burnout of the gasket between the head and the manifold.
- The appearance of cracks as a result of engine overheating.
- Replacing the collector with a device of a different configuration, adapted to a more severe operating mode.
In the event that we are not going to participate in high-speed races for the prize of the head of the regional traffic police, replacing or dismantling the collector may be necessary in a number of cases.
Tools and materials for dismantling
There are a number of symptoms that will indicate that you need to prepare to remove the exhaust manifold:
- increased noise level in the engine compartment , the engine produces a characteristic, loud sound in any operating mode;
- breakthrough of exhaust gases into the engine compartment and sometimes into the cabin;
- reduction in engine power due to a mismatch between the exhaust gas outlets in the cylinder head and in the manifold.
Many people decide to replace the standard manifold with a “tuning” one, made of stainless steel and having a different configuration, thereby wanting to increase engine power and reduce the resistance that the standard manifold provides to exhaust gases. As a rule, the most common reason for dismantling a unit is gasket burnout .
The manifold gasket on the VAZ-2114 is made of pressed reinforced asbestos and is designed to ensure a tight connection between the block head and the manifold flanges. Asbestos is used to correct the coefficient of thermal expansion of the aluminum alloy from which the head is cast and the cast iron from which the manifold is cast. At high speeds and under prolonged loads, the gasket may burn out. Then its replacement and dismantling of the collector are inevitable.
To dismantle the manifold, you will need a standard set of tools, a set of sockets with extensions, and WD-40 penetrating lubricant or its equivalent. In case of broken studs, a stud extractor, drill, drill bits and a set of taps will be useful. A day or two before dismantling the collector, it is worth moistening all the fasteners several times, this will significantly simplify the removal procedure .
Causes of malfunctions
The key factor that causes 90% of exhaust manifold malfunctions on VAZ 2114 cars is high temperature and poor quality materials from which the parts are made. During operation, the steel repeatedly heats up and cools down, which leads to the appearance of cracks in the body. This is a common occurrence for VAZ cars older than 7-8 years.
Auto repair shops offer crack welding services using argon welding. However, for a number of reasons, this activity is useless for cars older than 7 years.
1) Just removing and installing the exhaust manifold will cost about 2.5 thousand rubles. Taking into account the work of the welder and other actions, the cost of repairs can be 4-5 thousand rubles. If you do the work yourself, buying a new part will cost less.
2) Welding, even argon welding, disrupts the structure of “tired” metal. A boiled part rarely lasts longer than a year, after which new holes appear. The older the car, the faster the problem returns, and the collector has to be removed again.
If the car is older than 8 years and there are problems with cracks in the manifold, it is better to remove the part and replace it with a new one.
Manifold dismantling procedure - step-by-step instructions
The dismantling process itself is not so complicated; access to some nuts is difficult, so it is advisable to carry out the work on a lift or in an inspection pit. The algorithm of actions for the injection VAZ-2114 in this case looks like this:
- Remove the negative terminal from the battery or turn off the mains switch.
- Drain the antifreeze from the system. This point should not be neglected, despite the fact that the factory does not oblige you to empty the cooling system of liquid.
- Disconnect the fuel pipes.
- We find the throttle position sensor, idle speed sensor and remove the wires from them.
- We remove the crankcase ventilation hoses and the hose from the vacuum brake booster.
- We dismantle the receiver, disconnect the injector wires and remove the fuel rail assembly.
- We get full access to the collector. We dismantle the thermally reflective screen.
- Unscrew the muffler exhaust pipe from the manifold.
- Unscrew the manifold mounting nuts from the studs in the block head.
- We dismantle the collector.
Replacement of gaskets and installation of manifold
After dismantling the manifold, it is rarely possible to remove the gasket intact. It changes in any case , but parts of the destroyed gasket will definitely remain on the mating plane on the head side and on the manifold side. They must be carefully removed.
To do this, you can use a special spray that softens the gasket residues; you can carefully remove them with a blade. In this case, the plane must not be damaged, otherwise the tightness of the connection will be broken.
Also, when installing new exhaust manifold gaskets, it is not recommended to use sealants . They can be of different quality, and during crimping they can form particles that get into the crankcase, which is extremely undesirable.
Video about replacing the exhaust manifold gasket on a VAZ-2114
Removal and installation of the receiver and engine collectors of VAZ 2110, VAZ 2111, VAZ 2112
8 valve engine, instruction manual
Disconnect the vacuum booster hoses from the receiver...
...electro-pneumatic valve and fuel pressure regulator in the fuel rail.
The receiver can be removed without a throttle assembly - in this case, disconnect the throttle assembly of the VAZ 2110 (see Removing the throttle assembly). If we remove the receiver assembled with the throttle assembly, then disconnect all the hoses and connectors of the throttle position sensor and idle air control from the VAZ 2111 throttle assembly.
Using a “13” wrench, unscrew the two nuts securing the VAZ 2111 fuel pipe bracket to the receiver.
Remove the bracket.
Using a “13” wrench, unscrew the nut securing the VAZ 2111 receiver to the bracket...
...and five nuts securing it to the intake manifold.
We remove the VAZ 2112 receiver...
...and a gasket.
We remove the ramp from the intake manifold (see Removing the fuel rail of a VAZ 2111 engine).
Using a 17mm wrench, unscrew the nut securing the left intake manifold bracket...
...and loosen the lower bolt of the left bracket.
We remove the bracket from the intake manifold.
Using a “13” wrench, unscrew the nut of the upper fastening of the right manifold bracket and unscrew the lower bolt securing the bracket to the VAZ 2112 cylinder block.
Remove the bracket.
Using a 13mm wrench, unscrew the two nuts securing the eye.
We remove the eye of the VAZ 2110.
Using a 13mm wrench, unscrew the three nuts securing the receiver bracket...
...and remove the bracket.
Remove the bushing from the intake manifold stud.
We disconnect the exhaust pipe from the exhaust manifold of the VAZ 2112 and the bracket. Remove the exhaust pipe from the exhaust manifold studs.
Using a 13mm wrench, unscrew the upper and loosen the lower nut of the coolant pump supply pipe bar...
...and remove the bar.
Using a 13mm wrench, unscrew one nut on the bottom and two on the sides...
...remove the intake manifold of the VAZ 2110.
After unscrewing two more nuts...
...remove the exhaust manifold...
The connector of the manifolds and the block head is sealed with two gaskets.
Reassemble in the reverse order, replacing all gaskets with new ones.
VAZ 2110, VAZ 2111, VAZ 2112, Lada Ten
8 valve engine VAZ 2110, VAZ 2111, VAZ 2112
- — Timing belt
- — Gaps in the valve mechanism
- — Camshaft 8 valve engine
- — Valve seals
- — Camshaft oil seal
- — Engine 8 valve
- — Oil pressure lamp sensor
- — Receiver and engine manifold
- — Intake and exhaust manifold
- — Housing of auxiliary units
- — Removing and installing the cylinder head
- — Rear support of the power unit
Engine systems VAZ 2110, VAZ 2111, VAZ 2112
Maintenance of the Lada 2112 car engine. Instructions for repairing the cooling system, exhaust gases, power supply of the Lada 2111. Features of the 8 and 16 valve Lada 2110 engine. Operation of the main components and assemblies of the engine