Cars admin26.02.2020
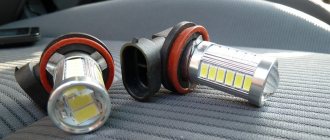
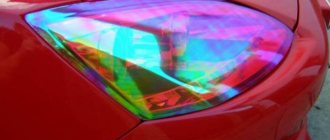
Installation of bi-xenon lenses in a VAZ 2109. For installation, we used 3-inch bi-xenon lenses, Philips D2S lamps, Prolumen xenon units, adapters from units to lamps, and a bi-xenon relay for switching between low and high beams. New polished glass was specially purchased to install bi-xenon lenses. Photos before installation
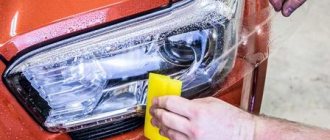
We remove the headlights from the car and begin to disassemble them. Installation process: the headlight needs to be heated with a hairdryer to remove the glass, we heat it in the place where we have the original sealant.
Next, we remove the lamps that we had before, we have a seat for an H4 lamp, a similar lens is also for H4. We won't have to drill out the seat in the headlight. The lens is attached using special washers and spacers, which prevents it from rattling when you fall into a hole. After we have installed the lens in the headlight, we put a decorative mask on top so that it does not move around and further pleases the owner’s eyes.
Personalized headlight tuning
on VAZ 2109
Tuning headlights on a VAZ 2109 is done independently using an electrical circuit. During the production process, the optics are tinted, and about 30% of their effectiveness is immediately lost. To solve the problem of reducing the intensity of VAZ headlights 2109
, install high power light bulbs.
We find out how to improve the headlights on a VAZ 2114
A significant part of VAZ owners are wondering how to improve the headlights on a VAZ 2114. This problem occurs on many car models. It needs to be resolved as quickly as possible. Light on the road is the key to safe driving. Otherwise, an emergency situation may arise.
Why bad light may occur on a VAZ 2114
To solve the problem, you need to understand all the nuances of the headlights. Simply replacing headlights may not give the desired effect. In some cases, changing lamps will be a waste of money.
Causes of headlight malfunction:
- One of the most common reasons is dirty windows. Dirt, which may appear on the headlights after prolonged use, can reduce illumination by approximately 50%. It also happens that it is quite difficult to notice any dirt on the headlights. This is due to the fact that they may not be noticeable. How to remove dirt from headlights? This may not be so easy to do, because using a dry rag is prohibited. It leaves small and unnoticeable scratches on the glass that can ruin the glass.
- Minor scratches are another common cause of dim headlights. Scratches can appear for a variety of reasons. The thing is that by wiping the headlights with a regular rag or even a glove or some item of clothing, you can actually clean the surface of the headlight, but small scratches will also appear on it. As long as the number of scratches is small, this will not have any serious effect on the performance of the headlights, but after a long time there may be so many scratches that the headlights will be exceptionally dim.
- In some situations, the glass may even burst. There are many reasons for this. In Russia and other CIS countries this can happen due to temperature. If a car enthusiast notices any crack, he needs to remove the headlamp as soon as possible and replace it with a new one. If this is not done, the headlight may stop working while driving. The consequences of unexpectedly turning off the lights can be unpredictable.
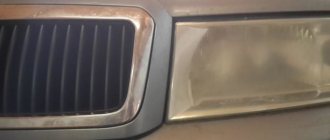
- Another reason for deterioration in illumination is the age of the headlight. Over time, the headlights become increasingly cloudy. This is due to the fact that while driving, various small debris, as well as sand and dust, fall onto the surface of the headlight. As a result, very small scratches begin to appear on them. Despite the fact that they are practically invisible, these scratches are capable of refracting light according to the principle of a prism. This is an extremely unpleasant effect. It is because of this that the glass has to be replaced. How to protect the headlight from such unpleasant consequences? In this case, it is recommended to cover them with a special protective film, which can be purchased at a car store.
What is the difference
Bixenon VAZ 2109
Having become widespread, headlights with xenon bulbs, or gas-charged ones as they are also called, today show off even in the optics of fairly budget car models. And what about budget ones, even a used car, the most used one, can be easily equipped with these light bulbs. First of all, such lamps ensure safety on the roads, because for normal traffic, not only at night, you need good and clear light. Imbued with the idea of creating something unusual, xenon manufacturers came up with a way to increase the brightness of luminosity indicators in gas-charging lamps by as much as 3 times. As a result, xenon finds application immediately, eliminating all “competitors” and remaining a sales leader until bi-xenon comes out with its own characteristics.
Bi-xenon lenses VAZ 2109
Although the principle of glow in these two types of lamps is identical, they have differences that will be useful for the reader to know about. Let's first look at the features of xenon and then bi-xenon to understand the difference between them.
Xenon Features
- The set of xenon headlights includes high-power gas-charging lamps. They are also called HIDs.
Bi-xenon lenses for VAZ 2109
Note. Despite this, many drivers today prefer a symbiosis of halogen and xenon. As a result, the owner of a car with such headlights feels calm on any road at any time of the day. Good visibility even of the roadsides is provided to him.
- A striking example of such a symbiosis is the installation of xenon for low beam and halogen for high beam. As a result, high beams, which are more often used on deserted intercity highways at night, will solve problems with visibility 100 percent. There is a good amount of cost savings - you don’t have to fork out money for xenon for long-range headlights, but only for low-beam headlights.
Bi-xenon lenses for VAZ 2109 BOSH
Bi-xenon and its features
- The complete opposite of halogen bulbs is bi-xenon. This type combines many advantages, including performing one function instead of two.
Note. Some cars have only one lamp for lighting (high/low). In this case, using bi-xenon will be the right decision.
- Bi-xenon lamps use one gas-charging lamp, which works for both low and high beam.
- The low/high beam control in bi-xenon occurs due to the displacement of the lamp screen. In other words, the luminous bulb in the lamp itself moves.
- Bi-xenon, or rather its kit, costs more than xenon.
As a result, we draw the following conclusions:
- Both of these lamps (xenon and bi-xenon) have the same principle.
Difference between xenon and halogen lighting
- Xenon lamps can be installed on both beams (high/low).
- Bi-xenon, on the contrary, is capable of combining both lights (high/low) in one housing.
- The bi-xenon is controlled mechanically, due to a moving element inside the bulb.
- Bixenon is more expensive than xenon, but is considered more versatile.
Tuning headlights for VAZ 2109
Every car enthusiast wants his equipment to become noticeable and original. You can upgrade any car, regardless of year and model. “Nine” is a popular car of the last century, produced by the Russian automobile industry. One of the reconstruction options is tuning the headlights on the VAZ 2109. The headlights on the VAZ 21099 and the headlights on the VAZ 2108 are the same.
Modernization of headlights
Car repairers believe that tuned headlights are more reliable than those installed at factories. Rework options:
- replacing standard optics with xenon;
- use of LEDs;
- covering lighting structures with tinted products.
Replacing lamps
Factory bulbs installed in a car do not last long. LED lamps have the following advantages over a conventional incandescent lamp:
- service life of at least 5 years;
- ergonomics;
- low power consumption;
- fast response.
At night, it is very important to have a good view of the road. Changing the optics often improves the light performance of devices
Xenon lamps are more powerful than diodes, but LED lamps are easy to maintain and have a low cost. Do not forget that unregulated xenon lamps emit a very powerful luminous flux. This can lead to a traffic accident, as the oncoming driver may be temporarily blinded by the bright light.
Painting
A common method of auto tuning is darkening the optics with a special varnish or painting. To complete the work you will need a can of black paint. Only materials with high temperature ratings are allowed. Regular paint will come off as a result of heating, and no tinting effect will remain.
The work is carried out in stages:
- How to remove a headlight on a VAZ 2110, 2111, 2112; dismantling and installing a headlight unit
- The headlight is removed from the car.
- The optics are completely disassembled.
- Using a curved screwdriver, unscrew the screws that hold the headlight mask.
- The turn signal reflector is removed.
- The chrome paint is being cleaned off.
- Apply primer for plastic in three layers.
- After the primer has completely dried, paint is applied (auto mechanics recommend applying paint in 5 layers.)
- The structure is being assembled.
- The headlight glass is cleaned of old compounds.
- The glass is washed, wiped dry and treated with a degreaser.
- Black sealant is applied along the edges.
- The device is assembled and installed on the car.
- The connection is made to the circuit through the fuse block.
Film tinting
An inexpensive way to change the optics of a VAZ 2109 is to use a tint film. The result depends on the quality of the materials used. Good tint films have high light transmittance. This is an important indicator on which the lives of all road users depend. It is allowed to apply the film to the inner and outer surfaces of the headlight.
Making spectacular tuning on Lada Kalina: 5 steps to results
Applying a tinting film to the external surface is possible without removing the optics from the car. To do this, you need to prepare the surface: remove dust, dirt, the surface must be clean and dry. A notch is made and a piece of the required size is cut out. Soap and water are applied to the glass. The protective layer is removed from the film and applied to the headlight. The air is expelled. The surface is carefully wiped with a rag to remove any remaining liquid. This method is fast and simple. Even a car enthusiast who does not have special skills and knowledge can perform it.
The tinting film is easy to remove. But tuning VAZ 2109 headlights with film has its downsides:
- peeling of the material after some time;
- reducing the brightness of the emitted light;
- violation of traffic rules, which may result in a fine;
- Difficulties in passing technical inspection.
Rear foot improvement
Tuning the rear lights of the VAZ 2109 is simple. You can do this operation yourself or contact a specialized auto center. Modernization of rear stops is often necessary even for factory optics: contacts oxidize, lamps burn out. Several reconstruction options are possible:
Using LED overlays. LED strips can create a unique pattern and make a car stand out in traffic. Application of diode rings. LED strips will allow you to define the hind feet and make them more expressive. Tinting. You can tune car headlights using film or paint.
It is worth paying attention to the characteristics of the material: it must withstand high temperatures.
Changing the appearance of a car is an interesting activity. There are many types of tuning known
It is important to always remember that a car is a highly dangerous vehicle. The driver should always have a good view and lighting in the dark
The best optics for the VAZ 2110
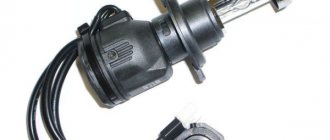
Installation of xenon lamps
Xenon bulbs for VAZ 2110
Let's find out how to install xenon bulbs yourself and what you need to know for this. But first, let’s analyze the advantages of installing these lamps compared to conventional ones.
Advantages of installing xenon lamps on a VAZ 2110
Today, xenon light is a calling card, a kind of fashionable outfit for modern cars, mostly imported. And there is an explanation for this. Below are the advantages of using xenon lamps instead of traditional ones:
- Lighting that is much better. This cannot be taken away from xenon, because compared to halogen lamps, xenon is several times brighter, and the color spectrum of these lamps is more comfortable for the human eye.
Xenon bulbs for VAZ 2110
- The xenon beam does not reflect during fog or from raindrops, like a traditional one. This beam is able to penetrate through the thickness of atmospheric precipitation, providing the driver with a clear and clear picture of the road.
- Xenon lamps are extremely reliable and have a long warranty period. You can’t argue with this, because compared to halogen, xenon does not have a weak spiral inside that tends to break off on potholes or uneven roads.
Note. On the other hand, the xenon is equipped with a rather complex ignition unit, which contains many parts that risk failure. On traditional lamps such a block is not needed.
Note. Heated headlights are more difficult to clean from dirt, and if they are doused with cold water at this moment, they may crack. In this regard, cool xenon headlights look more preferable.
- Xenon lamps look more aesthetically pleasing, they are prestigious and stylish.
Disadvantages of using xenon
In addition to the advantages of installing these lamps, there are also disadvantages that it would be unfair not to mention. Although they are insignificant, it is useful to know about them:
So these two disadvantages were given, which are in no way capable of influencing the obvious choice in favor of installing xenon lamps instead of conventional ones.
Replacement algorithm
Xenon lamps VAZ 2110 – daylighting
This step-by-step instruction will become doubly useful if you use visual aids in the process. Disassembling the headlight:
- First of all, remove the negative terminal from the battery;
- Now we find the electrical connectors for the headlights and disconnect them;
- We take a key, which we use to unscrew the bolts securing the upper mount of the headlamp;
Unscrew the bolts of the upper headlight mounting
- Now remove the radiator grille;
- Unscrew the lower fastening bolt;
- Take a screwdriver and carefully pry off the decorative trim;
- First, we move the pad to the center, and then pull it out completely;
- Now you need to unscrew the bolt securing the headlight to the bracket (use a 10mm wrench for this);
- Remove the headlight;
- Take a screwdriver and pry up the hydraulic corrector cylinder lock;
- Remove the retainer from the headlight housing;
- The turn signal is dismantled by unscrewing the two mounting screws;
- We remove the halogen or traditional light bulb from the headlight (depending on what is installed there).
Direct installation of xenon on the headlight
Before you begin the second stage of work, you should arm yourself with the necessary materials: 2 simple fasteners and 2 fasteners for thick wires (females).
- After removing the halogen, take a knife and cut off the wires (you will need to cut off the brown and yellow wires).
Note. As a rule, the yellow wire is positive and the brown wire is negative.
- Take pliers and a knife and strip the wires;
- Using thin-lipped pliers, we crimp two brown wires and fasteners for a thick wire - the female (do not forget to insulate them with a special tape);
Installing xenon headlights
- We do the same with the yellow wires, only we take mothers for thin wires;
- We carefully insulate everything with tape to avoid short circuits.
- We arm ourselves with a drill, on which we attach a thin drill;
- We make a hole with a diameter of approximately 23 mm in the protective cover of the hole;
- We stretch the wires from the xenon lamp into the hole made;
- Now we install the xenon lamp itself through the hole and secure it;
- We connect the mothers so as not to confuse the plus with the minus.
Connection of mothers
Note. You need to carefully check at this moment whether everything has been done correctly. We remember that a mistake can be costly, because an incorrect connection can damage expensive xenon bulbs or the ignition unit.
- We connect the ignition unit using a special circuit that comes with the xenon;
Ignition unit connection diagram
- Connect the headlight;
- Connect the negative terminal to the battery.
Add a commentAdd a comment We advise you to readXenon in the fog lights of the VAZ 2109 with your own handsXenon on the VAZ 2109: installation on your ownWe do the lens headlights on the VAZ 2109 ourselvesHydraulic corrector for the VAZ 2110 and its installation—> VAZ masters / External car lighting / Headlights
VAZ 2109 with bi-xenon
Installation of additional fog lights as a component of tuning
The purpose of additional fog lights is to improve visibility of the roadway in fog, snow or rain. To install additional headlights yourself, you must:
- stranded copper wire with a cross-section of at least 1.25 mm2;
- relay;
- a button with which the PTF will be connected;
- set of fog lights.
You should start by installing and connecting the button. The 2109 models, which have a high panel, have a regular place for this purpose. To place a button, perform the following operations:
- dismantle the grille;
- unscrew the speaker;
- remove the plug and replace it with a button;
- connect the electrical wires to the button connectors;
- put the speaker in place, followed by the grille.
In the engine compartment, you need to unscrew the mounting block, made in the form of a black box. Now you need to lay the wires from the headlights and the relay installation location to the block. Next, the wires located on connectors Ш7 and Ш8 are disconnected from the unit, the connection of which is carried out through a special electrical circuit. Now all the elements are connected into a single circuit and its functionality is checked.
Advantages of lensed headlights
This:
- Low power consumption.
- High luminous efficiency of the VAZ 2109 headlight lens.
- Complete security.
- Better visibility.
- High efficiency compared to other types of headlights.
- Effective light distribution.
- Clear cut-off line.
- The illumination of the road is much wider.
- The sides of the oncoming and passing path are clearly visible.
- Economical washer fluid consumption due to the smaller headlight area.
- Stylish and attractive appearance.
- Possibility of installing xenon bulbs.
Lens headlights for VAZ 2109
There are practically no disadvantages. You can only complain about the complex setup, but it is inevitable. Lenses should be adjusted to high standards. Safety depends on this, and one cannot argue with such things.
Pros of setting up such headlights
So:
- Adjusting the headlights is very important, because if there is even a slight misalignment or deviation in position, all this will lead to blinding oncoming drivers.
- Incorrectly configured lensed headlights significantly impair the visibility of the driver of the VAZ 2109.
- You can spend a considerable amount of money on setting up such headlights from specialists, or you can do everything yourself.
How to configure it yourself
The problem with an incorrectly adjusted lensed headlight is that it dazzles oncoming drivers to an even greater extent than in the case of conventional headlights. The low and high beam beams coincide in height, which is a disadvantage in this case.
So:
We are looking for reasons for fogging headlights
- First, you need to heat the headlight housing around the entire perimeter of the glass with a hairdryer. This will allow the sealant to soften.
- The glass now needs to be carefully separated from the body.
- Remove the decorative reflector and low beam lens.
- We adjust the corrector drive leash so that it fits between the reflector and the lens body.
Further assembly is carried out similarly to dismantling, in reverse order.
Choosing high-quality optics for the VAZ-2109
Modern headlights on the VAZ-2109 are very diverse, and it can be difficult to evaluate quality, appearance and their ratio to cost at the same time
It doesn’t matter which headlights you choose – the principles of choice are the same for everyone. To choose the right set of headlights, you should follow some tips:
When buying headlights, first of all pay attention to their appearance. Whether xenon or diode, the headlight should not “lobble”, its parts should be tightly fitted to each other; carefully check the tightness of the headlight
The sealant must be applied around the entire perimeter of the glass. If you find even the slightest omission, such a headlight is not suitable for use. If water gets in, a short circuit will most likely occur, and if the temperature changes, the headlight glass will fog up, worsening light emission. Similarly, headlights with deformed glass are not suitable for use - scratches, unevenness or even chips are unacceptable; Many car enthusiasts get carried away with tuning their car and do not notice that it significantly worsens safety. It is not advisable to choose headlights with tinted glass - a black film applied to them. Such headlights are practically invisible in the daytime, which can provoke a dangerous situation on the road; When choosing a manufacturer, be guided by what kind of headlights you want to purchase - standard or alternative. Standard headlights are made by Osvar. If you choose an unreliable manufacturer, the headlight may not be sealed tightly enough - in this case, the glass surface will often fog up.
For the most part, reliable headlights for the VAZ-2109 can be purchased within 10 thousand rubles for a set of front optics, and the price for rear lights varies from 1 to 4 thousand. Such a cost of headlights can really provide you with a quality purchase and a long time of use.
Responsibility for violations
Lately, law enforcement officials have been keeping a very close eye on the headlights installed in cars. Xenon causes terrible accidents on the roads, so their illegal installation threatens serious liability.
Many drivers offer bribes to traffic police officers, which further aggravates the situation. Of course, a greedy inspector may agree to turn a blind eye to a violation when he sees a pink bill, but it is important to understand that giving a bribe is a criminal offense.
Punishment is provided for those drivers who have installed xenon headlights on a car that are adapted for halogen headlights or incandescent lamps.
It is not difficult to determine the violation, especially in the dark, when bright white light illuminates the road well.
According to the Code of Administrative Offences, there are two penalties for the illegal installation of xenon:
- Deprivation of a driver's license for a period of 6 months to 1 year.
- Confiscation of equipment that is used illegally by the car owner. Xenon is confiscated from the driver and cannot be returned.
It does not matter who was driving the car - the driver allowed to drive the car under compulsory motor liability insurance or the owner.
The first one will be deprived of his license and the equipment will be confiscated. The owner will be able to use the car without restrictions, provided that the lamps are replaced.
According to the law, illegal installation of halogen is equivalent to operating a knowingly faulty car. And this is a fairly serious violation for which there is not even a fine.
It turns out that the driver is driving a car that, according to its technical parameters, is not suitable for driving.
Traffic police inspectors have the right to check the legality of installed xenon headlights on any section of the road where stopping is permitted. The driver may be asked to open the hood and even remove the headlight.
The situation becomes more complicated if illegally installed xenon led to accidents and casualties. In this case, the driver falls under criminal liability and is imprisoned for up to 8 years.
It will be almost impossible to prove your innocence, since as a result of the examination it will become clear what was the true cause of the accident.
In general, xenon has many positive aspects. It produces a bright, eye-pleasing light, improving visibility on the road.
But it can only be installed in those cars that have the ability to install xenon.
In other cases, the use of such headlights is considered illegal, for which punishment is provided in the form of deprivation of the license.
You should not use xenon where it is unacceptable. It is important not only to take care of yourself, but also to follow the rules of safe driving on the roads.
How to legalize xenon for a foreign car is described in the article: how to legalize xenon.
Why xenon lights up in different colors, see the page.
Find out about xenon installation in Moscow from this information.
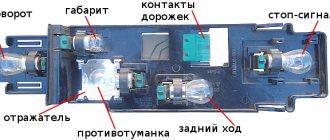
Hydrocorrector of lights
A very important part of the VAZ 2109 lighting system is the hydraulic corrector of the directional light source, which consists of an additional device (main cylinder), two functioning cylinders and connecting tubes. The tubes are filled with non-freezing liquid. If there is no hydraulic corrector in the car, then a special plug is placed in its place. The hydraulic corrector helps the driver adjust the lights: the direction of the beam of light produced by the lights goes in the vertical direction.
Adjustment is quite simple from the driver's seat - you need to turn the knob on the instrument panel to one of four positions depending on the load distribution in the car. Since the hydraulic corrector is a solid element, in the event of a breakdown it is replaced completely along with the tubes and cylinders. Replacement occurs in the following sequence.
| Operation | Actions | |
| 1. | It is necessary to remove the actuator cylinder from the hole located on the back surface of each of the lighting fixtures. | To do this, press the latch and turn it counterclockwise until it clicks. |
| 2. | Remove the knob from the instrument panel that is used to adjust the lighting. | In the hole where the adjustment knob was located, you need to unscrew the nut that holds the main cylinder of the hydraulic corrector and remove it through the bottom of the panel. |
| 3. | Pull out the hydraulic corrector tubes. | This is done together with two cylinders through a hole in the “torpedo”. |
Choosing fog lights
Fog lamps on the VAZ-2109 are represented by models from several manufacturers. The highest quality and brightest are fog lights from Osram and Philips. Such headlights provide increased light output, have a long service life and are considered the best.
VAZ 2109 with fog lights
If you want to focus not so much on the brightness of your fog lights, but on their long-term service, feel free to choose the Philips EcoVision model. This model has an ideal price-quality ratio and is rightfully called the optimal choice in the class of fog lights for the VAZ-2109. Chinese fog lights have one advantage - low cost, but their build quality leaves much to be desired.
Remember that when choosing headlights for your car, you are responsible not only for your safety on the road, but also for the health and lives of other road users.
Problems with law
Today there is no fine for installing bi-xenon if you meet a number of requirements in accordance with the law. The times of “free” xenon are over. What needs to be done for the installation of bi-xenon to be considered legal? The rules are given below:
- If xenon or bi-xenon is installed at the factory, then there will be no problems. The manufacturer provides for certification in advance in such cases, bringing all norms and rules into compliance.
- Installing bi-xenon on a VAZ 2109 is, in any case, an independent intervention in the design of the car, so it is necessary, first of all, to equip the device with automatic adjustment of the tilt angle adjustment.
General information about headlights
Lensed headlights VAZ 2109
VAZ 2109 headlight lenses today are already much more popular than ordinary ones, which are not even installed anymore. They consist, just like regular ones, of higher quality components. To verify the correctness of this statement, it is worth studying other types of headlights known today and which are competitors to lensed ones:
With a reflector or reflector, which is a concave mirror surface. Thanks to this element, such headlights form the necessary light beam. The best type of reflector is considered to be one that has a stepped structure. This reflector looks more like a faceted glass. Each segment of such a reflector is responsible for illuminating a specific part of the road.
- There are headlights with two reflectors. Such lights are called two-section and in them one sector is responsible for the low beam, the other for the high beam.
- Today in stores you can also find crystal headlights with a segmented reflector and transparent glass. Such glass does not become cloudy or scratched, and does not even change its color over time, like ordinary headlights that can turn yellow.
Lensed headlights for VAZ 2109
https://youtube.com/watch?v=19BpeNHJtpw
- Corrugated headlights are another type of reflector headlight. They come in glass with reflectors and corrugated glass. When trying to tune such headlights, problems may arise. There is no way to install xenon bulbs in them, and to install new lenses, you will have to grind the corrugation of the glass.
- The optics are modular, giving a completely different level of light. Suitable for all car owners who dream of changing the appearance of their car. Various types of modules are built into such lamps: for high beam, low beam and fog light. This headlight also includes headlights and turn signals.
Lensed headlights for VAZ 2109
Now let's talk more about the process itself.
Installation of fog lights on a VAZ 2109
- the headlights need to be dismantled and then disassembled;
- then you should remove the additional reflector for the turn signal;
- remove chrome from the lamp with fine sandpaper;
- apply primer.
The primer must dry well; this will require waiting at least an hour. Special paint must be applied to the headlight in 2-3 layers, otherwise the paint may simply peel off. After this, it will take time again for the paint to dry completely, this will take about one hour.
Once the paint has dried well, you can completely assemble the rear optics. You need to approach the application of sealant with special responsibility. The old sealant must be completely removed, then the tail light must be degreased and the new sealant must be applied directly. This must be done carefully, since if the sealant is applied incorrectly, the headlight may fog up, which can lead to serious consequences.
In general, tuning headlights is not a particularly complicated process, but if you are afraid of making any mistakes, of course, you can buy tuning devices. However, the tuning process itself is interesting; every car enthusiast would like to do everything himself, putting his soul into this matter.
Sources
- ladaautos.ru/vaz-2109/poshagovyj-tyuning-far-vaz-2109.html
- infokuzov.ru/tuning/fary-vaz-2109
- okuzove.ru/kuzovnoj-tyuning/tyuning-far-vaz-2109-svoimi-rukami.html
- drive2.ru/b/518553324232900727/
DIY dark optics
Tuning VAZ headlights in a dark color is done using matte paint, tape, and a knife. Beforehand, the optics are dismantled and the headlight glasses are separated from the body. The reflector is sealed with masking tape. The inner surface of the headlight is covered with dark paint. Do the same with turn signals. If the glasses of the last element are reddish in color, then they are replaced with transparent analogues.
The next step involves fixing the headlight glass using sealant. Similar tuning
does not have a negative impact on the quality of the light beam of the optics. If desired, on the 2109 there is an option to install and connect the fog lights on your own. These optics are designed to improve the illumination of the road surface during snowfall, fog or rain. Such tuning is carried out using the following materials:
Problems with the generator - the light dims due to lack of voltage
Many car owners drive with poor lighting and do not even suspect that the culprit is not the lamps or the headlights themselves, but the electrical circuit in the car. The first step is to check the generator, which produces a certain voltage during the trip and is the main source of electricity after the engine has been started. If the generator does not work well and does not produce the required voltage, the following troubles are possible:
- all elements of electricity consumption will not work very well, many may not turn on at all due to the lack of normal network operating conditions in the car;
- instead of the required 12V, 8-9V is supplied to the headlights at a constant network load, this can be checked by turning on the headlights with the engine off (if the light is normal, the generator is to blame);
- Also, if the generator malfunctions, fuel consumption increases, since the computer increases engine speed in order to obtain a more or less normal voltage in the network;
- Also, the poor quality of the generator is due to the fact that when you press the gas pedal, all lighting elements, as well as fans and other electrical appliances, begin to work better.
Car with "angel eyes"
“Angel eyes” on the VAZ 2109 can be made with your own hands. Neon tubes are used for this. They are bent and mounted on the front optics. The mechanism is equipped with a special ignition unit. You can choose any glow color. Sealant is used to secure the rings.
To obtain a beautiful cross-section you will need LEDs. The ring is made from plastic sticks, which are heated with a hair dryer. The resulting material is wound onto a jar. The legs of the diodes are connected to each other using a soldering iron. The minus is soldered to the minus, and the plus to the plus. The LED legs are then soldered to the wires.
Nail polish is used to fix the diodes. The product is applied to the ends. Varnish is used to ensure reliable fastening of the diodes and good contact of the stick with the previous element. For “angel eyes” with “eyelashes” you will need to make a notch along the entire length of the sticks. A distance of 10 mm is maintained between the “cilia”. Their depth is 5 mm.
To install angel eyes yourself, you will need to disassemble the optics housing and remove the glass. The surface of the reflector is cleaned of debris and dirt. It is recommended to use cotton swabs for this. This kind of work cannot be done using chemicals. It is forbidden to touch the surface with your hands. A sealant is applied to the glass. The rings are installed in place, with the LED elements at the top. Then the wires are laid. The notches on the ring are directed outward. Silicone is applied between the glass and the headlight. This product dries in 30 minutes.
Power is connected to the optics. To do this, the plug is disconnected. The last element is designed to include dimensions and turn signals. Their male connectors are connected to each other. The structure is connected to the “mother” of the direction indicators. The “plus” from the headlights is connected to the free “female” connector. A negative wire is connected to the turning light mounts. Installing xenon on a VAZ 2109 provides the best possible result if the car is equipped with lenses.
Tuning the rear lights of the VAZ 2109 is one of the most common modifications due to its simplicity and a huge selection of offers from manufacturers of tuned optics. Moreover, in standard flashlights, due to the design features, the contacts often oxidize, and the bulbs begin to go out, or due to a short circuit to adjacent tracks on the board, the dimensions or brake lights begin to wink in time with the turn signals. But if you decide to replace the standard rear optics with tuned ones, you should not rush to make a choice. Unfortunately, most commercially available taillights made in China and Turkey have nothing in common with high-quality accessories from well-known companies. In this regard, I will give some tips on choosing rear tuned headlights.
- We evaluate the overall appearance of the product. Nothing should hang out, creak or slurp.
- Check the rear lights for the presence of seals where the headlight housing contacts the car body. If there are no seals, you will have to use sealant, otherwise a puddle of water will accumulate in the spare wheel niche in the trunk, which has penetrated from the street into the gap between the headlight and the body.
- Check the lantern itself for leaks. Leaks are indicated by the presence of gaps in the joints between the parts of the lamp, often between the glass and the headlight housing.
- It’s good if the headlight has separate sockets for each lamp, such a lamp will not have the disadvantages of a standard headlight.
- It is not advisable to use tinted taillights. The light of such headlights is barely visible in sunlight, and if the person driving behind you does not see your brake lights in time, you will only have yourself to blame. Let me remind you once again: tuning should not worsen safety!
- Be prepared for the fact that the glass of the rear taillights is much more susceptible to aging. The seemingly non-standard rear optics can be compared to worn plexiglass. High-quality domestically produced headlights are less susceptible to this effect.
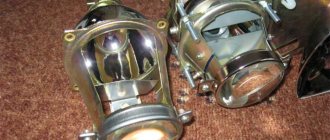
WE INSTALL B-XENON LENSES AT HOME
INSTALLING BIXENON LENSES
Without the help of others.
The rear dimensions of the VAZ 2109 have a special design. For such optics, rapid oxidation of contacts and breakage of light bulbs are typical. Auto mechanics advise purchasing tuned taillights for certain reasons. It is necessary to evaluate the suit of the product in advance. Rear markers usually have seals where the housing and body contact. Otherwise, sealant will come in handy.
If the lantern is not airtight, then there will be gaps in the connections between its parts. It is recommended to take tuned flashlights with separate sockets for each bulb. Auto mechanics do not recommend using tinted rear lights. The quality of light should not have an impact on safety.
To install the upgraded rear dimensions yourself, you will need to remove the plastic panels from the luggage compartment. The electronic connector is disconnected. The nuts designed to secure the headlight to the body are unscrewed. New optics are installed and screwed to the VAZ body. The connector is connected. To seal the joint, use a sealant.