Probably everyone understands that the safety of not only the driver and passengers, but also pedestrians and oncoming cars depends on how the headlights are set in any car, including the VAZ-2110. Adjusting the light can be done quite simply if you follow the recommendations of experts and carry out this step in stages. In this article we will try to analyze how to independently improve the headlights on a VAZ-2110 in just a few hours.
What to choose?
It would seem that we are talking about German quality products, which by definition should be better than their domestic counterpart. But in reality things are somewhat different.
Let's look at the key features of Kirzhach and Bosch headlights to determine which ones you should choose for your VAZ 2110 model.
- The purpose of any low beam is to provide good visibility of the roadway at night, while at the same time avoiding dazzling oncoming traffic. Headlights from German and domestic manufacturers cope equally well with these functions.
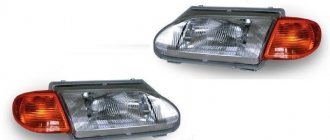
- The headlights from Kirzhach have a low beam lens, and a reflector is provided for the high beam. German products have two reflectors - for low beam and high beam. The lighting is ultimately the same, but Bosch has better brightness.
- Lenses are actually better than reflectors. They create a clearer line of light and allow the installation of xenon optics.
- As a study of reviews of VAZ 2110 owners using German devices shows, they are characterized by worse illumination in low beam mode.
- Bosch headlights have a very important advantage for many - when the car is driving in cloudy and rainy weather, it provides a better quality glow compared to Kirzhach devices. It's all about the larger surface of the low beam reflector.
- This Bosch plus also comes with a minus - you are deprived of the opportunity to install xenon optics.
- Note that, regardless of the manufacturer, these headlights contain H1 format lamps.
- If we take into account all other characteristics, then the undisputed leader here will be the products of the domestic manufacturer.
It is noteworthy that this is one of the few exceptions when domestic products turned out to be better than foreign ones. Sad but true.
Model features
Experts assessed possible headlight options for VAZ according to several parameters:
- ensuring excellent visibility at night. At the same time, the light should not blind oncoming drivers. In this parameter, both Kirzhach and Bosch are approximately the same;
- features of reflectors. The German analogue of the headlight has reflectors for low and high beam, while the domestic one has a lens for low beam and a reflector for high beam. This ensured almost the same level of illumination during the tests. The lens, which is installed in the headlights of the Russian manufacturer, provides better brightness (helps create clear lines of light, and is also suitable for installing xenon optics). In addition, some drivers note that the illumination is not very high-quality when the low-beam headlights are on; the product, due to the reduced lighting area, does not have such a drawback.
Differences between the Kirzhach headlights
Another feature of the Kirzhach headlight is that it can be easily bought in city stores, because the sales market for such headlights is in Russia. This and other features of the headlight make it more attractive to VAZ 2110 drivers and determine a slightly higher price for components from this company.
Sometimes it happens that, having purchased new headlights from a Russian one for your VAZ, you notice that their glow is not very good. Inexperienced drivers may attribute this to a defect or poor quality of the purchased product.
However, most often the problem is in the usual setting of the headlights. It is advisable to adjust the new lighting components that you install in place of the optics you just removed.
To do this, you will need, in addition to the skill of a draftsman, a flat surface. But if you do not have the necessary skills and time, entrust the adjustment of the Kirzhach headlights to specialists.
Removing a headlight from a VAZ 2110
The problem with new headlights
It happens that after installing new headlights, purchased for a lot of money from a reliable, excellent manufacturer, the quality of the glow leaves much to be desired.
Inexperienced drivers attribute everything to a defect or the purchase of a fake disguised as a trusted company. But in reality everything is completely different.
Headlights shine efficiently and efficiently not only depending on the manufacturer. Settings that some people don’t know about or simply forget play a big role
A little about the features of headlights
These cars were equipped, as mentioned earlier, with headlights from the Russian JSC Avtosvet and manufactured by German manufacturers. They represent several devices in one housing. In addition to low and high beams, the housing contains side lights and turn signals. The design of lighting devices from different manufacturers has some differences.
In the headlight with low beam of JSC "Avtosvet" there are lenses and a flat screen between the lamps and lenses; in the block headlight it is glued to the body. The light bulb that indicates the side light is located in the high beam headlights. The German manufacturer offers a slightly different design for such a product. For low beam, no lenses are installed, and the screen, in the form of a cap, is located on the glass bulb of the device. Because of such differences, experts do not recommend installing headlights on cars from different manufacturers.
Disassembling headlights
Before you start modifying the headlights in a VAZ 2110 car, you need to perform the following simple steps:
Their removal and disassembly
Using a utility knife, the glass is carefully removed from the headlight, and since it is secured using a special sealant, extreme caution is required so as not to break it. But if it breaks, then this is not a problem, you can buy it separately; Next, the reflector is removed, unscrewing several bolts. The next step is to remove all the wires from the back of the headlight and the spring from the place where the hydraulic corrector is inserted, and only then is it possible to remove the frame with the module itself from the headlight housing. Remove the low beam module using a screwdriver and disassemble it completely.
In order to make the glow better, they are refined, which includes the following steps:
- Shifting the lens closer to the reflector;
- Modernization of curtains;
- Changing the shape of the reflector.
These are the main stages that will ultimately lead to the complete modernization of Kirzhach headlights on a VAZ 2110 car. Now it is necessary to consider each individual stage.
Lens in the headlight of Kirzhach VAZ 2110
Shifting the lens closer to the reflector
The alteration begins with shifting the lens to reduce the area of the lens onto which the light flux falls. As a result, the curvature of the lens will also become smaller.
- Disassembling the module and removing the lens from it. Carefully mark the cut at the intended location of the module. It is imperative to ensure that the lens curtain does not move from its place, but remains at a distance of 50 mm due to the focal length of the lens;
- Cut off the lens at the marked location and attach it to the module. It is attached using the cuts that were made earlier, but the module itself will become shorter. The main thing in all this is that the closer the lens is, the more heating will occur due to its small area. In order not to miss the distance, the most optimal would be to approximate the lens by 10 mm.
Carrying out modernization of curtains
To carry out modernization and modification at the highest level, good and high-quality light distribution is done. The curtain is made straighter so that the light does not blind passing drivers driving in front of the VAZ 2110 into the rear mirrors. This type of curtain was developed according to the European GOST standard and is very successful.
To do this, you will need cardboard from which the curtain template will be made. The prepared cardboard template is transferred to a plate of metal material. To cut it out, metal scissors are used and the finished curtain is attached to the module. Also, if desired, it can be wrapped in foil to provide better light dispersion; it can also be used to install fog lights.
Under the lens on the module body, the edges are cut off. If they are cut correctly (no more than one millimeter along the ring), then the edge of the ring will not interfere with the correct flow of light.
Changing the reflector shape
If you want to change the width of the light output without changing its height, then you can change the shape of the reflectors yourself. By the way, on imported cars the reflectors have an oval shape, which is the best option.
Refining the headlights with a complete change in the shape of the reflector will help to significantly increase the width of the light beam. The reflector on a VAZ 2110 car has a standard round shape, and if you take it and press it to the floor, you can easily get an oval shape.
To reduce the cost of the reflector, it is made from ordinary sheet metal using an inexpensive cast method and therefore this material is very elastic and can be easily changed in shape.
Reflector in the headlight of Kirzhach VAZ 2110
To avoid cutting your hand, you should wear a glove. But you shouldn’t get too carried away, since there are certain standards for the width, which should be 93.2 mm in the flattened part. If this standard is not maintained, then the light beam will have a deformed feed shape. Therefore, when changing the shape of the reflector, efforts are applied little by little, controlling the change in size. So that when installing the reflector, all the fasteners coincide, they are also made oval in shape, as is the reflector fastening itself.
These changes, simple in their technology, will allow you to easily and without additional costs upgrade the Kirzhach headlights on a VAZ 2110. But the main thing is that all the changes made are not certified and fall entirely on the responsible shoulders of the driver.
After upgrading the headlights, it is imperative to adjust the VAZ 2110 headlights.
Replacing headlight bulbs
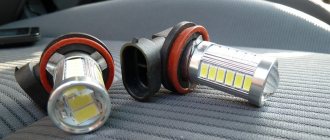
The owners' complaints about the lighting of this car mainly relate to electric lamps. An effective replacement can be found if you find and install devices that generate a luminous flux that has increased brightness and intensity. Manufacturers of these devices, both domestic and foreign, have mastered several types of such products:
- Halogen lamps. They are distinguished by a large selection of their sizes and a long period of operation, as well as reasonable cost. As a disadvantage, it is necessary to note their high energy consumption, as well as some features of their installation;
- Xenon lamps. This type of lamp has a high light beam intensity, is environmentally safe, and has a pleasant spectrum close to daylight. However, due to the high likelihood of blinding problems for drivers of oncoming cars, they were prohibited from use;
- "GT" type of lamps. They are classified as a new type of lighting devices; they embody all the best factors of previously produced devices, and therefore are very popular.
Article on the topic: “Which is better xenon or halogen.”
Review of offers of alternative (tuned) optics for VAZ 2110-2112 from ProSport and Hella
It’s worth mentioning right away that such exotics are quite expensive. On average, this kind of offer will cost 2 or 3 times more than the original optics. But all this pays off with the many design delights and sophistication of tuning offered. With alternative headlights from ProSport and Hella, your VAZ 2110 (2112) will look truly impressive and expressive.
Hella 2110 headlights
The problem is that this kind of optics on the VAZ 2110 often does not have better lighting characteristics and does not guarantee high reliability. Therefore, such headlights for the VAZ 2110 (2112) are good only from an aesthetic point of view. The headlights from the ProSport Aggressor and Hella series have proven themselves best in terms of durability.
If you like the idea of installing tuned optics on your VAZ 2110 (2112), you should also take into account the fact that it is compatible with different modifications of the car. For example, the optics on the VAZ 2112 from ProSport are not installed on coupe-type bodies, and the ProSport series is not suitable for the VAZ 2110 M series.
ProSport Aggressor headlights
Due to the highly controversial advantages of alternative optics on VAZ 2110-2112 cars and its high price, most motorists do not consider purchasing ready-made headlight modifications, preferring to independently tune the original VAZ lighting equipment. In this regard, undoubtedly, TM Kirzhach headlights remain the leader.
Application of “GT” devices in VAZ 2110 headlights
Before installing such lamps in “tens” headlights, let’s look at their technical and other features:
- The glow temperature, its coefficient is approximately 4000-5000 Kelvin;
- The maximum luminous efficiency coefficient has been achieved, which is approximately 45-50%;
- During manufacturing, the lamp bulb was enlarged, its body was made chrome;
- The spiral began to be installed with an increased length.
These lamps are widely used in retail chains; purchasing them is not difficult.
A few words about tuning tricks
Activities to modernize the head lighting of the “tens”, giving it uniqueness and inimitability, may require the purchase of some special materials, such as phosphor. Its unique properties are close to those of phosphorus, which has the ability to emit light in the dark.
This feature is widely used to obtain original tuning options. Most often, headlight curtains are coated with a pre-prepared mixture, which consists of phosphor and varnish. This needs to be done on both sides of the curtains, and after drying them, you can put them in place. Such actions allow you to get a completely new and unique look. As you can see from the story, tuning VAZ 2110 headlights with your own hands is not difficult. Carefully consider the design of the upcoming renovation, prepare the materials necessary for the work, and get to work.
How to improve headlights on a VAZ without the help of others2110
There is no such person who realizes that the safety of not only the driver and passengers, but also pedestrians and oncoming cars depends on the correct selection of the studio, how the headlights are set in any car, including the VAZ-2110. Adjusting the light is quite easy if you follow the advice of professionals and do this step by step. How to make the headlights on a VAZ-2110 better in just a few hours without the help of others, we will then try to analyze.
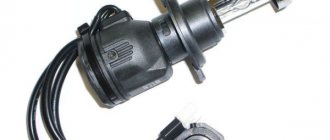
Replacing the H1 lamp in Bosch headlights model 2110 with H7
Many VAZ 2110 owners are faced with the fact that the Bosch lights on their car do not illuminate the road well enough at night. They have a standard H1 lamp installed.
Experts say that if you replace the Bosch with an H7, the situation will improve significantly.
The process of replacing a standard H1 lamp with an H7 in VAZ 2110 lighting sources is quite simple - it consists of the following steps:
- Disconnect all headlight connections.
- We remove the radiator grille - to do this you need to unscrew the bolts that secure it.
- We disconnect the blocks with wires from the turn signals.
- We remove the hydraulic corrector - to do this, press the latch and turn it ninety degrees.
- We unscrew the 3 bolts that secure the flashlight and move it back. We move the eyelash to the center, getting rid of the engagement with the wing.
- Loosen the 2 bolts securing the buffer and remove the eyelash.
- Unscrew another nut and remove the light source.
- We heat the sealant and use a knife to open the headlight.
- The hole for the H1 lamp will need to be drilled. It is smaller in diameter than needed for H
- You will also need to remove the terminals and install those that are suitable for the lamps that we installed - there will be 4 of them.
- After drilling, insert the lamp into the hole and fix it with standard fasteners.
- The fixation of the reflector will need to be adjusted so that it stays in place properly.
- Instead of lamps, we can install LEDs in side lights.
- Next, we assemble the lights back, install them on the car and adjust them.
By installing other lamps, you can make sure that the lighting will be of better quality - there will no longer be problems with visibility during night driving.
Preliminary preparation for adjusting the luminous flux of headlights
Read
Headlights need to be adjusted not so much for good illumination, but so that the luminous flux does not cause discomfort to oncoming drivers, in other words, does not blind them, especially at night. Both low and high beams are adjusted in a car service center, under the supervision of experts. If you have, albeit small, unfortunately, the ability to repair cars, you can actually perform this process independently in your garage, performing it step by step:
- Checking serviceability. First you need to check whether the car headlight range control is working properly. What exists is that this mechanism plays an important role, one might say, in lighting. In order for the light flux to be adjusted correctly, you should make sure that it is in good working order and is functioning normally.
- Choosing the right site. The headlights are adjusted on a completely level area. Having chosen a suitable place, you should check how even it is using a special level; if there is no skew, you can safely park the car on the site.
- Having measured approximately 6 meters from the car, it is necessary to free up space on the wall in order to use it for a typical screen where you can make notes with ordinary chalk.
- Of course, the headlights can be adjusted correctly only in such a situation if the car’s tank is filled, the tire pressure is normal, and a person in the same weight category as the driver sits in the driver’s seat.
Voltage problem
Also, the light may become dim due to any voltage problems. Due to voltage, problems with headlights may occur. The cause of the malfunction lies in the generator.
Advice. Any alternator replacement work should be carried out with extreme caution, so it would be best to consult a professional electrician.
Another cause of malfunction is incorrectly adjusted headlight position.
It also happens that a person initially adjusted the headlights properly, but due to some small push the adjustment was disrupted. This situation most often occurs due to a push. How to improve the headlights on a VAZ 2114 in such a case? This does not require any specialized optical devices, but you will have to spend quite a lot of time so that the direction of the light flux again becomes the same as before.
H1 diodes are money down the drain, headlights Bosch VAZ 2110-11-12
Subscribe to the group on Subscribe to Instagram.
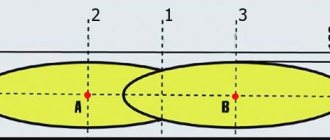
Next, vertical stripes are drawn on the previously constructed shield. Three stripes must be marked on the wall and marked with various signs, for example:
- line F must be drawn parallel to the middle of the car;
- line “A” parallel to the left car headlight;
- line “B”, respectively, is right.
Read
Horizontal stripes are marked. A horizontal mark is made through the F line, which we will call H, and stepping back approximately 60-65 cm from it, we draw an additional horizontal mark R. Next, we proceed to adjusting the light flux at home.
Step-by-step adjustment of headlights on your own car
Before you improve the headlights on the VAZ-2110 at home, you need to independently adjust the luminous flux . This is quite easy to do if you follow the following tips:
- the headlight located on the right side must be covered with at least some convenient material that will not transmit light, for example, cardboard;
- the corrector should be turned to the first position;
- Under the car hood you need to find special screws designed to adjust the light output. By turning them in the desired direction, the adjustment process is carried out;
- a correctly adjusted left headlight illuminates the H line from above, and the lower stream of light is displayed on the P stripes.
The right headlight is also adjusted using the same method, while the left one is closed. You should definitely make sure that the luminous flux does not fall too low. When a difficulty is detected, the headlights will certainly rise higher so that when driving the driver can perfectly see pedestrians, especially in the dark .
.
But under no circumstances should they be raised very high, because such placement will blind oncoming cars, which often leads to emergency situations on the highway. Only correct adjustment of the light flux , which will be carried out taking into account the above tips, will help you avoid unpleasant situations.
Why do the headlights on VAZ 2110 and 2114 shine poorly? We fix and improve
You need to understand and find out the reasons why the headlights on the VAZ 2110 and 2114 shine poorly as quickly as possible. Light on the road is the key to your well-being after sunset, and especially in winter, when it gets dark early (and dawn comes late). If bad weather conditions in the form of rain or snow are added to the general theme, then the lack of lighting becomes literally dangerous.
To drive almost by touch means to begin with risking the integrity of your iron horse: an undetected hole can seriously damage the chassis, or even cause a skid, which is fraught with injuries not only for your car, but also for oncoming/passing people. Why do the headlights on a VAZ shine poorly? 2110 and 2114, you need to look for the reasons until you are completely sure that this particular factor is interfering with proper functioning. Simply changing lamps to more powerful ones does not always solve the problem and may turn out to be an unnecessary waste of money.
Glass The simplest reasons are usually the most likely. Dirty headlights reduce illumination by 50%! Wiping them with a dry cloth is not a good idea. With this approach, you also scratch the glass, which over time will make their dim glow permanent. If you don’t want to regularly wash your headlights by hand, install a washer. By the way, the unit from Volga is perfect for the “ten”.
Moreover, the installation is quite simple and can be done on your own. The glass may burst. If you notice a crack on the surface, you will have to remove the headlight unit and replace it with a new one. If your car has already run well, the glass may naturally become cloudy from age.
Since it is in the forefront when moving, dust, grains of sand and small debris, hitting the headlight at speed, leave microscopic scratches on the glass. Most of them are so small that they are not even visualized, but at the same time they refract and scatter light according to the principle of a prism. The glass will have to be replaced; and so that the next replacement moves as far away as possible, you can cover it with a protective film. Articles on the topic:
- “How and with what to polish plastic headlights”;
- “Polishing headlights with toothpaste yourself.”
Reflector If everything is in order with the glass, a possible reason for the dim glow may be a peeling reflector. No matter how powerful the lamp you screw into the headlight, you will not get the proper brightness of light. On most foreign cars, in this case, you have to change the entire headlight; On VAZs, only the reflector can be replaced. Moreover, the procedure is very simple:
- The headlight unit is dismantled with the battery disconnected;
- The glass is removed from it. It is placed on a sealant, which is softened by heating using a hair dryer. Then the glass is pryed up and carefully removed;
- The light bulb is unscrewed;
- The shabby reflector is dismantled, a new one is installed, and the headlight is assembled in the reverse order.
Before installing the glass, do not forget to clean both it and the body of the old sealant and degrease before applying a new layer. Related articles:
- “How to restore a headlight reflector”;
- “What is the best sealant for gluing headlight glasses.”
Voltage problems: Especially typical for cars with halogen lamps. A lack of voltage can be caused by a malfunctioning generator or oxidation/breakage of the contact. Normal light is produced at a voltage of 13.8-14.2 V, and the same should be at the ends of the working lamp. A drop on it of no more than 0.2-0.3 V at 2000 rpm is acceptable.
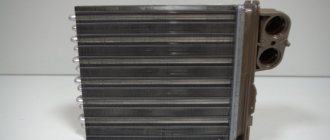
We recommend: Replacing the heater radiator on a Lada Kalina with your own hands
A lower voltage indicates that there is a faulty contact in the circuit. It is required to detect and eliminate the defect; Installing stronger lamps before repair is strictly prohibited: it can lead to overheating and even ignition of the faulty contact. Direction of luminous flux Insufficient lighting can be caused by unadjusted position of the headlights.
Moreover, at one time the adjustment could be correct, but due to an accidental shock (for example, a bumper catching a curb) it was disrupted. You can correct the position yourself, without optical instruments.
- A flat wall is selected, the car is installed at a distance of 5 m from it and loaded as standard: the tank must be full, and someone must be sitting in the driver’s seat.
- Markings are made on the wall: the central vertical line should coincide with the center of the car, the side lines should coincide with the center of the headlights.
- Horizontal is carried out at the level of the lamps. The border of the light spot is marked 6.5 cm below.
- The glass is removed from the headlight to access the adjustment screw, the second one is covered with any cardboard. The direction is adjusted to exactly hit the point of intersection of the lines. The adjustment is carried out with the low beam on: then the high beam will also be adjusted correctly.
- “How to properly adjust headlights”;
- "How to improve headlights."
After debugging one headlight, the same manipulations are carried out with the second. If the reason why the headlights on the VAZ 2110 and 2114 shine poorly was an imbalance of direction, after adjustment it will become easier not only for you, but also for other drivers: often crooked headlights blind oncoming people. And it also causes inconvenience to fellow travelers if they get caught in the interior rearview mirror.
How can you improve your headlights yourself?
Only when the luminous flux
adjusted, with slight modifications you can improve the headlight illumination on your own car without the help of others.
First, the headlight
is removed, and the improvement is carried out in this order:
- The protective glass is removed. To make it easier to remove the protection, it is recommended to heat the glass using a regular hair dryer for this purpose. A warm air flow will warm up the sealant, after which the panel, of course, can be easily separated from the headlight using a sharp knife;
- carefully remove the reflective gasket;
- When using the appropriate tool, it is necessary to move the lens approximately 15 mm towards the reflector or slightly shorten the modular ring on a lathe.
Such actions will help not only improve the light of the headlights, but also increase the luminous flux and make it much wider. Both adjusting the headlights and improving the luminous flux , as you can see, is a fairly common process that is available to every car enthusiast.
There is a special offer online on our website. It is possible to get a free consultation with our corporate lawyer by simply asking your own question in the form below.
Installation of headlight washers on a VAZ 2110
Have you ever thought about installing headlight washers in a VAZ 2110? In fact, the thing is very convenient. There's no need to go out and clean your headlights when you can just press a button. And clean headlights mean traffic safety! First, let's define what kind of headlight washers there are, and how they differ from each other: Types of windshield wipers and headlights:
- With brushes
- Jet (high pressure)
Headlight washers with brushes are considered to be the most effective. Here I think there is no need to explain and it is clear that dirt will be better washed off from the headlight glass if you physically wash it, and not just pour water on it :) High-pressure jet headlight wipers, unlike brush ones, clean the headlights only with a jet of liquid.
A very powerful jet of liquid escaping from the nozzles allows you to remove dirt deposits on the headlight or at least moisten this dirt in difficult conditions. Obviously, dirt is washed off better when it has not yet dried and there will be practically no difference between the two types of washers, but the situation changes when the dirt is already dry.
We recommend: Caution: painted! Preparatory work and organization of make-up
High-pressure windshield wipers can only partially remove such contamination, unlike brush wipers, which will more effectively clean the headlight glass. Don’t forget about the temperature. When the air temperature is below zero, you need to use antifreeze. And in severe frost it is better not to use headlight cleaners at all. Everyone knows that the headlight glass heats up from the lens, so if ice water gets on the headlight glass, it can crack.
To increase the effectiveness of headlight washers, it is recommended to use heated water. It is clear that warm or hot water cleans dirt much better, in addition, it becomes possible to use the washer in winter without the threat that the headlight glasses may burst. If you decide to heat the washer reservoir, then it is better to use one common one for the headlight cleaning fluid and windshield washer bachek.
The disadvantage of a common washer reservoir is that you will have to add water/antifreeze to it more often, and the plus is that the heating of the reservoir is also common. When using a separate reservoir for washing headlights, you will have to heat the second reservoir, in addition, the kits do not include a liquid level sensor, so You will have to check the amount of water in the tank visually (unless, of course, you install it yourself). It must be taken into account that all headlight washers cannot completely clean the headlights (the cleaning area depends on the model of windshield wipers).
Brush washers do not reach the edges of the headlight and high-pressure cleaners also have a strictly limited cleaning area, and the jet cleans much worse at the edges than in the center. But often this is quite enough to improve lighting in dirty weather. Also, washers can be retractable or permanently sticking out :), also with high and low pillars, spherical and flat.. On the top ten, both spherical nozzles (in the bumper) and flat ones (in the eyelashes under the headlights) are installed. You can install headlight washers on the VAZ 2110:
- Regular
- Universal
- Assemble the headlight washer system yourself from various components
- From other car models
Not many people know that the VAZ 2110 also produced headlight wipers, which were installed in a variant version (standard brushed headlight washers), although it is not easy to find such kits because they have already been discontinued..Universal windshield washers that are suitable for the VAZ 2110:
- SCYTHIAN
- SHO-ME
- Hella
You can also try to assemble a headlight washer system yourself from parts from different cars, or borrow a headlight washer from a foreign car and use it on a VAZ 2110.