Installation and connection diagram for VAZ 2109 window regulators: step-by-step instructions with photos
- Before starting work, you must turn off the power supply to the vehicle's on-board network from the battery. Or we separately turn off the power circuits for the cigarette lighter and the backlight of the instrument panel and buttons, because The power supply wiring for the power windows will be connected to these circuits in the future.
- Remove the door trim. It can be removed quite easily, but it is better to stock up on mounting pins.
- First of all, we dismantle the mechanism of the standard manual window lifter, fixing the glass (for example, using office tape) in a position that provides access to the place where it is attached to the lifting mechanism.
- Unscrew the bolts securing the door glass to the standard window lifter mechanism.
- We dismantle the guide of the standard window lifter mechanism (trapezium). Unscrew the bottom nut:
- Two nuts in the middle:
- Top nut:
- The guide is free, now all that remains is to unscrew the three nuts securing our window lifter in the area of the rotation handle.
- We take out the entire door window lifter mechanism. To do this, we bring the lower pin of the guide into the hole in the door (see photo).
- By pressing with a screwdriver, we remove the upper fastening of the guide.
- Done, the window lift mechanism is disconnected. We take it out of the door cavity.
- That's it, the standard mechanism has been dismantled, let's start installing a new one. The new mechanism is attached using standard fasteners; you don’t have to drill anything new. We place the window lifter mechanism into the inner cavity of the door through the largest technological hole in an “assembled” form (otherwise it won’t fit), as if in the “open” position of the glass.
- We fasten the mechanism inside the door using two studs, which we insert into two holes that previously held the middle part of the guide of the standard VAZ 2109 window lifter. We combine them and screw on the nuts.
- The next task is to combine the mounts on the window lift linkage system with the mount on the glass. This can be done by supplying power to the power window motor contacts from an external power source, for example, any working car battery.
- When the lift mechanism is combined with the strip on the glass, we connect them using the bolts from the kit.
- It is advisable to lubricate the rubbing parts thoroughly.
- The mechanical part is complete, let's move on to the electrical part.
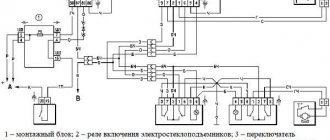
- We estimate the route for wiring from the door from the electric motor of the window lift drive to the installation location of the buttons - activators. The standard place for buttons in the high panel of the VAZ 2109 is two plugs to the right of the cigarette lighter, and we install them there. The hardest part is running the wiring from the door into the rack and then out of the rack under the dash. For this purpose, there are technological holes in the rack. You may need to use a special probe. The wiring is done with a wire with a cross-section of at least 1 mm. sq. We lay the wires in such a way that they do not touch any moving parts of the door or the ESP mechanism itself. We will take power for the electric windows from the cigarette lighter. We make electrical connections according to the following diagram: When the circuit is assembled, it is necessary to connect the battery power and check the correct operation of our system. We turn on the side lights and check the correct operation of the backlight of the ESP activator keys. If the backlight does not work, swap the sockets on the contacts of the keys, indicated in the diagram as 3 and 6. You can install the window lifters in the standard way, here are two diagrams:
Connection diagram for electric windows on a VAZ 2109 with mounting block 17.3722 (before 1998)
Connection diagram for electric windows on a VAZ 2109 with mounting block 2114-3722010-60, 2114-3722010-10 and 2114-3722010-18 (new model)
You can read more about the types of mounting blocks for front-wheel drive VAZs here.
- We check the functionality of the window regulators. The glass should move smoothly, without jamming or jerking, and should not come out of the guides. To facilitate the movement of glass in the seal, it can be treated with silicone grease.
- All that remains is to reinstall the door trim.
- That's it, the installation of the window lifters is complete, let's enjoy the completed modification!
Important points
- dismantling the standard ones and subsequent installation of new ESPs on the rear doors of the VAZ 2109 is carried out in the same way as indicated above (since the rear doors differ from the front ones only in the location of the standard window lifter handle: on the rear doors it is shifted 3 cm to the left);
- When removing the door trim using a screwdriver, you must be careful: the plastic plugs over the mounting bolts are very fragile. They break easily if you apply too much force by prying them with a screwdriver;
- The simplest ESP connection diagram given above is far from the only one. Car enthusiasts who are well versed in electrical engineering prefer more reliable and complex circuits that use mounting blocks. Here is an example of one such scheme:
But it should be remembered that this ESP connection diagram can only be used on cars manufactured before 98. for machines of a later release, a different scheme is used:
So, you can install an ESP on a VAZ 2109 yourself. In order to assemble a simple electrical circuit, no special electrical skills are required. Knowledge from a school physics course is quite enough. But at the stage of choosing window lifters you should be especially careful. It is strongly recommended to abandon both rack and pinion devices, even if their price seems incredibly attractive. Only lever window lifters should be installed, since they are the only guarantee that the glass will not freeze to the door on a frosty winter day.
Installation, wiring diagram for electric windows
Electric windows for VAZ 2107
Rack and pinion windows are sensitive to glass freezing
In the vast majority of cases, there is no need to drill anything additional into the doors. Standard mounting points for the manual mechanism are quite suitable for attaching the electric window regulator. Install new equipment as follows:
- The window lifting unit is placed through the largest door opening. In this case, the entire structure must be assembled.
- For fastening, there are a pair of studs on the body of the unit, which ideally fit into the holes freed from the mounting bolts. These holes are located in the central part of the door. Align the studs with the holes, screw and tighten the nuts.
- Now you need to align the window regulator mount with the glass itself. Since the mechanism is in the “fully open” position, you need to activate it and raise the seat close to the glass. The ideal option would be to temporarily connect the equipment directly to the battery.
- Having brought the lift element to the metal strip of the door glass and thereby connecting the mounting holes, secure everything with two bolts that come with the window lift.
- Do not forget to thoroughly lubricate all friction points of the window lifter parts.
The electrical wiring is connected as follows:
- Measure the length of the future wires that will be laid from the window motor contacts to the button installation points on the front panel. The plugs for the activator buttons (2 - one per door) in the case of cars with a “tall panel” are located to the right of the “cigarette lighter”.
- To pull the wiring into the rack and then under the panel, you will need to use a cable holder. For such purposes, an ordinary steel wire with a loop at the end will do - to capture and pull the wiring through the channels.
- When purchasing wires, make sure that the cross-section is at least 1 mm. sq.
- The simplest and most convenient option for chain tables is to connect the window regulators to the cigarette lighter. However, some motorists recommend preferring power supply directly from the battery. There is also a standard connection diagram provided by the factory.
Articulated-lever ones are considered the most reliable window lifters
After completing the work, you can put the door trim in place, close the resulting holes with decorative plugs, which usually come with window regulators, and connect the battery terminals to try out the new equipment.
Tips for installing ESP
- Electric lifts are produced by many companies; there are various designs. But you should not buy parts from unknown manufacturers, and you should keep in mind that cable power windows quickly fail. The most reliable ESPs are plank and rack type. On average, sets of lifts consist of 2 pieces. VAZ cars cost approximately 2500 to 3000 rubles, too low a price should be alarming.
- In order for the mechanism to reliably raise and lower the glass, it is necessary to lubricate the guides in the doorways with silicone grease.
- Universal electric windows are always inferior in quality to those parts that are specifically designed for a particular model. It is better not to purchase universal ESPs - they usually do not last long.
- Many drivers install ESP buttons on the instrument panel or next to the gearshift lever, but there is a small disadvantage - you have to pull the wires. It is more convenient to mount the buttons on the door armrest - there is no need to get confused in the electrical wiring, installation of lifts takes less time, and it is convenient for the driver to raise and lower the window.
How to install fog lights on a VAZ 2109
Manufacturers of electric windows for VAZ cars
ESP for VAZ 2101-07 and 2108-2115 cars is produced by various companies - the mechanisms can have different designs and are sold in sets for two or four doors. Zhiguli electric windows are almost never sold individually; in stores you can only find separate ESP motors. Among the most well-known manufacturers of electric window lifting mechanisms are:
- Katran (2104-05-07);
- Granat (2104/2105/2107);
- Forward (2108-09-099);
- SPAL DE LUX (2110-11-12);
- Golden eagle (2110/2112).
The industry produces several types of ESP for Zhiguli cars, and electric windows can be:
Each model of window lifters has its own characteristics, advantages and disadvantages. It should be noted that ESP mechanisms from different manufacturers have design differences between each other, and therefore they are not interchangeable. Kits of parts are relatively inexpensive, and the most popular are ESP kits for front doors. The standard set of electric windows includes:
- the door lifting mechanisms themselves with motors;
- two window lift buttons;
- wires with plugs for connection;
- necessary fasteners;
- stubs.
Almost all kits contain instructions for installing parts with an electrical connection diagram.
Types of electric windows and which ones are better for the VAZ 2109
How to make and install a car lift for your garage yourself
ESPs come in various types.
- cable-type (weak and very slow, with the advantage of being cheap and being able to replace the motor separately if it suddenly burns out);
- rack and pinion (a bit weak, based on operating experience - require regular lubrication);
- articulated-lever (work quickly, make little noise, are quite powerful: they can easily cope with frozen glass).
We opt for the latter, called “Pomegranate”. Moreover, the kit of these ESPs includes everything necessary for installation - electrical wiring, buttons, plugs, all the necessary fasteners, rubber cuffs for pulling the wiring from the rack into the door.
There are also “Katran” and “Berkut”, they have a slightly different device and installation is a little more complicated, but according to reviews they are also not bad.
Window lifter options
According to their design, electric windows (ESP) are divided into three main types:
The most popular among lever ESPs are the “Granat” lifts. Their popularity is due to two factors: a fairly affordable price and good equipment. Along with the ESP, the driver receives wiring, fasteners, cuffs and plugs.
Connection instructions
It should be borne in mind that installing rear window regulators or front devices is a rather labor-intensive task. Before you begin the process, weigh all your strengths. You need to know not only how to install window closers and electric motors themselves, but also how to adjust, configure and train the system. Not every car enthusiast can do this at home. Detailed instructions on how to connect power windows are presented below (the author of the video is the irtimidneuss channel).
Stages
Installing universal electronic devices first of all implies familiarity with the circuit. The wiring diagram for the power windows should be included in the kit. Before starting the process, disconnect the battery.
How to install and connect power windows correctly:
- First, remove the door cards - to do this, unscrew all the bolts, remove the handles and disconnect the trim clips.
- The glass must be securely fastened before dismantling the old mechanism. The glass needs to be secured with tape. Also remove all rubber plugs from the service holes through which the wires will pass.
- Install the adjusting plate into the inclined groove and secure it; for this you will need M6 bolts. The plate is attached to the glass bracket, be careful not to damage it.
- The ESP mechanism must be installed in the upper hole in assembled form. You need to securely mount the device to the door, for this you will also need M6 bolts with lock washers. As a rule, installing an electronic device involves the use of three bolts, but their number may vary depending on the design of the device.
- The next step is to remove the two plastic plugs located in the front panel; to do this, you will need to disconnect the wire from the cigarette lighter device in advance. Then simply pull the wire - it can be put through the technological hole that is located in the car door, as well as its pillars. At this stage, be careful - when laying, make sure that the wires do not come into contact with the moving elements of the electronic device, otherwise the wiring may break. If necessary, all wires will need to be secured with electrical tape, and they will also need to be additionally wrapped with it.
- Next, you need to make sure that you have connected the contacts to the switch correctly. Connect them to power and turn on the side lights. In this case, the backlight of the ES button should be activated. If it does not light up, then try swapping the contacts.
- Now we need to work on the lever system. Connect the device to the plate and glass. Tighten all nuts securely as they may become loose while driving. You need to adjust the device so that the glass is in one position and securely fastened.
- Next, the adjusted window regulator should be connected to the power supply, that is, the on-board network of the car. To avoid mistakes at this stage, you should study the car's wiring diagram, as well as the ED diagram.
- After all these steps are completed, you need to secure the clamps. For example, you can use silicone spray for this (the author of the video is LESH MASTER).
Typical faults
Keys are used to control the power windows. Over time, it may fail. You need to know what malfunctions can occur and how you can fix them yourself.
Causes
The reasons why the power window key may not respond to pressing may be different:
- glass froze during severe frost;
- glass lift failure.
It is almost impossible to detect a breakdown without disassembling the window lifting mechanism. Therefore, you need to remove the casing and disassemble the mechanism.
Removing door trim
When removing each part, you should check it for integrity.
The main causes of breakdowns can be divided into two groups:
- Problems with the key's power supply.
- There may be situations where everything is fine electrically, but the power window switch still does not work.
Remedies
If problems arise due to the power supply, then first of all you should check the fuses. If they are in good condition, the next step is to carefully inspect the motor of the beet lifting mechanism and check what voltage is supplied to its terminals. The test can be done using a multimeter or a regular 12 V light bulb. If there is no voltage, you need to check the relay, wiring and control unit.
Removing the Switches from the Door
If the button works periodically (it works, then it gets stuck), the problem is most likely in the button itself. It is necessary to disassemble the window regulator, remove the button and clean the contacts if they are oxidized.
Installation of electric windows on a VAZ
The procedure is performed in the following sequence:
- temporarily remove the glass seal located on the inside of the door;
- remove the glass, and then dismantle the window regulator fastening mechanism;
- we install devices that will operate from an electric drive;
- connect the negative terminal to the battery and check the operation of the new window regulator;
- We install the glass in place and trim the door.
Unlike conventional mechanical devices, power windows are not equipped with traditional gear reducers, but with a special drum. The shaft of a DC electric motor is inserted into its hole located in the center. In this case, the motor is only a component of the gearmotor, on which, as we found out earlier, the speed and quality of raising and lowering the windows depends.
Installation of the lifting device is quite simple. It starts with disconnecting the battery. After this, use a curved screwdriver to unscrew 3 screws, unfasten the door trim latches and remove the door pocket. Using a thin screwdriver, pry off the handle (latch) of the window lifter - the tip of the tool is inserted into the recess between the latch and the socket.
The handle itself is removed. At the next stage, the car door opening handle is dismantled. To do this, use a screwdriver to pry the handle cover and remove it. Now use a screwdriver to remove the 2 fastening screws that were hidden by the cover plate. After this, the handle can be removed without much difficulty. Using a screwdriver, you can also remove the power window button, which serves to lock the door.
After removing 6 pistons, the trim covering the car mirror adjustment mechanism is also removed. As a result, it remains easy to dismantle the door trim. Armed with a 10mm wrench, unscrew the 2 bolts that hold the auto glass clips. Next, 2 nuts securing the lifting mechanism, nuts of the upper and lower fastenings, and 3 nuts securing the lifting mechanism are unscrewed in sequence.
Upon completion of the described stage, it is time to remove the lower guide pin of the lifting device from the door panel. To facilitate and simplify such an operation, the upper pin of the guide must be bent using a screwdriver. Now the entire lifting mechanism can be safely removed through the resulting opening in the door frame.
Today, electric windows have become an indispensable element, in principle, like any household electrical appliance. New versions of the VAZ 2109 car, of course, have ESP installed at the factory, but it is difficult to say that they work with the required efficiency. In frosty months, the rubber seal freezes to the door, making it almost impossible to lower the glass. Having a suitable manual for the VAZ 2109 at hand, replacing the window regulator will be easy and simple. Thus, it is possible to get rid of all the errors of a given manufacturer. On a VAZ 2109, replacing the window regulator can be done on your own.
First you need to visit a specialized store that sells quality products. It is recommended to immediately purchase a rack-and-pinion design for ESP; compared to a cable design, it is characterized by increased reliability. The purchased kit should also include:
- control buttons;
- special brackets designed for installation of joint ventures;
- plugs for the holes in the handles of a conventional window lifter;
- various washers and nuts.
Installation is performed according to the following scheme:
- the device is first mounted on one door, then on the other;
- wiring is being laid;
- work efficiency is checked;
- assembly is in progress.
Detailed replacement of window regulators
So:
- From the interior side, you need to remove the handle and remove the “soap dish” located under the door handle itself.
- The fastening bolts are carefully unscrewed and the interior trim is dismantled. Do not damage the plastic latches.
Note! If several latches are broken, they must be replaced with new ones. Otherwise, rattling will be observed in the cabin.
- Now, one by one, remove the plugs, the handle and its lock. You should also unscrew the bolts from the handle and remove the “pipe”.
Replacing the window regulator of a VAZ 2109
- As a rule, manual window lifters are secured with 7 nuts and a pair of bolts that secure the device to the glass. In this case, you need to remove all the bolts and remove the device from the door. Since there is a risk of glass breaking during the change process, it is recommended to secure it with a cable.
Replacing the window regulator of a VAZ 2109
- The guide bolt of the old window lifter is removed, as well as the bolts of the bracket for raising the glass through the door hole. The same applies to the lower mounting bolt of the SP slide.
- After unscrewing all the necessary fasteners, you can safely remove the mechanical device.
- Now you need to pay attention to preparing the new window lifter, as well as installing the correct brackets.
- Temporary wiring from the battery is currently being installed to the door. It may be required to regulate the ESP in order to prevent sticking and biting of the glass when lifting and when fixing the device to the glass.
Note! You need to be extremely careful not to allow short circuits in the wires.
- To install the window regulator inside the door, you first need to install it in the folded state, as there is a risk that it will not fit.
Note! At the time of purchase, the device is in an unfolded state. In this case, you need to connect it with temporary wires, only after that, changing the polarity, the rail is brought into the middle.
- The ESP is mounted in place of the old lift, the SP studs are inserted into the door holes and secured with several nuts.
Note! The studs are not driven in, but attached, since then you will need to screw the lift to the glass, which requires some adjustment.
- The lift rail is raised, so it becomes possible to align the holes with all the glass mounting holes, only then the joint is screwed into place.
Replacement of power windows of VAZ 2109
Note! In some situations, such actions make the joint venture work worse, then you will need to turn the mechanism in the opposite direction.
Determining the location of control buttons
For these actions you will need a ruler, pencil, file and hand drill:
Note! The wires must not be short-circuited; it is advisable to disconnect the “-” terminal of the battery at the time of work.
- The plastic of the front pillar is dismantled and the interior trim is folded back.
- Several meters of two-core wire are passed through this stand directly into the door. It is also required to conduct a single-core wire according to this principle.
- Since the wires rot and break after a while, you need to install casings between the door and the stand. As a rule, when the ignition is turned off on the “nine”, only the cigarette lighter and side lights work.
- Once the wiring is all the way through, it's time to connect it. To do this, you need to have an appropriate diagram available.
- At the end of the work, you need to check the functionality of the entire mechanism. Place the terminal on the battery, press the button, evaluate the efficiency of the new ESP and the lighting of the backlight on the button.
Note! If the joint venture is working too slowly, you need to try switching the “+” wires.
All resulting connections are wrapped with electrical tape, while the wires themselves are hidden in a niche in the cabin. This must be done in order to prevent them from being pinched by the ESP rail. You can install a button in the door trim of a VAZ 2109, connect the block and mount the trim in place. All removed elements are installed in the opposite order of removal and the functionality of the power windows is re-checked. Of course, ESP is an important part of the machine, but it is not necessary to turn to professionals to install them, since videos and photos on the Internet reveal all the intricacies of installing the mechanism with your own hands. For a better understanding of the replacement process, detailed instructions are provided with a description of each stage. To obtain the desired result, it is important to purchase a high-quality mechanism, the price of which may vary depending on the manufacturer.
Add a commentAdd a comment We recommend readingHeated rear window of a VAZ 2110: design and repairReplacing the rear window of a VAZ 2109: how to do it correctlyRemoving the windshield of a VAZ 2109:how to do it correctlyReplacing the side rear window on a VAZ 2109 on your own
Installing electric windows on a VAZ 2109 will take just an hour
Installation and connection diagram for VAZ 2109 window regulators: step-by-step instructions with photos
- Before starting work, you must turn off the power supply to the vehicle's on-board network from the battery. Or we separately turn off the power circuits for the cigarette lighter and the backlight of the instrument panel and buttons, because The power supply wiring for the power windows will be connected to these circuits in the future.
- Remove the door trim. It can be removed quite easily, but it is better to stock up on mounting pins.
- First of all, we dismantle the mechanism of the standard manual window lifter, fixing the glass (for example, using office tape) in a position that provides access to the place where it is attached to the lifting mechanism.
- Unscrew the bolts securing the door glass to the standard window lifter mechanism.
- We dismantle the guide of the standard window lifter mechanism (trapezium). Unscrew the bottom nut:
- Two nuts in the middle:
- Top nut:
- The guide is free, now all that remains is to unscrew the three nuts securing our window lifter in the area of the rotation handle.
- We take out the entire door window lifter mechanism. To do this, we bring the lower pin of the guide into the hole in the door (see photo).
- By pressing with a screwdriver, we remove the upper fastening of the guide.
- Done, the window lift mechanism is disconnected. We take it out of the door cavity.
- That's it, the standard mechanism has been dismantled, let's start installing a new one. The new mechanism is attached using standard fasteners; you don’t have to drill anything new. We place the window lifter mechanism into the inner cavity of the door through the largest technological hole in an “assembled” form (otherwise it won’t fit), as if in the “open” position of the glass.
- We fasten the mechanism inside the door using two studs, which we insert into two holes that previously held the middle part of the guide of the standard VAZ 2109 window lifter. We combine them and screw on the nuts.
- The next task is to combine the mounts on the window lift linkage system with the mount on the glass. This can be done by supplying power to the power window motor contacts from an external power source, for example, any working car battery.
- When the lift mechanism is combined with the strip on the glass, we connect them using the bolts from the kit.
- It is advisable to lubricate the rubbing parts thoroughly.
- The mechanical part is complete, let's move on to the electrical part.
- We estimate the route for wiring from the door from the electric motor of the window lift drive to the installation location of the buttons - activators. The standard place for buttons in the high panel of the VAZ 2109 is two plugs to the right of the cigarette lighter, and we install them there. The hardest part is running the wiring from the door into the rack and then out of the rack under the dash. For this purpose, there are technological holes in the rack. You may need to use a special probe. The wiring is done with a wire with a cross-section of at least 1 mm. sq. We lay the wires in such a way that they do not touch any moving parts of the door or the ESP mechanism itself. We will take power for the electric windows from the cigarette lighter. We make electrical connections according to the following diagram: When the circuit is assembled, it is necessary to connect the battery power and check the correct operation of our system. We turn on the side lights and check the correct operation of the backlight of the ESP activator keys. If the backlight does not work, swap the sockets on the contacts of the keys, indicated in the diagram as 3 and 6. You can install the window lifters in the standard way, here are two diagrams:
Connection diagram for electric windows on a VAZ 2109 with mounting block 17.3722 (before 1998)
Connection diagram for electric windows on a VAZ 2109 with mounting block 2114-3722010-60, 2114-3722010-10 and 2114-3722010-18 (new model)
You can read more about the types of mounting blocks for front-wheel drive VAZs here.
We check the functionality of the window regulators. The glass should move smoothly, without jamming or jerking, and should not come out of the guides. To facilitate the movement of glass in the seal, it can be treated with silicone grease. All that remains is to reinstall the door trim. That's it, the installation of the window lifters is complete, let's enjoy the completed modification!
Installing a new window regulator
The new mechanism must necessarily have a bracket that secures two branches of cables. It cannot be removed until a full installation has been completed.
In general, the installation process looks like this:
- Installing and fixing the case in its “own” place.
- Installing cables around the rollers.
- Fastening the glass clips with a cable. It is fixed with screws using 2 brackets.
- Installation of the guide groove.
- Cable tension.
- Now the bracket that secures the branches of the cable is removed.
- Installation of door trim and handles.
The cable can be routed around the rollers in two ways through the rolling support (upper or lower). If the line goes through the lower roller, then the cable is routed as follows:
- Left guide roller (lower).
- Left guide support (top).
- Central tension reel (bottom).
- The guide element is at the top right.
If the front window regulator is being replaced, then you can loop it through the upper coil in the reverse order.
- Lower the glass to the down position.
- Turn the handle all the way in the direction of lowering the window.
- Adjust the cable tension by moving the required roller.
- The bolt clamp that secures the roller.
Please note that the tension should be sensitive. The cable should not be overtightened, but it should not be allowed to dangle either.
If a creaking noise appears after installing the new mechanism, then do the following:
- Loosen and remove the cable from under the rollers.
- Cross the lower and upper branches that come out of the mechanism drum.
- Repeat the installation and tensioning procedure.
Installation and connection of electric windows on a VAZ 2109
During the period of popularity of the “nines”, the installation of electric windows was not carried out on all VAZ 2109 cars. The presence of such devices in the car was more of a luxury than a regular attribute of the car. Over time, the tastes of car owners have changed, and the option itself has become more accessible.
At the present stage, electric windows are an invariable component of cars. This is also facilitated by domestic manufacturers who produce mechanisms for various models, including the VAZ 2109. And if the car was not initially equipped with such a useful device, then you can install it yourself. How are window regulators installed and connected? What to consider when doing work? Let's look at these points below.
Types of electric windows, and what is best for the “nine”?
Today, three types of electric windows are installed:
- Rack and pinion. Their peculiarity lies in their weak design and the need for periodic lubrication.
- Wire rope. These mechanisms do not differ in reliability and speed of glass movement. The advantages are the low price and the ability to replace the motor if it is damaged.
- Articulated-lever. Such devices are distinguished by fast glass movement, low noise, sufficient power and the ability to move even a frozen glass sheet.
In our article we will look at the process of installing and connecting window lifters of the “Granat” model. The model comes with everything needed for installation - buttons, wires, plugs, the necessary fasteners, as well as cuffs for pulling wires from the rack into the door cavity. The Berkut and Katran models have good reviews, but installing window lifters of this type is a little more complicated.
Power windows Garnet on VAZ 2109
Installation of a lever window regulator
And now in more detail about how to install power windows on a VAZ-2109. To install the mechanism you will need:
- Completely assemble the structure.
- Install the entire mechanism through the large hole in the door.
- The entire structure is secured using two small pins that are included in the kit. They must be screwed in advance into the holes in which the guide bolts were previously located.
- Make sure the holes on the window lift mechanism and the glass line up. To combine, you will have to connect the electric motor to the battery.
- After the lever rises and is level with the glass, the holes should line up.
- Screw the glass clamp to the top of the power window arm using two 10mm head bolts. They can be taken from the new kit.
- Secure the glass.
- Lubricate all mechanisms.