The VAZ 2110 car itself is quite nice. An important advantage of the model is that it interacts well with various tuning methods. This car is literally made to be customized.
Moreover, the improvement should be not only technical and external. Many people do the right thing when they decide to replace their door trim. So the interior looks richer, more interesting, newer, the inside looks no worse than modern foreign cars. The most important thing is that you can do all this yourself. More about this in our article today.
What you can get
How to reupholster the doors of a VAZ 2110 with venil leather
I recently read an article that described the process of reupholstering the door trim of a VAZ 2110 with my own hands. After reading this news, I was going to make a similar feature on my VAZ car. I went to the store to look for material. When I went into one of the stores I saw a material called vinyl leather, I really wanted to cover my car with it.
An hour later I had already bought all the materials and was ready to get to work. To work we need:
- Furniture leather (vinyl is leather, you can find it in any store that sells fabrics)
- Any glue (Moment, titanium, master)
- Construction hair dryer
- Brush with good bristles
- Knife (preferably a stationery knife)
- Gloves
- Antenna cable
Everything has been purchased, let's start tuning the interior of the VAZ 2110.
Door trims for VAZ 2110
First you need to remove the door trim. This procedure is not complicated. After the door cards are removed, it is necessary to clean the trim from dust. To do this, you can use a vacuum cleaner, and now the surface is prepared for work. We take out the glue, in my case glue moment, which has already earned a reputation.
Don't apply glue to all the cards at once, because you won't have time to do all the work at once. Let's take a closer look. Take a brush and use it to apply glue to the surface of the sheathing.
The glue is applied directly to the sheathing. When the door card is coated, put it aside and take the venil leather. The size of the skin should be 5 - 7 centimeters larger than the size of the door trim on each side.
This is necessary so that during the tightening process you do not have to use additional. patches. Also, coat the leatherette with instant and leave to dry for 15-20 minutes, depending on the ambient temperature.
After 10 minutes, we glue the venil skin to the standard casings and begin to heat it with a hairdryer. Venyl leather has good stretch, so it will be much better than simple leatherette. Using a hairdryer, we warm up those places where the contact zone is at the bottom and press the material with our hands, wearing gloves.
Warming up the leatherette well, we press it, while pulling it towards the sunken areas of the card. When everything is ready, we repeat the same with the other door cards.
Next, remove the tabs on the door handles, the triangles of the rear-view mirrors, the glove compartment lid, and the top cover of the steering wheel housing. Just like the door casings, we glue them over. This will be easier to do than door casings because they have a smooth surface. Everything is ready, all that remains is to make the final touch.
I covered only the strip that is located above the door trim with black material. At the fastening points, I cut small holes using a utility knife. We collect everything as it was, in reverse order. When everything is assembled, take the antenna cable and glue it into the recess of the joint between the trim and the door strip.
Self-upholstery
Before directly reupholstering, it is recommended to check the condition of the inner door panel, remove pockets of corrosion, check or replace sound insulation, replace rubber seals, so the doors will open better. For VAZ 2110, the service life of door seals is up to 3 years. The process of re-covering a door part yourself step by step:
- Clean the outside of the card. You can sand it with fine-grain emery for better adhesion of glue and leather.
- Attach the door card to the material, cut around the perimeter, leaving at least 7 cm around the edges.
- Treat the outer surface with glue and the inside of the future cladding with glue. Apply glue according to the manufacturer's recommendations. If an adhesive composition is used, then after coating you need to wait up to 10 minutes.
- Place the vinyl on the door card, constantly heating the material with a hairdryer, and level the surface so that the leatherette fills all the curves of the part: the space for the speaker, for the central panel, the recesses for the handles.
- Cut out all the holes that are covered with vinyl in the door card from the center and not reaching the perimeter, carefully wrap it on the wrong side, making sure that the edges of the fold do not exceed 2-3 cm. Trim off the remaining vinyl.
- After gluing the card, trim off the remaining vinyl, leaving at least 3-5 cm on the inside of the card perimeter.
Detailed instructions for replacing the windshield and rear glass of a car with your own hands
After the glue has completely dried, install the door card on the car in the reverse order, having first changed all the clips.
Tuning and repair of VAZ 2110
Tuning the interior of a VAZ 2110 is a very important sub-item of external tuning. Since tuning on the outside of the car (body kits, spoiler, optics, etc.) pleases the eyes of passers-by, and changes in the interior are pleasant for you and those who ride in your car. The scope of work here is very wide, so first draw up a plan on a piece of paper. Namely, decide what you want to change.
How to improve the interior of the VAZ 2110?
- Replacing the steering wheel.
- Replacing the dashboard.
- Replacing seats.
- Replacing the instrument panel.
- Changing the material of door panels, etc.
- Noise insulation.
- Installing linings and attachments (rose, skull, etc.) on the gearshift lever
- Installing pedal pads
And in general, a change in everything you see around you while sitting behind the wheel.
We will not consider such simple things as replacing the steering wheel, I think everything is simple here, but reupholstering the door cards is more complicated. Therefore, let’s consider this procedure in more detail:
Let's start reupholstering with the rear doors, since it is easier to do this with them than with the front ones.
What will be useful:
- The material you are going to use to reupholster (carpet, leather to suit your taste). In our case it is vinyl leather.
- Glue (take a good one like “Moment”, “Titan”). The reliability of fastening your covering will depend on its quality. If it is of poor quality, the skin will simply peel off over time.
- Hair dryer, preferably a construction hair dryer.
- Stationery knife.
- Vacuum cleaner
- Gloves
At the very beginning, we remove the cards from the doors; I won’t explain how to do this, since it’s as easy as shelling pears.
Now you need to peel off the standard coating of the cards. But this task will test your nerves for endurance, since it will not be easy for you. I immediately want to please you that you don’t have to touch this hairiness, but cover it with the selected material on top.
The only thing you need to do then is to rid the cards of dust. For this we just need a vacuum cleaner.
The next step is to coat our door card with glue. Apply evenly over the entire surface. It is advisable to do this in 2 layers, apply the first, wait 10 minutes and apply the second. This is necessary because the fleecy cover absorbs glue well.
Now let's get to the vinyl leather. We cut it out so that it is slightly larger in size than the card, about 25 centimeters (since the cards are not even in structure and these centimeters will go into all sorts of depressions and sills) on each side. And we coat it with glue too. We wait about 7 minutes and proceed to the most important stage.
The sheathing should be glued from the center, pressing it and spreading it to the sides. This material stretches well, which is what we will use. At the same time, performing this operation, we warm up the leather well with a hair dryer, it’s better here
Wear gloves as it will be hot in places. Try to stretch it so that there are no folds, otherwise it won’t look very good later. Having completed this procedure with one card, we move on to the rest.
Stories from our readers
“Fucking basin. "
Hi all! My name is Mikhail, now I’ll tell you a story about how I managed to exchange my two-wheeler for a 2010 Camry. It all started with the fact that I began to be wildly irritated by the breakdowns of the two-wheeler, it seemed like nothing serious was broken, but damn it, there were so many little things that really started to irritate me. This is where the idea arose that it was time to change the car to a foreign car. The choice fell on the melting Camry of the tenth years.
Yes, I had matured morally, but financially I just couldn’t handle it. I’ll say right away that I am against loans and taking a car, especially not a new one, on credit is unreasonable. My salary is 24k a month, so collecting 600-700 thousand is almost impossible for me. I started looking for different ways to make money on the Internet. You can’t imagine how many scams there are, what I haven’t tried: sports betting, network marketing, and even the volcano casino, where I successfully lost about 10 thousand ((The only direction in which it seemed to me that I could make money was currency trading on the stock exchange, they call it Forex. But when I started delving into it, I realized that it was very difficult for me. I continued to dig further and came across binary options. The essence is the same as in Forex, but it’s much easier to understand. I started reading forums, studying trading strategies. I tried it on a demo account, then opened a real account. To be honest, I didn’t manage to start earning money right away, until I understood all the mechanics of options, I lost about 3,000 rubles, but as it turned out, it was a precious experience. Now I earn 5-7 thousand rubles a day. I managed to get the car buy after half a year, but in my opinion this is a good result, and it’s not about the car, my life has changed, I naturally quit my job, I have more free time for myself and my family. You’ll laugh, but I work directly on the phone)) If If you want to change your life like me, then here’s what I advise you to do right now: 1. Register on the site 2. Practice on a Demo account (it’s free). 3. As soon as you get something on the Demo account, top up your REAL ACCOUNT and go to REAL MONEY! I also advise you to download the application to your phone, it’s much more convenient to work from your phone. Download here.
Plastic reupholstery VAZ 2110
Instructions for covering plastic with your own hands
Ceiling reupholstery VAZ 2110
Instructions for covering the ceiling with your own hands
Upholstery of rear doors of VAZ 2110
Instructions on how to cover rear door trims with your own hands
Front door reupholstery for VAZ 2110
Instructions on how to reupholster the front door trim yourself
Panel reupholstery for VAZ 2110
Instructions on how to drag the panel yourself
VAZ 2110 gearbox handle reupholstery
Instructions on how to tighten the gear knob with leather yourself. Where to buy a leather gear knob for a VAZ 2110
VAZ 2110 steering wheel reupholstery
Instructions on how to tighten the steering wheel to ten with your own hands
Reupholstery of sun visors VAZ 2110
Instructions on how to cover visors with Alcantara
DIY instrument panel visor reupholstery
Instructions on how to fit a car instrument mask
Do-it-yourself car seat reupholstery
Instructions on how to cover chairs with leather or Alcantara
The result of reupholstering the interior of a VAZ 2111 with your own hands
I believe that he can reupholster the interior of a car with his own hands..
Tuning the interior of a VAZ 2110 is a very important sub-item of external tuning. Since tuning on the outside of the car (body kits, spoiler, optics, etc.) pleases the eyes of passers-by, and changes in the interior are pleasant for you and those who ride in your car. The scope of work here is very wide, so first draw up a plan on a piece of paper. Namely, decide what you want to change.
Door trim for VAZ 2110
The VAZ 2110 car itself is quite nice. An important advantage of the model is that it interacts well with various tuning methods. This car is literally made to be customized.
Moreover, the improvement should be not only technical and external. Many people do the right thing when they decide to replace their door trim. So the interior looks richer, more interesting, newer, the inside looks no worse than modern foreign cars. The most important thing is that you can do all this yourself. More about this in our article today.
What you can get
Options
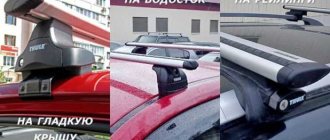
There are several options for replacing door trim. Each of them has its own characteristics, advantages and, of course, the final appearance.
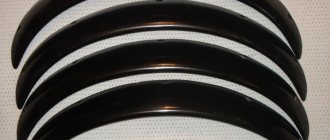
- Lux 1 and Lux 2. These are ready-to-install cards designed specifically for the domestic top ten. Depending on the design, these door cards are made entirely of plastic or with inserts made of fairly good quality fabric.
- Europanels. For some reason, in online stores such products are called Lux 2 door trim, although this is actually a little different. Regardless of the name, this trim looks great. But it has a serious drawback - high cost.
- With my own hands. The most budget option for replacing door trim. If you approach this issue competently and consistently, you can easily cope with the task without outside help. Today we will talk about them in more detail.
Required Tools
Any work involving repair or modification of a car begins with the search for the necessary materials and tools.
This list is mandatory; without it, it will be impossible to carry out work on replacing the door trim.
- Fabric or artificial leather, that is, vinyl. Buy them at fabric stores. Don’t forget to make replacements and calculations first to determine the exact amount of upholstery material needed. IMPORTANT! There should be an allowance of 5 centimeters on each side of the door. This significantly affects the total amount of fabric.
- Glue. Choose a proven adhesive that is sure to hold your new upholstery. It could be Moment, Master, Titan or something similar.
- Scissors. They will be used to cut upholstery material.
- Stationery knife. Something will definitely have to be cut off. In this case, a sharp stationery knife cannot be replaced.
- Construction hairdryer. It’s not worth buying it for one event to modify the car. Today this device can be rented.
- Brushes with high-quality bristles. One should be narrow, and the second should be a little wider.
- Antenna cable.
- Mounting clips. With their help you will attach fabric or leather. Be sure to buy extra, as these caps may break during installation. Also keep in mind that there are 8 pistons for each door.
- Self-tapping screws. Their size depends on the selected panels. If these are handmade products, you will need short, standard self-tapping screws. If we are talking about Euro panels, then purchase long screws.
- Speakers. New pre-fabricated panels include holes for speakers. So, in Lux 2 their size is about 17 centimeters. This is an excellent reason to install a new audio system in the cabin.
What is the best way to drag?
It is very important to choose the right material for reupholstering door panels. These can be either natural or artificial fabrics.
Genuine Leather
Sheathing made from this material has an excellent appearance and can last for a long time. The only drawback of genuine leather is the cost, which is one of the highest. This material is ideal if you plan to do all the work yourself.
Leatherette
An option that is inferior in quality to its natural counterpart, but has a more affordable price.
Eco leather
Another worthy alternative, which has high elasticity and can withstand mechanical and temperature influences.
Eco-leather is the same as leatherette, it will look good, cost inexpensively, and last less than the original
Velours
An excellent option for reupholstering not only doors, but also the entire interior of the car. Less commonly used for re-lining ceilings.
Alcantara
Interesting texture and pleasant canvas. Please note that decent samples cost a lot. As an alternative, you can choose products from the budget segment.
Alcantara is artificial suede, but it is made using advanced technologies
Faux suede
The dense fabric consists of polyester with a cotton base. The structure is velvety and moderately soft.
Faux suede is a budget material that is also pleasant to the touch. Looks pretty good in the showroom
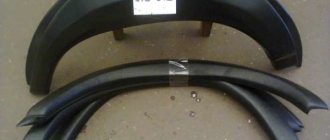
Removal
Dismantling work is the beginning of your journey to replacing the door panel trim. It's nice to know that this task is quite simple. This is especially true for the front doors.
We will tell you separately about the nuances of dismantling the front and rear door trims of your VAZ 2110.
Disassembled cards
Front
Let's say right away that the likelihood of damaging the standard clips is very high. But this is not scary, since new products are cheap, and their installation is much simpler than repairing old caps.
If you are installing Euro panels, you will have to remove the lever from the window regulator.
The process is performed according to a certain algorithm:
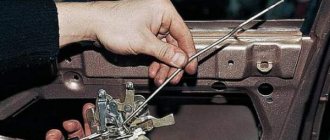
- Using a thin screwdriver, pry the window handle trim away from the socket. Direct it in such a way that it disengages. Now remove the lining. This item is not relevant for those whose car is equipped with electric windows;
- Remove the socket now;
- Using a screwdriver, press out the latch on the plug for the inner handle of your armrest, and then remove it;
- Remove the handle mounting screws;
- Press the inner handle of the lock and turn the armrest handle up. This way you can remove the element;
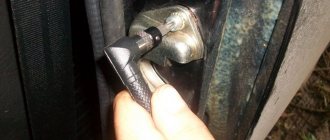
- Next, unscrew the button that blocks the door lock;
- Remove the screw that secures the exterior mirror control mechanism. It must be removed from the lever;
- Remove the triangular trim. To do this, the fastening pins are removed from two holes in the door.
Working with ready-made kits
Do-it-yourself upholstery is good, cheap, and the interior will be a source of pride for you, since you decorated it with your own hands.
But still, not every car owner is well versed in fabrics, knows how to sew, or has mastered all the nuances of a pattern. So the result does not always live up to expectations.
Therefore, we advise you to pay attention to ready-made kits. Factory VAZ Lux 2 panels are in great demand; they create an excellent appearance for the interior.
An important advantage of Lux 2 type kits is the presence of an additional sound insulation effect, which is very important and useful for the VAZ 2110.
It is not necessary to contact specialists, since the installation can be done by yourself.
- The kit often includes only panels - 4 units. But the grids for the speakers, pistons and other elements will have to be purchased separately.
- You should not trust sellers who claim that Lux 2 fits perfectly on the doors of the domestic top ten. Some of the pistons probably won’t want to be installed where they are supposed to be. This is because they slightly do not match the car model.
- Fastening from below must be done using long self-tapping screws.
- If your doors do not have power windows, then you will have to slightly change the configuration of the panels yourself by cutting holes in them for the “oars”.
- The problem of the gap that is formed as a result of installing Euro panels on a model with manual windows can be solved by masking it with some object. Although the best solution is to re-equip the car by installing electric windows.
Example of a finished banner
Price issue
Finally, we invite you to familiarize yourself with the current prices for ready-made upholstery kits. This is a set consisting of 4 panels. Clips and podiums will have to be purchased separately.
Replacement options
Today you can find VAZ 2110 door cards ready for installation, especially in the Lux or Lux 2 versions; they can be either purely plastic or with fabric inserts.
Door trim VAZ 2110 Lux
There are also euro panels, which in online stores are most often called “Door trim for VAZ 2110 Lux 2”. The finished cladding probably has only one drawback - its high price.
But there is another, more budget-friendly option - to do the door trim yourself. With the right approach, you will cope with this task, and we will tell you how to do it correctly.
What you need to replace the upholstery yourself
In order for the door cards to be re-stitched as efficiently and quickly as possible, you will need not only material, but also a certain tool.
Before you start, you need to stock up on the necessary tools
The material is fixed to the door card using special glue. It is its quality that determines how firmly the new upholstery will hold. To tighten all the doors of a car, you will need about one liter of adhesive. It is better to apply it with a brush.
Tools and materials
Before you start upholstering doors with your own hands, you need to stock up on what you can’t do without:
- Fabric or vinyl (another name is faux leather) is best purchased in stores that sell fabrics. Even before you go there, take measurements of your doors so that there is about 5 centimeters of allowance on each side. This is necessary to ensure that the fabric fits perfectly, and most importantly, that it is enough to fill all the protrusions and cavities;
- Glue like Moment or another that has worked well for you. Possibly – Titan, Master, etc.;
- Cutting scissors;
- Stationery type knife;
- Construction hairdryer. If you are unlikely to need it in everyday life, you can often rent it;
- 2 brushes: narrow and wider with normal bristles;
- Antenna cable;
- Upholstery fastening pistons (clips). It is better to take them with a small reserve, since their removal is often accompanied by breakage. Please note that each door has 8 pistons;
- Self-tapping screws. If you are making fabric or vinyl trim, then standard, short screws, the same as the previous ones on the door, will do. But if you are going to install Euro panels with your own hands, then to attach them to the bottom you will need long self-tapping screws;
- You may need new speakers, these should also be purchased in advance. Please note that usually in ready-made Lux 2 panels there are holes for speakers of 16 - 17 cm.
Dismantling
Front doors
Removing door trims is not at all difficult. The only unpleasant thing is that the clips are often damaged.
They can, of course, be repaired, but it’s much easier to stock up on ready-made ones without fooling yourself. There are some peculiarities: if you have euro cards, you need to dismantle the window lift lever (if your VAZ has one).
But we will tell you about the basic algorithm for dismantling door trim with your own hands:
- It is necessary to use a thin screwdriver to press the trim of the manual window lift handle away from the socket, guiding it so that it disengages and remove it. If you have electric windows, then naturally skip this point;
- Remove the socket;
- Using a screwdriver, release the locking mechanism for the inner handle of the armrest and remove it;
- Remove the screws securing this handle;
- Press the inner handle of the lock, turn the armrest handle up and remove it;
- Unscrew the button blocking the door lock;
- Unscrew the screw securing the outside mirror control mechanism and remove it from the lever;
- Remove the triangular trim, removing the pistons for its fastening from the two holes in the door.
Rear doors
Removing the rear door trim of a VAZ with your own hands has some differences.
First you need to unscrew the fastening screws (there are 3 of them) and remove the cover. Using a screwdriver, press the upholstery so that the pistons bounce off.
When doing this, keep the screwdriver close to each piston so as not to tear off the holders. It is also necessary to remove the spacer sleeve from the window lifter shaft.
Photo report on the dismantling and installation of the casing
Now you can proceed directly to the work itself. So, open the car door on which all this needs to be done and unscrew the three screws securing the lower door pocket. Look clearly at the photo below:
Then you need to do the following:
- push the bottom part back slightly
- carefully move the pocket down, thereby removing it from the grooves in the casing itself
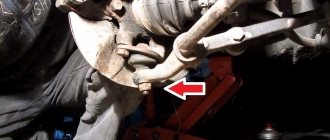
If you have front speakers installed in the doors on a VAZ 2110-2112, then you need to unscrew the 4 bolts securing them along the entire diameter:
Then we perform the following procedure:
- carefully push the speaker back to pull it out of its seat
- disconnect the power wires from the contacts on the inside
Now you can proceed further
We take a thin screwdriver or knife and carefully pry up the trim on the door closing handle, after which we simply remove it by hand
As you can see, under it there are two more bolts that also need to be unscrewed:
Then you can remove the handle, since nothing else holds it:
- turn it up slightly
- and disengage with the door opening handle
Almost everything is done. There are several points left, one of which is unscrewing the latch locking the front door of the VAZ 2110.
Now, carefully, starting from the bottom corner, we pry up the casing and also carefully try to tear it off the latches (plastic clips) that secure it to the metal part of the frame:
And then we move in small sections in a circle, but we must act carefully so as not to damage or break the upholstery itself. At the last step, we lift it slightly up to free it from the door lock control rod (on which the latch, which we have already unscrewed, is screwed on):
This repair procedure can be considered complete. Then we carry out those actions for the sake of which all this was started; for everyone here there will be their own goals. After completing the repair, install in the reverse order.
Tuning
After finishing removal, clean the cards from dust using a vacuum cleaner, and begin tuning yourself.
First of all, measure and cut the necessary “patterns” for all door cards, taking into account an allowance of 5 or even 7 centimeters for each side.
This is so that during the process of gluing the sheathing material you do not have to install patches or redo everything all over again.
The glue must be applied to the cards with brushes one at a time so that it has time to dry a little, but not dry out. Having coated the doors with glue, we proceed to the cut piece of vinyl or fabric, which we also coat with glue on the back side, and set aside for 10-15 minutes.
After this time, we proceed directly to gluing the upholstery to the door cards. Vinyl stretches well, filling door “cavities”, but for this it needs to be heated with a hair dryer and smoothed over each cavity and bulge with your hands, preferably with gloves. The edges need to be carefully folded inside out and trimmed.
We subject the remaining doors to the same procedure. In addition, it is advisable to paste the same material over other parts of the interior so that it is in the same style.
These include door handle inlays, the glove compartment lid (if you want to highlight it), triangles at the mirrors, and the top cover of the steering casing. In places of various fastenings, you need to cut small holes using a stationery knife.
When reinstalling, do not forget to replace damaged pistons.
Lada 2110 Lastochka › Logbook › Covering the door with suede
Well, I finally got my hands on the first door. I am describing the number of materials for one!
doors.
Materials and tools:
In general, the whole process can be divided into four stages:
1. Removing the trim from the door 2. Removing the old velor from the trim 3. Upholstery with suede 4. Restoring and replacing clips, installing the trim
1. The first stage is the simplest, remove the plug from the door handle, unscrew the two bolts, remove the handle. Open the three bolts from the bottom of the plastic forming the pocket and remove it. Unscrew the plastic door lock rod. Remove the trim.
2. The second stage is very tough, labor-intensive, and almost the longest. At first I suffered, tearing off the velor piece by piece, grabbing the edges with pliers. I wore out all my fingers to the point of calluses. And he dropped the matter. The next day I decided to continue, about half of all the velor was torn off. Then a hair dryer caught my eye. And a miracle happened! As a result, it took me ten times less time to remove the second half of the fabric with a hairdryer than without it.
As a result, we get this bare skin:
3. At the third stage, the covering technology is not very different from panel covering. We apply glue, lay down suede, smooth it, steam it on the bulges and press it. The truth is, when I got to the armrest, I couldn’t pull it out. I decided to cut it and make a joint on the edge of the armrest. As a result, the entire door was covered in two pieces. It took a lot of glue compared to the panel. I stole three large tubes of the moment, and when it ran out I still had half a can of titanium. The consumption is probably so high due to the roughness of the surface; the panel is still smooth.
Installation of a ready-made kit
If you decide to buy a ready-made set - VAZ Euro trim panels Lux 2, you will get a more stylish version of the interior.
In addition, such plastic panels improve sound insulation, which is always important for VAZ.
You can also install them yourself.
Door trim VAZ 2110 Lux
We have already talked about how removal is carried out, and now about some of the subtleties of installing Lux 2 upholstery:
- The kit usually includes only the upholstery panels themselves in the amount of 4 pieces. Everything else for them - caps, meshes for the speakers - needs to be purchased.
- Don’t really believe sellers who claim that the Lux 2 upholstery will exactly fit the doors of the VAZ 2110. Don’t be surprised if some of the clips don’t fit, usually 2 of them in the front door, and 1 in the rear.
- Be sure to secure the bottom of the casing with long self-tapping screws.
- If your front doors are not equipped with power windows, you will have to make holes for the handles.
- With conventional window lift handles, a gap will form in the rear doors, which will need to be masked, for example, using a piece of hose. However, it would be better to immediately install electric windows on all doors - it’s convenient, plus the trim panels will fall into place without problems.