Replacing eggs VAZ 2109
To reduce car roll when cornering and increase the angular stiffness of the front suspension, modification and tuning enthusiasts install an anti-roll bar with increased rigidity.
Owners of VAZ 2109 - 2115 can be said to be lucky in this regard, since for such a suspension modernization the standard anti-roll bar of the front suspension from the “ten”, VAZ 2110, is suitable. It is only 2 mm thicker than the 2109, but the effect of its installation is “ nine" (similarly to the other models of the Samara family) is clearly out of competition in terms of the criterion "price - the effect obtained from modernization." The car rolls less when cornering, returns to its original position faster as a result of maneuvering, and generally behaves completely differently. So, to carry out this installation we will need the actual anti-roll bar for the front suspension from the “ten” complete with stabilizer struts, commonly referred to as “eggs” (if you see them live, you will understand why). Actually, to replace the stabilizer, you just need to dismantle the standard stabilizer along with the “eggs” and install an analogue from the VAZ 2110 in its place.
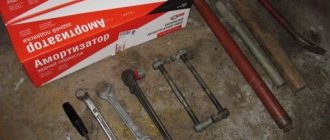
We pre-treat the stabilizer bar fasteners to the bottom of the car and the arm with a product like WD-40. It is better to perform this operation the day before installation, and also clean the fastening nuts from rust with a wire brush.
Using two 17mm wrenches, unscrew the bolt securing the stabilizer bar to the lever.
Use a soft metal drift to knock out the fastening bolt.
Next, unscrew the nuts securing the stabilizer pad brackets. There is a danger here of tearing off the studs welded to the bottom, so we proceed with caution. It is recommended to operate not with the socket, but with a regular 13-size open-end wrench, in order to better feel the force applied and observe the movement of the nut. The matter is further complicated by the fact that these nuts are self-locking, with nylon inserts, this prevents not only the spontaneous loosening of the nuts, but also the penetration of liquid like WD-40 into the threads.
Remove the brackets securing the stabilizer to the bottom of the car.
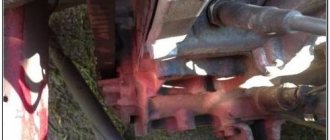
We remove the stabilizer from the space between the bottom of the car and the exhaust system.
That's it, the old stabilizer has been dismantled. Now all that remains is to install the stabilizer from the “ten” in place of the dismantled one in the reverse order. We treat the stabilizer mounting studs with WD-40. If the nuts screwed onto these studs are suspicious, it is better to replace them with new ones.
The result of this installation is felt immediately. We can say that the feeling of driving a car changes. The car's roll when cornering is reduced, body sway in motion as a result of steering wheel turns is softer, and the overall stiffness of the suspension increases. It's not scary to take turns at higher speeds.
For a complete set, you can also install a rear beam stabilizer, as well as install front and rear strut braces, so the body of our car will acquire additional rigidity on all fronts!
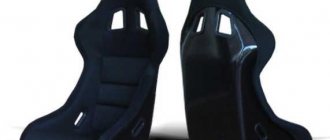
Stabilizer struts for front-wheel drive vehicles are a rod, to both ends of which two rubber-to-metal hinges are attached by spot welding at right angles. The stabilizer links connect the stabilizer bar to the lower arm of the front suspension, providing a movable connection that takes the brunt of the load when the car rolls, returning it to its original position. At the same time, the hinges and their joints can be affected by long-term radial, coaxial and thermal loads both in tropical conditions and in the winter frosts of Siberia.
What is needed for replacement
First of all, you will need to purchase the tips themselves. Car enthusiasts and car service specialists recommend buying these parts from one of the brands:
- AvtoVAZ stock production;
- "Track Champion";
- "Belmag".
“Original” auto parts are the most popular, as they have a long service life. Despite their low price, competent mechanics on the VAZ-2109 recommend installing stock
However, it is important to purchase parts from trusted places, from authorized dealers. In markets and small shops they can sell you refurbished components that will not last even a month
In addition to the tips, you will need to replace the boots immediately.
Additionally, you will need to purchase a special puller for hinge joints. If it is not there, then there is a risk of damaging the rods. Prepare the usual tools - a set of spanners and pliers.
Order of Operations
To carry out repair work, you need to place the car on an inspection hole, put it on the handbrake, disconnect the negative terminal to de-energize the on-board network, and remove the engine mudguard. Now you can start disassembling:
- Install a jack that will temporarily replace the front pair of wheels. You need to unscrew the nuts on them, remove the chassis and put them aside.
- To remove the contact part of the ball joint from the hub, you need to unscrew the bolts.
- Instead of the 2 upper conventional bolts, you need to install cylinder head fasteners.
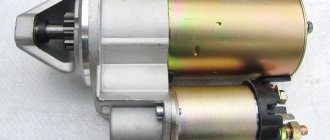
Now you can remove the starter; it is attached to three nuts that need to be unscrewed.
At this stage it is necessary to install a jack under the engine. After this, the side motor support is detached.
After this, you can disconnect the rear engine mount and unscrew the gearshift linkage.
The protective cover must be removed from the clutch.
- The box is secured with several bolts; first you need to unscrew the front one.
- Now the transmission is accessible, the rear nut is unscrewed first.
The gearbox bolts are located on the left wing side; they need to be unscrewed until they stop and the gearbox should be removed. It is important to ensure that the end of the assembly rests on the lever extension. This will create a gap that will allow you to remove the clutch.
Disassembly is complete. At this point, the guide for the clutch remains. It needs to be thoroughly lubricated. After this, you can put the release bearing on the guide.
- Subsequent operations are performed in the reverse order of the above steps. Important! There is no need to rush while completing the work. All operations are performed consistently and calmly. Make sure that after assembly there are no “extra” spare parts left.
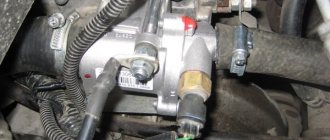
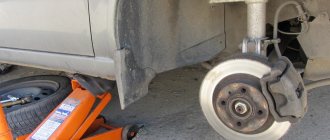
Removing the shock absorber strut
First, loosen the bolts on the wheel, lift the side to be repaired using a jack and place it on a reliable support. After this, you can finally remove the wheel. Remove the cotter pin from the tie rod end using pliers. Use a 19mm wrench to unscrew the nut. Loosen the nut fastening to the support bearing. There is no need to unscrew it completely; it is best to do this immediately after removing the shock absorber strut. Using wrenches 19 and 17, unscrew the nuts from the bolts that secure the strut to the wheel hub. Move the brake hose to the side and secure it with a small piece of wire. Using a 13mm wrench, unscrew the four nuts that secure the support bearing to the car body. At this point, the dismantling can be considered complete; the shock absorber strut will completely come out of its place. Now you can disassemble it into small elements.
Causes of failure
The desire to replace stabilizer links arises mainly due to the failure of the old ones. As practice shows, these elements, borrowed from Priora, work better than those native to the VAZ 2114.
Therefore, many specialists in the modification of domestic cars, as well as ordinary owners of the “fourteenth” model who have tried this method, agree on the correctness of replacing the original struts with “Prior” ones.
The best way to determine a breakdown is to carry out diagnostics.
Troubleshooting
If the stabilizer bar on a car fails, you will hear a characteristic knock, and the car itself will begin to move to the side when moving in a straight line.
It is also worth paying attention to strong swaying when entering turns.
Many have now noticed that we voiced signs similar to bushing failure. Indeed, the symptoms are quite similar, so for your own confidence we recommend conducting a diagnosis.
Instructions for replacing stabilizer struts on a VAZ 2114
The anti-roll bar is an incredibly important element of the entire vehicle suspension. Due to these devices, car roll is minimized when cornering. As a result, the quality of handling improves and the car becomes more obedient.
Plus, these stabilizer links improve driving safety and also improve the performance of your suspension.
Today we will talk about how you can install a stabilizer on a VAZ 2114, borrowed from a newer model from AvtoVAZ - Priora.
Causes of failure
The desire to replace stabilizer links arises mainly due to the failure of the old ones. As practice shows, these elements, borrowed from Priora, work better than those native to the VAZ 2114.
Therefore, many specialists in the modification of domestic cars, as well as ordinary owners of the “fourteenth” model who have tried this method, agree on the correctness of replacing the original struts with “Prior” ones.
The best way to determine a breakdown is to carry out diagnostics.
Troubleshooting
If the stabilizer bar on a car fails, you will hear a characteristic knock, and the car itself will begin to move to the side when moving in a straight line.
It is also worth paying attention to strong swaying when entering turns.
Many have now noticed that we voiced signs similar to bushing failure. Indeed, the symptoms are quite similar, so for your own confidence we recommend conducting a diagnosis.
Checking the condition
Checking the condition of the stabilizer struts is carried out in two ways.
- Professional. To do this, you will need a reliable service center that has the appropriate diagnostic equipment. The accuracy of identifying a breakdown is high, but the price of the service is not low.
- Independent. To do this you will need your own garage and a little time. Turn the wheel as far to the right and left as possible. If knocking or play occurs, the stabilizer struts should be replaced. There is a second method of checking - using an inspection hole. You should unscrew the bottom nut and release the strut. If the hinge moves freely, the stabilizer link must be replaced.
Such modernization of the front suspension often becomes the basis for tuning the VAZ 2114. This is one of those models from a domestic manufacturer that is perfectly suited for tuning. Moreover, both external and technical.
By installing Priora stabilizer struts, you can increase body rigidity and slightly raise the front end. The sensations on the road will be different; even an inexperienced driver will feel it. The bottom line is that the new elements improve maneuverability and safety.
How to replace the Kalina stabilizer
To replace the bushings and stabilizer on a car, you need to perform the following steps:
- install the car on a lift or inspection hole (in the latter case, you need to place wheel chocks under the wheels);
- treat threaded connections with WD-40;
- unscrew the left and right nuts securing the stabilizer struts;
- unscrew the nuts holding the left and right stabilizer mounting clamps;
- dismantle the struts, bar and stabilizer brackets;
- Unscrew the nuts securing the stabilizer links to the arms;
- knock the stabilizer struts off the rod using a polymer or wooden hammer;
- inspect the stabilizer pads (bushings) and, if necessary, replace them with new ones;
- inspect the condition of the stabilizer bar;
- if the ends of the rod are in different planes or it has other signs of deformation, a new rod should be used;
- inspect the condition of the stabilizer struts and their bushings;
- replace worn bushings and deformed struts with new ones;
- lubricate the threaded connections with graphite lubricant;
- install the bar and stabilizer pads on the car;
- tighten the nuts of the stabilizer mounting clamps;
Tip: when using split pads, the nuts must be tightened until the gap in them is eliminated. To do this, first tighten the front, then the rear fastening nut.
- tighten the nuts holding the Kalina stabilizer struts;
- if the replacement work was carried out on a lift, it is necessary to lower the car to load the wheels;
- make a final tightening of the threaded connections of the clamps and stabilizer struts (4.5-5.3 kgf and 1.3-1.6 kgf, respectively).
At this point, the replacement of the Kalina stabilizer is completed and the car is ready for use.
How much will the repair cost?
Restoring the worn out bottom of a “nine” or “eight” costs a significant amount - from 5 to 29 thousand rubles. The price of overcooking in car services varies depending on several points taken into account by the craftsmen:
The cost of overcooking the bottom of 2109 when purchasing the cheapest repair kit will be 5–8 thousand rubles. Purchasing consumables in specialized auto stores will cost 11–12 thousand rubles. For the work of a service technician, you will have to pay from 20 to 30 thousand rubles, depending on the assessment of the damage, the volume performed, and the complexity of the restoration.