Connecting heated Ergon mirrors. — Lada 2114, 1.6 l., 2007 on DRIVE2
Post about blue tomatoes It's time for wet mirrors
".
Too often I began to remember the function of heating the mirrors, namely in the rain and on cold autumn mornings. It's time to connect. As I said, there will be no relay
!
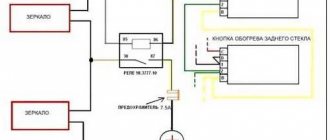
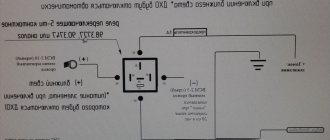
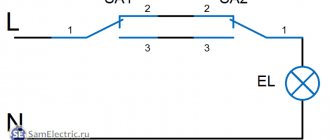
Ergon mirror heating connection diagram (without relay)
I'll tell you why there is no relay. Having measured the consumption of two mirrors
I got
2.25A
at 13V, with a lower voltage the current will be higher (even if it’s 2.5A).
The rear window heating button (and other similar ones) can withstand 5A.
Confirmation of my words.
Then I started looking at the car’s wiring diagram and figuring out where to get the + from the ignition. Then I realized why people install a relay, as you understand, there is nothing to unload there - the load is not the same, but in order not to load the ignition - yes.
Let's start practicing
I want to say a few words about wiring. I did not take the easy route and did not insert the wires from below into the technological hole (near the bottom loop). I ran the wires through the standard entry points into the door and interior. The easiest part, it seemed to me, was the left side; the dashboard didn’t interfere like the right side. But a bunch of wires and circuits get in the way.
Lightest side (right door)
Heating wire routing diagram (left door)
Extended wires from the right door
Run the wires into the dashboard
Lengthened the left side
I connected the right and left sides together, the minus to the hardware and the plus to the button.
Heated mirror button and 5A fuse
The button was modified with a knife.
Result
Heated mirrors work.
Well, again I’m bursting to mention the quality of the parts! The rear window heating button (standard), or rather its indicator is brighter than that of a purchased new one. I also had 2 buttons for heated seats, I collected the best (brightest) of the 3. The cloudy light filter was to blame... Abidna yes.
UPD
About connecting heated mirrors to the ignition relay
. Connecting heated mirrors — Lada 2114, 1.6 l., 2008 on DRIVE2
Greetings!
heated mirror elements
. But in winter, as everyone knows, it is cold. Therefore, I left the heating connection for warm days. With the arrival of spring, they actually came, but for some reason I didn’t get around to it))
And so I decided to connect them. What I used: — 4-pin relay (I took it with a fastening element) — Block for the relay — Block for the button — Terminals: ring-shaped 3 pcs. — Nut, bolt and washer to secure the relay. — Wire — Electrical tape — Fuse and fuse bulb (in my case it was not needed, because there is a separate mounting block)
I connected everything according to the diagram taken from DMMC. Because After reading his post, I decided to quickly turn on the heating))
After installing the mirrors, the wires were already routed into the door. And they hung there for half a year)) The mass from the mirror elements was secured to a bolt holding the window lift motor. But I pulled the positive wire into the cabin, it was not an easy task)) But thanks to the wire, I pulled it through.
As it turned out later, the positive wire was not long enough to reach the relay, so it had to be extended. I secured the relay near the injector brains, and this is where I needed a fastening element for the relay. I screwed the relay ground there in the same way as the ground from the emergency gang.
After turning on the ignition, I took 12V from the trip computer (Thanks again to DMMC, otherwise I would have gotten tired of looking ). Here I made it simpler, inserted the wires into the socket and secured it with electrical tape.
Orange wire - 12V from ignition. Next to it is yellow - on the mirrors.
Trial version
We connect all other wires according to the diagram, it's all simple! But I had a problem with the button itself, or rather, I didn’t have it. I drove for a long time with the block sticking out of the lining. I later ordered a button from DMMC (This already looks like PR ). After she fell into his hands, I was unable to pick her up for some time. A lot of work :((And then there was a chance, I wrote, called, met...aaand...it’s in my hands! A small, extremely rare piece of the missing interior turned out to be in my possession)) The heated mirror icon is quite strange))
Arriving home, I went to the car. I got into the cabin and put the button in its new home!)) Immediately I lowered the heated rear window button to the bottom row, and raised the emergency light button up. And this is what happened in the end:
The heated mirrors work, which means the time was not wasted)) I'm happy!)
And finally, a parcel arrived from China. With a small accessory. We look and comment... I think the children will not twist them))
Almost the color of the car
With this I say goodbye to you, until we meet again! All the best and more useful things in the car!))
Connecting Ergon mirror heating — Lada 2115, 1.6 l., 2010 on DRIVE2
Hi all. I haven’t been able to connect the mirrors for a long time; I haven’t had any free time for the car. And finally got around to connecting the heated mirrors. about installing mirrors earlier.
.
At first I just wanted to connect it to the rear window heating wire. After all, heated mirrors and rear windows are usually used simultaneously during rain or snowfall. But after studying people’s experiences in detail, I came to the conclusion that a separate button needs to be done and here’s why: glass heating consumes approximately 11.5A, while both mirrors only consume 3A. Turning everything on at once greatly reduces the tension. In addition, for example, in the dark, the glass heating may not be turned on, because... The car is tinted and you still can’t see anything through the glass. But mirrors are needed in any case. In order not to run the generator just like that, it is better to have mirrors with a separate button, let them work independently of each other.
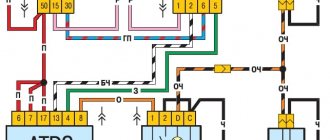
I’m very slow in understanding electrical things, so before I started doing anything I had to figure out how everything works, and also resort to the help of my father (and for good reason). The following diagram was used for connection:
Connection diagram
Everything was done according to the scheme, the only plus for the mirrors was taken from the cigarette lighter. The wires going to the on-board computer somehow did not inspire confidence.
For connection, the following were purchased: - rear window heating button + block - 4-pin relay + block - 7.5A fuse + block - bolt terminals - wires - hedgehogs for trim.
We modify the rear window button with a sharp object (scalpel or needle), giving it the appearance of a mirror.
It turned out well.
You can twist part of the circuit on the table.
The ground wire from the mirror is short, clearly designed for connection to the door. Therefore, we extend the wire. And on the driver’s side, the positive wire turned out to be short and did not reach the center console. Apparently designed for connection to the rear window heating wiring that runs along the driver's door sills (how primitive everything is). Therefore, we lengthen it too.
From the mirror we pull the wiring down along the inner wall of the door, making sure that the wires do not interfere with the glass lowering. To prevent the wires from wandering, it is better to secure them, for example with electrical tape, to the existing wiring. Next, we pull out the rubber corrugation on both sides and pull both wires (+ and ground) into the corrugation. They don’t get through that easily, so it’s better to take thick wire and pull the wires through with the wire.
Let's start pulling the wiring. It was decided to take the mass from the salon, because... taking a lot on the door is not good. It may be weak and inconsistent, as a result of which the mirrors may not heat up well. We disassemble the door trim.
Unscrew the door sill covers.
Below the hinges in the interior you can see a hole through which wires can be routed into the interior. To do this, you need to lower the corrugated wires to the very bottom inside the rack and remove them from the hole. Doing this turned out to be the most difficult task. The thick wire gets through, but the wire with the wires gets stuck inside, apparently there is not enough space inside. So I just had to lower the wires and catch them at the bottom.
We disassemble the center console. Traditionally, the most difficult thing was to remove the climate control knobs, i.e. handles vharyu-nogi, stove-street and windshield. To do this, you need to contrive to use a screwdriver to press the plastic latches away from the metal adjustments, and then look for these flying handles under the seat. But I found it!
We unscrew all the screws holding the center console so that we can crawl up and pull the wires through.
We run the wires from the mirrors under the carpet to the center console. We twist the bolt terminal to the negative wire, and you can place it on the metal frame inside the torpedo.
Next, connect the wires according to the diagram.
For the side lighting of our
button, we take it from the rear window heating button from the white wire. And to turn it on - from the yellow-blue wire.
We connect the mirror heating button to minus 2 black wires, and we connect 2 green wires to the relay, although one is possible (the second is empty). Terminal wire colors may vary.
It looks like everything was put together, everything is great. We try to turn on the dimensions - the button lights up. We turn on the button itself - it doesn’t work. Strange. Maybe the button is not working. We tried using the button for the heated glass, but it didn’t work either. We tried to turn on the heated glass itself, and it didn’t work, although it always worked. So what to do? We reached into the fuse box and looked and it turned out that the 20A fuse had burned out. Well, it's good that I had a spare one. We stuck it in, the heated glass started working, we turned on the heated mirrors - it didn’t work. And then the glass heating doesn't work. The fuse blew again. And again, fortunately, I had another spare one.
We started watching and checking the connection. Everything seemed to be turned on correctly, but suspicion fell on the relay. We tried to take the plus for the relay from the cigarette lighter - the wires sparked and the radio turned off. This means a closure.
There is no point in guessing on the coffee grounds. Therefore, we need to act wisely - we had to use the tester and call everything in order. We checked the relay itself - it clicks. But for some reason the relay in the block no longer works. Suspicion fell on the protective diode that connects 85 and 86. It was decided to try to cut it and lo and behold, the relay worked.
We came to the conclusion that, apparently, the protective diode was soldered on the wrong side and burned out after turning on the power, resulting in a short circuit. Or maybe the block is not for this relay at all. I had to solder a new diode.
Everything was assembled, connected and working. The mirrors are warm. Due to some nonsense, the whole scheme did not work. I myself would not have guessed what the matter might be.
We fix the wires with electrical tape so that they do not dangle. This is what happened.
We collect everything we took apart and rejoice. I bought new hedgehogs for the sheathing so that the sheathing would fit better.
I also bought a button in front
Connecting Ergon mirror heating — Lada 2114, 1.6 l., 2010 on DRIVE2
Ergon wrote earlier about the purchase and installation of mirror panels. Now we're ready to connect. I didn’t take many photos...since I was stuck with the wiring in the board. I’ll use a photo from the forum... so don’t kick me too hard...
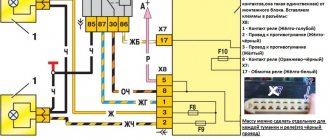
Connection diagram
I took this diagram as a basis. I bought 3 meters of wire 2x0.75 sq. The relay is an ordinary 4-pin, terminal for pre and pre 5 A, and 6.3 mothers to the relay. A button with a chip.
I ordered the button on emex.ru
According to the diagram, I will say that I took the power from the lock from the blue wire with a stripe.
Bottom right
There, after turning on the ignition, 12 V appears. The previous one took 5 A, since the blades consume about 1 ... 1.1 A each, in total about 2 ... 2.2 A. I also wrote down contact 1 of the mirror heating button from contact 2 of the rear window heating button, since +12 appears on pin 1 of the heated rear window button after the heated window button itself is turned on. That is, the mirrors can only be turned on if the glass heating is turned on... and if not powered to 2, then separately. I hid the relay at the bottom of the ecu... the terminal with the front next to it on duct tape.
Full size
Heated glass and mirror buttons nearby
Next came the actual sex. The mass was applied to the door.
Full size
Weight
Then I pulled the wire through the corrugations and spent about 3 hours trying to get it out through the common bundle...
This is how I ran the wire on the driver's door
The bunch goes into a really awkward place... I tore off all my fingers, remembering the designers of AvtoVAZ. The right door is pulled out differently
The right door is the same
It's much more convenient. Then I ran the wire to the relay and connected everything as in the diagram. When turned on, the mirrors become warmer within 1 minute. It just started to rain. The drops dry out quickly... I think it will be great in winter...
How to check for a function?
You should not begin work on installing such a system unless you are sure that you no longer have heated mirrors. You can check it very simply. If you have a heating button in your car, or the mirrors get warmer a couple of minutes after turning on the car, then you have it.
You can also check if the wires go to the mirror housing and if there is a heating element in them. Heated side mirrors can be easily connected to a similar system for the rear mirror. This way you can control everything with one button. The main thing is not to mix up the wires.
Connecting heated mirrors — Lada 2115, 1.5 l., 2001 on DRIVE2
Having bought new “Polytech” mirrors with heating, I installed them at first, but didn’t turn on the heating; after driving one winter without heating, I finally got around to the next! Somehow, initially there were no plans to connect a heated rear window from one button. I made a separate button. To connect, I bought: - heated rear window button + block - 4-pin relay + block - 7.5A fuse + block - bolt terminals - wires I don’t have my own photos, as I did this last summer, I took the photo from the person who did all this according to his blog)))
The following circuit is used for connection
Wiring diagram for heated mirrors
Part of the circuit can be twisted at home)))
As it turned out, the ground wire at the mirrors is short, clearly designed to connect the ground in the door, but I think it’s no secret that the hinges on the doors tend to rust, hence poor contact, it’s better to connect the ground in the cabin! Also, the plus was also not long enough to reach the center console. We extend both wires (I used heat shrink to connect, I don’t like snot with electrical tape) and pull them from the door to the salon. From the mirror, we pull the wiring down along the inner wall of the door, making sure that the wires do not interfere with the lowering of the glass. To prevent the wires from wandering, it is better to secure them, for example with electrical tape, to the existing wiring.
Next, we pull out the rubber corrugation on both sides and pull both wires (+ and ground) into the corrugation. They don’t get through that easily, so it’s better to take a wire, for example, and pull the wires through with the wire. I didn’t bother with the wire, but tied the wires with electrical tape to the speaker wires on the doors that were extended into the cabin to the radio and pulled the speaker wire where needed.
We run the wires from the mirrors under the carpet to the center console. We twist the bolt terminal to the negative wire, and you can place it on the metal frame inside the torpedo.
Next, we connect everything according to the diagram and install a button instead of a plug!
This is already my photo
Everything works great, both mirrors heat up))) I am completely satisfied with the work done! And as it turned out, heated mirrors are a very useful thing, especially in the rain, the mirrors are dry and everything is clearly visible.
And here is my video of the heated mirrors working
Installation and connection of mirrors Polytech. — Lada 2114, 1.8 l., 2007 on DRIVE2
Well, finally I joined the army of basins with these mirrors!
They look good, visibility is good, 100
t
on every 3 cars is bad Well, to hell with them, we are not chasing the title of “the most original basin”) ) But I decided to write this bzhzh because...
I didn’t find a sane connection diagram, so tell me for posterity so that they don’t step on my rake) I got mirrors from the Volna NL-15 series or something...))) heated, with a repeater, aspherical, and most importantly... PA-BAAMM! with email drive) 1.
We tear off the old mirrors and screw on the new ones.
I think no one will have any problems with this. 2.
We climb into the door pillar and remove the trim to run the wires through. I had to pull additional corrugation because... Nothing else fit into the standard one :(. I couldn’t install the stock corrugation either, because there was stupidly nothing to use to drill the hole. I had to install it from the classics.
3.
Next we start connecting. To do this, you need to unwind the intestine that came with the kit, and determine where is the right and where is the left. (the answer is written upside down at the bottom of the page =) ). Please note that next to the left mirror bundle there are yellow and brown wires (for turn signals and heating).
Next, we assemble the chip according to the colors of the wires on the mirror chip. This is all clear.
4.
After this, we begin to practice the Kama Sutra, namely.
We lean upside down in the place where the driver’s legs usually are, and try to rip the X9
out of the mounting block.
After 5-20 minutes (depending on stubbornness), we climb under the hood and unscrew the mounting block, after which we calmly remove this chip. By the way, connector X9 is the leftmost connector on the block, if you look in the direction of travel. We take out contacts No. 2
double blue wire (right turn) and
No. 9
double blue wire with a black stripe (left turn).
And we connect them with yellow wires as in the photo.
We connect the blue one with a black stripe to a yellow wire with a black cambric.
I handled the heating easier: because... I used to have heated mirrors, so I tied the brown wire to the old heating wire. 5.
.
We take out the button for heating the ass glass and begin to mock it. =). We smoke the manual. I didn’t have time to take a photo of the button connector, so I’ll explain it with my fingers. Black wire with ground for heating button. Everything is simple here: . Black with black Orange (+ backlight) is connected to the gray wire;
this is if you look at the chip from the button side, then in the lower left corner.
the white wire
to the + on the butt glass heating button.
This is the top connector in the center, I don’t remember the color.
We put joystick 6
Well, if you liked the report, then point your finger =)
Heated mirrors — logbook Lada 2114 2010 on DRIVE2
Being too lazy, I decided to make heated mirrors. I turned it on with a separate button.
We will need:
— Mirror elements anti-glare + heating + aspherical ERGON — 1 set (465 RUR)
— Electromagnetic relay 4-pin 12V 75.3777-10 (analogue 90.3747-10) — 1 piece (48 rubles)
— Relay block -1 piece (6 rubles)
— Heated rear window button with warning lamp — 1 piece (102 RUR)
— Block for the rear window heating button — 1 piece (30 rubles)
— Detachable terminal 2.8mm MAMA — 6pcs (6rub)
— Detachable terminal 6.4mm MAMA — 6pcs (9rub) — Bolt terminal 8mm — 2 pcs (3rub) — Flat fuse 10A — 1pc (5rub) — Wire cross-section 0.75mm2 — 5m (48 RUR) — Drill, drill bit with a diameter of 3 mm — Crimper
TOTAL: 765 RUR
I removed the mirrors and replaced the mirror elements in them. To drag the wiring from the mirror into the door, you need to drill a hole (3mm) in the body of the mirror itself.
Wiring diagram for heated mirrors. The diagram shows that the heated mirrors only work when the ignition is on and is activated by a separate button through its own relay. The control + was taken from the button, and the supply + was pulled from the battery through the fuse.
We lay the positive wires of the mirror elements through the corrugations of the doors to the center console and connect them to the 30th contact of the relay.
The negative wire of the mirror element, having previously drilled a hole in the door, dragged it through the door, crimped it with a bolt terminal and secured it with a mirror fastening screw.
The relay and fuse were located inside the center console.
Result:
I moved the rear window heating button down and installed a mirror heating button next to it (it was made by modifying the rear window heating button).
All that's left to do is wait for it to warm up and glue the covers onto the mirrors.
Procedure
Now you can begin installing the heater. First, remove the holder with the mirror from the case. On most cars, it is enough to pry it with a screwdriver or something flat from below and pull it towards you.
Based on the characteristics of the holder, we choose the method of fastening the wire. If the inner surface of the holder is smooth (as in the photo), then stick double-sided tape on it.
Then we lay a piece of wire on this surface. This can be done arbitrarily, for example, in a zigzag or something else. The main thing is to place it so that the thread covers as much of the surface of the holder as possible. In this case, the wire should not intersect anywhere. Scotch tape will hold the nichrome thread well.
If the inner surface of the holder has any protrusions or fastening elements, then it will not be possible to stick the tape. In this case, a soldering iron will help to secure the wire. Everything is simple here - we apply a nichrome thread to the surface and press it with a heated soldering iron. The plastic will begin to melt and the wire will sink into it. Once cooled, the plastic will become hard and will hold the thread. But here it is important not to overdo it with heating the plastic, so as not to “push” it to the mirror. It is enough just to “drown” the wire in it a little and that’s it.
In this way, we fasten the wire along the accessible surface of the holder without touching the fasteners.
When laying the wire, its ends should be placed towards the side of the holder that is closer to the door, and so that they do not touch each other. To these ends we solder terminals for connecting to the wiring or simply the ends of prepared wires. Then the resulting connections need to be insulated.
All that remains is to provide insulation. If the wire was secured with tape, then to insulate it you can simply stick several more layers of regular adhesive tape on top. This will provide thermal insulation and prevent the wire from peeling off and shorting.
As for the holder where the wire is secured with a soldering iron, you can simply fill the entire surface where the thread passes with sealant and wait until it dries. In this case, the fastening elements will not be affected, which will ensure ease of fastening, and the wire itself will be insulated.
Before installing the holder in place, we pull the wiring through the mirror body into the door, the wiring for powering the heaters. Only after this we assemble the mirror.
Winter package. Part 3. Heated mirrors — Lada 2114, 1.6 l., 2009 on DRIVE2
The third entry in the “Winter Pack” series Part 1, Part 2 This time we will talk about heated mirrors. As readers of my blog know, I installed Grant Liftback mirrors with already built-in heating elements, all that remained was to connect them. The connection was made according to this diagram
Full size
The heating is switched on together with the rear window heating. Many people write that the consumption of heating elements is not high and when connecting, you can get by with an additional relay base by simply connecting to the rear window heater circuit, but I still decided to connect using a relay. The most attentive ones have already seen in the connection diagram a module called ROST, I will dwell on it in a little more detail. The Glass Heating Regulator (ROST) is another device of APEL LLC in my car (if anyone is interested, I also already have: RPV-2, MAUS-2, MAX-2, ROS) What is this device for?
Full size
The ROST glass heating regulator provides automatic control of the heating power of the rear window and side mirrors of the car. It extends the service life of heating elements and increases the safety of their operation. The maximum power of the heating elements is 300 Watt. The regulator is installed in cars with an on-board voltage of 12 Volts. When the glass (mirror) heating is turned on, the controller smoothly turns on full power, which increases the service life of the heating elements. During the first 20 minutes of operation at full power, rapid heating of the glass (mirrors) is ensured. Then heating is provided at 20% power for 3 hours. After 3 hours of operation, the regulator completely turns off the heating elements. If the glass (mirrors) have not warmed up in the first 20 minutes, you can repeat the heating cycle at full power. To do this, you need to turn off and turn on the heating button again.
Heated mirrors. Installation and operating principle
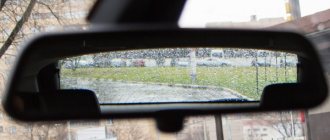
An option such as heated mirrors is not always available as standard on a car. But in latitudes with continental and moderate continental climates, a function such as heated rear-view mirrors is simply necessary.
As you know, in such a climate there are often periods of high humidity, which leads to fogging or freezing of glasses and mirrors. Just as heating is beneficial for windows, heated side mirrors completely solve this problem.
Heated mirror elements — Lada 2114, 1.6 l., 2007 on DRIVE2
The frosts are starting to get a little stronger, and cleaning the mirrors is really inconvenient. Not only can you not clean it humanly with a scraper, but when you do it, the adjustment of the mirrors gets lost. I got tired of this and went to online stores to order mirror elements. Prices on average 850 + delivery. Expensive. I went shopping and found Ergon mirrors for 650 rubles. Let's take it)
I wanted to buy the same ones I had, i.e. with a blue mirror, but there was only a white one, so I took them. As it turned out they are better)
top - stock, bottom - ergon
I also needed:
•Heated rear window button + socket for it •Fuses •Fuse holder •4-pin relay + socket for it •Set of heat shrink •Soldering iron •2-3 meters of wire
To route the wires into the interior, I made a hole in the mirror housing with a hot small screwdriver (there was no drill)
I attached the minus to the mirror mounting bolt, the minus is good, I checked it 100 times.
minus
But I had to tinker with the plus, it’s very difficult when you don’t know where the hole is, to push the wires in, but after several hours of dancing with a tambourine, I finally found this hole and, woefully, shoved the wire in half and half, but before that I pushed it through the corrugation of the door.
A little hard to see, but it should be roughly understandable
Then I took everything I needed to connect
I modified the heating button a little to make it look like a mirror
before after
I collected the wires according to this diagram
Article: 996.3710-07.15
Order code: 151446
In stock Available for order – >10 pcs. Data updated: 05/30/2021 at 19:30
Order code
151446 Articles 996.3710-07.15 Manufacturer AVAR Catalog group: ..Electrical equipment Electrical equipment Width, m: 0.015 Height, m: 0.025 Length, m: 0.05 Weight, kg: 0.012 Purpose of the switch button: mirror heating
Description
Switch 996.3710
The switch is designed for switching various electrical consumers of the car.
- Weight: no more than 0.014 kg;
- Connection: block 2114-3724564;
- Applicability: Lada Kalina (1117, 1118, 1119), Lada Samara (2113, 2114, 2115), Chevrolet Niva, GAZ.
Product reviews
Where is it used?
Certificates
Reviews
There are no reviews for this product yet.
Write a review
- Switch button VAZ-2115,2123 heated mirrors AVAR Article: 996.3710-07.15 Order code: 151446 190 ₽ or place an order by calling 8 800 6006 966
Availability of goods in warehouses and stores, as well as the price of the goods is indicated on
30.05.2021 19:30
.
Prices and availability of goods in all stores and warehouses are updated once an hour.
If there is a sufficient quantity of goods in the store you need, you can buy it without pre-ordering. Internet price
– valid when ordering on the website or through a call center operator by phone
8-800-600-69-66
. Subject to sufficient quantity of goods at the time of order.
Price in stores
– retail price of goods in store sales areas without pre-order.
The period for moving goods from a remote warehouse to the warehouse of an online store.
The parts data presented on this page is for informational purposes only.
1d004190a385353c0c50b5bea89f25c9
Add to cart
Available to order:
Order quantity:
Product successfully added to cart
!
How to install heated mirrors on a VAZ 2114?
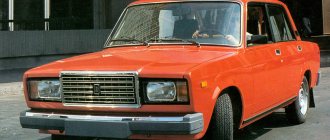
Heated rear-view mirrors of the VAZ 2114 are a rather convenient option in the car, which, unfortunately, the manufacturer did not provide for. Installing heated mirrors on the VAZ 2114 will save you from the need to clean your mirrors from freezing and frost formation in winter. By the way, visibility will also improve in damp summer weather. This publication will tell you how to install heated mirrors on a VAZ 2114.
As with installing a heated windshield, which was described in the previous article, you will need to buy new mirrors, the heating of which will be carried out through a special button in the cabin. You can purchase such a set of electrically heated mirrors in specialized stores.
Installing heated mirrors on the VAZ 2114 will increase the visibility sector and image clarity, which will ultimately affect traffic safety. Before installation
Installation of heated mirrors for VAZ 2114
— Work begins with dismantling the old mirrors. First, remove the front door trim and the inner mirror trim.
For convenience, use a screwdriver, prying in the right places.
— The original VAZ 2114 mirrors are secured with three bolts. Unscrew the nuts and remove the mirror.
— Please note that the kit for new heated mirrors includes a template with appropriate markings for correct installation. Cut it out, attach it and transfer the markings to the door. For example, you can use an awl to transfer. Then use a file to increase the size of these holes.
— Now let’s move on to the most difficult part of the work - carrying out the necessary wiring. First, run the wires into the inner cavity of the doors. To go from the doors to the inside of the counter, use corrugated tubing.
— Now you need to connect the wires to the relay responsible for heating the rear window of the VAZ 2114. Here we will take the control signal. Using the diagram, connect the electrical circuit. We advise you not to simplify the scheme; let the heating of the mirrors be separate from the glass.
— Stretch the negative wire into the passenger compartment and strengthen it tightly, connecting it to the metal body.
— Place the external button for turning on the heated mirrors in the cabin in the same place where the heated rear window is turned on.
- Now you can continue installing the mirror. Strengthen the mirror adjustment knob. Thus, it will be possible to rotate the mirror from the interior.
— Having returned the cladding to its place, strengthen the mirror with three self-tapping screws.
— Check operation by turning on the heating. Do the same with the other mirror.
The following video demonstrates heated mirrors assembled with your own hands.
You can purchase rear-view mirrors for domestically produced cars here. The catalog contains mirrors of different shapes, sizes, with repeaters
A few important details
To disassemble the mirrors, you will need screwdrivers of different sizes, as well as hex keys. You will need to find a place in the car to set the heating to turn on and off.
To disassemble the side window, first loosen the mounting screws. Use a hair dryer to soften the mirror elements. If this tool is not available, the driver can use hot water. The mirror must be completely placed in water, after which the analysis will be much easier.
Important! When dismantling, you must use plastic elements so as not to damage the structure or scratch the glass.
To get the maximum effect from the heating operation, the elements must be prepared so that the contacts do not touch the coating. Contact between heat and coating results in burnout. All work can be done independently. However, it is better to contact a specialist, he will help with installation and perform the correct installation, so that unforeseen situations do not arise during the operation of the mirror heaters.
Installation and assembly must be performed sequentially. Each stage is performed one after another (certain actions cannot be skipped). Thus, heated mirrors will bring the driver the necessary comfort. In wet weather and frost, the mirrors will always be clean and dry.
How to connect heated mirrors to a VAZ 2114 ~ AUTOTEXNIKA.RU
Now we are going to discuss the installation and connection of heated mirrors for VAZ 2114, 2109 and 2110 cars. Russian cars are almost always supplied with side reflectors without a heating function, which, of course, spoils the memory and pleasure of operation, especially in winter. Therefore, with our weather and climate, installing heating parts is simply necessary.
Basically, most of these parts consist of an electronic heater, a control button or remote control, and wiring. The connection diagram of the workpiece is connected to the on-board circuit, as well as to the vehicle network. When the corresponding button is pressed, the circuit is closed and the heating is turned on. Thanks to this system, the ice melts and the glass does not fog up.
Before changing the side reflectors, you need to know the methods you can use.
You can purchase prefabricated parts that have a heating function, but you can also make your own reflectors. Because the cost of finished parts can hit your pocket a little. You can choose to purchase spare parts separately and then assemble them into a finished component. But the cheapest way, of course, is to assemble the tuner yourself. The cost will be kept to a minimum and the operating efficiency will be better at best. Moreover, by doing all the installation work yourself, you can significantly improve the relay and all operating mechanisms. You can also see the possibility of installing reflectors from VAZ 2110 to VAZ 2114, since the standard mounts in this model are quite suitable and suitable for this purpose. In addition, they will be fully installed on the VAZ 2109.
Installing heated hail mirrors yourself
One good, but also cheap way is to install incandescent lamps in the reflector. These lamps have enough power (21 W) to melt some frozen glass in a few minutes. The ideal result of this method is to install 2 bulbs of 10 watts of any kind, while the entire load will not be so large, and you will certainly be happy with the result of this setup.
As we have already said, perhaps a larger category of cars that do not have standard heated side mirrors are VAZ cars. If you have already decided on the type of device you purchased or created yourself, you can install it on your computer. Under no circumstances should you carefully remove and disassemble the mirror housing; you only need to perform the following operations: 1. Bend the reflector body from the movement of the car, which requires some effort. 2. Remove the white pin and pull it out of the frame. You can see the pin in the socket that appears after removing the housing. 3. Unscrew the mirror element on each side so that you can reach the element. 4. Now you need to apply force to the center of the reflector to pull it out of the latch. Congratulations, part has been removed. You have to completely change everything so that the new part fits correctly at the end of the installation.
You may also like
Lateral
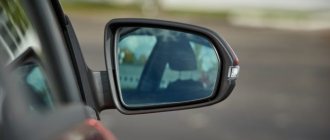
There can also be many reasons for removing side mirrors. But mainly this is replacement, painting or installing a heating system.
Regardless of the situation specifically with your VAZ 2114, the first thing you will have to do is remove the elements. How to do it?
Side mirrors
Dismantling
Removing side mirrors is not a difficult task. Here you only need a screwdriver to work. Perhaps not alone.
- Pry off the plug located on the side mirror control knob.
- Behind the plug there is a screw that needs to be unscrewed with a Phillips screwdriver.
- Remove the triangular plug. In the case of the VAZ 2114, it is held in place by special clamps. So to remove it you need to carefully unscrew the latches. Use a flathead screwdriver to pry the plug and remove it without too much trouble.
- Next, three mounting screws appear in front of you.
- By unscrewing them, you will thereby remove the side mirror.
- Do the same procedure with the second rear view element.
As you can see, removing the components is quite simple; simple fastening is provided. This is largely why they love domestic cars, since even a person without much experience can disassemble and assemble most components.