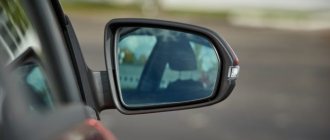
In order for the driver to control the situation on the road, each car is equipped with rear-view mirrors - side and interior. The presence of these elements provides the motorist with a 360° view. But, like any part, a mirror can break. Most often, these elements are hit during an accident, because the side ones protrude strongly beyond the body, so a small blow is enough for them. Sometimes the plastic base also breaks. There are always fewer problems with interior glass, but knowing how to disassemble them will not be superfluous, because drivers need to understand the VAZ 2114. After installation, the side and internal rear view mirrors need to be adjusted to get a full view.
Salon mirror
There are several reasons why motorists remove their rearview mirrors:
- Replacement with a more modern and new model;
- Electronics installation. For example, a rear parking sensor camera;
- Broken glass;
- Installation of non-standard sensors that are not initially included in the VAZ 2114.
Before starting work, you need to make sure that replacement parts are available. You need to choose an element according to your capabilities. For example, for a large sum you can purchase a panoramic mirror, which significantly surpasses the standard element in visibility. Replacement can be made with any mirror, it does not have to be from a VAZ 2114. The average price for a regular brightening mirror is 650 rubles. For a panoramic one in a car shop they will ask about 800 rubles.
Replacement instructions
VAZ 2114 refers to cars manufactured before 2009, which means that the interior rear view mirror has a standard mount. The element is held in place by two bolts. This mounting option has been used since 1976. The only disadvantage of the bolts is the inability to install a rear view mirror from a foreign car. But there are enough original and non-standard models for domestic cars on the market. Replacement is carried out as follows:
- You will need to remove the cap from the bolts if present.
- Next, holding the body with your hand, you need to unscrew the fastening bolts.
When you install the rear view mirror in its place, you need to make sure that the patch is in the same place. The fixing bolts must be tightened tightly to prevent the glass from being damaged by vibration and shaking.
Adjustment
The modern rear view mirror can be adjusted in tilt. The ideal setting is that you can see everything going on behind the car. But if your VAZ 2114 has high seats, then you can see the headrest and even part of your right ear in the glass. This is normal, nothing needs to be adjusted.
It is recommended to choose a modern panoramic model with lighting, as it has flat glass and does not distort the reflection. Therefore, the presence of a panoramic model increases safety. By looking in the mirror, you can immediately determine the distance to the car or lamppost that is behind you. The larger the rear view mirror, the better.
Internal
Let's start with the rearview mirror installed inside your car.
Interior rear view element
There are several reasons why the driver will want or have to dismantle this element:
- The desire to replace with a more advanced, new model;
- Installation of electronics, parking sensors;
- The glass or plastic case is damaged, broken and does not allow further use of the component;
- There is a need to install sensors that are not included in the standard equipment of your car.
Replacement
Do not rush to remove the old mirror if you have not yet purchased a new product. Sometimes you have to wait for weeks because of the speed of delivery, and sometimes it’s enough to go to the market or store, where you will immediately find the desired product.
VAZ 2114 were produced until 2009, which requires the use of a standard type of fastening consisting of two bolts. This method of fixation has been used since 1976.
The downside of bolt-on mounting is the impossibility of installing an interior mirror from a foreign car. It’s good that there are many domestic products on the market that perfectly match the VAZ 2114.
You can start working.
- Remove the plug from the bolts. Although it is not always present.
- Holding the mirror body with one hand, begin to unscrew the mounting bolts with the other.
- Remove the old mirror.
- Check the condition of the seat and clean it.
- If the old bolts are covered with rust, it is better to replace them with similar new ones.
- Screw in the new mirror using the bolts.
- Insert decorative plugs so that the bolt heads do not spoil the appearance of the interior.
The simplest fastener
The bolts should be fixed as tightly as possible to avoid damage to the glass as a result of shaking and vibration.
Adjustment
The interior rear view mirror is tilt adjustable.
- The ideal setting is when, when you look into it, you can see everything that is happening behind your car;
- Some cars have high seats, which means you can see part of your ear and headrest in the reflection. This is a normal phenomenon, so there is no need to change the settings;
- A panoramic product with backlighting is best suited for the role of a rear mirror, since the glass used is flat and there is no image distortion, which has a positive effect on safety.
Side mirror
The side rear view windows can be removed to install heating, paint or replace mirrors. You may also need replacement or disassembly, which is performed for tuning (installation of lighting, heating) or repair.
Replacement instructions
Replacing the rear view mirror is quite simple; you only need screwdrivers for the job.
- There is a plug installed on the control knob, which is visible in the photo. You need to pry it off and then unscrew the screw located under the plug. It is unscrewed using a Phillips screwdriver.
Parsing
There are several ways to parse:
- You can press down on the plastic housing from the inside while using a flat-head screwdriver to release the holders. The method is not the most reliable, as there is a chance of breaking the mirror element.
Sometimes the plastic housing or main mount needs to be replaced. To do this, you need to remove the adjusting rod and remove the pin. Assembling the side mirror proceeds in the reverse order.
Heating
You can buy either a one-piece side mirror or a separate element. The standard case has a nice shape and is in harmony with the body of the VAZ 2114, so it is better to make a choice towards purchasing glass or a case. If you have ever driven a foreign car in winter, then you probably appreciated the heating that the side mirrors were equipped with. The VAZ 2114 did not receive such an option, but you can always buy a model with heating. It will cost 600-800 rubles.
You only need to connect the wiring of the new element. The side mirror will be equipped with two wires that will need to be connected to the power supply of the VAZ 2114. You can also install the light bulb and insulation into the body yourself. Here the light bulb will act not as a light source, but as a heater. To do this, you will need to disassemble the housing according to the instructions described above, and then install the insulation and light bulb. On the automotive market you can find an insulation kit, which includes a light bulb, insulation, and wiring.
Instructions for self-insulation
Before installing heating electronics, you need to take care of the heat preservation inside the case. More precisely, the front wall. To do this, we need a heat-resistant material, of which there are many options:
- Getinax;
- Paronitis;
- Electrical cardboard;
- Lakotkan.
In addition to insulation, these materials also have an additional useful function - insulation. It is triggered when the “plus” of the heater touches the body. The materials are most suitable for metal cases. In a plastic case, the layer will absorb heat, and if high voltage is applied, it may even catch fire. To prevent this from happening, you need to take care of the foil that will cover the main layer of heat-insulating material.
Cost of covers for Kalina mirrors
They cost on average from 500 to 1000 rubles, depending on the shape, color and method of attachment. Unpainted overlays can be purchased for only 200 rubles. Chinese cheap analogues cost very little (100-300 rubles), but are significantly inferior in quality. They are more fragile, brittle and inelastic.
Mirror covers for the Lada Kalina are the simplest but most noticeable tuning element!
The VAZ service station provides complete diagnostics and repairs of the Lada Kalina (1118) sedan.
Our car service specialists have extensive experience in maintaining and repairing VAZ vehicles, and thanks to our own auto parts store, we always have the necessary parts in stock.
View the price list for basic VAZ repair work
Prices for our car service services are significantly lower than the market average, which allows you to carry out high-quality repairs at an affordable price.
STO VAZ provides the following types of services:
- Car repair Lada Kalina (1118) sedan;
- Full diagnostics of VAZ 1118: diagnostics of the engine, brake system, suspension, compression measurement;
- Maintenance of Lada Kalina 1118 sedan: changing engine and transmission oil, replacing filters, replacing technical fluids, replacing the brake system and timing belt;
- Repair of the chassis: suspension, clutch, steering, brake system;
- Tire fitting and storage;
- Car wash;
VAZ-1118 is a new model of AVTOVAZ LLC, the production of which began in 2004. This is a five-seater passenger car with front-wheel drive, a front engine and an all-metal welded body. Lada Kalina is distinguished by a reinforced structure of the roof, sills and central pillar. Additionally, safety is ensured by bumpers made of impact-resistant polypropylene. The engine is four-cylinder, four-stroke, in-line, eight-valve, with a displacement of 1.6 liters.
In the basic configuration, Lada offers electric power steering, and as an additional set of options you can choose seat belt pretensioners, air conditioning, airbags, heated front seats, electric rear-view mirrors and an anti-lock brake system. All VAZ-1118 vehicles are equipped with special catalytic exhaust gas converters.
The exterior rear view mirror on the Lada Kalina is designed and dismantled very simply and conveniently, like everything on this model of a domestic car (in my opinion, the best in terms of price-quality ratio).
This particular mirror is suitable for both Tens and Priora. As we can see in the photo above, the mirror mounting principle is the same as on other Ladas, with one small difference. The side mirror is attached to three self-tapping screws using a shaped screwdriver (see photo above).
The side mirror itself (in this case, simple, without a turn signal repeater, with manual adjustment) consists of two parts. The main part (the mirror itself) and the protective cover. Connect these parts carefully and accurately by aligning the grooves on the mirror and the inserts on the lid and press it. It should click into place.
Next, lean the mirror on the outside of the door so that all three guides and the cable connection fall into place (photo above). Then, screw in and tighten the three screws. Make sure that the mirror on the outside of the door is level and properly positioned.
And now, that same “one small difference” - instead of the Zhiguli plastic nut that we screw onto the connection of the control cables, here it is attached to the same Zhiguli corkscrew, which on the classics secures the door lock cylinder. And finally, put on the plastic panel so that the adjustment lever fits into the rubber frame, lean the panel against the two guides in the corresponding holes and press it.
Mirror for Kalina, price 3000 rubles (with mechanical adjustment and without repeater)
Specifications
Manufacturers are constantly trying to produce car mirrors with modern reflective elements, equipping them with a heating system and electric drives. All this can significantly improve the life of the owner of a Lada car. A good mirror increases safety many times over.
Modern products can be characterized by an increased level of visibility, the presence of special anti-reflective coatings, clear and high-quality images, and a convenient and reliable adjustment system.
Sufficient visibility for a car mirror is achieved using a combination of the shape, size, and level of curvature of the optical reflective element. The position of the mirror relative to the eyes is also verified. A lot depends on the overview - the higher it is, the more information about the situation the driver will receive.
Young car enthusiasts love to equip their cars with xenon optics. At night, xenon is very blinding to other drivers through the side mirrors of the VAZ-2114. To prevent even minimal glare, a special liquid crystal layer is introduced into it, which, when exposed to bright light, reduces the intensity of reflected light and helps protect the driver, thereby helping to avoid accidents.
A clearer picture, which is viewed in electric mirrors, is ensured thanks to a special reflective layer. Previously, it was applied only to the inner surface of the reflective element - even with heavy contamination, the driver saw a distorted image. Modern manufacturers produce VAZ-2114 side-view mirrors with a reflective layer on the outside.
Standard models on the VAZ-2114 and their disadvantages
The car is equipped with products with a strong and fairly reliable fastening, however, with all this, these elements have a whole host of very serious shortcomings. The main disadvantage that distinguishes the standard side rear view mirror of the VAZ-2114 is poor visibility. Also, the disadvantages include a small number of adjustment options, and it also shakes when moving.
Particularly intense shaking can be observed when driving on bad roads or off-road. And everything would be fine, but constant vibrations lead to the fact that the plastic lining becomes unusable. And due to the fact that the side mirrors of the VAZ-2114 are also not very well designed, most of the road is simply not visible in them. When performing maneuvers, the driver must be distracted to check through the windows that there is no obstacle. The manufacturer offers to adjust the position of the mirror using a mechanical lever - this is quite convenient, but this method is primitive and does not make it possible to obtain the desired tilt angle when all the blind spots, or at least most of them, are available.
Lada 2115 Closer to ideal › Logbook › Adjusting mirrors
How to properly adjust the mirrors in a car is a question that is relevant for many drivers, especially for beginners - how to properly adjust the mirrors in a car for the best view.
After all, this is not at all easy, and you need to know the setup technique, which we will talk about in this article. If you look in the side mirror and see the rear wing of your car, this means that the mirror is not adjusted correctly. With this mirror arrangement, most of the area behind the car is visible both in the side mirrors and in the rearview mirror. At the same time, the area next to the car is very poorly visible and creates the risk of an emergency.
Adjusting the left side mirror
Lean to the left until you almost touch the side window. Adjust the mirror so that you can see the rear wing of the car (as shown in the picture). When you sit in your seat as usual, you will practically not see the side wing of your car in the mirror.
Adjusting the right side mirror
Lean to the right so that your head is in the center of the car. In the mirror you should also see the rear wing of the car (see picture).
Adjusting the rear view mirror
The center of the rear view mirror should be in line with the center of the rear window.
After driving with mirrors configured in this way, you will notice that there are much fewer “blind” spots. You see the car in the rearview mirror, and if it starts to overtake you, then you still see part of it in the rear mirror, and part of it in the side mirror. Thanks to this, it is easier for you to change lanes, and the risk of an emergency situation is significantly reduced.
Some useful tips:
1. At first it will be very unusual for you to drive with mirrors configured in this way. But wait a week and you will get used to it so much that you will not understand how you drove differently before.
2. Be careful when parallel parking. With this alignment of the mirrors, you need to turn your head more and lean away to see both the side of your car and the car next to it.
3. Constantly glance at the mirrors, and not just at the moment when you want to change lanes. This manner will allow you to constantly be aware of the situation on the road and correctly make sudden unexpected maneuvers (for example, when you go around a hole).
A few important warnings:
1. Do not adjust the mirrors while driving.
2. Even properly aligned mirrors have blind spots. And sometimes it’s better to take a quick glance over your shoulder when maneuvering, so as not to hit, for example, a cyclist or motorcyclist. Looking over your shoulder gives you the information you need that you will never get by looking even in properly aligned mirrors.
Alternative options
In car stores you often find products with cable adjustments or electric mirrors. They have folding functions. In addition, heated side mirrors for the VAZ-2114 are offered. There are modifications that are protected from glare and with turn signal indicators.
The most famous and popular as well. You can often find high-quality models from Japanese brands. Such a replacement of the side mirrors of a VAZ-2114 will not be difficult - it can be done without modifications. The product, regardless of the manufacturer, has a massive base at the points of attachment to the car, which significantly reduces, if not completely prevents, vibrations and shaking.
Price issue
First of all, we will orient you a little on the price tags that are presented on the market today.
The cost may vary depending on the manufacturer, technical features of the product and the region of its sales. Therefore, prices are average.
| Mirror type | approximate cost |
| Internal normal | 650 rubles |
| Indoor panoramic | 800 rubles |
| External normal | 500-600 rubles |
| Outdoor heated | 700-900 rubles |
Obviously, the characteristics of the panoramic interior mirror provide a better view, and the presence of heated exterior mirrors provides comfort and does not require constant wiping. It is better to pay more, but buy new functional products.
Cost and equipment
The approximate price of one such mirror starts from 700 rubles. The cost may vary significantly depending on the configuration. New left electric mirrors with an aspherical reflective element have appeared on the market, while the right one has an ordinary spherical shape.
Electric mirrors of this type are in a special protective casing - it allows you to reliably protect the mirror glass from any damage. These models also have anti-dazzle reflectors of various shades. The kit includes pads. They are made of black plastic and can be painted immediately to match the body color. They sell options specifically for tuning enthusiasts - with turn signal repeaters. Such details will add attractiveness and uniqueness to the appearance of the car.
Alternative models, installation of electric mirrors
The most famous manufacturers on the domestic market are NPK Polytech and Ergon. You can also buy models from Japanese manufacturers. The design of the alternative product allows it to be installed in existing outlets without additional modifications. A rigid, massive base at the point of attachment to the car prevents excessive vibration when driving on uneven roads.
Such electric mirrors are placed in a special protective casing, which reliably protects the glass from mechanical damage. The products are equipped with anti-dazzle reflectors in neutral, blue or gold shades. Models have additional decorative overlays.
By installing such covers on your VAZ mirrors, you can guarantee the unique appearance of your vehicle. As in other cars, VAZ mirror covers are attached to a grease-free surface using special tape. The bonded surfaces are allowed to stand in stable weather conditions for several days.
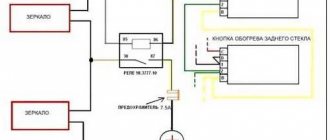
Installation of a VAZ mirror is standard and does not take much time. First of all, unscrew the old, standard product, which is secured with only three bolts. Next, you need to connect the electrical elements for control, folding and heating. The circuit is closed parallel to the electric lift circuit and the adjustment keys are brought into the cabin.
Removing the mirror on a VAZ-2114
The first step is to dismantle the old mirror. This is not a difficult task, and all you need is a regular screwdriver to complete it. First you need to pry off the plug that is on the mirror control knob. Behind it is a screw for a Phillips screwdriver.
Next, the plug is removed - on the VAZ-2114 it is held on by clips. It is very easy to unclip the latches using a minus screwdriver. There are three screws under the decorative plug; if you unscrew them, the product can be removed.
Such a task as replacing a side mirror on a VAZ-2114 can be solved simply and simply. This is why many people love Russian-made cars - repairs can be performed using a minimum number of tools and without much experience. To install a new mirror, you need to do all the steps in reverse. This won't be difficult either.
How to disassemble a side mirror
Sometimes a complete replacement of the side view mirror of a VAZ-2114 is required. It is quite possible that everything can be done by installing a separate element on the left or right side.
Let's see how we can disassemble the structure as carefully as possible. First you need to press the plastic case from the inside. The holders are carefully snapped off using a flat-head screwdriver. This method is not very reliable - there is a considerable chance that the mirror element or other parts will break.
The second option carries even greater risks - here you need to quickly hit the glass on the surface (but it is better if it is soft). This is a quick option for dismantling and replacing the element. The blow should be light and fast. To replace the plastic housing or main fastener, remove the adjusting rods and pin. The assembly is done exactly the opposite.
Heating from an incandescent lamp
So, one 21-watt light bulb can defrost even a very frozen mirror in just a few minutes.
If one lamp is not enough, then you can use two 10 W lamps or one, but with two contacts. One is intended for defrosting, the second will be used for anti-fog. This function will save you more than once in rain or snow.
Summary
Thus, you can replace or modify your car mirror as desired. Some people purchase electric drive solutions - this is very convenient. You can equip it with heating yourself. In both cases, there will be no problems with them in winter.
By the way, ultrasonic glass cleaning was used on Toyota Crown cars of the 90s. Thus, the ice that had accumulated on the surface broke off in a matter of seconds. However, most manufacturers preferred to install electric heating, including AvtoVAZ (of course, as an option). However, you can add this function to yourself using a regular light bulb.
So, we found out how to change the side mirror on a VAZ-2114 with your own hands without much effort.
The content of the article:
Side rear view mirrors of VAZ 2113 - we will install them. The standard mirrors that are installed on the VAZ 2113 are too small and inconvenient; it is difficult to provide sufficient visibility through them. Plus, they are not heated; in frosty weather, ice forms on them. We are purchasing a new set of side mirrors that have a safety housing, they have a wider field of view, improved visibility, heating and cable-driven adjustment. Such mirrors can be found in a specialized store, and they are not so expensive.
In this set, the mirrors are equipped with a special black protective cover. It can be repainted to match the color of your car. The blue tint of the mirror provides an anti-dazzle effect. It is very easy to attach the mirrors to the mounts; you just need to tighten the mounting screws. Difficulties arise with the hole through which the cable drive passes; its diameter is too small and will have to be bored. To do this, you need to prepare special tools: an electric drill with an appropriate drill bit or a screwdriver with boring attachments. Next, we dismantle the interior upholstery panel and a special screen on the door, which prevents moisture and dirt from entering.
Then we pry it with a screwdriver and take out the triangular decorative plastic panel of the VAZ 2113. If the car is equipped with electric mirrors, then carefully disconnect all the wires. Unscrew the three mounting bolts and remove the standard mirror. Assembly proceeds in reverse order. At this point, the installation can be considered complete.
Rear view mirrors are an integral attribute of a modern car. They are necessary for safe road driving. It is impossible to do without them when changing lanes, reversing, or entering the road. The quality characteristics of the side mirrors of the VAZ 2114 are very important. These include the viewing sector and the quality of reflection.
Standard-fitted side mirrors do not always meet the demands of modern life on the road.
Disadvantages include insufficient viewing angle and small adjustment ranges. Alternative side mirrors have many advantages. Among which you can find heated glass, which prevents the appearance of an ice “crust”, darkening of the mirror surface, which protects the eyes from being blinded by the headlights of cars behind. In addition to its functional purpose, tuning the side mirrors of the VAZ 2114 improves the appearance of the car. Mirrors can be supplemented with turn signal indicators. And the most important thing is that the design of the side mirrors is made in such a way that without any modifications it is attached to the standard places of the VAZ 2114 car.
Sequence of actions for installing mirrors.
• Regardless of the type of mirrors chosen, preparation for installation is the same. To do this, remove the mirror control handle and the front door trim. • Take a thin flat screwdriver, pry up the inner lining of the mirror and remove it. • Use a Phillips screwdriver to unscrew the screws securing the standard mirror, then remove it. • Now, depending on the selected side mirror for the car, choose one of the options for installing it. • To install heated mirrors, cut out the marking template supplied with the side mirrors, apply and use a sharp object to mark the surface of the door. • Now you will need a round file. With its help, the diameter of the holes is increased to “template”. • Lay the heating harnesses in the doors, then through the corrugated casing into the passenger compartment and connect according to the attached instructions (usually parallel to the rear window heater). • Use three screws to secure the side mirror to the door, under which you need to place large washers, also supplied in the kit. • The top screw must go through the hole in the side mirror adjustment mechanism. • Next, the mirror control knob is installed. • Then check the functionality of the installed mirrors. Turn on the heating and observe the temperature of the mirror. If it becomes warm, then everything is working normally. You can assemble the door trim.
Note on installing side mirrors on your vehicle.
The difference between installing side mirrors with turn indicators is that the template used to modify the mount is slightly different. And the wires coming from the mirror are connected not to the heater, but to the turn signal (in parallel).
How to secure and how to glue a new one
If you have successfully dismantled the mirror yourself, then returning it back will not be difficult.
As a rule, all actions are performed in reverse order. But you should pay special attention to the selection of glue, since not everyone is suitable for this process
it is necessary to choose the right adhesive for attaching the mirror to the windshield
Glue selection
There are three types of compositions for gluing mirrors:
- chemically cured;
- light-curing;
- compositions based on epoxy resin.
A composition with resins will work well only if it is allowed to dry properly. This usually takes from 10 hours to a day. In this case, the part must be pressed tightly at all times. This approach is not very convenient, so such products are not used in everyday life.
Light-curing mixtures operate when exposed to special ultraviolet lamps. This is one of the most common methods in production. However, if you are not the happy owner of a lamp, you should not purchase such a composition. Sunlight, especially diffused light, is not able to have a sufficient effect.
For these reasons, chemically cured compounds are the most popular. A special hardener starts the polymerization process. As a rule, they consist of the glue itself and an aerosol activator, although one-component compositions are also found.
Please note that some materials cannot be used to glue the mirror
- household superglue;
- double-sided adhesive tape.
The adhesive component of both materials has such a composition that when used on glass or metal, it will not be able to harden completely. High air temperature inside the cabin or heating of the glass from sunlight will soften it and the mirror will fall off. You can use household adhesives only if the mirror fell completely unexpectedly, and now you need to urgently get to a car service center.
Max
https://homo-habilis.ru/v-garazhe/223-chem-prikleit-zerkalo-zadnego-vida-v-avtomobile
How to stick to windshield
Having selected the appropriate glue, you can begin returning the rear view mirror to its rightful place. Choose a warm day for this or install a heater in the garage: the air temperature should be between 20 and 25 ° C.
process of applying glue to the holder platform
- Clean the holder platform of any old adhesive residue.
- Lightly sand the surface of the holder to improve the adhesion effect.
- In the same way, sand the area of the windshield where it is glued.
- Degrease the holder and glass area.
- Apply a thin layer of glue to the holder.
- Spray a special activator onto the place where the part is attached.
- Place the adhesive side of the part onto the glass. Try to follow the trail left from the previous time.
- Press the mirror firmly against the glass and hold for the time indicated on the package.
- After making sure that the part is firmly in place, clean the mirror from any remaining activator and glue around the holder.
- Reinstall the windshield (if you removed it) according to the owner's manual.
Ready! If you followed all the instructions carefully, the mirror looks like it was installed at the factory or at least in a car repair shop.
How to install on bracket
If during dismantling you did not separate the bracket platform from the glass, it will be even easier to assemble it. To do this, find a fixing element: it may be a screw or a latch. After this, connect the bracket leg to the platform.
There are also special brackets that are not glued to the glass, but are installed on the ceiling or other elements of the car, for example, on sun visors.