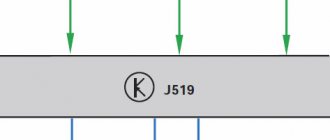
06/30/2021 4,732 Consultation with a specialist
Author: Ivan Baranov
Please tell me how to solve the problem with the rear window heating not working on a VAZ 2107? (Semyon)
Good afternoon, Semyon. This problem can be solved by completely replacing the heating if you do not know which tracks are not working. But if you want to save money, then we will give you some tips.
[Hide]
Heater device
First of all, let's carefully study the structure of the object in question. On the rear window of a car there are conductive threads that heat up due to the fact that current passes through them. They create heating. Its voltage is maintained by elements such as relays, wiring and fuse. This elementary circuit ends, of course, with a power button.
The diagram below describes in detail the structure of the heater of the VAZ 2107 car:
- mounting block or so-called “block”;
- on/off relay;
- egnition lock;
- on/off button;
- warning light on the dashboard;
- heating filaments on the rear window.
Causes of problems
- If the power button does not light up and the glass does not fog up, then most likely the control for turning on the heating relay has failed. In this case, you should check whether there is voltage on it.
- If the glass also does not defrost and the button does not light up, then, presumably, the control for turning on the heating relay is not working. The diagram will help you diagnose control voltage and ground, indicated on the relay as 85 and 86 and wires numbered 1, 2, 4, 9, fuse F7, power button.
- If the rear window heating does not work and the control light on the dashboard is on, then it is worth checking the power to the wires numbered 5, 19, 30, fuse F4 and whether the heating element is in working condition.
- If, when this function is turned on, the glass clears unevenly, it means that some of the threads carrying current have been damaged. In this case, the circuit is no longer needed. Below we will tell you how to solve this problem.
The rear window heating does not work: reasons and solutions. Rear window heating repair
Heated rear window is a useful and very convenient option that allows you to avoid fogging and freezing of the rear window and at the same time provides excellent visibility at any time of the year.
Heated rear window saves not only in winter, but also in autumn, when humidity rises and all the windows in the cabin begin to fog up. In just a few minutes, heating the rear window melts ice and light snow, and also dries the condensation that accumulates on the glass in wet weather.
All this is good, but what to do when nothing happens when you press the button, in other words, what to do if the rear window heating does not work? This is exactly what we will try to figure out today. You will learn how the heating works, why it fails, and also how to find a fault and repair the heated rear window of a VAZ.
How does the heated rear window work?
The operating principle of heating is as follows. Voltage is applied to a conductive thread, called a heating element, causing the thread to heat up, thereby melting the snow and drying the moisture. The heating system consists of a network of conductive threads, several fuses and a button. When the driver turns on the heated rear window, a warning lamp on the panel lights up, and power is supplied to one of the relay contacts. The second contact is connected to the car body, which represents the “minus”. In this way, current circulates through the heating system.
Rear window heating diagram for VAZ cars
Causes of rear window heating malfunction
- Circuit breakers. If the heating does not work completely, then most likely the fuse has blown and should be replaced.
- Break. It also often happens that conductive threads burn out or break, as a result of which the current does not flow beyond the break point. Thread breakage can occur due to chafing or breakage, for example, during careless repairs.
- Faulty button or relay. If the rear window heating button or relay malfunctions, no current will flow.
- Contacts. Oxidation, disruption or deterioration of contacts leads to unstable current supply and, as a result, poor heating of the filaments.
Finding a broken rear window heating
The search consists of finding the location of the circuit break. We check the relays and fuses (F8 (20A) and F8 (20A) mounting block), as well as the button, if everything is in order, then you should look for broken filaments. To do this, we first perform a visual inspection. We turn on the heating and observe where the threads heat up and where they don’t.
If a visual search does not produce any results, you can use a voltmeter or multimeter. To search for a break with a voltmeter, turn on the ignition and heating, then connect one probe of the device to the ground of the car, and wrap the second in foil and move it to the middle of the conductive thread. In this case, the device should show a result in the range of 5 V. At the point where the device shows 0 V or, conversely, rises above 10 V, we can make the assumption that there is a break in this exact place.
detailed instructions
Strand breaks most often occur when the driver is too diligent in scraping snow and ice from the rear window. But it is very easy to fix this problem: you need to purchase a special kit for repairing contacts of the VAZ 2107 rear window heater at a spare parts store. Its cost is approximately 400 rubles.
Before work, be sure to degrease the glass with alcohol, apply conductive paste exactly according to the supplied stencil and leave to dry. Most often, you can turn on the heated rear window within a day after the repair. Despite the fact that the algorithm of actions is always approximately the same, read the instructions carefully and strictly follow the sequence of work steps.
How to fix the heating of a VAZ2107 with your own hands
To eliminate the causes of malfunctions, you will need the following devices:
- multimeter or voltmeter;
- foil.
Identifying the cause throughout the entire circuit
The most common failure of a defroster is a blown fuse. Until some kind of breakdown occurs, for example, failure due to a blown cigarette lighter fuse, the location of the unit and the fuses themselves are not known.
- Step No. 1 - in VAZ 2107 cars, the fuse that is responsible for heating the rear window is located in the fuse block under the designation F5.
- Step No. 2 - if the fuse is working, then the next step is to check the heater terminals on the glass and for ground.
- Step No. 3 - check the control unit connector (relay and toggle switch (on/off button)).
- Step No. 4 - checking the heating filaments with a tester.
- If the above steps do not reveal the cause, then Step #5 is to check the ignition switch contacts or fuse block board.
Step-by-step guide to diagnosing defroster filaments:
- To ensure that the heating filaments are not damaged by the sharp tips of the probes, it is necessary to wrap pieces of foil around the probes of the measuring device (voltmeter or multimeter in position “B”).
- Turn the ignition key and turn on the heating switch.
- One probe of the measuring device must be connected to the positive wire, the second - to the middle of the wire (see figure).
- The value in volts should be 6. If it shows 6 V, then the heater filaments are working.
- If the value on the device displays 12 V, then the thread is broken between these two points.
- If 10 V is visible on the screen, then the thread is broken from the midpoint to the negative point.
- Next, you need to move the probes to the right, from the middle point to the right vertical stripe (minus), from the “plus” to the middle. If in this section the meter shows from 0 to 5 V, then this section of the circuit has a break.
Diagnostics of heater filaments with a voltmeter
Before repairing threads, you need to buy a repair kit in advance, and then do the repairs in this order:
- Clean the torn section of thread with alcohol.
- Along the length of the thread, above and below it, we evenly glue electrical tape (you can use adhesive tape, but electrical tape is more convenient). The width between the two strips of electrical tape is equal to the width of the heater filament.
- We apply a special solution with a brush (called a kit for repairing rear window defroster filaments) along the entire length between the electrical tapes. It would be more effective to trim the brush, remove the side sticking hairs, so as not to smudge the electrical tape and avoid overspending.
- We wait until the solution dries naturally, that is, we do not turn on the heater. Natural drying time is about 1 day.
Which car lamps are the most popular? Lamps H8 and H11 have some differences, but are interchangeable.
Recommendation for choosing a special regenerating agent for the glass heater:
- the color of the solution should be red-cinnamon (in practice, gray color did not work);
- the cost of a good working special tool is about 350-400 rubles (bought for 150 rubles, I could not restore the thread).
Windshield improvement
As you know, in VAZ 2107 cars the manufacturer did not provide such a function as a heated windshield. There is only its airflow, which allows you to remove the effect of “foggy glass”. If you want to improve your car, then you can become the owner of a heated windshield. This athermal glass can be installed independently without any problems, since all the necessary components are included with it.
This type of glass is ideal for the VAZ 2107, so a snowy, frosty morning will no longer be able to ruin your mood. Of course, heated glass is quite expensive compared to its simple counterpart. But you definitely won’t regret this windshield improvement.
Source
Modifications of the VAZ-2107 car
VAZ-2107 . Basic version of the sedan, with an 8-valve carburetor VAZ-2103 engine, 1.5 liters.
VAZ-2107-20 . The same VAZ-2107, but with a 1.5-liter VAZ-2104 injection engine that meets the Euro-2 environmental standard.
VAZ-2107-71 . The car for the Chinese market was equipped with a VAZ-21034 engine, with a volume of 1.4 liters and a power of 66 horsepower, specially tuned for A-76 gasoline. The pistons were taken from a VAZ-2108.
VAZ-21070 . Modification of a car with an 8-valve, carburetor VAZ-2103 engine, volume 1.5 liters.
↑ Connection diagram for heated rear window of VAZ 2107
The description of the rear window heating circuit is as follows. On its surface, on the right and left, two busbars run vertically; wires are connected to them, through which a voltage of 12 V is supplied. The busbars are connected to each other by conductive horizontal strips 2-3 mm wide, which are the main working tool.
By passing an electric current, they create a positive temperature on the surface of the glass, freeing it from freezing or fogging. Like any electrical appliance, it is controlled by a fuse designed for the intended voltage and current.
↑ How to check the heated rear window
If it is discovered that the device has failed, the question arises of how to check the heated rear window. It's not difficult, proceed in the following sequence:
- Check the fuse. If it burns out, it is replaced.
- Measure the voltage on the wires supplying power to the device. It should be at least 11 V. If the voltmeter shows a lower value, it means that the contacts on the connectors have oxidized. The terminals should be cleaned with fine-grained sandpaper and a rust remover. It is worth checking the reliability of the power supply connection. A loose contact can also cause a breakdown.
- The most common cause of heater malfunction is rupture of the conductive threads. It breaks easily under the influence of a light touch. Visual inspection of the threads will reveal the location of separation. Torn edges are black. To restore the functionality of the device, it is necessary to repair the gap.
- If all of the above actions are performed, but no breakdown is detected, the switch button may be faulty or the wires may be broken. First you should examine the button, then diagnose the wiring.
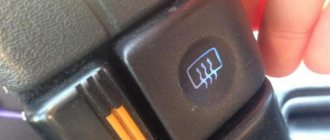
Heated rear window switch: frost is not an obstacle to visibility
Many passenger cars are equipped with a heated rear window, which is controlled using a special switch on the dashboard. Read the article about rear window heating switches, their types, design and operation, as well as the correct selection and replacement of these devices.
What is the heated rear window switch?
The rear window heating switch is a switching device for manually turning on and off the electric rear window heating system of cars, trucks and other automotive equipment.
This switch is an element of the power circuit of the wire heater located on the rear window of the car; it is used to switch this circuit with the on-board electrical network (its connection to the battery or generator). Usually the switch is located on the dashboard and is indicated by a corresponding pictogram (most often it is a rectangle with vertical wavy arrows). When the glass ices up, voltage is applied to the heater using a switch, and due to the release of heat, the glass is defrosted - this ensures the necessary visibility during the cold season.
The rear window defroster is an auxiliary system of the vehicle, but it improves driving safety and comfort. Therefore, the faulty switch must be replaced, and in order to make the right choice, you must first understand the design and features of this device.
Switch button VAZ-2108,2109,M-2141 rear window heating AVAR
Switch button VAZ-2115,2123 rear window heating AVAR
Switch key VAZ-2101-2107 rear window heating AUTO FITTINGS
Switch button VAZ-1118 rear window heating AVAR
Switch button DACIA Logan (LS) (04-) rear window heating ASAM
Switch key VAZ-2107 rear window heating AUTO FITTINGS
Switch button VAZ-2115 rear window heating AUTO FITTINGS
Switch button VAZ-2170 rear window heating AVAR
Switch UAZ-3163 Patriot for rear glass heating AVAR
Switch key VAZ-2105,2121 rear window heating AUTO FITTINGS
Types, design and characteristics of rear window heating switches
All rear window heating switches are divided into two types according to design and operating principle:
- Key switches;
- Push-button switches.
Key switches are toggle switches in which the movable contact plate is moved using a key of one shape or another. To close the circuit, press one part of the key, and to open it, press the opposite part. Typically, two-position switches with an “On” position are used to control the defroster. and “Off,” but there are also three-position switches with a middle position and the ability to turn on various heater modes.
Push-button switches are switching devices with a button that is locked in a pressed (recessed) position. To close the circuit, press the button - it will sink into the body and lock in this position, providing current to the heater. To turn off the heating, press the button again - it will release and break the circuit. The buttons are only two-position - with the “On” positions. and "Off."
Keys and switch buttons can have a standard neutral design or be made for specific car models. Most often they are black, so they can be installed on various vehicles without disturbing the overall design of the dashboard. Therefore, today a standardized range of switches is used on both domestic and many foreign cars.
The basis of both types of switches is a contact group, which consists of fixed contacts and movable contact plates. The switches have contact groups that contain both normally closed and normally open contacts - this allows you to switch circuits in a particular position of the key/button, as well as control several circuits at once. The contact groups are located in a plastic case, on the outer surface of which fasteners are provided for installation in the dashboard (these can be latches or eyes for screws) and terminals. On switches, blade terminals are most often used, compatible with standard electrical connectors, but other options are also possible - pin, screw and other types of terminals.
Also, switches of both types are divided into two groups:
- Without position indication;
- With position indicator light.
Devices of the second type have a built-in miniature incandescent lamp or LED, which lights up when the switched circuit is closed. The light indicator can be located directly on the pressure part of the key or button, or installed in the switch housing behind the plastic light guide built into the key or button. Switches with position indicator lights usually have additional terminals to supply power to a lamp or LED.
The switches can be designed for 12 and 24 V and various currents, which makes them suitable for cars and trucks. The switch is mounted on the dashboard and, together with the corresponding relay, is part of the power supply for the heated rear window.
Correct selection and replacement of the rear window heating switch
Rear window heating switches wear out over time and various malfunctions may occur in them, which requires their replacement (making repairs today does not make much sense - it is cheaper and easier to buy a new switch assembly). For replacement, you should choose a device of the same type and model that was previously installed on the vehicle. It is easiest to choose a switch for a domestic car - both old VAZs and current Lada models, as well as GAZs and many trucks, have standard switches that have been produced by our industry for decades. Therefore, finding the right product is not difficult. However, when choosing, you should pay attention to the presence or absence of a light indication in the switch and its operating voltage.
For foreign-made cars, you should choose your own “native” switches, although standard models are often found here too. But if the car is new and still under warranty, then you can only make a choice in favor of a switch of a certain model and catalog number. Also, for new machines you cannot replace parts yourself.
Heater device
First of all, let's carefully study the structure of the object in question. On the rear window of a car there are conductive threads that heat up due to the fact that current passes through them. They create heating. Its voltage is maintained by elements such as relays, wiring and fuse. This elementary circuit ends, of course, with a power button.
The diagram below describes in detail the structure of the heater of the VAZ 2107 car:
- mounting block or so-called “block”;
- on/off relay;
- egnition lock;
- on/off button;
- warning light on the dashboard;
- heating filaments on the rear window.
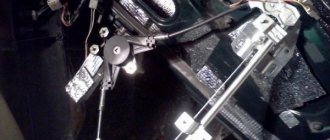
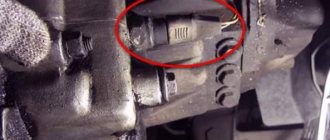
Fuse and relay block VAZ 2107
“Seven” is still popular, they are bought, then sold, then bought again. This is the most advanced model of the classic Lada.
The heating circuits for each car brand are different, but for models of the same family they are approximately the same. The VAZ 2107 heater circuit is simple. You should look for the reason for the intermittent or completely non-functioning glass heater in the electrical circuit diagram. Heated glass does an excellent job of preventing fogging, but it happens that the heater is working, the heating is working, but the glass in the car still sweats.
As the temperature drops, it becomes necessary to frequently use devices for heating the interior and heating the rear window on a VAZ 2107. Although the rear window is not the main one, reduced visibility through the rear view mirror can cause an emergency.
Structurally, the rear window heater is presented in the form of conductive strips through which current flows. This current causes these strips to heat up, resulting in heating of the entire glass, which means defrosting the ice and eliminating fogging.
The heating circuit includes not only conductive strips, but also relays, wiring and a fuse. To turn on the device, a button is installed in the interior of the VAZ 2107 car. To understand how the design of this device works, below is a diagram that shows in detail all the components.
In the diagram, each element has its own purpose:
- A mounting block or relay and fuse block is a device that houses a relay with two fuses inside.
- Relay - helps to reduce the current in the circuit, thereby eliminating overheating of the wiring and failure of the power button.
- Ignition switch - a positive contact comes from the lock, which eliminates the possibility of turning on the rear window heater when the engine is not running.
- The button is dual-mode - turns the device on and off.
- The warning light is an indicator indicating the operation of the system and is located on the dashboard.
- Heater - has the form of conductive strips or threads that are glued to the glass on the inside.
Knowing the circuit diagram of the device, it will not be difficult to eliminate various malfunctions. We will consider below what types of malfunctions most often occur in the rear window heating system of the VAZ 2107.
Owners of sevens know all the “sores” of this domestic vehicle, so when a malfunction occurs with the rear window heater, you don’t have to look for a breakdown for long. However, beginners and those who have not yet encountered such a malfunction are wondering how to check the system to find the cause and the faulty part.
Logbook VAZ 21074 (2006)
Do-it-yourself: Repairing the heated rear window. Part 1
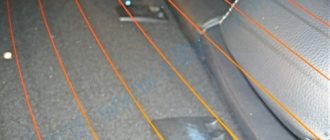
Back in the fall I noticed that one strip of the rear window heating filament was not heating.
And right in the middle, which rather interfered with the view from behind. The break was detected with the naked eye by a brightened area and a dark point on the glass and was measured with a multimeter.
Without thinking twice, I ordered a special metallized glue from China for such cases, I had to wait more than a month, but I saved money).
Five minutes and a day of waiting and everything is ready:
True, due to the difference in the resistance of the material, the repair site heats up a little more; it was still necessary to smear it with a thicker layer or.
P.S. It was decided to apply a second layer of glue to equalize the degree of heating.
- More about this car:
- Logbook
- Breakdowns
- Electrical, muffler burnout, antifreeze filter, etc.
- OSAGO and Transport Tax 2021. New changes
- Replacing a rotten floor of a VAZ-2107 spare wheel
- Replacing the fender liner, hole in the sill and cylinder oxide
- Do-it-yourself replacement of VAZ-2107 stabilizer cushions
- Leak from under the VAZ-2107 tensioner - fixing it
- I fell into a hole on the highway, I thought I slipped through, but after... 218,000 km
- The beginning of the story: ... 218,000 km
How can this thing even break? I wouldn’t be surprised at Nexia - there was all sorts of exotic stuff there. but on 7k.
Previously, Lada cars constantly fell off.
I was transporting a threshold on a Focus, pushed it a little when I closed the trunk lid (Hatch) with a threshold on the glass and one thread stopped working.
The author’s presentation is interesting. It’s a pity it’s short))
what don’t you understand?)
Now we have 3 sections on our website.
Hands are not for boredom - Land Rover
We study the German diesel car industry - Passat and Golf
And we study the structure of the car on the seven.
My dad didn’t change anything in it, it’s inexpensive, but a lot. Reliability is low. Over the course of 5 thousand miles per year, I lost several weekends over small things. Back then the Internet was slow, you had to contact your friends, but he was proud, according to the book))
Judging by the site, buying a new car ex-showroom has become a rare occurrence, so such sections will only grow in number. During 2006-2014, the car fleet in the Russian Federation has grown significantly and has even reached a considerable age, so their maintenance is a very necessary and lively topic. Well, an unspoken rating has already appeared, what can be bought, and what is categorically no, no and no.
When I owned Zhiguli cars of various stripes, I also had similar problems, and I also repaired the heating filaments several times using similar adhesives. And in the same way, “thanks to” the increased resistance during the movement of current in the repaired area, the power of the thread was noticeably reduced compared to those located nearby. But that's not so bad. What was much worse was that the contact at the repair site would eventually fail again after several months of operation. Let's hope the author has better luck. Well, as a preventive measure, owners of such cars should refuse to wipe the inside of the rear windows with rags, or do it more carefully. being careful not to touch the delicate heating threads. and do not carry all sorts of things (balls, bags, etc.) on the back shelf. which can damage these threads.
Causes of problems
- If the power button does not light up and the glass does not fog up, then most likely the control for turning on the heating relay has failed. In this case, you should check whether there is voltage on it.
- If the glass also does not defrost and the button does not light up, then, presumably, the control for turning on the heating relay is not working. The diagram will help you diagnose control voltage and ground, indicated on the relay as 85 and 86 and wires numbered 1, 2, 4, 9, fuse F7, power button.
- If the rear window heating does not work and the control light on the dashboard is on, then it is worth checking the power to the wires numbered 5, 19, 30, fuse F4 and whether the heating element is in working condition.
- If, when this function is turned on, the glass clears unevenly, it means that some of the threads carrying current have been damaged. In this case, the circuit is no longer needed. Below we will tell you how to solve this problem.
Lighting
Light bulbs, Headlight lamp, Halogen lamps, Xenon lamps, LED lamps, PTF lamp, Rear PTF lamp, Tail lamp lamp, Brake lamp, License plate lamp, Brake lamp, Reversing lamp, Parking lamp, Turn signal lamp, Instrument panel lamp, Trunk lamp, Engine compartment lamp, Interior lamp, Heater backlight lamp, Headlight, Left headlight, Right headlight, Xenon headlight, Headlight washer, Headlight washer pump, Headlight washer nozzle, Headlight range control, Additional headlight, Finder headlight, Headlight ignition unit, Sensor ground clearance, Headlight mount, Headlight cover, Headlight reflector, LED headlight, Headlight glass, Fog light (PTF), Fog light, PTF mount, Fog light, PTF frame, Tail light, Reversing light, Brake light, Running lights, Side lights , Reflector (reflector), Side marker, Parking lights, Turn signal, Side turn signal, Rear turn signal, Front turn signal, Repeater, Lamps, License plate light, Trunk light, Door light, Engine light, Dashboard light, Interior light, Rotating light
Electrical diagram VAZ-2107 carburetor
Electrical diagram of VAZ 2107, 21074 produced in 1988-2001 with generator 37.3701
- block headlights
- side direction indicators
- accumulator battery
- starter relay
- carburetor electro-pneumatic valve
- carburetor microswitch
- generator 37.3701
- gearmotors for headlight cleaners *
- Fan motor switch sensor
- engine cooling fan motor
- sound signals
- distributor
- spark plug
- starter
- coolant temperature gauge sensor
- engine compartment lamp
- low oil pressure warning sensor
- low brake fluid level indicator sensor
- windshield wiper motor
- carburetor electro-pneumatic valve control unit
- ignition coil
- headlight washer pump motor *
- windshield washer pump motor
- mounting block
- windshield wiper relay
- hazard warning and direction indicator relay
- brake light switch
- reverse light switch
- ignition relay
- ignition switch
- three lever switch
- hazard switch
- socket for portable lamp**
- heater fan switch
- additional resistor for the electric motor of the heater (stove)
- rear window heating indicator lamp
- low brake fluid level warning lamp
- signaling unit
- heater fan electric motor
- glove compartment lamp
- light switches on the front door pillars
- switches for warning lights of open front doors ***
- front door open warning lights ***
- connection block
- cigarette lighter
- watch
- instrument light switch
- diode for checking the serviceability of the low brake fluid level indicator lamp
- fuel level indicator
- fuel reserve indicator lamp
- speedometer
- turn signal indicator lamp
- carburetor choke indicator lamp
- battery charge indicator lamp
- carburetor choke warning switch
- instrument cluster
- econometrician
- light switches on the rear door pillars
- coolant temperature gauge
- tachometer
- parking brake indicator lamp ("handbrake")
- low oil pressure warning lamp
- high beam indicator lamp
- indicator lamp for turning on external lighting
- voltmeter
- parking brake indicator switch ("handbrake")
- outdoor light switch
- rear window heating switch with backlight
- rear fog light switch with on/off indicator *
- fog light circuit fuse
- lampshade ****
- tail lights
- level indicator and fuel reserve sensor
- connectors for connecting to the rear window heating element *
- license plate lights 2107
detailed instructions
Strand breaks most often occur when the driver is too diligent in scraping snow and ice from the rear window. But it is very easy to fix this problem: you need to purchase a special kit for repairing contacts of the VAZ 2107 rear window heater at a spare parts store. Its cost is approximately 400 rubles.
Before work, be sure to degrease the glass with alcohol, apply conductive paste exactly according to the supplied stencil and leave to dry. Most often, you can turn on the heated rear window within a day after the repair. Despite the fact that the algorithm of actions is always approximately the same, read the instructions carefully and strictly follow the sequence of work steps.
Windshield improvement
As you know, in VAZ 2107 cars the manufacturer did not provide such a function as a heated windshield. There is only its airflow, which allows you to remove the effect of “foggy glass”. If you want to improve your car, then you can become the owner of a heated windshield. This athermal glass can be installed independently without any problems, since all the necessary components are included with it.
This type of glass is ideal for the VAZ 2107, so a snowy, frosty morning will no longer be able to ruin your mood. Of course, heated glass is quite expensive compared to its simple counterpart. But you definitely won’t regret this windshield improvement.
Source