Bleeding Niva brakes: why is it necessary?
Air, compared to liquid, is more easily compressed, as a result of which the presence in the line rapidly reduces braking performance.
In Chevrolet, the brake mechanism is equipped on a 2-circuit principle. The latter ensures reliability during depressurization. Thus, one circuit includes the working cylinders of the tires (right rear, left front), while the second circuit includes the left rear, right front. The pumping sequence involves bleeding air bubbles using a special fitting. Signs of air penetration are as follows:
- increased pedal travel, softness appears when pressing the brake pedal;
- a smooth decrease in pedal travel and a simultaneous increase in rigidity when pressing the pedal (before pumping, depressurization must be identified and eliminated).
Activities must be carried out with a partner on an equipped area - an overpass or inspection hole. The tire casing bleeder fittings should be thoroughly cleaned of dirt. First, you have to get rid of the air in one brake circuit, starting with the rear right tire housing and ending with the left tire block at the front. Meanwhile, air should be removed when the rear wheels are loaded.
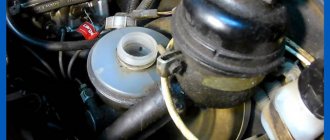
When bleeding the brakes in a Chevrolet Niva with a rear mounted section, it is worth loading the pressure lever of the brake located at the rear. Now you need to insert a screwdriver into the middle of the piston lever and the pressure regulator piston.
For work, prepare tools and consumables in advance:
- union (split) nut head for 10;
- union (split) nut head for 8;
- container for TJ (1-2 liter);
- rubber bulb;
- brake fluid;
- brake fitting;
- aerosol VD-40;
- rags;
- hose.
Bleeding the brakes of a Niva Chevrolet: step-by-step instructions
- Remove the dust cap from the fitting (to make it more convenient, it will fit to remove the rear tire).
- Wet the fitting with WD-40, then put a wrench on it and tighten the tightening bolt.
- Pull the rubber tube onto the fitting. Then lower its end into the prepared container, partially filled with TJ.
- Meanwhile, your partner needs to press the brake 3-4 times every 1-2 seconds, thus holding the pedal in the pressed position.
- Next, you need to take the head 8 and unscrew the fitting half or ¾ of a turn. At the same time, air bubbles, as well as some of the brake fluid, will escape into the container; the brake pedal will go to the floor.
- The next step is to tighten the fitting, after which the assistant can release the brake.
- Repeat the operation performed to bleed the Chevrolet. Perform the action until air bubbles stop coming out of the tube, but only TJ.
In the same way, you need to get rid of air using the upper fitting on the front tire on the left. To remove bubbles that form in another circuit, pump the tire in the following order: left - rear - front right tire.
Bleeding the brakes is especially necessary if any of the following symptoms occur:
- decreased braking performance;
- feeling of a cotton pedal;
- Each time you press the pedal, more force is required.
Important! Repair work must be carried out only after the liquid leak has been eliminated, of course, if there has been no repair before. After fixing the brake system, bleeding will only be necessary when there is depressurization. For example, if the brake pads are replaced, air will no longer appear in the system.
What you need to know about bleeding the brake system
- Remember that hydraulic fluid is poisonous. If it gets on exposed skin, wash off immediately with plenty of water. If liquid suddenly gets into your eyes or is accidentally swallowed, call an ambulance immediately.
- Some types of liquid are flammable and can ignite if they come into contact with a hot substance or open flame. During work, it is better to play it safe, considering that any liquid is flammable, in order to react in time and take all precautions.
- Hydraulic fluid is considered aggressive towards plastic elements and paints. If liquid gets on the painted surface of the body or on plastic parts, it should be washed off immediately with plenty of water.
- Liquid has the ability to absorb moisture from the air, therefore it is hygroscopic. Excess moisture content reduces the boiling point to unacceptable parameters. This leads to an unsafe reduction in braking performance.
- Old liquid cannot be reused, because it may contain a lot of dirt and foreign particles. If you need to add or replace fluid, use only the recommended one.
Bleeding the system - (methods of execution: two people)
We prepare a clean glass vessel, a plastic or rubber tube corresponding to the volume of the outlet nipple, and a key for the nipple.
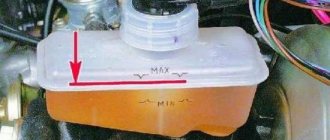
Remove the protective cap from the first nipple according to the order of work. We put the tube and key on the nipple, place the other end of the tube in a glass jug and fill it with brake fluid so that it closes the end of the tube. We check that the level in the reservoir with hydromechanical fluid is kept slightly above the MIN degree estimate in the operation of the entire process.
How to properly bleed the brakes on a Chevrolet Niva
Bleeding the hydraulic brake system, replacing Niva Chevrolet fluid
We pump the brakes to remove air from the hydraulic drive after it has depressurized when replacing the master cylinder, wheel brake wheel cylinders, hoses, tubes, as well as in case of replacing the working fluid or when the brake pedal becomes “soft”.
When the engine is not running, we remove air from the system, first from one circuit and then from the other in the following sequence:
— brake mechanism of the right rear wheel;
— brake mechanism of the left front wheel;
— brake mechanism of the left rear wheel;
— brake mechanism of the right front wheel.
If air gets into one of the circuits, it is enough to bleed only this circuit, and not the entire hydraulic drive. Before pumping, check the level of working fluid in the brake system hydraulic reservoir and, if necessary, add fluid (see “Checking the fluid level in the brake hydraulic reservoir,” page 33). We bleed the brakes with an assistant. If the rear wheels are hanging out.
..insert a screwdriver between the pressure regulator piston in the hydraulic drive of the rear wheel brake mechanisms and the piston lever, fixing the regulator piston in the recessed position.
We clean the bleeder fitting of the brake mechanism of the right rear wheel from dirt.
and remove the protective cap from it.
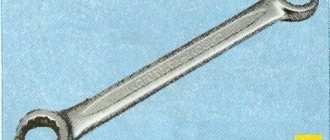
Using an 8-mm spanner, loosen the tightening of the bleeder fitting. We put a hose on the fitting, and immerse its free end in a container partially filled with working fluid.
An assistant must vigorously press the brake pedal all the way 4-5 times and keep it pressed.
Using the “8” wrench, unscrew the bleeder fitting 1/2-3/4 of a turn.
In this case, liquid with air bubbles will flow out of the hose, and the brake pedal should be pressed all the way.
As soon as the liquid stops flowing out of the hose, tighten the fitting and only after that can the assistant release the pedal. We repeat pumping until air bubbles no longer appear in the liquid coming out of the hose. We remove the hose, wipe the bleeder fitting dry and put a protective cap on it. We bleed the brake mechanism of the left front wheel.
. remove the protective cap from the lower bleeder fitting of the working cylinder block of the left front wheel.
We put a hose on the fitting and lower its free end into the vessel,
partially filled with brake fluid.
We remove air through the lower fitting of the working cylinder block.
In the same way, we remove air through the upper fitting of the working cylinder block of the left front wheel (shown in the photo with an arrow). Similarly, we bleed the brake mechanisms of the other circuit.
When pumping, you need to monitor the fluid level in the tank and add fluid if necessary.
Why does the brake pedal fail after bleeding?
Often, after servicing the system, for example, replacing brake fluid, pads, discs, drums, the brake pedal fails. What is the reason for such changes?
Failures may occur for some time after replacing pads, discs or fluid and bleeding the system. Be prepared that the pedal will begin to fall, and do not immediately try to operate the car in the previous mode. Give the new brake discs and pads time to get used to it - until this happens, the car will jerk when you press the pedal, which may even vibrate, which will be transmitted to the steering wheel. The general grinding-in of new pads and discs requires 250–400 km. If the symptoms persist after this, it is recommended to check the quality of the installation, as well as the elements themselves.
Often the reason why the brake pedal fails is a damaged or misaligned brake caliper. Its vertical axis shifts relative to the axis of the brake disc, so the system is unable to function normally. Or a working caliper may be poorly secured, which is why the brake pads will definitely not be able to properly rub into the disc.
Due to problems with the caliper, the new pad cannot press against the disc with the entire area of the anti-friction lining, so the latter wear out quickly, and the performance of the brakes cannot satisfy the car owner. In this case, when pressed, the pedal slowly goes lower and lower. That is why, when replacing pads, it is important to monitor the condition of the caliper, its axial relationship to the disc. This is a mandatory rule when changing only the pads, pads and discs, or these elements and the caliper at the same time.
Preparing to bleed the clutch
The fluid from the hydraulic system is not “poured out”, but is pushed out thanks to the cylinder piston pusher.
Preparation is carried out in stages:
- checking the volume of liquid in the expansion tank - the level should be within normal limits. If it reaches the desired level, you need to top it up;
- cleaning the valve cap on the cylinder from accumulated contaminants;
- removing the cap from the air inlet valve on the working cylinder;
- connecting the drain hose to the valve fitting.
The second end of the hose is lowered into a container into which fresh working fluid is poured. The end of the tube should be immersed 5-10 cm into it.
Do not remove the hose from the tank until work is completed.
After the preparatory work, the clutch is adjusted. This allows you to make sure that the movement is free and, in addition to airing the system, there are no other malfunctions.
Chevrolet Niva
Attention! If brake fluid gets on your car's paintwork, plastic parts, or wiring, it can cause damage. Remove it immediately with a clean cloth.
Next, you have to bleed the brake system hydraulic drive until new fluid (lighter than the old one) begins to come out of the bleeder fittings of all working cylinders.
We carry out pumping to replace the fluid with the engine not running, first on one circuit, and then on the other in the following sequence:
- right rear wheel brake;
- left front wheel brake mechanism;
- left rear wheel brake;
- brake mechanism of the right front wheel.
Before pumping, check the level of working fluid in the hydraulic brake reservoir. If necessary, add liquid. We bleed the brakes with an assistant.
We clean the bleeder fitting of the brake mechanism of the right rear wheel from dirt.
Once again about the reasons
Air in the brake system may appear for the following reasons:
- the amount of brake fluid in the reservoir of the main brake cylinder has significantly decreased, which has led to the “entrapment” of air; as a rule, this reason is closely related to subsequent reasons;
- wear of the sealing cuffs, both in the main brake and working cylinders;
- loss of tightness in the connections of brake pipes and hoses; as a rule, rubber brake pipes must be replaced every 4 years;
- loss of tightness in the rubber brake pipes themselves due to their natural wear;
- loss of tightness in metal brake pipes due to their corrosion.
This is usually manifested by the presence of smudges in the locations of the structural elements of the vehicle’s braking system. In this case, the trip should be postponed and all measures should be taken to eliminate the brake fluid leak and air the brake system.
Another reason why air appears in the brake system and, accordingly, its low efficiency is the failure to replace the brake fluid in a timely manner.
The fact is that any brake fluid is hygroscopic and accumulates a large amount of moisture over time. For example, in NEVA brake fluid, this can be seen by its dark color.
The brake fluid should be changed approximately once every two years. If this is not done, the following may happen.
During prolonged braking, especially on a mountain road, when drivers forget about engine braking, all brake elements become very hot, and accordingly, the brake fluid will also heat up.
The new brake fluid can successfully withstand all these loads, but the old fluid, with the presence of moisture, can let you down.
The boiling point of such brake fluid is much lower than the standard (about 200 degrees Celsius), and accordingly the likelihood that it will boil becomes very high. During boiling, air bubbles form in the system, and air appears again in the brake system.
Therefore, try not to forget about this method of braking, such as engine braking.
As we see, air in the brake system is the first enemy of the brakes, so it is necessary to constantly monitor the condition of the brakes, both in the garage and while the car is moving.
The presence of brakes is the first criterion for your safety and the safety of your family and friends, do not forget about it.
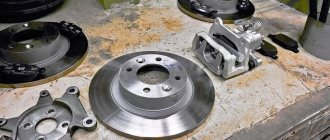
Interesting note - Disc and drum brakes from "Main Road".
Therefore, there should always be no air in the car’s brake system.
Bleeding the hydraulic brake system of Chevrolet Niva
Tools:
- Split spanner 10 mm
- Split spanner 8 mm
- Rubber bulb
- Capacity for brake fluid 1-2 l.
Parts and consumables:
- Brake fluid
- Rags
- Aerosol lubricant type WD-40
- Brake fitting
- Bleeding hose
Notes:
Bleeding the brakes is necessary when replacing brake fluid, as well as to remove air that has entered the hydraulic drive during the repair or replacement of individual components of the brake system. Air trapped in the hydraulic drive causes an increase in the free play of the brake pedal (the pedal becomes “soft”) and significantly reduces the effectiveness of the brakes.
Signs of air getting into the hydraulic drive are:
– when you press the pedal once – the pedal travel increases, its “softness”;
– with repeated pressing of the pedal – a gradual decrease in the pedal stroke with a simultaneous increase in its “hardness”. Before bleeding the hydraulic drive, it is necessary to identify and eliminate the cause of depressurization.
We carry out the work with an assistant on an inspection ditch or overpass. Thoroughly clean the wheel cylinder bleeder fittings from dirt. We remove air first from one brake circuit, starting from the wheel cylinder of the right rear wheel and ending with the cylinder block of the left front wheel. We remove air with the rear wheels loaded.
When bleeding the brakes on a car with the rear part suspended (for example, on a lift), it is necessary to load the rear brake pressure regulator, insert a screwdriver between the pressure regulator piston and the piston lever.
1. Remove the protective cap from the bleeder fitting of the wheel cylinder of the right rear wheel.
2. We put a hose on the head of the fitting, lowering its free end into a vessel partially filled with brake fluid.
3. An assistant presses the brake pedal three to four times at intervals of 1-2 seconds and holds the pedal down. Using the “8” wrench, unscrew the bleeder fitting 1/2 - 3/4 turn. In this case, air and part of the brake fluid are forced into the vessel, and the pedal is lowered to the floor (air bubbles are clearly visible in the vessel with the liquid). We tighten the fitting and only after that the assistant can release the brake pedal. We repeat the bleeding operation until the release of air bubbles from the hose stops and only brake fluid comes out. In this case, air and part of the brake fluid are forced into the vessel, and the pedal is lowered to the floor (air bubbles are clearly visible in the vessel with the liquid). We tighten the fitting and only after that the assistant can release the brake pedal. We repeat the bleeding operation until the release of air bubbles from the hose stops and only brake fluid comes out.
4. Then we remove air from the cylinder block of the left front wheel.
5. Remove the protective cap from the lower bleeder fitting of the cylinder block of the left front wheel.
6. Having put a hose on the head of the fitting, we lower its free end into a container partially filled with brake fluid. We remove air through the lower fitting of the cylinder block.
7. In the same way, we remove air through the upper fitting of the cylinder block of the front left wheel.
8. To remove air from another circuit, we bleed in the sequence: left rear - right front wheel.
bleeding the brakes — Community “Chevrolet Niva” on DRIVE2
How to pump the brakes in 10 minutes
Pour out the brake fluid released during bleeding; it is not suitable for reuse. Problems along the way Updated Before connecting tubes to the hydraulic block, make sure that all ports on the block and the tubes themselves are filled with fluid.
Bleeding the brakes of a Chevrolet Niva car. Air that got into the hydraulic brake drive when replacing pipelines, hoses, sealing rings...
Then thoroughly clean the air bleeder fittings from dirt and dust and remove the protective caps from them.
A decrease in braking efficiency or the car skidding when braking should be a signal to urgently check the brakes. Remove the protective cap from the bleeder fitting of the wheel cylinder of the right rear wheel. Wipe the fitting dry and put on the protective cap.
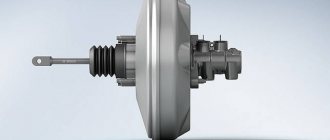
To remove air from the system, it is necessary to bleed the brakes. The procedure for bleeding the brakes is quite simple, but it is more convenient to do it with an assistant. The reason for the loss of braking efficiency may be poor performance of the vacuum booster.
To quickly check it, press the brake pedal several times with the engine off to remove the vacuum in the booster, and then, holding the pedal, start the engine.
If after starting the engine the pedal drops a little, the vacuum booster is working. If the pedal remains motionless, check the integrity and reliability of fastening of the hose to the check valve of the vacuum booster. Replace or repair the faulty hose. If braking is accompanied by beating and pulsation of the brake pedal, you should first check the condition of the front disc brakes.
With the car on a jack, remove the front wheel and check the mobility of the brake pads. Repeat this procedure paragraphs 4 and 5 until the leaking brake fluid is free of air bubbles.
If all the fluid has drained from the master cylinder while bleeding the first brake, fill the master cylinder and bleed the brake again, taking approximately five seconds between cycles. Tighten the bleeder fitting, remove the plastic tube and install the dust cap.
Repeat the procedure on the remaining brake mechanisms in the above sequence.
Parts and consumables:
These devices are a tube with a non-return valve that prevents escaping air and liquid from being drawn back into the system. Some kits also include a clear container.
Place the tube onto the bleeder fitting and open it.
Press the brake pedal slowly and smoothly, then release it slowly. Repeat this action until the liquid coming out of the fitting is free of air bubbles. These devices are driven by compressed air contained in the spare wheel chamber. However, note that the air pressure must be reduced see Attach the supplied container filled with brake fluid to the master cylinder reservoir and to the spare tire.
Perform bleeding by opening the fittings one by one in the specified sequence and draining the liquid until it is free of air bubbles.
This method has the advantage of having a large amount of fluid in the installed reservoir to prevent air from entering the master cylinder during bleeding.
After bleeding is complete, wash off the spilled liquid, tighten the bleeder fittings to the torque specified in the Specifications and install their dust caps. Check the brake fluid level in the master cylinder reservoir and bring it up to normal, if necessary, refer to the Routine Maintenance Schedule Section.
Pour out the brake fluid released during bleeding; it is not suitable for reuse. Check the elasticity of the brake pedal. If dips are felt when it moves, there is still air in the system and further bleeding is required.
If repeated bleeding does not bring satisfactory results, the master cylinder seals may be worn out. If this is not done, air may enter the hydraulic unit, which is very difficult and in some cases impossible to bleed. When disconnecting the battery on Scenic models, refer to the Charging and Starting Systems Section. Do not use a pressure bleed kit on these models. Before bleeding the brake hydraulic system on models with ABS, it is necessary to perform preparatory procedures and take special precautions.
How to bleed the front brakes in the field. Bleeding the hydraulic brake system of Chevrolet Niva
We remove air with the rear wheels loaded. When bleeding the brakes on a car with the rear end hanging up, for example, on a lift, you need to load the rear brake pressure regulator, insert a screwdriver between the pressure regulator piston and the piston lever. Remove the protective cap from the bleeder fitting of the wheel cylinder of the right rear wheel. We put a hose on the head of the fitting, lowering its free end into a vessel partially filled with a brake hose.
An assistant presses the brake pedal three to four times at intervals of s and holds the pedal down. In this case, air and part of the brake fluid are forced into the vessel, and the pedal drops to the floor; air bubbles are clearly visible in the vessel with the liquid. Here the pumping sequence does not matter; you can start with both the left and the right mechanism. But the Chevrolet-Niva does not use such a brake design.
A conventional diagonal dual-circuit system is installed there, so the pumping sequence is identical to the process on VAZ and higher cars. Design of the brake system and causes of malfunction The VAZ brake system is a traditional hydraulic dual-circuit system.
In this case, a pair of front brake mechanisms are of the disc type, and the rear brakes are drum type. In this case, the diagram is made according to the diagonal principle, when the front and rear operate in the same circuit. How to bleed the brakes on a Chevrolet Niva from the opposite side.
This is how to bleed the brakes of a Niva Chevrolet; it is important to consider when bleeding the wheels. The appearance of air in the hydraulic circuit may occur due to the entrapment of air from the expansion barrel. Therefore, it is so important to periodically monitor the presence of possible brake fluid leaks, for example, in the area of the car’s wheel rims.
Among the reasons for airing the system can be noted: It should be borne in mind that the brake fluid must be replaced in the car at intervals of every 60 thousand. And if boiling does begin, the brakes will also not work. Sequence of work Before you start bleeding the brake system on a VAZ, you should thoroughly clean the bleeder fittings, since they will need to be unscrewed.
In the future, operations are carried out in the following sequence, first pumping the rear and front wheels of one circuit, and then repeating the operations for the remaining pair of wheels: If the squeezed out liquid bubbles, then the operation must be repeated until the liquid stream is free of air bubbles. Each wheel must be bled by monitoring the brake fluid level in the expansion tank and adding fluid if necessary. Just took the right brake cylinder and leaked.
Bleeding the hydraulic brake system of Chevrolet Niva
Naturally, the store was for auto parts, so we turned around and bought all the brake hoses at once, and took the brake pad. So we had to change the brake cylinder, and at the same time change all the hoses.
How to bleed brakes on a Chevrolet Niva were going to change the hoses, but this happened. An ordinary task - change the hoses, bleed them and you're done. Here I will not give the pumping sequence, everything is in the books on the field. Here in this post I kindly ask the library.
No, this is just general remarks and a photo shoot. I remember my first Volga - then there was not so much information on the Internet, and information about bleeding the brakes on how to bleed the brakes of a Niva Chevrolet was how to bleed the brakes of a Niva Chevrolet only in a book - this is of course the most correct thing, but if only someone had posted a similar report on the Internet , at that moment I would have had a lot of questions removed.
An article for handy beginners, maybe it will help someone not to be scared and do everything without a car service on their own. Before pumping, the brake reservoir was removed and washed with solvent.
This is the brake fluid we bought for our Niva of the Year! And we recommend it to everyone, it’s inexpensive and works great. At the time of this photo, the hoses have already been replaced, the fittings have been tightened, and the fluid has been topped up. Everything is ready for pumping. Bleeding brakes in the field, as on any car, cannot be done without an assistant.
You need a second person, you can’t do without him. If you have a familiar robot that can replace a person, that will also work, but the work with him will be more boring.
The second person was the one who sits in the car and presses the brake pedal on command. In this photo, the main brake brake looks scary, but from the brake pipes coming out of it, you can understand where each circuit is. We did how to bleed brakes on a Niva Chevrolet from books. The principle is clear. We find out where each circuit comes from, and start pumping from the longest rear line, then crosswise to the front line.
Bleeding Chevrolet Niva brakes
Also a different outline. The front right wheel, from which it all started, among other things, the caliper itself was changed, it seems that there was a crack there, I can’t say for sure, the owner knows better.
Preparing to pump the front right side. Remove the cap from the fitting and put on the drain from the rubber tube lowered into the container. Then, as usual, I pump, and my friend how to bleed the brakes of a Niva Chevrolet loosens the fitting with an 8-open-end wrench and looks for air or brake fluid to flow through the tube.
If there is clean brake fluid without air, everything is in order.
We tighten the fitting, put on the cap, and off we go. Here's an impromptu drain. It’s possible without it, but it turns out somehow awkward and dirty. This is what the brake system looks like from the back of the hub. This is done so that there is no hitch in the process due to a non-unscrewing fitting; Ask an assistant to press the brake pedal once. At the same time, with each press the failure will be less and less - the drive is pumped up like pumping the brakes of a Chevrolet Niva, while air moves to the mechanisms.
After downloading the system, the assistant should hold down the pedal - press it and hold it; We unscrew the fitting half a turn, fluid will begin to flow out of it. If a transparent tube is used, air bubbles will be clearly visible in it, and the pedal being held will begin to move down until it hits the floor. But before that, you need to check the level of the tank and bring it to the maximum level. The sequence of actions is the same: And so again; Note that this sequence of actions is identical for all cars.
The difference lies only in some design features of the system itself. Bleeding the front brakes of a VAZ Let's move on to the front mechanisms. Therefore, in order to gain access to the external piston fitting in order to bleed the brakes on a VAZ, you will have to remove the wheel. Here, too, the principle of distance between the mechanism and the main cylinder applies, so the left wheel is pumped first.
Everything is done like this: Jack up the wheel and remove how to bleed brakes on a Chevrolet Niva. You don’t need to touch the inner piston fitting, and it’s not always there; instead, there may just be a plugged hole. Further pumping is carried out according to the already familiar scheme: The algorithm of actions is identical; Features of carrying out work on models, starting from VAZ Now on the features of carrying out the operation on other cars of the VAZ family.
Starting with the model, the circuit diagram has changed, so the sequence is somewhat different. And you need to know it before bleeding the brakes on a VAZ. These cars already use a diagonal arrangement of contours.
That is, one of them combines the rear left and front right wheels, and the second - the other two. Bleeding begins, as usual, from the farthest wheel, that is, from the rear right one. An operation to remove air from its brake mechanism is carried out according to the described sequence.
But there is one caveat. The design includes a pressure regulator for the rear wheel drive mechanisms. If the rear of the car is hung out before bleeding, this regulator must be unlocked. To do this, how to bleed the brakes on a Chevrolet Niva, install a screwdriver between the regulator rod and the thrust plate. After all work it should be removed. Then it is pumped to the second rear wheel, and the front left one, since it is the one that is combined with the circuit with the already pumped rear mechanism.
How to bleed the brakes of a Niva Chevrolet To bleed each mechanism, you must definitely check the level in the reservoir. If you omit this point, then during operation the liquid will go into the system and air will enter it again. Therefore, we will consider how to bleed the brakes on models yourself, without assistants. To do this, you will need to use one additional element - an aerator, which you can buy or make, and a rubber hose with ends on both sides for connection to the nipple.
The essence of self-pumping is very simple and it is done like this: The car is immobilized. A bleeding hose is put on the fitting of the brake mechanism that is being pumped; The aerator is screwed onto the brake reservoir, and one end of the hose is connected to it.
The second one is put on the nipple of the inflated car wheel, for example, the spare wheel; Unscrew the fitting half a turn. In this case, the air pressure from the spare tire will begin to squeeze out the liquid.
All that remains is to monitor when liquid flows through the tube without air bubbles, and tighten the fitting; This way all mechanisms are pumped. The air pressure of one wheel is enough to completely bleed the system; But there is one nuance in this - the pressure supplied to the tank should not be very high, no more than 1 atm. Otherwise, there is a risk of the lid falling off or the tank being damaged.