Chemical composition and properties of fuel fluid
The brake fluid used in Chevrolet Niva cars complies with the DOT4 standard and consists of almost 98% polyglycol. The remaining percentage consists of additives that improve the characteristics of the base and perform a number of valuable functions: protecting metal parts from corrosion, and reducing the oxidation of fuel fluid under the influence of high temperatures.
All types of liquids are characterized by two parameters - kinematic viscosity and boiling point.
The first is responsible for the ability of the liquid to circulate in the lines at operating temperatures from -40 to +100 degrees.
The second is for the prevention of vapor locks that occur when the fuel oil boils and inevitably lead to brake failure.
There are two thermal characteristics of TF: the boiling point without water impurities (“dry” TF) and the boiling point with a content of up to 3.5% water (“wetted” TF).
All polyglycol-based brake fluids are very hygroscopic, i.e. prone to absorbing moisture from the environment.
The need to replace the TJ
Regardless of whether the car is parked in a garage or driven around the clock, the “brake fluid” poured into its system constantly absorbs moisture (remember the “breathing” hole in the reservoir cap!).
Over some time, the water content in polyglycol will increase above the permissible level, and accordingly, the viscosity and temperature properties of the fluid will drop catastrophically.
The DOT4 fluid used in the Chevrolet Niva, compared to DOT 3, absorbs water more moderately and has improved temperature characteristics:
| Liquid class | Temperature boiling, O WITH | Viscosity, mm 2 /With | ||
| "Sukhoi" TJ | "Moisturized" TJ (water up to 3.5%) | "Moisturized" at +100 0 WITH | "Moisturized" at -40 0 WITH | |
| DOT3 | not less than 205 | not less than 140 | no more than 1.5 | not less than 1800 |
| DOT4 | not less than 230 | not less than 150 | no more than 1.5 | not less than 1500 |
According to the FMVSS 116 standard, 150 degrees indicated in the table is the maximum temperature to which the brake fluid can heat up, without boiling and the formation of vapor locks, during emergency braking of a car from a speed of 160 km/h to a complete stop.
Please remember. No matter what colleagues say that they have never driven at a speed of 160 in their lives and will never drive, they should not forget that every day there is more and more water in the “brake housing”, and one day the pedal may “get stuck” at minus 20, or in the summer, during a long descent from the mountain, “sink” to the floor. With all the sad consequences.
Fluid replacement interval
The Chevrolet Niva manufacturer recommends completely replacing the brake fluid every three years.
These recommendations are based on the rate of hydration of fuel fluid and the loss of its basic qualities in average climatic conditions.
What exactly needs to be filled when replacing
For the first filling, the plant uses brake fluid DOT4, SAEJ 1703, FMSS 116, brands ROSDOT (Tosol-Sintez, Dzerzhinsk) and KAPROS-DOT (Sibur-Neftekhim, Dzerzhinsk).
If desired, you can use products from other brands if their labeling matches the “original”.
It is strictly not recommended to use other brands of diesel fuel, for example DOT3 or DOT5.
- DOT3, apart from its low price, has no other advantages, although it corrodes seals and cuffs much more effectively.
- DOT5 is based on silicone, and mixing it with polyglycol means that the Shnivy’s braking system is guaranteed to fail.
Self-replacement of fluid in the brake system
Preparation for replacement work:
- Purchase 1.0 liters of TJ of the required brand. The capacity of the brake system of our car is 0.5 liters, but believe me, you will have very little left.
- Prepare a tool - an “8” wrench or, preferably, a special socket wrench with a slot and a bolt for fixing, a blunt flat-head screwdriver.
- Make a container for collecting waste from a colorless plastic bottle of 0.35-0.5 liters and a rubber hose about 0.5 m long and with an internal diameter of 6.5 mm.
- Place the car on an overpass or inspection hole. Unload the rear axle and wheels by jacking up the body on both sides.
- Find a smart assistant and instruct him. An assistant is definitely needed; no one has ever been able to twist the fittings under the car and press the pedal at the same time.
- Before starting work, press the pressure regulator rod with a screwdriver (this is why the rear wheels are unloaded).
Self replacement process
- Clean off dirt and remove the protective cap from the bleeder screw screwed into the brake cylinder (actually, its correct name is “air bleeder valve”).
- Place a plastic bottle hose over the valve.
- At your command, the assistant presses the brake pedal 3-5 times and holds it. Presses sharply, releases smoothly, holds pressed patiently and waits for the command “Release!”
- Unscrew the valve (fitting) 1/3…1/2 turn (you won’t be able to do more with one step, but you don’t need more).
- Dirty brake fluid will leak out of the hose. Tighten the fitting. Give the command “Release”.
- Leave the hose and wrench on the fitting. Look under the hood and add fresh fuel oil to the reservoir.
- Return under the car and repeat the cycle of pumping and topping up until clean, clear fuel fluid begins to flow out of the hose.
Be careful. Do not allow the fluid level in the tank to drop below “Min”. If the system sucks in air, everything will have to start all over again.
Warn your assistant: As the old brake fluid comes out, the pedal under his foot will move forward (fall through).
Don't forget to put the protective caps on the bleeder fittings back in place!
Caps. Photo: Yandex.Pictures
Sequence of bleeding the working brake cylinders
We work taking into account two circuits of the system according to the principle of “crosswise” and “first - the one farthest from the main cylinder”:
- Right rear wheel.
- Left front wheel, top valve.
- Left rear wheel.
- Right front wheel, top valve.
- Right front wheel, lower valve.
- Left front, bottom valve.
All. The brake system is filled with fresh fluid. But it’s too early to rejoice. Still left
Bleeding the hydraulic clutch system
The master and slave cylinders, the connecting pipeline and the system reservoir are filled with the same brake fluid, which performs the same functions - transmitting pedal force to the diaphragm spring, turning the clutch on and off.
On a Chevrolet Niva, the hydraulic clutch drive is structurally similar to the VAZ “classic”, and, in principle, DOT3 can be poured into it, but we will not deviate from the factory requirements.
Moreover, the system holds 0.153 liters, and we bought a whole liter.
The pumping procedure is the same:
- We remove the protective cap, set up the key and the hose of the “receiving vessel”.
- An assistant presses the pedal 2-3 times and holds it in the lower position.
- We unscrew the fitting, release the dirty liquid, and wrap the fitting.
- Add liquid to the reservoir.
Already mastered actions are complicated by the fact that access to the outlet valve (fitting) of the clutch slave cylinder is quite difficult.
When working with brake fluid, remember:
- If HF gets on the paintwork, plastic parts and wiring, it can cause damage. Remove it immediately with a clean cloth.
- Brake fluid is poisonous. Store it in a closed original container, out of reach of others.
In some highly respected sources you can find descriptions of other methods of replacing brake fluid, similar to the technology used at car factories for filling a new system under pressure.
Unfortunately, among colleagues and employees of existing car services, I have not yet had the opportunity to meet people who actually performed such work alone.
So, we will experience deep satisfaction from work done in the traditional way.
This is interesting: Replacing the intake and exhaust manifold gasket of Chevrolet Niva
Purpose and operation of the pressure regulator
The pressure regulator (“sorcerer”) is designed to prevent the car from skidding during sudden braking. This is achieved due to the fact that the rear wheels begin to brake after the front ones. The time delay is provided by the regulator lever, which, when the car brakes sharply (the nose drops and the rear rises), pulls the piston in the regulator cylinder and closes the fluid supply channel to the working cylinders of the rear wheels.
In this case, the rear brakes do not work and the wheels spin until the rear of the car drops back. Thus, the “sorcerer” automatically regulates the fluid pressure in the rear cylinder path in inverse proportion to the load on the rear axle. In addition, it increases the braking efficiency of an empty vehicle when the load on the front axle is higher than on the rear.
This work must be carried out at every maintenance and after repair of the rear suspension.
Summary
You can replace the fluid yourself only on cars with a hydraulic accumulator and valves combined into one unit. List of required equipment:
- syringe with extension tube or bulb;
- transparent containers;
- transparent tube 20-30 cm long;
- open-end wrenches at “8” or “10”.
Briefly about the procedure for replacing brake fluid in a car with ABS on your own:
- replace the composition in the tank with a new one;
- bleed the left and right front brake cylinders;
- bleed the rear right cylinder with the brake pedal depressed and the pump turned on;
- bleed the rear left cylinder with the brake pedal released and the hydraulic pump turned on;
- check the system for leaks.
If there is a drain fitting on the ABS module, you should use the classical method according to the scheme specified by the factory to bleed all 4 brake cylinders, and then “drive” the ABS installation with excess pressure supplied from outside.
According to the operating rules of any car, including the Lada Priora (VAZ 2170), the brake fluid level in the reservoir is checked every time immediately before leaving. Always use only one brand of brake fluid; do not allow different modifications to be mixed, as this will lead to a loss of basic qualities. As a rule, DOT-3 or DOT-4 fluid is widely used today. Adding fluid, provided that the tightness of the system is at the proper level, is done extremely rarely, once every six months, or even a year. If it goes away quickly, then it is necessary to check and troubleshoot.
To carry out repair work, prepare a standard set of tools, new fluid and perform the following sequence of actions:
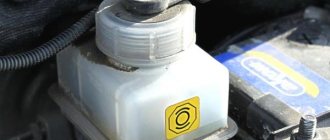
First of all, we check the level. The fluid is poured into the brake reservoir, which is located on the master cylinder. The level must correspond to the “MAX” mark. If the level is below the recommended value, top up. In addition to visual monitoring, a float sensor is built into the tank lid, which monitors the level and informs the driver through a warning lamp on the instrument panel when the level is critical.
Holding the sensor with one hand, unscrew the tank cap with the other and remove it. Next, add new brake fluid to the maximum mark, not higher, otherwise the float will displace the excess and it will overflow. Screw on the cap, having first checked the operation of the sensor, turning on the ignition and moving the float to its extreme positions, the lamp on the instrument panel should light up, otherwise replace the sensor.
At this point, the repair work to check the level and top up the brake fluid on the Lada Priora car has been completed.
Sources
- https://vaz-russia.ru/remont-vaz-2170-priora/zamena-tormoznoy-zhidkosti-na-priore.html
- https://mashinapro.ru/1233-tormozuha.html
- https://zubilovaz.ru/lada-priora-proverka-i-dolivka-tormoznoj-zhidkosti
Checking the level and adding brake fluid Chevrolet Niva
You will need: brake fluid, a clean rag.
USEFUL TIPS Brake fluid type: “Tom” or “Rosa” with a class of at least DOT-4. When the brake fluid level in the reservoir drops below the “MIN” mark, the warning lamp in the instrument cluster lights up red. We recommend checking the level before each trip and, if necessary, adding fluid to the tank without waiting for the warning light to come on: this operation is best carried out in advance. If you have to add brake fluid to the reservoir quite often, immediately contact a specialist or fix the problem yourself. When replacing brake fluid in the system, remember or write down the brand of fluid that was added so that when topping up, use the same brand. When installing the tank cap with a sensor, the liquid level in the tank increases slightly due to the volume of the sensor float.
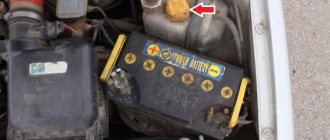
The reservoir is installed on the master cylinder of the brake system on the left side of the engine compartment near the bulkhead.
WARNING Take precautions when working with brake fluid: it is toxic.
USEFUL TIPS To avoid exposing yourself in the future to unforeseen expenses for repairing the brake system, or even the entire car as a whole, promptly replace the brake fluid with fresh one. It is very hygroscopic and absorbs moisture from the air, which, in addition to causing corrosion of brake system parts, increases the boiling point of the fluid itself, which can lead to brake failure during frequent heavy braking. Do not reuse the fluid drained from the system: it is contaminated, saturated with air and moisture. If brake fluid comes into contact with wires, plastic or painted body parts, they may be damaged. Therefore, always use clean rags when pouring. If liquid gets on these parts, wipe them immediately with a clean cloth.
1. Check the brake fluid level in the reservoir. It should be located between the “MIN” and “MAX” marks marked on the tank body.
2. If the fluid level is below the “MIN” mark, unscrew the reservoir cap and add brake fluid to about. Then close the tank cap.
3. Check the operation of the brake fluid level drop sensor installed in the reservoir cap. To do this, turn on the ignition, then press the button on the tank lid. In the instrument cluster, the emergency warning lamp for the service brake system should light up. If the lamp does not light up, the sensor is most likely faulty.
Source
Niva Chevrolet: filling tanks, features, purpose
The number of these elements in each vehicle may vary. In addition, it is important to have a clear understanding of the location, types, engine and transmission oil used, types of lubricants and fluids.
- After all, Chevrolet Niva filling tanks must be filled taking into account the plant’s recommendations so that all systems can fully operate.
- Video
- FILLING CAPACITIES, OILS AND LIQUIDS.
- Oils and liquids
- Motor gasoline with octane number 93, 95**
- Engine cooling system
- (including interior heating system)
- Coolant with a freezing point no higher than –40°C
- Latest recommendation from AvtoVAZ
- Sintec Antifreeze Lux G12
- Engine lubrication system
- (including oil filter)
- Motor oils (with API quality level: SG, SH, SJ, SL,SM, SN)
- Gearbox housing
- Gear oils with quality level according to API GL-5 and viscosity 75W-90
- Rear axle housing
- Steering gear housing
- Transfer case housing
- Front axle housing
- Hydraulic clutch system
- DOT-4 brake fluid
- Hydraulic brake system
- Windshield and headlight washer reservoir
- A mixture of water and windshield washer fluid
- Rear window washer reservoir
- Power steering reservoir
- Fluid for refilling the hydraulic steering system Pentosin SHF11S
- * For VAZ-2131 cars and its modifications.
- **For vehicles with fuel injection system equipped with an exhaust gas converter
The recording is more for myself, but maybe it will be useful to someone else. Since after the purchase I only changed the oil in the engine, and it’s not at all clear what and how much in the transmission, I’m thinking about changing the oils in the gearbox, transfer case and axles. It would be good to know what kind of transmission oil to fill in to reduce the howling of the transfer case.
And also interesting: Engine VAZ 21213 Niva | Niva engine tuning and repair
Fuel tank 58.
0 l Engine cooling system 8.0 l Engine lubrication system 3.75 l Gearbox housing 1.6 l Transfer case housing 0.79 l Front axle housing 1.15 l Rear axle housing 1.3 l Brake hydraulic system 0.5 l Clutch release hydraulic system 0.15 Windshield washer reservoir 5.0 l Tailgate washer reservoir 2.0 l Front shock absorber 0.15 l Rear shock absorber 0.215 l Power steering 1.7 l Air conditioning: refrigerant 0.650 kg
Conditioner: oil 0.22 l
- Places for lubrication, filling, processing
- Motor oils type SUPER (classification according to SAE; API) Engine lubrication system Viscosity class according to SAE: 5W-30: from –25 to 20 С5W-40: from –25 to 35 С10W-30: from -20 to 30 С10W -40: from -20 to 35 С15W-40: from –15 to 45 С20W-40: from –10 to 45 Level of performance properties: according to API SG, SH, SJ according to ASEA A2
- according to CCMC G3, G4
- Transmission oils (classification according to SAE; API) Gearbox, Transfer case Viscosity grade according to SAE: 75 W-90; 80 W-85; 80 W-90; Level of performance properties: according to API: GL-4 or universal: GL-4/ GL-5 Front axle, Rear axle, Steering gear Viscosity grade according to SAE: 80 W-90; 85 W-90; Level of performance properties: according to API: GL-5 or universal: GL-4/ GL-5
- Power steering: Pentosin Hidraulik Fluid CHF11S VW52137
How to avoid falling asleep while driving on the highway
GreasesFront wheel drive joints CV joints-4M, SPECTROL CV joints MoS2 TU 0254-001-0014882Front suspension ball joints, Steering rod joints ShRB-4 TU 38.
USSR-201-143 Joints for cardan shafts Litin 2 TU 0254-311-00148820 Splined joints for cardan shafts 158 TU 38.
Dowcorning
Pressure regulator DT-1 TU 38-USSR-201-116
Brake and clutch hydraulic drive system Brake fluids type DOT-4 SAE J 1703, FMSS116
In this article we will talk about how to change the oil in the gearbox, transfer case and axles of a Chevrolet Niva. The use of high-quality lubricants for vehicles plays an important role in the operation of any car. The most common process for proper vehicle operation is the oil change process. It is possible to change the oil yourself, without resorting to the help of auto service employees, while significantly saving money.
Choosing engine oil is a responsible task on which the service life of the power plant depends. This procedure is no less important than the oil change process itself. Oil should be selected according to the parameters and tolerances specified in the operating instructions.
You cannot make a mistake in your choice, as this mistake can result in a serious technical breakdown, and incompatible oil can cause a major overhaul of the engine.
In this article, using the example of the popular Chevrolet Niva SUV, we will pay attention to the most important parameters of motor oil, and also consider the best brands of oils and how much oil should be filled.
Also interesting: Various options for tuning the Niva 21213 and 21214 engine
After all, Chevrolet Niva filling tanks must be filled taking into account the plant’s recommendations so that all systems can fully operate.
Tips for caring and maintaining the brake system
- Strictly adhere to the technical inspection schedule. The manufacturer recommends an interval of 15,000 km;
- Buy and install only original spare parts and consumables;
- Maintain a moderate driving style. For systematic off-road use and mountain serpentines, install brake discs of the class with notches and a perforated surface.
If you still don’t know how to replace brake system components yourself, read the instructions and watch the video. If you do not have enough time to service your Niva Chevrolet, contact the service center to order a paid service.
Read news about the new Niva
- Electrical diagrams of Chevrolet Niva VAZ-2123, wiring harnesses
- Brake system Chevrolet Niva
- Bleeding Chevrolet Niva brakes: step-by-step instructions
- How to bleed brakes on a Chevrolet Niva correctly
- VAZ 21214 brake system bleeding. Video on the topic
- How to bleed the brakes of a Niva Chevrolet || Chevrolet Niva brakes are pumped
- How to bleed brakes on a Chevrolet Niva correctly
- Niva Chevrolet front hub repair || Niva brake pedal price
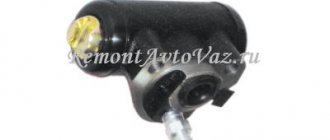
Design of the working hydraulic system
In order to increase the reliability and safety of control, the hydraulic brake system of the Chevrolet Niva is built according to a dual-circuit diagonal design. The first hydraulic drive circuit drives the front right and rear left wheels, and the second drive drives the front left and rear right wheels. Thus, controllability is maintained in the event of failure of one of the hydraulic drive circuits. The hydraulic braking system includes:
- brake pedal located in the cabin under the driver’s right foot;
- vacuum pedal pressure booster;
- master cylinder with reservoir for filling brake fluid;
- dual-circuit hydraulic drive pipeline;
- working brake cylinders of the rear and front wheels;
- pressure regulator with actuating lever.
Also interesting: How to bleed the brakes on a Chevrolet Niva correctly
The pressure of the driver's foot on the brake pedal is increased by a vacuum booster and transmitted to the piston of the master cylinder, which, moving, compresses the brake fluid. The fluid pressure increases and is transmitted through pipelines to the working cylinders of the front wheels and the brake pressure regulator of the rear wheels.
Replacing brake hoses Niva 2121
The front hoses on Niva 2121 and 21213 are distinguished by their length, the outer hose is longer than the inner one. There are a total of four hoses on the front of the car; on the rear of the car there is one hose from a VAZ 2101, from a tee.
To replace hoses on Niva 2121 you will need:
- Split wrench 8 - 10
- Open-end wrench 17
- Copper washers from the brake system of a VAZ
- Pliers
Replacing the front hose 2121:
- We hang and remove the front wheel.
- Next, you need to unscrew the end of the brake hose from the tube. To do this, use a 17 wrench to hold the end of the hose, and use a 10 wrench to unscrew the tube connector.
Then use pliers to pull out the hose clamp. We remove the hose from the hole in the body bracket, having previously twisted the flat of the tip so that it passes through the hole.
- Next, bend the stopper securing the hose and remove it. Niva front brakes
- The second hose is removed in the same way.
- Assembly is carried out in reverse order.
Required Tools
In order to change the brake fluid on a Chevrolet Niva, you need the tools from the table below.
Table - List of tools required to change brake fluid
| Tools | Note |
| Spanner | "at 8" |
| Transparent hose | Up to a meter long |
| Rags | To clean dirt |
| Syringe | Can be replaced with a rubber bulb |
| Tara | Can be replaced with a rubber bulb |
To carry out work, access from the bottom is required. Therefore, an inspection hole or overpass will be required. It is more convenient to replace the vehicle with a partner, but there are ways to carry out the task alone.
Also interesting: The design of the Chevrolet Niva brake system and its diagram
Replacement frequency
According to the official technical regulations, brake fluid replacement on a Chevrolet Niva is required every 45 thousand km. In this case, it is important to change the entire volume of liquid, and not how much can be pumped out of the tank. In difficult operating conditions, it is recommended to reduce the interval relative to the official one to 30-35 thousand km. However, there are reasons why the brake fluid may need to be replaced sooner. Extraordinary filling of the brake fluid is performed in the following cases:
Failure to follow recommendations for brake fluid change intervals can lead to the following negative consequences:
Characteristics
Basic requirements for brake fluid:
- Should not destroy rubber seals in the system. Maybe someone remembers red BSK brake fluid. Only the factory rubber bands remained alive. She ate all the “co-op and China” like a crocodile.
- Brake fluid must have lubricating properties. This applies to the surfaces of the brake pistons in the cylinders.
- Must have stable characteristics at low and high temperatures. This issue will be discussed in a separate paragraph below.
Classification of brake fluids
Let's decipher the mysterious abbreviation - DOT. It's simple - Department of Transportation, US Department of Transportation. In the USSR and Russia there have never been GOSTs for these products, so everything is produced in accordance with the specifications. And this is translated for the average user, “some to the forest, some to get firewood.” Maybe something has changed in 2021, but I doubt it. Further after the abbreviation DOT, there are also some mysterious “numbers”. Their translation into Russian is as follows:
- DOT3 – mineral base. 50% - alcohol, 50% - castor or camphor oil. Accumulates moisture relatively quickly. My personal opinion: can be applied and used in dry climates.
- DOT4 is the most common option today. The base is glycol. To bind the condensate, boric acid is added. The most versatile option.
- DOT1 is an improved version of DOT4. The boiling point is slightly increased and the viscosity at low temperatures is reduced. Relevant for the north and other “resort places” of our homeland.
- DOT5 – silicone base. Does not absorb moisture from the air. But as always, if there are pros, there are also cons. Accumulated water can collect in the lower parts of the brakes and freeze there. Applicability: sports cars and motorcycles.
What you need to know about bleeding the system in a Chevrolet
- Hydraulic fluid contains poison. If it comes into contact with exposed skin, wash it off immediately with a large stream of water. If suddenly the substance gets into your eyes, or, worse, you swallow it, you should seek medical help.
- Some types of hydraulic fluid are flammable and can therefore catch fire if they come into contact with hot elements or an open flame. During your work, you should always remember this in order to take appropriate precautions in time.
- The liquid is aggressive to plastic parts and paint. If the substance gets on the surface of a painted body or plastic, immediately wash it off with a large stream of water.
- The liquid is hygroscopic, that is, it can absorb moisture from the air. Excess moisture content lowers the boiling point to unacceptable levels, resulting in an unsafe reduction in braking performance.
- Used hydraulic fluid cannot be reused. It is most likely already contaminated. If you need to add or replace fluid in the system, use only the recommended type.
Transmission
Replacing lubricant in machine engines is a simple procedure that you can perform yourself, without the help of specialists. The main thing in this matter is to know what kind of oil and where to fill it.
If we talk about the VAZ 4x4 2121 Niva, then the engine should contain approximately 3.75 liters of oil product. Moreover, you need to fill in one brand of oil; different types cannot be mixed. Otherwise, the entire proportion will be ruined.
When mixing a mineral and a synthetic sample, the result will be a substance of low quality. It forms pieces that are not acceptable for the normal operation of the unit.
Replacing lubricating fluids is provided not only for the engine, but also for other components of the VAZ 4×4 2121 Niva. Places, filling volumes, names of oils are given in the table.
Page 66
Page 68
Page 70
The Niva 4x4 transmission system has the following filling volumes:
- transfer case - 0.79 l;
- gearbox - 1.6 l;
- rear axle - gearbox - 1.3 l;
- front axle - crankcase - 1.15 l;
- steering column - crankcase - 0.18-0.2 l.
| Lower limit of ambient temperature, °C | -15 | -25 | -25 | -30 | -40 |
| Upper limit of ambient temperature, °C | 45 | 45 | 35 | 45 | 35 |
| SAE lubricant viscosity grade | 85W-90 | 80W-90 | 80W-85 | 75W-90 | 75W-80 75W-85 |
As stated in the operating instructions, transmission lubricants need to be changed once every 30 thousand km. mileage At the same time, replacement is not provided for in the steering mechanism housing, only an addition through the top plug. The “native” oil for Zhiguli transmission units is considered to be TAD17I.
Transmission oils have good penetrating ability. Therefore, poorly clamped plugs and worn gaskets of units begin to gradually leak lubricant. In such situations, it is allowed to add oil of the same viscosity class and, preferably, the same manufacturer. If you do not top up during a leak, the lubricant level in the unit will decrease, which will lead to accelerated wear of expensive mechanisms.
Manufacturer's recommendations
If you do encounter any doubts or misunderstandings, it is never too late to consult an automobile expert. Always remember to undergo maintenance as your safety is entirely in your hands.
Most people know that routine car care includes checking
Squeaky brakes attract attention, as does a car that takes longer to stop than is usually necessary. But brake lube? Many car owners forget that it even exists
However, proper maintenance of your vehicle includes taking care of this essential fluid.
If you have questions about this oil, you are not alone. My workshop clients often ask whether the fluid needs to be changed, and if so, how often it should be done. Here are some tips and facts to answer the most frequently asked questions.
Main elements of the system
The largest and most basic element is the fuel tank, but the total number reaches sixteen. Their volumes vary greatly.
- They are necessarily included in the engine cooling and lubrication systems.
- Axle housings and gearboxes are also extremely important for safety during travel.
- Chevrolet Niva filling tanks include power steering systems and hydraulic brake lines, front and rear shock absorbers.
- An integral part are tanks for windshield washer and air conditioning.
How to bleed ABS brakes yourself
An assistant is required to bleed the brakes.
You need to prepare:
- clean glass container;
- a suitable piece of rubber/plastic tube;
- a wrench with a head corresponding to the valve size;
- brake bleeding kit.
Meanwhile, the choice of the sequence of bleeding the brake lines is not significantly important, since each caliper has its own connection to the main cylinder.
The car must be placed on a level surface, in first or reverse gear. Then it is advisable to place wheel chocks or a device made of boards under the wheels. Next, you need to check the brake fluid level in the cylinder reservoir, which is located under the hood (between the windshield and the air filter housing).
- Remove the dust boot cap from the bleeder valve of the 1st caliper.
- Place a wrench on the valve. Then you need to pull the drain tube onto the valve nipple. The opposite end of the tube should be lowered into the vessel and a little “brake fluid” should be added to close the lower end of the hose.
- During the process, it is worth monitoring the liquid level in the container, preventing it from falling below the minimum level. If necessary, fluid is added to the Niva Chevrolet car.
- Next, you need to instruct an assistant to press the brake pedal to increase the pressure in the brake system. When pressing the last time, the assistant needs to hold the pedal in the pressed position.
- Having raised the pressure in the system, it is necessary to loosen the valve approximately 1 turn, allowing the liquid to flow into the container. During the process, the pedal must be used to maintain pressure in the system. If necessary, you should fully depress the brake pedal all the way, but without releasing it. Next, when the liquid stops flowing, you need to tighten the valve. At this time, the assistant can smoothly release the brake.
- Check the brake fluid level in the reservoir. If necessary, it is worth topping up.
- If there was air in the system, it is easy to notice it as bubbles in the fluid coming out of the brake system. The process should be repeated until the liquid stops producing bubbles. In the event that the brake fluid was drained from the main cylinder and a new one was poured in, and air was pumped out of the 1st brake line, you need to make an interval between cycles of 5 seconds. This is necessary to refill the master cylinder passages.
- After air bubbles have stopped appearing, tighten the valve tightly, then remove the tube, as well as the key, and replace the dust cap.
- You need to repeat the process with the remaining lines until the air is completely out of the system and the feel of the brake pedal becomes firm again.
Good day, dear car enthusiasts! There is most likely no driver among us who has not at least once experienced a feeling of helplessness at the moment of braking. When the car continues to move, and not at all in the direction the driver wants. Skid.
Fortunately, engineering does not stand still. The modern driver is armed with a system such as ABS. Let's take a closer look at the system and see if it is possible to bleed ABS brakes yourself.
Question answer.
Why don’t you use and recommend using Russian brake fluids?
I have already spoken about the lack of GOSTs. Another important fact. There are industries in which we are not very far behind others, and I am completely on the side of our manufacturers. But as far as chemistry is concerned, and this includes oils, lubricants, cuffs, rubber, the lag is very serious. I don’t want to fill in the “semblance” of brake fluid and put my reputation and the client’s LIFE on the line. Bad brake fluid is not the same thing as windshield washer with a bad smell. Once again, let me remind you of a well-known phrase from the world of sports: car tuning begins with the brakes.
The brake system on a VAZ 2121 and Niva 2131 is bled when air appears in the system, which usually occurs in the event of depressurization of the latter due to temporary wear and damage, as well as after replacing various elements of the system. To carry out repair work, you will need an empty plastic bottle, a silicone hose (the internal diameter of the hose must be equal to the diameter of the brake cylinder fittings), brake fluid and a standard set of tools, you will also need the help of an assistant, since this work is quite difficult to do alone at home.
If you have everything you need, do the following:
Having driven the car onto a viewing hole or overpass, we loosen the fittings on all brake mechanisms, having first removed the rubber caps. If some of the fittings do not have caps, then upon completion of the work they must be installed to prevent clogging with dirt.
We put an assistant behind the wheel and, pressing intensely on the brake pedal, create pressure in the system, that is, you need to pump until the pedal is blocked and without releasing, but continuing to press on it, you thereby put a hose on the fitting, and its other end Place it in a bottle that has been previously filled with brake fluid. Loosen the fitting and release the pressure in the system. If there is air in it, the liquid will come out with characteristic air bubbles. Then tighten the fitting and repeat the operation.
We pump until only liquid without air comes out of the system.
Similarly, we pump each wheel of the front and rear circuit. During the work process, do not forget to add liquid to the tank.
Upon completion, tighten the fittings on all cylinders and put rubber protective caps on them.
At this point, the repair work on bleeding the brake system on the VAZ 2121 and Niva 2131 has been completed.
We bleed the hydraulic clutch on a Niva 2121 and 2131 when there is air in the system, which is accompanied by deterioration of the clutch, provided that the remaining elements of the system are in good condition. To carry out repair work, the car must be driven into an inspection pit, overpass or lifts, then prepare a standard set of tools and perform the following sequence of actions:
At this point, the repair work on bleeding the hydraulic clutch on the Niva 2121 and 2131 has been completed.
The procedure for repairing or replacing components and mechanisms
In fact, according to the observations and assessments of specialists, repairing the master cylinder in a garage rarely leads to the desired result - increasing the efficiency of the brakes.
The recommendation is simple - it is easier to replace the master brake cylinder assembly, if we are not just talking about replacing the rubber seals.
When replacing the master cylinder reservoir, it is recommended to change the sealing gaskets, having first lightly lubricated them with brake fluid.
When completely replacing or dismantling the master cylinder for repair, first pump out the brake fluid from the reservoir and plug the pipelines.
It is strictly forbidden to repair the pressure regulator of the master cylinder. The characteristics of the regulator are set by the manufacturer during manufacture, so the pressure regulators are replaced as a set.
After repairing the brake cylinder, do not forget to bleed the brake system.
Good luck with your brake master cylinder repair.
Design Features
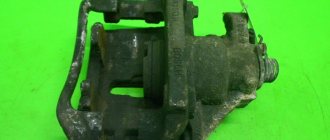
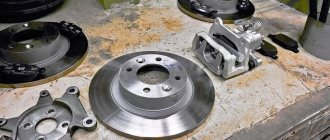
The front wheel brake mechanism (Fig. 1) is a disc with a floating three-piston caliper.
Cylinder block 1 is fixed in the caliper on two guides and secured with a spring retainer.
Brake pads 2 with steel bases having a figured shape, ensuring their tight fit to the pad guide.
When installing the pads, spring-loaded levers 3 press the caliper 7 to the ends of the pads, which ensures constant pressing of the pads to the guide grooves.
Brake disc 8 is made of cast iron.
Replacing front pads in the field: features of the process
Replacing a part such as pads is often done independently, without the help of car service specialists, for several reasons:
An important rule to remember: diagnosing wear and malfunction of one of the pads makes it necessary to replace both parts (front pads). That’s why the manufacturer offers them as a set
This state of affairs ensures high quality operation of the car’s braking system, whereas after replacing one (damaged) pad this fact is not observed.