Interior ventilation and heating controls
Interior ventilation and heating are adjusted depending on the outside temperature.
Rice. 1-6. Interior ventilation and heating controls:
1 — side nozzles for blowing glass of the front doors; 2 — windshield blower nozzles; 3 — air flow regulator; 4 — lever for changing the direction of air flow; 5 — central nozzles of the interior ventilation system; 6 — heater valve control lever; 7 — air supply hatch control lever; 8 — distribution lever; 9 — holes in the heater casing; 10 — heater cover lever; 11 — rear window heating switch; 12 — heater electric fan switch.
Interior ventilation
Outside air can enter the vehicle interior:
- through open door windows;
- through nozzles 2 (Fig. 1-6) for blowing the windshield, if you move distribution lever 8 and lever 7 for controlling the air supply hatch cover to the right;
- through the side nozzles 1 for blowing the door windows, if you move lever 7 to the right and lever 8 to the left;
- through holes 9 of the heater casing into the driver's and front passenger's foot area, if you open the heater cover with lever 10 and move lever 7 to the right;
- through the central nozzles 5 directly from the air supply box when the car is moving, if the regulators 3 open the nozzle flaps (summer airflow). By moving lever 4 in the horizontal and vertical directions, the direction of the air flow from the nozzle changes.
In the middle position of lever 8 and in the right extreme position of lever 7, air will flow through nozzles 1 and through nozzles 2.
If the car is moving at low speed, you can increase the amount of incoming air by turning on the electric heater fan with switch 12.
Fault Diagnosis
The stove supplied as standard will need to be modified for preventive purposes. The procedure will not take much time, but it will prevent many problems in the future. Driving experience suggests that the first severe frosts will undermine the “health” of the device. The list of main weaknesses is as follows:
- the optimal operating temperature range for model 2121 is from -5 to 10°C;
- inability to warm up the air in the cabin if outside is -8°C or lower;
- when the blowing power increases, the temperature does not increase;
- When driving in 2nd gear, the noise from the Niva's stove becomes significant.
That is why it is better to take the necessary measures in advance. The driver has few alternatives. On the one hand, everything remains in its place. The heating device is used at minimum power. During mild winters this is still tolerable, but with the onset of real cold weather the conditions will become unbearable. On the other hand, it's easy to spend a few hours rectifying the situation.
Further developments proceed as follows. If the heating in the car is running at ½ power, you can limit yourself to minor repairs. The main thing is to make sure that there are no noises or extraneous knocks, otherwise the Niva 21213 should immediately go for a technical inspection.
The presence of an unpleasant sound indicates the need to replace the device. A specialized retail network offers ready-made options for heating mechanisms for Niva. If desired, it can be assembled independently.
The second option is considered more preferable. When you assemble it yourself, you have the opportunity to literally personalize the stove. To do the work yourself, you will need to visit a specialized store or market to buy spare parts.
When purchasing, original parts or analogues are selected. The main thing is that they have a quality certificate. Otherwise, they cannot be installed. It would be useful to rewrite the technical data of the vehicle so as not to exceed the parameters recommended by the manufacturer.
There are two main radiator malfunctions:
- Clogged grille and radiator tubes.
- Radiator leakage.
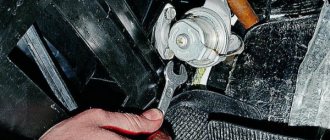
Since the Niva is often operated in difficult road conditions, the likelihood of contamination of the grille from dusty outside air is very high. Clogging of the cells reduces the heat transfer area of the radiator, and as a result leads to a decrease in the heat released from the air ducts into the passenger compartment. In such cases, the stove radiator is dismantled and washed under high pressure.
Clogged radiator tubes are also common. If the outlet pipe is barely warm or cold, then the radiator tubes are clogged. This happens for various reasons, including the entry of foreign objects into the cooling line during repair work. In such cases, the tubes themselves are also washed.
A leak in the radiator tubes can be determined by a coolant leak, which usually forms on the right side of the center console in the passenger foot area. As a rule, a leak is accompanied by the smell of antifreeze (antifreeze) in the cabin. Don't rely on the smell of antifreeze alone. Coolant vapor is very volatile and can be misleading as to the source of the leak. The smell of antifreeze also indicates a leak in the engine compartment.
Preventing glass from fogging
To protect the windshield and door windows from fogging, it is enough to direct cold air onto them, for which:
- close the heater cover with lever 10;
- move lever 7 to the right, and set lever 8 to the middle position;
- If necessary, turn on the electric heater fan.
If you need to warm up the incoming air a little, move lever 6 of the heater valve control partly to the right.
To protect the rear window from fogging, turn on its electric heating with switch 11.
Interior heating
To heat the interior and protect the windshield, door windows and rear window from fogging and freezing:
- move levers 6 and 7 to the right;
- set lever 8 to the middle position;
- open the heater cover with lever 10;
- turn on switch 11 heated rear window;
- If necessary, turn on the electric heater fan with switch 12.
Warm air will be directed both to the driver’s and passengers’ footwells and to the windshield and front door glass. For faster heating of only the windshield, close the heater cover with lever 10 and move lever 8 to the right.
Source
How to connect a stove on a field 21213
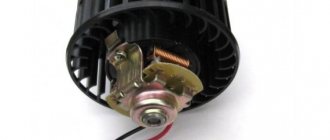
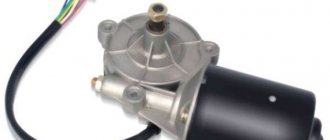
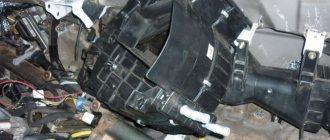
VAZ-21213 (Niva). Heater fan motor
Heater fan motor connection diagram
| Wires are damaged or wire connections are oxidized | Check and restore connections. Replace damaged wires |
| Fuse 1 in the fuse block has blown | Replace the fuse |
| The heater switch is damaged - no voltage is supplied to the switch output terminals | Check the switch, replace it with a new one if necessary |
| Sticking or wear of the motor brushes, a break in the armature winding or contamination of the commutator | Check motor, repair or replace |
| Short circuit to ground in the armature winding - when the electric motor is turned on, the fuse burns out | Replace the motor |
| Wires are damaged or wire connections are oxidized | Replace damaged wires, strip wire ends |
| Damaged heater switch | Replace the switch |
| Additional resistor burnt out | Replace the resistor |
| Additional resistor burnt out | Clean the commutator, replace the brushes |
| Contamination or oxidation of the commutator, worn brushes | Replace the motor |
| Interturn short circuit in the armature winding | Disassemble the electric motor, clean the shaft journals |
| 1 – ignition switch; 2 – main fuse block (fragment); 3 – heater motor switch; | 4 – additional resistor; 5 – heater fan electric motor |
Electric motor type ME-255 DC with excitation from permanent magnets.
When an additional resistor 4 is connected to the power supply circuit of the electric motor, the armature shaft rotates at a reduced frequency. The resistor is secured with two spring washers in the heater fan housing. The resistor value is 1.5 Ohm at 20° C.
It is recommended to replace a faulty electric motor with a new one. The only possible repair is cleaning the collector.
To disassemble the electric motor, you need to unscrew the screws securing the cover and remove it. Then you should remove the lock washer from the armature shaft and remove the armature from the housing. Assembly is carried out in reverse order.
Checking the technical condition is similar to that described above for the windshield wiper motor.
Possible malfunctions, their causes and methods of elimination
The electric motor does not work
The electric motor only operates at one speed
Motor armature rotates slowly
1.30. Heater controls
| GENERAL INFORMATION |
Heater controls and their purpose
The temperature controller sets the air temperature at the entrance to the cabin, and also turns the heater on and off.
In the extreme left position of the handle the heater turns off, the temperature is highest in the extreme right position.
Using the air intake adjustment lever, you can set the mode of full or partial recirculation with outside air intake. When the outside air lever is positioned, air from outside the vehicle is supplied to the air conditioning system. To recirculate, move the lever to the recirculated air position.
The flow direction control lever sets the channel through which air enters the cabin.
Turning on, off and air flow speed is set by the fan control lever. To turn off the fan, move the lever to the off position.
Other details
The standard heater radiator and thermostat are also replaced.
Preference is given to three-row copper radiators. They are more efficient in operation and leak less often. The thermostat is replaced with an analogue one or its thermal insert is modified. Do-it-yourself modification of the stove on Niva 21213 with your own hands is quite labor-intensive and takes a lot of time. To modify the heating system of this car, you can find ready-made kits on sale that make this work easier. The procedure is presented in the video “Remaking the stove on Niva 21213 with your own hands: video instructions.”
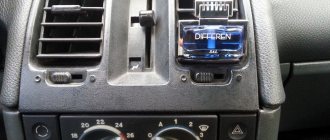
Heater control sliders
Reg.: 12/06/2004 Threads / Messages: 627 / 51712
And the instruction manual doesn’t really say anything, I’m new to automotive technology myself.
VAZ 21213 “Taiga”, 98 In the middle of the panel we have a heating/ventilation control unit? I don't know what to call it correctly.
There are three slides: 1. The top one, on the right is marked with a red triangle 2. The middle one, on the left and right there are erased icons, you can’t really understand. 3. The bottom one, on the right, is marked with a blue triangle.
Questions: 1. Which one is responsible for what? Well, for example, what should be set to make it warmer or, on the contrary, cooler? How to regulate heat in winter and, conversely, cool air in summer? Is it possible to choose where the air will come from - from the street, the cabin, or both?
2. There is some kind of door at the bottom from which, if you turn on the stove fan, it starts blowing into your feet - how can it be closed? I couldn't find a latch there, but it keeps opening.
3. There are air intakes on the sides of the car - where do they send the air? Why do they put plastic “visors-overlays” on them - for the interior or is there any sense in it? Do they overlap, or will cold air flow there in winter?
Reg.: 03/10/2005 Threads / Messages: 5 / 549 From: Tambov (68rus) Age: 45 Car: Nissan Pathfinder 2.5D 2013
According to the slides: 1. Open/close the heater valve. Towards the “open” triangle. 2. I don’t know, I have 2121 with two skids. 3. Open/close the heater air intake damper. Towards the “open” triangle.
Heater (stove) and ventilation system
1 – side nozzle; 2 – side nozzle air duct; 3 – air duct for heating the windshield; 4 – central nozzles; 5 – control rod for air supply damper; 6 – air supply damper; 7 – radiator; 8 – heater seal; 9 – radiator casing; 10 – outlet pipe; 11 – supply pipe;
12 – tap; 13 – air distribution cover; 14 – fan casing; 15 – impeller; 16 – electric motor; 17 – crane control rod; 18 – control rod for the heated windshield damper; 19 – bracket for heater control levers; 20 – air supply damper control handle; 21 – control handle for the heated windshield damper; 22 – crane control handle.
How is the stove motor connected in the field?
VAZ-21213 (Niva).
Heater fan electric motor Heater fan electric motor connection diagram
| 1 – ignition switch; 2 – main fuse block (fragment); 3 – heater motor switch; | 4 – additional resistor; 5 – heater fan electric motor |
Electric motor type ME-255 DC with excitation from permanent magnets.
When an additional resistor 4 is connected to the power supply circuit of the electric motor, the armature shaft rotates at a reduced frequency. The resistor is secured with two spring washers in the heater fan housing. The resistor value is 1.5 Ohm at 20° C.
It is recommended to replace a faulty electric motor with a new one. The only possible repair is cleaning the collector.
To disassemble the electric motor, you need to unscrew the screws securing the cover and remove it. Then you should remove the lock washer from the armature shaft and remove the armature from the housing. Assembly is carried out in reverse order.
Checking the technical condition is similar to that described above for the windshield wiper motor.
Possible malfunctions, their causes and methods of elimination
REMEDY METHOD
The electric motor does not work
The electric motor only operates at one speed
Motor armature rotates slowly
7.11.2. Motor test data
Source