Deflectors for car windows and hood: installation and removal instructions
Deflectors on car windows and hoods are used everywhere. Most vehicles on the road are equipped with black or body-colored visors pasted over the sliding windows.
Some vehicles have a similar design in the front part of the hood. What are these devices used for? How to choose and install a deflector with your own hands?
Why are deflectors needed?
The structures under consideration have several functional purposes, which include:
- Protection of the hood from mechanical damage - a deflector mounted in the front part of the hood changes the direction of the air flow flowing around the car. Together with the upward flow, small stones and wheel spikes are diverted from the car, flying out from under the vehicle in front. In the absence of the so-called “fly swatters” all this ends up in the windshield of the car. In addition to the above, the deflector mechanically protects the edge of the hood from flying sand and dust.
- Protection of the windshield from insects - the direction of the oncoming flow changing under the influence of the device helps to remove mosquitoes and midges, which in warm weather literally stick to the windshields of cars that are not equipped with protective devices. Installing a fly swatter solves this problem.
- Improving the design of the car - visors and fly swatters significantly improve the appearance of most cars. Black elements look best when installed on light-colored cars.
- Protection from splashes in the cabin - a deflector on the car windows allows you to open them a little even in heavy rain. Of course, if the window is completely lowered, the device will not save you.
Criteria for choosing car deflectors
Installation of deflectors begins with their selection and purchase. It is necessary to select products based on several parameters. First of all, the visors must match the shape of the door or hood where they are planned to be mounted
It is important that the coincidence of all angles is accurate. Otherwise, the installed deflectors will not last long and will soon disappear
The second selection criterion is the method of attaching the products to the glass. There are plug-in and self-adhesive visors. Installing a hood deflector is always done in one way, so there is nothing to choose from.
The quality of a product is determined by its manufacturer. It is preferable to purchase goods from a monobrand manufacturer. However, devices of acceptable quality can also be sold by brands that develop several car models at once.
The most famous companies today are the following:
- Mono-brand (products for one brand of vehicle): climair, airpiex, heko.
- Multi-brand (products for several brands): autoclover, mobis.
- Little-known (not very common, usually Russian manufacturers): strelka, cobra, comfort.
Fly swatter installation procedure
Installing a fly swatter on the hood requires some knowledge. Violation of the installation technique leads to damage to the paintwork. The result is accelerated corrosion of the metal under the deflector.
Things to consider before installation
Before gluing the deflectors to the car, you should evaluate the condition of the hood edge.
Corroded areas should be cleaned, treated with a rust converter, puttied, primed and painted. The device should not be placed on rusty surfaces, as moisture almost always accumulates under the device. This will lead to the final destruction of the metal within several months.
The second factor to consider is the speed at which you plan to travel. On relatively low-speed vehicles, installation of deflectors can be carried out using adhesive tape or standard fasteners. For high-speed vehicles, additional fastenings should be made.
If installation is planned using glue or tape, the temperature in the room where the work is being carried out must be at least 10 °C. Otherwise, the fixing compounds will not stick to the paintwork and the deflector will fall off at the first shake. Installation using mechanical clips or bolts can be done at any temperature.
How to dismantle central deflectors and install new ones
Removal of deflectors may be necessary in one of the following cases:
- they are clogged and require cleaning;
- a deeper cleaning of the system with removal of the air ducts is necessary;
- the deflectors were pressed into the air duct;
- The deflectors are broken and need to be replaced.
In any case, whatever the reason for dismantling them, it is quite simple to do and does not require a lot of free time or special tools. The entire process of removal and reinstallation takes place in just a few steps, the first of which is removing the dashboard panel.
In order to do this, you need:
- disconnect the battery;
- remove the receiver/radio tape recorder, disconnect the cable harness from it;
- remove the center console screens;
- remove the cigarette lighter by disconnecting the harness of suitable wires;
- remove the ashtray light bulb and disconnect the wires that go to it;
- remove all protruding buttons and adjustment knobs (to do this, carefully pry them off with a screwdriver);
- Use a Phillips screwdriver to unscrew the screws holding the instrument panel panel (one each on the left and right);
- Unscrew two screws located above the dashboard and two screws located under it;
- pry and remove the rear window heating plug;
- Unscrew the self-tapping screw located under this plug with a Phillips screwdriver;
- move the panel back and to the right;
- disconnect all blocks with wiring harnesses from the switches and on-board computer.
Heat from side deflectors
We return heat from the side deflectors
using pliers. VK group: Instagram: .
How to remove double-sided tape and replace window deflector
Once the panel is completely detached, the deflectors themselves can be removed. To do this, you need to unscrew the three screws responsible for fastening the central deflectors. One of them is located under their body, the other two are on its sides. After this, all that remains is to remove the deflector, clean it (if necessary), and install it back.
Assembly of the front panel and its installation are also carried out according to the above described scheme, but in the reverse order.
Before installing the deflectors in their place, it will be very useful to cover their perimeter with sound-absorbing material, such as modelin.
https://youtube.com/watch?v=7OUuphinDvo
Replacing side deflectors
Now let's look at how to remove the VAZ 2114 interior air deflectors located on the sides (and this is quite easy to do; they are attached without the use of screws at all, but are held in place by eight latches). The first 4 of them are located on the outside, two in the upper part under the overlay and two in the lower part.
In order to squeeze them out, you should use a thin screwdriver or a strong knife blade. Also, in order to avoid scratches on the surface of the reflector, you should place a soft cloth under the instrument. Once the outer latches are open, all that remains is to disconnect the deflector housing from the duct body (which is held in place by the remaining four latches) and remove it.
Installing the reflector in place is done in exactly the same way, but in the reverse order. A very useful action before installation (both in the case when replacing the heater deflectors of a VAZ 2114 with new ones, and when installing old ones in their original place after cleaning) would be to glue the entire perimeter of their body with a noise-insulating material, which at the same time plays the role of a seal (for example, modelin or its analogues).
When opening the side reflector latches, you should place a soft material under the screwdriver or knife; this will protect the housing from damage and scratches.
Removal and replacement instructions
If you need to dismantle the heater, you will need to completely remove and disassemble the dashboard. As for directly replacing the radiator device, it will be enough to only partially disassemble the console. Repairing such a plan is not a particularly simple undertaking, however, if you have patience and strength, you can do everything yourself. To perform the work, you will need standard plumbing tools, including screwdrivers, wrenches, and pliers.
Replacing the VAZ 2114 heater radiator is performed as follows:
First of all, the antifreeze is drained from the heating system. To do this, you need to unscrew the filler cap of the expansion tank and drain the consumables from the main radiator assembly into a previously placed container under the drain hole. When the liquid from the radiator is drained, it is necessary to unscrew the cap in the cylinder block, which will allow the liquid to be drained from the BC. If you notice that the antifreeze has become dark and contains sediment and deposits, then most likely the consumable has already reached the end of its service life and it’s time to change it. Next, you need to remove the audio system from the center console. Remove the frame, pull out the radio itself and disconnect the connectors and wires from it, after which the device can be dismantled. Next, remove the plug and unscrew the screws of the frame that secures the dashboard - in total you need to unscrew 4 screws - two on top and two on the bottom. It is not necessary to dismantle the device itself. After completing these steps, you will need to remove all control levers and sliders from the heating system control unit. Next, the protective cover on the steering column is dismantled; the clamps are located at the top and bottom. The next step is to remove the diagnostic connector cover; it is located in the center console, under the cigarette lighter. To do this, you need to unscrew the screws that secure the connector itself, after which the cover can be removed without any problems. During this step, be careful not to damage the connector. Having done this, you can disconnect the connector from the cigarette lighter. After completing these steps, you need to disconnect all connectors and plugs that are on the center console. At this stage, be careful - it is better to mark all the connectors in advance, otherwise you can confuse them during panel assembly. Next, the signaling unit is removed; to do this, you need to unscrew two screws. This will leave the center frame of the dashboard free so it can be removed. Having done this, you will be able to get to the cigarette lighter illumination connector; it will also need to be disconnected. The next step will be to dismantle the glove box. It is attached to six self-tapping screws; they need to be unscrewed. There are fasteners on the sides of the control panel - self-tapping screws; they will also need to be unscrewed. Remove the screws that secure the ECU mount. Then unscrew a few more screws that secure the heating system control unit. Next, there are plastic trims on the A-pillars; they will need to be dismantled; to do this, again, you need to unscrew the screws. There is a special screw between the steering column and the panel, which also needs to be unscrewed. Having completed these steps, you have loosened the center console, now all that remains is to lift it up and towards the seats. It is not necessary to completely remove the console - you just need to have it pulled back enough to remove the radiator. The panel must be fixed to the side. Now you need to get to the clamps installed on the hoses of the heating unit; use a screwdriver to loosen them. Remove the hoses, but before doing this, wrap them with a rag, since they will most likely release residual antifreeze.
Pay attention to the condition of the pipes - if you see that they are worn out or heavily clogged, or there are signs of damage, then it is better to replace them immediately. The radiator is directly fixed to the heater body using three self-tapping screws - they need to be unscrewed, and the device itself must be removed
After dismantling, the device is replaced with a new one, the assembly procedure is carried out in the reverse order.
Price issue
Prices for radiators vary, but they vary roughly within the same range. The cost of devices depends on the quality of the product, the manufacturer, and the place where it is purchased. For example, Luzar products for the VAZ 2114 on average cost on the market from 900 to 1300 rubles. Aluminum radiators from the manufacturer DAAZ cost on average about 1 thousand rubles.
Loading …
What will be needed for repairs?
Please note that replacing the VAZ 2114 stove can be done in 2 ways: with removing the dashboard and without dismantling the dashboard. Professionals prefer the first method. That is, master mechanics of any service station replace the radiator with a 2114, having first disassembled the top down to the screw. Only someone who has already assembled and disassembled the dashboard with their own hands can handle this work. There are a lot of subtleties and nuances.
Speaking for us, we will replace the VAZ 2114 stove radiator without removing the dashboard.
By the way, there is another way to change the radiator. Craftsmen cut out the bottom of a VAZ 2114, calmly crawl under the radiator and quickly remove it.
But again, only highly qualified craftsmen can qualitatively change the design of the machine. We won't interfere there, out of harm's way.
For this job we will need:
- Screwdriver Set
- A set of keys
- A pair of new clamps for the diameter of the radiator pipes
- New radiator. By the way, it’s better to take something imported, for example, Fenox RO0004C3 (it costs twice as much as the original)
- New antifreeze for the heating system
Now let's look at the question of how to replace a VAZ 2114 stove without removing the panel (only the radiator).
Problems with the stove on a VAZ 2115
The VAZ-2115 is an updated version of the earlier G8, Nine and VAZ-21099. The same characteristics are available for the three- and five-door hatchbacks VAZ-2113 and VAZ-2114. The interior heater design in these cars is the same, so if you are the owner of one of the listed models, then this article should be of interest to you.
Let us also recall that we have already discussed on our website Vodi.su the question of how to fix problems with the stove on a VAZ-2109.
The device of the interior heater of the VAZ-2115
The stove design here is standard:
- fan - it directs the air flow;
- radiator - heated antifreeze from the engine enters it for cooling, and the heat generated during this is sent to the passenger compartment;
- heater tap - when you turn on the heater, the tap opens and antifreeze begins to flow into the heater radiator;
- damper rods - used to regulate the air supply, as well as to heat the legs and windshield;
- heater resistor - serves to create additional resistance so that you can select the operating mode of the stove.
Refinement of the stove pipe
When the air flow from the left deflector is too small, you can force its intensity. To do this, you need to insert a small (about 50 mm) fan into the pipe. A cooler used in computers is suitable for tuning.
First remove the deflector. Make a hole for the cooler and install it. Seal. Put the branch pipe with the fan in place. Restore electrical. An alternative is to connect the cooler directly to the heater contacts. In this case, it will only work when the ignition is on.
Properly carried out modernization will add warmth to the interior and save the owner of the VAZ 2114 from many problems.
VAZ 2115: replacing the heater radiator with your own hands
In order to replace the heater radiator on a VAZ-2115 with a “Euro-torpedo”, you need to remove it. But it is possible to replace the heater core without completely removing the instrument panel.
So let's get started.
Disconnect the negative terminal from the battery. Drain the coolant. To do this, unscrew the drain plug on the cylinder block using the head at “13”. The plug is located just below the ignition module. Sometimes, depending on the design of the ignition module, it must be removed because it blocks access to the traffic jam.
To minimize coolant loss, place a container under the engine to collect the liquid and unscrew the plug. We also remove the plug from the expansion tank, otherwise a vacuum will form in it, which will retain the coolant.
For further work you will need the following tools:
- Screwdrivers – Phillips and flat blade
- A set of heads, or rather heads for “8” and “13”
- Key to "8"
- Chisel and hammer
We've prepared the tools - let's get to work
- Remove the steering shaft facing casing and turn off the emergency lights button.
- We snap out the steering column switches and, having removed the connectors from them, put them aside.
- We disconnect the gray and black wires from the base of the horn slip rings, having previously remembered which is which, otherwise the signal may be triggered by turning the steering wheel.
- Unscrew the screws and remove the side screens of the console.
- Open the cover that covers the diagnostic connector and, by unscrewing 2 screws, remove the connector from the instrument panel. Remove the connector from the cigarette lighter and the ashtray illumination lamp.
- From the heater control unit, remove the speed selector handle and the damper control lever handles.
- We remove the radio, unfasten it and pull out the “slides” of the radio (they will interfere when removing the instrument panel panel).
- After unscrewing 7 screws (one is located under the decorative plug to the right of the button block), disconnecting the connectors from the buttons and the BSK block, remove the instrument panel panel.
- We remove the instrument cluster.
- We unscrew the bolts securing the central bracket (the top ones, unfortunately, are not visible in the photo), this is where the “8” key comes in handy. We take out the bracket and, having disconnected the connector of the engine control unit, remove it.
- We unfasten the heater control unit and lower it down as far as the damper control cables will allow.
- Using a marker, mark the position in which the steering column is located so that when assembling it, put it in the same place. Using a chisel, unscrew the 2 shear bolts, do not cut them off, but rather unscrew them and turn them counterclockwise with blows. When assembling, you need to install new ones (as a last resort, you can install regular ones, not shear ones), but it is better to install those that are provided for by the design. Unscrew the 2 nuts to “13” and lower the column onto the seat.
- Remove the front strut covers.
- Loosen the clamps and remove the pipes from the heater radiator. It is necessary to either substitute something or use a material that absorbs liquid well, since some coolant remains in the radiator.
- Next, unscrew the 5 screws that hold the Torpedo. Two - in the area of the A-pillars, two - under them at the bottom of the panel and one in the niche of the steering column, to the right of the instrument lighting control.
- That's it, you can start replacing the radiator. To do this, move the right side of the instrument panel to the side. Unscrew the 3 screws securing the radiator to the heater body. Another one holds the damper control cable; we also unscrew it and release the cable. We remove the radiator from the heater housing.
- If necessary, clean the inside of the heater through the opened hole (usually fluff and dry leaves).
- We install a new radiator and assemble it in the reverse order.
- Assembly nuances.
- When assembling, make sure that the instrument panel seal on the windshield side is in place. The intermediate body of the central nozzle stood where it was supposed to without distortion. The wiring must pass through the same openings as before disassembly, otherwise you will have to start assembly from the beginning.
- After assembly, tighten the drain plug. Pour in coolant, new or old, after passing it through a fine-grained sieve. For cleaning, it is very good to use a paint filter funnel (sold where car paints are sold).
- Warm up the car until the radiator fan comes on. Check connections for leaks. We check the operation of the heater and dampers. We check the operation of the electrical equipment of the instrument panel.
- This completes the replacement of the heater core.
Sources
Features of installing a new radiator
Installation of a new radiator and assembly of the car is carried out in the reverse order. At this stage, it is important not to accidentally lose the panel fasteners, and also to follow the rules listed below:
- It is better to install new clamps on the radiator pipes, which will ensure complete tightness of the heating system;
- It is advisable to lubricate the outlet and inlet fittings of the device with soap or some detergents to simplify the installation of the pipes, as well as improve their fit to the fittings;
- The central pillars of the panel need to be secured especially well, since they are responsible for the main functions of driving the car;
- after the panel is installed and secured, you need to check that the cable settings are correct, and also make sure that the faucet and valves are open to the proper level;
- When filling the system with coolant, you need to make sure that there is no air in it. After the antifreeze level has been restored, be sure to start the engine and make sure that the pipes and their connections to the radiator are tight.
If you follow all these rules, you will be able to ensure the perfect operation of the heater in your car, as well as minimize the risks of its repeated failure due to clogging of the system.
How much does it cost to replace a radiator at a car service? The price for this service is quite high, since specialists usually remove the control panel, which takes much more time and requires considerable effort. Using the method described above, you can replace the part yourself and save money.
How to disassemble the instrument panel on a VAZ 2114
Before embarking on this complex process, the driver must carefully familiarize himself with the design and arrangement of the instrument panel on his car. When disassembled down to the cogs, it looks like this:
The device of the VAZ 2114 dashboard
Instrument panel and its accessories:
1 - VAZ 2114 torpedo, or - instrument panel, that is, the main part of the entire structure to which the instrument unit, on-board computer, stove control levers, key blocks and other linings and latches are attached;
2 — overlay on the instrument panel, has a decorative function, it also contains air duct outlets for blowing the windshield;
5 — ashtray body;
6 and 11 - right and left crossbars;
7 and 10 - right and left console screens;
8 — instrument panel;
9 — central bracket.
If you carefully study this diagram, it becomes clear how to remove the panel on a VAZ 2114. Having determined the order for yourself, you can begin the process.
Using a Phillips screwdriver, you need to unscrew the three screws holding the left console screen. For convenience, when doing this work, it is better to use a screwdriver with a short handle and blade.
Left screen of the VAZ 2114 console
When removing the screen, carefully remove the lower edge of the trim from the body bracket. The right console screen is secured with five self-tapping screws. Using a Phillips screwdriver, carefully unscrew all the screws while holding the trim with your hand.
Right screen of the VAZ 2114 console
remove the screen without allowing it to get caught in the wiring harnesses that are hidden behind it.
Disconnect the ground from the battery by disconnecting the connectors. If your car has a radio, disconnect it from the main bundle of wires by pulling out the connecting connector. If there is no radio installed on the car, then simply pull the wires out of the panel; they should be closed with a plug. Be sure to turn off the cigarette lighter and remove the socket with the ashtray light bulb.
Remove the handles from the heater damper control levers. To make the process easier, pry them off with a flat-head screwdriver.
Removing handles and levers from the dashboard of a VAZ 2114
Despite the apparent simplicity of this item, removing the handles from the levers can take a lot of time. To do this, a clear example is given of how this should be done on a removed unit.
Removing the handle using a VAZ 2114 screwdriver
Remove the electric heater fan handle by simply pulling it towards you.
Removing the handle of the electric fan VAZ 2114
Unscrew the cross-head screws securing the instrument panel to the brackets on the right and left with a screwdriver.
Self-tapping screws on the dashboard brackets of VAZ 2114
in the window on the instrument panel where the instrument unit is located there are two screws on top and two on the bottom - under the window. It is necessary to turn them out, loosening the cover (2) and the shield (8).
Releasing the lining and shield of the VAZ 2114
pull out the plug and unscrew the screw located behind it.
Self-tapping screw under the plug VAZ 2114
- remove the two screws from the bottom holding the trim and remove it.
- Having marked the wires suitable for the switches, disconnect them.
Disconnecting wires from VAZ 2114 buttons
Unscrew the bolts from the steering wheel bracket.
Bolts on the VAZ 2114 steering bracket
Using the “8” key, unscrew the screws of the lower bracket fastening.
Lower mount on the VAZ 2114 bracket
- Unscrew the self-tapping screw and remove the light guide.
- remove the fasteners of the heating control unit and remove the cartridges from the back of the unit.
Cartridges from the reverse side of the VAZ 2114 block
- remove the decorative insert, removing all external parts.
- Unscrew the nuts with a key to “21”.
- remove the hydraulic corrector illumination.
- Unscrew the top and bottom fastenings of the panel, remove the fastening to the cross member on the left side.
Upper mount on the left side of the VAZ 2114 panel
Now you can remove the VAZ 2114 torpedo.
Removing the instrument panel of VAZ 2114
Installation is in the reverse order.
In order to clearly see the whole process in motion, you can watch a video on how to remove the dashboard on a VAZ 2114.
https://youtube.com/watch?v=F-FEZZiQ31Y
It would seem, why suddenly remove the air duct deflector. The need for this may arise for various reasons. For example, it may simply fail, in which case it should either be repaired or replaced. To improve the interior, some people purchase deflector grilles from other car models and install them. Our goal is to tell you how to remove the air duct deflector in order to carry out the desired operations. The process will be examined using the example of different VAZ models. Here you will also find instructions on how to remove the air deflector on foreign cars.
Kia Rio
But with this model you will have to seriously tinker. Since the deflector is attached to screws that are hidden by the visor. It must first be removed.
The tools you will need are Phillips and slotted screwdrivers, a flashlight and a construction spatula.
The process involves some combination of activities. Watch in detail how this work is done in the video.
Video: removing the instrument panel visor on a Kia Rio
;
Only then can you remove the central deflector. It is attached to pistons and screws. Two screws at the top, two pistons at the top and one at the bottom. After the deflector is removed, you need to disconnect the plug.
Before dismantling the left deflector, remove the left panel and the panel under which the fuse box is located. The deflector is attached to the side with two self-tapping screws. Before dismantling the right panel, open the glove compartment and remove the right panel, unscrew the screws. Now, by prying with a screwdriver, you can remove the deflector.
Video: dismantling the central and side heating deflectors
This is how the air duct deflector is removed on different cars. Of course, within one article it is impossible to give complete instructions for all car models. From all of the above, we can conclude that the amount of work that needs to be done to remove the air duct deflector is not the same. In some cars, the deflector is removed simply by pulling it out (Renault Logan), in others you have to remove the dashboard or other large elements (Lada Vesta, Kia Rio).
Very often, car enthusiasts are faced with the following question: how to remove the deflectors on a VAZ 2114? It occurs as a result of the fact that when they are handled carelessly (for example, when trying to clean them with force), they break or are pressed inward. How to correct this situation will be discussed in today’s article.
How to remove air ducts on a VAZ 2114
It was evening, there was nothing. A bad idea came to my mind - to illuminate the air ducts of the stove. The question is why? The answer is... he knows, just for fun, plus I was looking for information on the net about the illumination of the air ducts of the VAZ 2114 torpedo, I really didn’t find anything, just a couple of photos of the finished version of an unknown artist.
I also didn’t really see any information on removing the grilles, so I’ll write a little about it, maybe someone will need it. The grill itself looks like this
Hi all! When buying a car, I experienced such an unpleasant moment as the self-closing curtains of the central stove deflectors on bumps. This really bothered me; unfortunately, you can’t find such scarce things in our stores. And therefore, when I lived for a short time in Saratov, I found all 3 nozzles (central and two side). Just before the New Year holidays, I went to BBC and saw all the nozzles in a single copy, and even with a discount + 5% card. I don’t think long, I take it. Upon arrival home I decided to start installing it. Just in time for your birthday.
First of all, I pulled out all the buttons, plugs, bk, etc. from a torpedo.
I unscrewed all the screws and safely removed the cover.
Replacement is simple, just unscrew three screws and put them in place. Before installing the new deflector, I glued it with modelin or anti-creak, whichever is more convenient for you. I also glued the exhaust air duct inside along the perimeter. The exhaust air duct inside was all covered in dust, I suppose the dust had accumulated even before installing the cabin filter adapter, since I had previously driven without a filter at all. I wiped everything thoroughly there and safely started reassembling it, oh no, before assembling it I ran more wiring to the panel so that the emergency warning light would light up, it won’t fit into this entry, so I’ll tell you in another one.
The deflector fit very tightly, so it was centered with the air duct.
Next I set about replacing the side ones. I started with the driver's license. Mine was dented, just like the passenger one, in principle it could have been repaired, but I considered it necessary to replace it with a new one, because the car was no longer new and the plastic on them had faded.
Replacement is also quite simple, it is held on by 8 latches (two on top under the lining and two on the bottom under the lining, the remaining four are fixed in the air duct, also, two on top and two on the bottom). I needed a knife and a flat screwdriver, oh yes, it’s even better to put a cloth under the screwdriver and knife so as not to scratch the plastic.
Dismantling of air ducts
Sometimes, in addition to removing the deflectors, you also have to remove the air ducts themselves (this may be necessary if they are damaged or severely clogged).
- remove the deflectors (how to do this was described above);
- remove the dashboard by unscrewing the fastening screws;
- disconnect the side air ducts (left and right) by unscrewing two screws securing them to the central air duct;
- disconnect the central air duct by unscrewing three screws - one in the center and two at the edges.
After the air ducts have been cleaned or replaced with new ones, their installation and assembly is carried out according to the specified scheme, but in the reverse order.
FakeHeader
Comments 7
I cut a piece of metal from a nail of the same diameter and fused it into plastic))))
I thought about doing this too) what was the result? Doesn't the nail fall out over time?
No, that’s how the former Logan sold it, it seems to me that it turned out even stronger than the standard one, now I’ll have to do it on the Sander, otherwise passengers have a bad habit of twisting the deflector until the crap...))))
I should also try soldering a stud)
I cut a piece of metal from a nail of the same diameter and fused it into plastic))))
I don’t even understand where the carnation is and why?
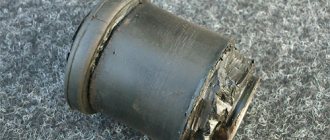
There are 4 latches in the “curtains” of the deflector, reminiscent of some kind of pistons. They broke off from the author. This problem is common, and in order not to buy a new “flap”, a piece of nail similar in diameter and length is soldered into place of the broken piston
The overall impression of a car's interior is made up of little things. Only a set of measures to improve the interior make it truly attractive and unique. Let's consider one of these modifications, which concerns air duct deflectors and can significantly change the interior of the Lada Largus.
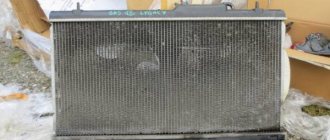
Cleaning and flushing the radiator of the VAZ 2114/15 stove
You can increase the efficiency of the stove by cleaning and flushing the radiator. The procedure can be performed without dismantling the radiator or with dismantling it. In the first case, you will need to remove the outlet and inlet pipes from the heater and pour a cleaning solution into it. Citric acid, plumbing cleaners (for example, “Mole”), etc. are used as such a solution. Then the radiator is washed with running water and coolant is added. You can clean the radiator better by removing it from the car. This will allow you to wash it not only from the inside, but also from the outside, removing dirt between the honeycombs. Washing is usually carried out with running water.
If after performing these procedures the stove does not work better, the radiator must be replaced.
Video: flushing the stove radiator
Thus, diagnosing a malfunction and determining the cause of poor heating of the VAZ 2114/15 interior with your own hands is quite simple. Self-repair and replacement of individual elements of the heating system are also not very difficult. It is enough just to strictly follow the recommendations of specialists.
Source
Resistor fault
As noted above, the resistor is designed to change the level of resistance of the current supplied from the generator to the heating system fan. In the VAZ-2114, using a switch, you can ensure the fan operates in three modes. In the extreme position, the fan is powered by a voltage equal to the nominal voltage of the vehicle's on-board network, providing maximum power output. In the intermediate position of the switch, the level of the supplied voltage is reduced due to one of the two resistor windings, the resistance of which increases by 0.20 Ohms. In the third mode, the second winding also comes into operation, due to which the total resistance of the resistor increases by 0.80 Ohms, reducing the fan rotation speed to a minimum.
If the windings burn out, regardless of the switch position, the fan operates only at full power. The inability to switch fan operating modes is evidence of a resistor malfunction.
Types of heater radiators installed on VAZ 2114/15
The manufacturer installs its own aluminum radiators on the VAZ 2114/15 with a service life of 3–5 years, after which the radiator is replaced. Selecting a new heat exchanger is quite difficult. There is a wide range of radiators from various manufacturers on the market. Of course, there are fakes.
Heating system radiators for the entire Samar family have catalog numbers 2108–8101060 and 2108–08101060–00 and the same dimensions:
- length - 250 mm;
- width - 158 mm;
- height - 42 mm.
The scheme of their attachment to the body is also identical.
Radiators for the VAZ 2114/15 stove are produced under catalog numbers 2108–8101060 and 2108–08101060–00
The VAZ 2114/15 can be equipped with aluminum and copper radiators, which have their own advantages and disadvantages.
| Aluminum | Copper | |
| Service life, years | 3–4 | 5–7 |
| Heat dissipation, W/mg | 209,3 | 389,6 |
| Maintainability in the event of a leak | Conditionally repairable | Repairable |
| Cost, rub. | 800–1000 | 1600–1800 |
The main advantages of copper products are longer service life, increased heat transfer and maintainability. However, they usually cost almost twice as much as aluminum ones. The technical characteristics of radiators are largely determined by their manufacturer.
Radiators DAAZ
The most popular among VAZ 2114/15 owners are radiators manufactured by Luzar, Hola, Craft, Pekar, etc. They are all in the same price category and have similar performance characteristics.
DAAZ radiators are highly efficient and have a long service life
DAAZ aluminum radiators have improved parameters. They have a service life of 4–7 years and a price of about 1000 rubles. The design features of such radiators include a larger number of lamellas (thin plates), and this significantly increases the heat exchange area. DAAZ radiators are the best option for VAZ 2114/15 owners.
Due to the larger number of lamellas, DAAZ radiators have increased heat transfer
How to remove air duct grilles on a VAZ 2114
- Registration
- Entrance
- To the beginning of the forum
- Forum Rules
- Old design
- FAQ
- Search
- Users
Now it is in a closed state, I tried to open it, but something got stuck there. I remember shooting on 9 in 2 seconds, but here I don’t know how. Please tell me.
maybe your nozzle is right there and there is something to jam
halt
then this is correctly called a blowing nozzle and not an air duct, you take a minus screwdriver with a thin tip and carefully insert it from the bottom or top of the nozzle itself and slowly pull it out, but everything is done carefully so as not to break the nozzle itself and spoil the panel.
Did you film it yourself? I think it should be something different there because... answer I tried, I'm afraid I'll break something
Major electrical failures of the heating system of the VAZ-2115
If no changes occur in the heating system at any position of the switch knob, then most likely the system motor is faulty (the brushes are worn out) or there is no voltage at the terminals. But also in this case there may be problems with the ignition switch or mounting block (fuse F4 has blown).
It is important for the proper operation of the car's heating system that there is no more than 3 ohms at the engine ground (installed under the hood). If the heater works normally at maximum engine speeds, and problems arise only at low speeds, then the cause of the malfunction most likely lies in the speed switch button or additional resistors
If the heater works normally at maximum engine speeds, and problems arise only at low speeds, then the cause of the malfunction most likely lies in the speed switch button or additional resistors.
If you turn on the interior heating system and hear a noise and the heater is not blowing properly, this also indicates an engine problem. Malfunctions may include jamming of the impeller or armature bearings. Malfunctions can be eliminated by replacing components or, if necessary, lubricating them. But, as a rule, these actions have a short-term effect and the problem returns.
Over time, any equipment breaks down and requires repair. Therefore, the heating system is no exception here, and the least that needs to be done for preventive purposes is to at least carry out periodic visual inspections and diagnostics. Don’t forget that over time the system ages and wears out, so the older the car, the more it needs to be prepared for the heating season.
Stove tap leaking
This malfunction occurs as a result of the heater housing drying out or due to souring of the shut-off device. The last reason is usually a consequence of the car being idle for a long time. In order not to damage the faucet or break the control cable, in such cases it should be opened very carefully, without using excessive force.
When the stove dries out, it is often not possible to diagnose the malfunction in time, since the leak may be minimal. But over time, the coolant leaking from the stove will certainly make itself felt. The first obvious sign of this malfunction is the appearance of a puddle on the floor of the car in the area of the passenger seat closer to the center panel. A driver or passengers with a good sense of smell can sense a characteristic odor before a puddle appears, which will only increase.
Another nuisance when the heater tap leaks is the formation of a thin oil deposit on the windshield, which appears as a result of evaporation of the coolant. At night, or when the sun shines directly into the driver's eyes, this can cause problems with the quality of vision, making it difficult to make the right decisions in a timely manner when the traffic situation changes. Such stains are difficult to remove, and if the leak is not eliminated, an oil film will form again and again. The operation to replace the VAZ-2114 tap will require partial removal of the stove.