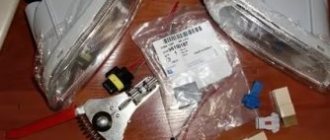
It is important to remove the headlight correctly if you decide to replace it with a new version, adjust the light, or to improve its decorative properties. From the factory, Lada Kalina is equipped with two types of headlights from different manufacturers: Avtosvet CJSC and Bosch. Regardless of the type of device, they are attached according to the same principle. There is only one difference in lighting technology: Bosch is marked with the letters AL and is made of polycarbonate, while “Avtosvet” has a cap on the low beam lamp.
The procedure for removing and installing the headlight unit on Kalina:
- If on previous domestically produced models it was possible to perform this procedure quite quickly, then on Kalina you will first need to remove the front bumper. I wrote about this in a previous article, so read this first: Removing and installing the front bumper.
- After this, you will need a 13mm socket and a wrench to unscrew the bumper power beam from the side where it is needed.
- The next step is to unscrew the lower headlight mounting bolts. To get to them, you need to bend the beam a little to the side and unscrew two bolts using a ratchet with a 8-mm head.
- Now you can proceed to the upper bolts, there are also two of them: one for an 8-point wrench, and the second for a Phillips-head screwdriver:
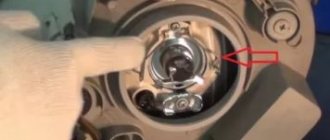
- And after that, you can disconnect the power plugs from Kalina’s front headlight: one of which is responsible for lighting, and the second for adjusting the height of the light beam. The electrical adjustment plug is secured with a latch, which must first be bent.
- We take the body with both hands and remove it from the seat.
- If it needs gluing, then it is necessary to apply silicone sealant around the entire perimeter of the junction of the glass and the body, wait at least an hour until it dries and install it back.
- If you replace the headlight with a new one, we immediately assemble everything in the reverse order, installing all the power wires in their places.
Removing, installing and replacing the headlight Link to main publication
This is interesting: What if you mix water with antifreeze
How to disassemble a headlight: working with the front light
How to install bi-xenon lenses in a headlight yourself
Using a hairdryer, the sealing compound in the headlight heats up well
When dismantling the headlight on a foreign or domestic car (VAZ 2107, 2109, 2114), you should remove the front fender liner along the required side. After this, you need to dismantle the cover of the bracket hole on which the radiator is fixed. Then you need to remove the lining and the bumper reinforcement.
Upon completion of these steps, the headlight unit itself is dismantled. Next, the following manipulations are carried out:
- heating the sealant;
- detaching the glass from the body.
When the above operations are completed, you can begin to directly replace the required parts. When assembling the lantern, you must ensure that all components are installed correctly.
How do you remove headlights?
The lighting system in Kalina includes:
- glass or polycarbonate;
- frame;
- lamp plugs;
- the lamps themselves;
- reflectors;
- wiring;
- decorative inserts.
To replace and adjust the headlights, most often you have to remove the front bumper. Only after this all the screws from below, as well as from above, will become more accessible. Once they are dismantled, you can remove the headlight itself, having first removed all the wires and pads.
But not every car owner has enough experience to dismantle the entire bumper. In addition, a common problem is the lack of time to change the entire lighting system. That is why replacing lighting without complete dismantling is considered more popular.
To disassemble the headlight with your own hands, you need to prepare the following tools:
- one key for 8 and one for 10;
- Phillips and flathead screwdrivers;
- new lighting system component.
To modernize the lighting on Kalina, you need to take the following actions:
- Remove the air filter housing and the special coolant unit.
- Remove the PTF plug using a screwdriver.
- Using a 10mm wrench, unscrew the bolt located underneath the headlight.
- Remove the bolts located on top of the light blocks. They are located near the radiator. In this case, you need to use the key 8.
- Remove the screw that secures the light to the car's fender using a large Phillips screwdriver.
- Rotate the light block so as to move the part near the radiator a little closer to the car engine. This will allow you to remove the fasteners located below from their seats.
- Remove the lower iron fasteners. To do this, you need to unscrew several bolts with a short head.
- Remove the headlight by pulling it towards you. Try not to damage the varnish layer, because the lamp is located next to the wing and bumper.
Knowing how to disassemble a headlight, installing another device with your own hands will not be difficult. Install a new headlight by performing the steps in reverse order. Now all that remains is to figure out how to adjust the headlights so that the light from them is directed correctly and illuminates not only the road, but also shines on the sides of the car.
Which sealant for headlight glasses is better?
How to install heated mirrors with your own hands?
The choice of sealants today is quite large and varied. Even experts find it quite difficult to answer the question of which sealant is best for gluing headlights. Very often, motorists complain about the poor quality of sealants. Some types flow heavily and stain both hands and surfaces being treated. Others do not bond well and take a long time to harden, and so on. Based on numerous reviews and experience of experienced car enthusiasts, experts recommend using the following sealants for headlights:
ABRO WS-904 is manufactured in the form of adhesive tape, rolled into a tight roll. Vulcanized 100% polyisobutylene is sold in plastic packaging costing 300-500 rubles. One package is enough to seal two headlights.
To seal the headlight, cut the tape to the required length and stretch it to the required thickness. The material is applied to a previously degreased surface so that all gaps are filled. Then the connected structural elements of the headlight unit are pressed tightly against each other for several seconds. At low temperatures, it is recommended to heat the sealant with a hairdryer to a temperature of more than +20 o C.
The material has excellent elasticity, is well processed and does not stick to bare hands at all. You can pre-wet your hands with water.
- excellent adhesion to almost any surface;
- the tape is easily processed and stretched to any thickness;
- instant hardening;
- no odors;
- high strength and reliability of the connection.
DowCorning7091 is specially designed for bonding and sealing materials that have different thermal expansion parameters, such as plastic-glass, metal-glass, and so on. Silicone one-component sealant for headlight glasses is characterized by high adhesion, elasticity and strength of connections. Experts recommend this material for sealing car headlights, LED lamps, electronic components, as well as for fastening inductors, capacitors and other parts.
The sealant is easy to process and hardens quickly. No preliminary priming of the surface is required. The Dow Corning operating temperature range is from –55°C to +185°C.
- connection and sealing of any materials;
- excellent frost and heat resistance;
- high elasticity and strength of the seam;
- good dielectric properties;
- easy processing and fast curing.
DoneDeal is a universal transparent sealant for cars. Excellent resistance to aggressive technical substances makes it possible to use DD6703 not only for gluing and sealing headlights, lanterns, glass, hatches and other parts, but also for replacing solid standard gaskets. The sealant is made on the basis of methyltriacetoxysilane, ethyltriaxetoxysilane and special additives. Curing time is at least 15 minutes. The operating temperature range is from –60 o C to +260 o C.
- high moisture resistance and joint strength;
- excellent adhesion to glass and other materials;
- resistance to mechanical loads and vibration.
The procedure for dismantling the lights
You should know that the Lada Kalina 1118 flashlight system consists of:
- housings;
- glass (polycarbonate);
- lamps;
- reflector;
- wiring;
- lamp plugs;
- decorative inserts (masks).
As for the ease of removal and subsequent replacement of the lamp on the 1118 model, the process usually involves removing the front bumper. After this, the screws on the top and bottom of the lighting fasteners become accessible. After dismantling them, you can immediately remove the headlight unit, not forgetting to first remove the blocks with wires.
Removing the front optics
However, not all car enthusiasts have a lot of time to replace the lighting system or experience in removing the bumper. For this reason, a more popular method is to change the Kalina headlight without removing the bumper.
To do this you will need to use:
- key for 8 and 10;
- a set of screwdrivers (flat and Phillips);
- new lighting system component.
Set of tools
In order to adjust the block lighting on the Lada. You will need to complete the following steps:
- Remove the air filter housing, as well as the coolant unit.
- Remove the PTF plug using a screwdriver.
- Unscrew the bolt on the lower fastener of the lighting component using a 10mm wrench. Insert your hand into the PTF hole.
- Remove the bolts located on the upper fastener of the light block component. They are located closer to the radiator. Use the key at 8.
- Unscrew the screw securing the product to the car fender using a large Phillips screwdriver.
- Expand the Lada Kalina headlamp so as to move the part closest to the radiator closer to the car engine. This measure will allow you to remove the lower fasteners from the seat.
- Remove the lower iron fasteners of the headlight. To do this, you will need to remove a couple of bolts with a short head.
Removing the headlight on Kalina
- Remove the car light by moving towards you. At the same time, try not to damage the paint layer, since during dismantling the lamp will be located as close as possible to the bumper and fender.
After this, you can install a similar device in reverse order.
What is needed for installation work
To install bi-xenon and classic lenses, you will need to complete the following steps:
- Remove the headlights from the car. This may require a special tool.
- Warm up the light fixtures with a hairdryer, disassemble the module and remove the old sealant.
- Remove the halogen lamp from the reflector and unscrew all fasteners.
- Place the lens into the hole that appears and secure it with the retaining ring on the reverse side.
Installation of lenses in the headlight is carried out in accordance with the side position indicators. Otherwise, the “daw” will be turned the other way around and the beam will shine incorrectly. After installation, you will need to install ignition units in the engine compartment and connect the wires.
Disassembling lanterns
To disassemble headlights of any brand on a Lada, you will need:
- hair dryer (household or industrial);
- flat screwdriver;
- stationery knife.
To separate glass or polycarbonate, you will need to remove the material's fastening brackets. After this, heat the sealant that holds the glass or polycarbonate in place with a hairdryer. Next, the softened sealant can be cut off. This makes it possible to remove the glass with a flat screwdriver.
Education: secondary specialized. Specialty: car mechanic. Professional diagnostics, repair, maintenance of passenger cars of foreign production 2000-2015. Extensive experience working with Japanese and German cars.
Installing ignition units and adjusting light
Ignition units are installed inside the headlight housing or outside in the engine compartment of the car. If one of the units fails, you will have to disassemble the case again and remove the glass, so it is more convenient to place the electronics behind the bumper or directly under the headlight using double-sided tape.
Xenon devices shine perfectly even in heavy snow and fog, but for correct operation they require professional setup using a special stand. This procedure is offered at each maintenance station and is inexpensive.
Replacing headlights LADA Kalina
Required tool : Phillips screwdriver, wrench or 8-mm socket.
To remove Kalina's headlight, press the latches and disconnect the wire blocks from:
|
Remove the front bumper (see “Removing the front bumper”).
- We unscrew the screw of the upper fastening of the headlight unit with a Phillips screwdriver. Unscrew the 3 bolts securing the headlight unit (shown by arrows) and remove it.
- The headlamp housing is marked “RE” on the right, and “LE” on the left.
- If you need to replace the headlight glass, use a screwdriver to pry up and remove the six spring brackets that press the lens to the headlight seal.
- Remove the headlight glass and seal.
Installing the headlight is done in reverse order.
This is interesting: What kind of oil to fill in Renault Logan 1 6 8 valves
How to properly disassemble a headlight?
I have a spare headlight at home and want to take it apart (in light of recent events regarding the installation of LED rings). A quick inspection showed that in addition to the plastic latches, the entire structure is sealed.
Question: — how to melt the sealant?
It doesn't cook in the microwave. I don't think it will melt in hot water. I'm afraid that the whole headlight will melt with a hair dryer.
Are there any other options?
By the way, this is a topic.
I opened mine in the oven, it turned out very well, the main thing is not to let the sealant get on the headlight glass itself, you’ll wash it off later. So, keep scissors ready so that you can immediately lift the glass slightly to cut the sealant snot.
damn, what should I do, the headlight doesn’t fit into the oven. )))))
I bought 2 LED rings today and mentally prepared myself for collective farming. and here on you)))) tsknkh.
Maybe it’s not worth bothering with?
damn, what should I do, the headlight doesn’t fit into the oven. )))))
I bought 2 LED rings today and mentally prepared myself for collective farming. and here on you)))) tsknkh.
Maybe it’s not worth bothering with?
They shine brilliantly))) diameter 12cm. I’m still thinking, should I make all 4 rings the same, or should I buy 2 more with a smaller diameter?
I watched them check it in the store.
since the LEDs are located at a short distance from each other, from a distance it seems like a ring with breaks))))
At home I actually tried to power it from a battery - it didn’t work. Doesn't want to charge from a mobile phone either. Apparently you need 12V, I'll go and try it on the battery in the evening.
I'll have to stir it up in my eyes))) first to see how it looks on you.
You have a rasta glasha, right? Big-eyed?
I'll have to stir it up in my eyes))) first to see how it looks on you.
You have a rasta glasha, right? Big-eyed?
When I looked at the car before buying it, I saw traces of “work” on the inside of the wings)))) and the previous owner said that the car had been hit in the front. but apparently it was either beaten in Japan or made with high quality, because there were almost no traces of putty, but it was clear that the metal was bent and straightened. Dorestayl headlights were probably installed based on financial considerations, they are more expensive. and to be honest, I like these headlights better))))
and the car is Restyle because it’s 2003, black interior, display with yellow backlight, the mileage screen is not on the side, but under the speedometer, the stopari is Restyle, and not the usual red ones, and everywhere the Gloria inscriptions are made in a new font, so to speak (thresholds, floor mats), yes and the computer version is up to date (I don’t think it has been updated).
Lighting system design
Optics for Kalina are manufactured at two factories:
- Bosch;
- JSC "Avtosvet"
Both types of optics have excellent characteristics and provide high-quality illumination of the road. You can recognize Bosch products by the missing cap on the lamp in the near module, as well as by the AL code on the glass.
The headlight design of the Lada Kalina is no different from most cars. The flashlight has low and high beam modules, blocks with turn signals and side lights. In the new Kalina body, the dimensions also play the role of running lights.
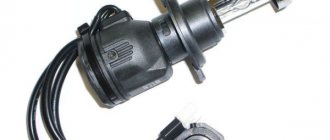
The following lamps are used in Kalina optics:
- low – H7, 55W;
- long range – H1, 55W;
- direction indicators – PY21W, 21W;
- Dimensions – W5W, 5W.
Light elements from the dimensions fit into the license plate lighting module on the trunk lid. Since 2013, modernized optics have been installed in Kalina, where part W21/5W is responsible for the clearance and daytime light. The fog lamps are equipped with H11 lamps with a power of 55W.
How to choose headlight sealant?
In this article we will analyze the process of disassembling and assembling the headlight, as well as the materials that are used.
The following reasons may lead to the need to disassemble the headlight:
– headlight fogging; – replacing broken or cracked glass; – reflector repair; – tuning of optics (installation of lenses, diodes and other work on retrofitting optics).
The most important mistake is trying to disassemble the headlight mechanically, using improvised means.
At manufacturing plants, headlights are most often assembled using butyl sealants. This allows you to disassemble the headlight without any problems by heating it in an oven to +120°C or heating the seam with a hair dryer to the same temperature.
Next, the disassembled headlight must be thoroughly cleaned of all remnants of the old sealant mechanically (with a screwdriver or knife).
You can also use ABRO® Sealant Remover, but avoid contact of the remover with the transparent surface.
Which optics is better to choose
While using the machine, the lights are subject to sudden temperature changes, impacts from stones and small grains of sand. These factors negatively affect glass, reducing its transparency, worsening light characteristics.
High-quality headlights that meet safety requirements are installed from the factory. Unofficial replacements are equipped with xenon lenses, “angel eyes” and modified reflector geometry. These lights look beautiful, but wear out faster due to poor quality materials and can fog up in humid weather.
When choosing new optics, it is better to trust the official ones. When purchasing, it is important to clarify the modification of the body and the year of manufacture of Kalina. Depending on the configuration, there are darkened masks or improved lighting characteristics.
Low and high beam optics
Depending on the body type, Kalina has different parts installed:
- sedan, hatchback – standard optics;
- sport, station wagon - are equipped with a more elongated reflector with an increased area to increase the lighting area by 20%.
To connect improved optics to Kalina, you do not need to lay additional wires or change contact connectors. The optics are no different in mounting points and shape.
When purchasing flashlights, you should pay attention to original parts with improved performance. This will improve the characteristics of the beam without interfering with the wiring or altering the standard fasteners.
Fog lights
When buying new PTFs, it is better to choose from original parts. Standard lights are equipped with durable glass and a high-quality reflector that directs the beam in accordance with GOST.
Fog lights for Kalina are produced by:
- Bosch;
- "Kirzhach".
The models differ in the shape of the glass, but there is no difference in quality. The headlights are connected to the standard wiring and installed in the mounts on the bumper. There are no fog lights in the basic trim levels. To connect them, you will have to additionally purchase a button for the interior, a PTF relay, and remove the bumper plugs.
In stores you can find modernized flashlights with lenses for gas-discharge lamps or LED modules. Such products are not certified for use in Kalina because they do not meet transport safety requirements. For such parts you can receive a fine and an order to eliminate the malfunction within 10 working days.
Description of automotive optics
Car headlights vary in appearance, size and type. However, the parts meet stringent requirements for certain characteristics. For example, for right-hand traffic, the optics must correctly collect the beam of light, have a clear limitation without flare horizontally and a clearly defined “daw” towards the side of the road. This luminous flux allows you not to dazzle oncoming drivers and illuminate the side of the road on the right.
You can form and direct the light beam:
The reflector is most often used with halogen lamps, but there are exceptions with xenon. The lens is used to form the beam for all types of lamps. It can be halogen, xenon or even LED.
Glass with special guide ribs on the inside can be seen on old foreign cars produced before 1990. The most striking example is considered to be a lantern from an old Zhiguli. For example, on the glass of a VAZ 2107, stripes are clearly visible, which are responsible for collecting the light flux.
Structurally, any headlight consists of:
You can install the lens in any headlight, except for those models that use external glass to form the “daw”. In this case, you will have to buy a transparent part separately or disassemble it and grind the protruding ribs on a special machine.
Features of headlights
As standard, Lada Kalina headlights are combined into blocks, which are divided into three sections, providing:
- low beam;
- side and main beam;
- turn indicator.
When turning on the low beam, only low beam bulbs are used. If you turn on the high beam lighting, a complex consisting of high beam and low beam lighting at the same time lights up, each with a power of 55 W. At the front of each section of indicators there are specialized transparent lenses.
The turn signals glow orange and have a power of about 20 watts.
The headlights are adjusted using a specialized corrector. The electric headlight corrector has an electromechanical drive. The standard adjustment system contains a device mounted directly on the dashboard itself and a specialized wire that connects the electrical wires in the headlights. To adjust the electric headlight corrector, you will have to disassemble them.
Replacement or removal of the lighting system occurs for various reasons. Among the most common are:
- headlight tuning;
- installation of a new kit instead of the old one;
- need to adjust the electric headlight leveler.
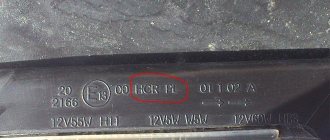
Before removing a headlight when it needs to be replaced, it is advisable to identify the company that manufactured the part. To do this, you need to carefully examine the glass. If the AL symbols are present on it, this lighting complex was manufactured by Bosch.
Some headlight models from this manufacturer are made of polycarbonate and do not have a low beam lamp cap. If the lamp used for low beam in a polycarbonate headlight is equipped with a cap, it is most likely made.
How to put the headlight back together?
There are many ways to seal a headlight.
- You can use butyl tape (3M Windo-Weld Ribbon Sealant/Glass Setting Butyl Tape). You need to apply the tape into the groove around the perimeter of the headlight, heat it up (120 degrees Celsius, for 7 minutes) and connect the two halves of the headlight together. Once cooled, cut off the remainder with a razor blade.
- You can use polyurethane adhesive sealant.
- You can restore the connection with silicone sealant, but it is less reliable than polyurethane. During connection, you can heat it with a hairdryer.
- It is not advisable to use hot glue, as it can crack in the cold.
- After applying the new adhesive sealant, you need to connect and press the two parts of the headlight together. There should be no gaps left. Headlights contain metal clips or plastic latches. They will come in handy at this stage, keeping the two parts of the headlight pressed together for 30 minutes to an hour.
If there are scratches or clouding on the transparent part of the headlights, you can also read articles on how to properly polish the headlights and varnish the headlights.
How do Kalina lighting devices work?
Regardless of the type, the headlights on Kalina have the same design. Each lamp has three sections for lamps with different light levels:
- further;
- near;
- dimensional (also rotating).
To activate the low beam, you need your own lamps, and when switching to high beam, both units work at once with a power of 55 W. To make the light wave stronger, manufacturers use special diffusers, transparent in the center in each section. The block of side lights and direction indicators differs in color (orange) and power - the bulbs produce only 20 W.
In order to adjust the light, it is necessary to use a corrector on an electromechanical drive. To use it, you will have to completely disassemble the headlight. The corrector is a device on the instrument panel associated with an electromechanical drive. Due to this, the wires of the light source are connected.
Description of lenses
The lens is the most favorable component for installing a gas discharge lamp. The internal device allows you to accurately collect the light flux and direct it to the right place, providing a clear cut-off line and a clearly defined daw.
Lenses are divided into:
The bi-xenon version comes with a special built-in curtain that covers the light flux in low beams and opens completely in high beams. Thus, one lens is sufficient for installation in a headlight with one module. Classic components are responsible only for high or low beam and are not equipped with a curtain.
Replacing low beam lamps with your own hands
Changing them in headlights is one of the simplest procedures, which is quite accessible to a beginner. The only thing that needs to be taken into account are some nuances. They depend on the modification of the car.
Instructions for replacing low beam in Kalina 1
Changing such a part is very simple. First you need to open the hood and turn off the power to the on-board network by disconnecting the terminals from the battery. To make it easier to change, it is recommended to dismantle and move the reservoir with windshield washer fluid to the right. Next, you need to remove the protective cover of the headlight and pull out the desired lamp. To remove it, just slightly squeeze the latch and then remove the terminal.
When installing a new lamp, do not touch it with your fingers. Otherwise, greasy marks will cause a decrease in resource. If this happens, you can wipe the glass flask with alcohol.
Replacement in Kalina 2
Everything is simple here too. It is enough to remove the rubber boot and disconnect the terminal from the lamp contacts, then press the latch and remove the lamp. Installation is carried out in reverse order.
Replacing these elements does not require a visit to a car service center. The main thing is to observe some nuances. For example, removing the terminals from the battery. This way the on-board network will be de-energized and an accidental short circuit will not occur. You also need to choose the right high-quality components so that you do not have to change them often.
The main reasons for replacing and adjusting headlights
- cracks and breaks in the body;
- breakdown in the electrical connectors of the headlight;
- damage to reflectors;
- defects in fasteners;
- clouding of the optics (the headlight sweats or becomes dirty).
Replacing a headlight is one of the activities after which it is impossible to do without adjusting the lighting fixtures, since the light must be properly dispersed. Headlight leveling plays a decisive role in improving driving safety. Therefore, knowing how to replace front or rear lights is only half of the whole replacement process, where an important role is also played by how to adjust new headlights correctly.
Replacement of headlights for LADA Priora (station wagon, hatchback)
If you understand your car, then replacing the rear headlight unit will not be difficult for you. To do this you need:
- open the rear lid and fold back the trunk trim behind the taillight;
- then you need to release the latches;
- then disconnect the rear wiring harness block from the rear light;
- then remove the upholstery from the side of the removable lamp, unscrewing the screw that holds it in advance;
- unscrew the 3 nuts securing the lamp;
- remove the wiring and remove the device.
In general, as we see, if you act consistently and accurately, you can remove the headlight yourself without turning to specialists. It's important to note that the back piece is a little more difficult to remove than the front piece. There are some peculiarities that you need to know in order to perform the procedure correctly. If you doubt your abilities, it is better to contact the service center. Today in Russia there are a lot of such places, and everywhere there are good craftsmen who will quickly remove the headlight range control or install a new version. Of course, you will have to pay for this, but you will be sure that the work is done correctly and efficiently.
It is noteworthy that the headlights of any car require maintenance. In this case, they will serve for a long time and properly. Over time they become cloudy, so they need to be cleaned. It is very important that they are crystal clear and transparent. If the headlight is very dirty, it should be cleaned with sandpaper and then wiped with a damp cloth or microfiber.
Of course, there are special care products for car lights, but they are quite expensive, and the results are no worse than using sandpaper and water. You can also use a rubber squeegee to clean the lights using polishing paste. In general, there are a lot of products for car headlight care. The main thing is to keep them clean and repair them in a timely manner. Then they will illuminate the road well and serve for a long time.
Step by step guide
Removing a headlight on a Priora is a simple process, but it has some features that you should familiarize yourself with in advance.
- To completely detach the headlight from the existing mounts, you first need to remove the bumper. In order not to unscrew extra nuts and bolts, you can try to remove the bumper. After removing the bumper, you need to unscrew the fastening bolt from above, and then from below.
- The third headlight mount is located on the side. To remove the headlight from this mount, you need a Phillips screwdriver.
- After working with a screwdriver, all that remains is to unfasten the block and the harness from the headlight itself. To make removal easier, you can pry the lock with a thin screwdriver.
- After all the above steps, you can easily pull out the headlight; nothing will hold it in place.
READ Wheel Bearing Replacement for KIA Sportage 3
You will need to install the headlight back in the reverse order.
Additionally, we recommend reading our specialist’s article on how to replace a low beam light bulb.
We also recommend reading our expert’s article, which details how to change the low beam bulb on a Priora .
You can learn how to adjust the headlights yourself from the detailed material from our specialist.
Installation process
If you buy a lamp for bright light in low-beam headlights of a foreign manufacturer, you can simply follow the instructions. Everything is written out very clearly in it, so changing the light bulb in the low beam headlight is not difficult.
Once you have the bulb and the headlight has been removed, you can begin the installation process. Initially, you need to remove the special rubber casing. This can be done with a regular screwdriver. This will make it easier to pry off the edges of the rubber base. The casing is located on the inside of the headlight.
After removing the casing, you can begin to dismantle the old lamp for light. First, remove the terminals from the lamp. At this stage, it is important to remember their original location. Next, you should remove the special metal clips that held the old light bulb. It's very easy to remove. This can be done with virtually no improvised means.
Installing a new light bulb
Only after this can you remove the old lighting fixture and begin installing a new one. Please note that old burnt out lamps must be disposed of.
Before you start screwing the new device into the headlight, you need to make sure that the contacts are intact and only then insert the new bulb.
Please note that while screwing in the new element, do not allow your hands to touch the glass part. This is due to the fact that this way the lamp will fail (burn out) much faster. If this happens, you should wipe the glass part with alcohol and wait until it dries completely.
At the final stage, it is important to correctly install the terminals without mixing up the polarity (plus and minus). After this, you can install the rubber cover back and test the device.
Connecting the low beam bulb