Headlight adjustment
After replacing the bulbs, it is recommended to adjust the headlights. Manufacturers usually recommend doing this at a car service center, but the process itself can be done independently. This can be done manually, with the help of car service specialists or using the necessary equipment. If you want to save money, but carry out this procedure correctly, then self-adjustment of headlights is carried out in four stages:
- make markings on the wall;
- mark the lamps;
- adjust low beam;
- adjust the high beam.
Replacing lamps on Daewoo Matiz
Daewoo Matiz
A high-quality head light in a car is an important safety criterion, and all car enthusiasts know this. Every year, automakers improve their lighting equipment to ensure its most efficient functioning.
However, regardless of the perfection of the technologies used and the design of the main element - the headlights, the actual lighting capabilities directly depend on the type of lamp that is used in it.
In this regard, the most common compact urban hatchback on the domestic market, Daewoo Matiz, is the most illustrative example of how the choice of light bulb affects the efficiency of headlights.
What lamps are used on Matiz?
The design of the headlights of the urban “compact” from Daewoo uses standard low and high beam lamps of the H4 type. The main difference between this light bulb (by the way, the most common on the market) is its design simplicity and reliability. It is expressed in the fact that two filaments are used here - for low beam and high beam, respectively. This design once allowed automakers to simplify the design of headlights and provide convenience when replacing lamps.
Despite the fact that the H4 light source has not undergone significant changes throughout its production history, its effectiveness is determined by a number of design aspects, including the quality of materials, the type of gas used in the bulb, manufacturing accuracy, etc. The luminous output of the source directly depends on this. Actually, it is for this reason that one can observe that two outwardly completely similar lamps from different manufacturers produce not only different radiation power, but also the light temperature of the beam.
Low/high beam lamp H4 60/55W 12 Volt, used on Daewoo Matiz
How to choose the right lamps?
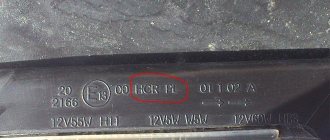
The Matiz headlights, as noted above, use standard H4 light sources with a power of 60/55 W, designed for an operating voltage of 12V and used in many other Daewoo car models. You can find them in almost any auto parts store. However, when purchasing, you should pay attention to several important aspects:
- Bulbs from a specific company must be certified by the car manufacturer, which is usually indicated on the packaging;
- The power of the lamps must fully correspond to that for the car model in question;
- The light bulb should not have noticeable damage and be in its original packaging with appropriate protection (usually a holographic sticker).
These simple criteria will allow you to easily distinguish a high-quality lamp from a fake and be insured against possible problems in the form of premature failure or high load on the vehicle’s on-board electrical network.
You should also avoid buying light bulbs from unknown Chinese suppliers.
Despite their affordable price, they often have unstable workmanship, and their actual performance parameters often do not correspond to those declared by the manufacturer.
Procedure for replacing light bulbs on Daewoo Matiz
Replacing light bulbs on a Daewoo Matiz is a very simple procedure and can be performed by the car owner independently without the use of special tools. To carry out this procedure you need:
- Disconnect the plug with the wiring from the car headlight, gaining access to the rubber seal that prevents moisture from getting inside;
- Carefully remove the seal (this operation should be performed manually, without using auxiliary tools such as a screwdriver, in order to avoid damage);
- Having gained access to the lamp socket body, it is necessary to release it from the retaining clamp by squeezing its ends and moving it to the side;
- Remove the faulty light bulb and install a new one in its place, locking it with a spring clip;
- Reassemble the headlight in the reverse order (remember that when reassembling the rubber seal, its tongue should be placed at the top).
An important nuance when replacing light bulbs is to be careful during the procedure. In particular, you should not touch the flask with bare hands (if touching cannot be avoided, use gloves). This is due to the fact that traces of sweat and grease on the surface lead to darkening during operation, as well as premature failure as a result of changes in the temperature balance of the lamps. This happens because the temperature of the light bulbs during their operation is very high, and foreign substances on the surface greatly affect its operating properties. In addition, dust and moisture should be avoided from entering the headlight housing through the hole in which the bulb is located.
Use gloves when replacing a lamp in Daewoo Matiz
conclusions
As can be seen from the above, Daewoo cars, and the Matiz hatchback in particular, offer their owners ease of replacing elements of lighting equipment. However, when purchasing them, it is very important to follow the car manufacturer’s recommendations for such consumables (for all Daewoo models they are set out in the vehicle’s operating instructions), and also use products from trusted manufacturers and suppliers. By following these simple measures, you can ensure safe operation of the vehicle in any conditions and be confident in the reliable operation of all electrical equipment of the vehicle.
When to adjust headlights
Every driver should know when to adjust their headlights. Therefore, if you are not one of them, then let us briefly remind you about this. This procedure is performed in one of the following cases:
- When replacing lamps in a headlight. This applies to devices with both single and separate optics.
- When replacing one or both headlights. This may be caused by its failure, an accident, or the owner’s desire to install a more powerful or technologically advanced lighting device.
- In case you feel that you have become uncomfortable driving with the existing light and need to make adjustments.
- In the case when, when driving in the dark, drivers of oncoming cars flash their high beams at you, thereby signaling that you are blinding them.
- When installing fog lights. As a rule, only the PTF is adjusted.
- After performing work related to changing the stiffness of the suspension.
- When replacing wheels or tires with similar products with different diameters.
- In preparation for undergoing routine maintenance.
- Before traveling long distances.
Monitor the light emitted by your vehicle's headlights and adjust it if necessary. Remember that an incorrectly set light causes discomfort and a threat not only to you, but also to drivers of oncoming cars.
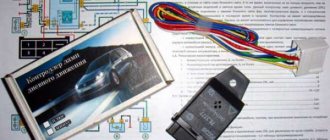
Recommendations for operating the system
Sometimes during operation problems arise that any car enthusiast can solve; in addition, certain improvements can be made that will increase the reliability of the system and save you from troubles. Let’s consider the most common cases:
| The light doesn't work | In this case, you first need to check the fuse and light bulbs. If everything is in order with these elements, then most likely the button used to turn on the low beam on the Matiz has failed. Over time, the contacts on this element may burn out, which is the reason for its failure; in this case, the button is simply replaced |
| Poor light quality | In this case, replacing the lamps will help, since even high-quality options lose their properties over time, and after 2 years they will shine much worse than new ones. You should not purchase cheap options, since a low price a priori means the same quality; it is better to take products from a well-known brand with a good reputation |
| System modernization | Many car owners complain that when the ignition is turned off with the low beams on, the headlights still light up, which leads to periodic discharge of the battery. Therefore, many services provide such a service as modifying the low beam on Matiz; they improve the design, increasing its reliability: when the ignition is turned off, the light goes out |
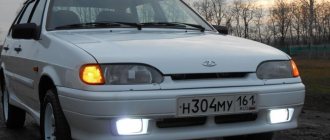
Options with increased light output solve the problem of dim headlights without major alterations
Adjusting the headlights
Before you start adjusting the headlights, you should check the following car parameters:
Markings for adjusting headlights.
- The difference in tire volumes.
- The condition of the springs in the suspension.
- Complete distribution of all possible loads.
- Tire pressure level.
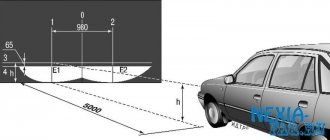
If there are malfunctions here, then the lighting angle will be incorrect, which, in turn, will certainly affect the quality of the adjustment itself. Naturally, in order to adjust the light correctly, you will need to meet some important conditions. The first of these is the presence of a vertical, flat wall with sufficient space for a car - a length of at least 7.5 meters.
For direct marking, you can use either chalk or adhesive tape. Since each car has its own dimensions, the markings for it are purely individual. However, there are several standard values that can be used for almost all cars.
We find a flat area, the side of which should rest against the wall. The wall, in turn, must be without protrusions, corners, various irregularities and strictly vertical. We drive close to the wall and mark the center of the car, as well as the central axis of the lamps.
To correctly mark the wall, you need to mark the distance from the floor to the lamp and from the marked lamp to the center of the car. Then you should draw another line on the wall, located 5 cm below the first. Next, we move 7.5 meters away from the wall and draw a horizontal line on the wall that will connect the central points on both lamps.
Then we draw vertical lines through the central points of the headlights. Another vertical line should be drawn through the center point of the machine. This line should be 7.62 cm lower than the one that connects the center of our headlights.
Having made the markings, turn on the low beam of the headlights and make a direct adjustment, in which the angle of the lamps completely coincides with the horizontal line. And the place where the light begins to rise upward must necessarily coincide with the intersecting drawn lines.
As a result, to get the desired beam of light, you should tighten the adjusting screws, which are located under the hood of the car on the back of the headlight.
The ideal option is when the light is slightly below the center of the headlights.
If the car has a combined high and low beam, then only the high beam can be adjusted, and the low beam will be adjusted automatically.
If your car has a separate high and low beam system, then each beam of light will have to be adjusted in turn. And the wall markings will also be slightly different - the low beam is adjusted according to the method described above. And the high beam must be placed so that it exactly falls on the central markings of the headlights. In this case, it is better to use special equipment, without which ideal adjustment will not be possible in this version.
The working process
If everything is organized correctly, the replacement will be done quickly and without any problems; it is important to be careful and not rush.
Preparation
To carry out the work you will need the following:
- Low beam lamp for Matiz in the amount of 2 pieces, this model uses H7 type halogen elements with a power of 55 Watts, you should not purchase more powerful options, as this will lead to overheating of the car wiring and other problems in the form of burnt contacts and failed controls. You can opt for LED solutions; they are more expensive, but they also have a resource three times longer.
LED options offer high light quality, low power consumption and long service life
- When carrying out work in the garage, or even on the street, we advise you to stock up on a flashlight; with its help you will clearly examine everything down to the smallest detail, which will help carry out the work faster and easier.
- We also recommend taking a small mirror and having someone to hold it, this will help you see the inside of the body without having to stick your head under the hood. You yourself will appreciate how convenient it is to work while controlling the process through the mirror.
Replacement
The instructions for carrying out the work are quite simple, and you can easily do them yourself; this will not only get a high-quality result, but will also save significant money.
A step-by-step description of the process is as follows:
- First of all, you need to disconnect the connecting block of the wires, which is located outside. Everything here is very simple and easy: grab the chip and pull it away from the body, under no circumstances pull the wires, as you will damage them and have to deal with them later, and this is much more difficult than simply replacing a light bulb.
The connection is removed very simply, the main thing is not to damage the contacts
- Now nothing prevents you from removing the rubber plug; this is done simply: there is a tab on top that you need to grab and pull, the cover can be removed very easily.
The plug protects internal elements from contamination and moisture.
- Next, you will need a mirror with which you can examine the location of all the internal elements. You need to release the spring clamp, which holds the light bulb and does not allow it to move when vibrating, to do this, press the two antennae, either together or separately, and disengage from the protrusions of the body, do not pull too hard, as you can pull the clamp out of its place of attachment , and putting it in place is not an easy task. By pressing the tabs you can release the clamp
- Then nothing holds the lamp, and it can be easily removed, after which a new one is installed in its place. There is nothing complicated here, the only thing you should remember is that you should not touch the glass, take the product by the base, but if you do touch the flask, then wipe it with a cloth soaked in an alcohol solution.
- Assembly is done in reverse order and takes just a few minutes. (See also the article Fog lights on Gazelle Business: features.)
Do-it-yourself replacement of Daewoo Matiz lamps
Every car enthusiast knows how important high-quality headlights are in a car. Light directly affects the level of safety while driving. Automobile manufacturers are constantly improving lighting equipment to ensure that the cars they produce are much safer. Despite this, headlights often fail.
There is a completely natural explanation for this. Any complex technical equipment wears out over time, so it is not surprising that headlights also need to be replaced. Daewoo Matiz lamps are no exception. This car can be called quite reliable, but its headlights may also be faulty. What needs to be done to fix them?
How to replace Daewoo Matiz lamps
The procedure for replacing lamps on such a small car is not particularly difficult. What exactly needs to be done to replace the lamps?
1. At the first stage, you will need to disconnect the plug with wiring from the car headlight. This is necessary in order to gain access to a special rubber seal. It is this that most prevents moisture from getting inside.
2. Then you need to try to remove the seal as carefully as possible. This should be done as carefully as possible and without any aids.
3. After the car owner can gain access to the lamp socket housing, you need to try to free it from the retainer. To do this, the ends of the clamp need to be compressed and then moved to the side.
4. Now all that remains is to remove the light bulb that needs replacing. When this is done, the owner will only have to install a previously prepared new lamp in its place. It should be locked using a special spring lock.
5. The last step of replacing the lamp involves assembling the headlight. Every car enthusiast should definitely remember that during reinstallation of the rubber seal, you need to make sure that its tongue is secured at the top.
Daewoo Matiz lamp and its technical features
The headlights of such a small city car as the Daewoo Matiz are equipped with conventional (standard) lamps for both low beam and daytime running light. These lamps are type H4. Their main difference from many similar lamps is that they have enviable simplicity and reliability. These lamps use only 2 filaments.
It is precisely because of the extreme simplicity of the design that car enthusiasts can count on the fact that repairing or replacing these lamps will be a piece of cake. The Daewoo Matiz lamp is an example of simplicity.
Replacing lamps on Daewoo Matiz. How to choose the most suitable lamps
Standard light sources for this car have a power of 60 or 55 W. They are designed for a voltage of approximately 12V. Similar voltage sources are used in many other vehicles. This is extremely important, because you can choose suitable light sources in almost any store that sells car parts.
What to look for when choosing the most suitable spare parts
When purchasing, it is recommended to pay close attention to the availability of manufacturer certification. Usually this information can be found directly on the packaging. Also, the power of the lamp must fully correspond to the power of the car. Under no circumstances should you replace a standard lamp with one whose power is significantly higher or lower. Otherwise, it can lead to the most serious problems. Also, the light bulb should not show any damage. It must be in standard factory packaging.
By paying attention to all of the above, a car enthusiast can easily choose the most suitable lamp model for his car. Daewoo Matiz lamps have standard characteristics, so finding a suitable replacement is quite easy.
Important information! Every car owner should know that under no circumstances should you touch the bulb with bare hands. The fact is that fingerprints can cause damage.
Conclusion on lamp replacement
The procedure for replacing lamps on such a small car can be performed by anyone. You don't need much experience to do this. After reading this text, you can once and for all forget about the need to repair your own car at a car service center.
Replacing lamps on a Daewoo Matiz car:
© rusavtoplus.ru, 2013-2020 | All rights reserved
Related posts:
Daewoo Matiz, Headlights
conclusions
As can be seen from the above, Daewoo cars, and the Matiz hatchback in particular, offer their owners ease of replacing elements of lighting equipment. However, when purchasing them, it is very important to follow the car manufacturer’s recommendations for such consumables (for all Daewoo models they are set out in the vehicle’s operating instructions), and also use products from trusted manufacturers and suppliers. By following these simple measures, you can ensure safe operation of the vehicle in any conditions and be confident in the reliable operation of all electrical equipment of the vehicle.
Source: ravon2.ru
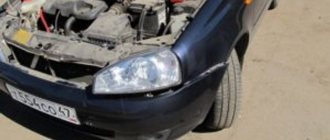
How to change the headlight bulb on a Matiz
Replacing incandescent lamps Daewoo Matiz
A bulb with a spiral break is quite common, in this report I will write how to replace convex front lights with side lights in a Daewoo Matiz. This guide can also be used to replace a headlight . The only difference is the bulbs used.
I decided to use light-emitting diode (LED) lamp analogues not only because they are low-power, but primarily because, according to the manufacturers, they last incomparably longer than conventional lamps. In the course of my work, I took several photographs, which I offer to read.
For tools and materials, we will need a Phillips screwdriver and a W5W socket. For the headlight you will need a lamp with an H4 socket.
First of all, remove the plastic cover that holds the headlight in place. You only need to remove one screw using a Phillips screwdriver.
figure 1
Remove the plastic cover
The headlight is held in place by three 10mm bolts. The easiest way to unscrew is the one that is visible; the other two, located under the headlight, are more difficult to unscrew.
Replacing headlight bulbs for Daewoo Matiz
If for some reason you have not yet been to the World of Matizov channel, I strongly recommend watching there first
Headlight Matiz: headlight bulb replacement
How to replace the bulb
in the spotlight
Matiz
headlight ? Check out the next World of Matiz workshop! useful
figure 2
Bolts that need to be unscrewed
After all the screws have been removed, we remove the headlight assembly from the mount, providing access to the rubber plugs that prevent moisture from entering the headlight.
Rice. 3
Daewoo Matiz headlight in a remote state.
Disconnect the power wires and see the back of the lamps. parking light bulb is removed with the socket and the headlight are held in place by the clamp.
Figure 4
Reversing the
headlight
We replace the lamp with a new one and repeat all the steps in reverse.
Figure 5
New / used lamps for comparison
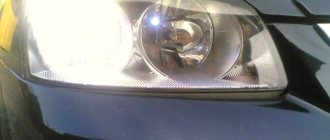
Rice. 6
The
headlight now appear yellow compared to the size of the LEDs
Fig. 7
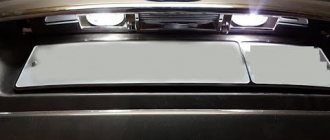
Appearance at night
That's basically it, I hope it's useful to someone. Good luck on the roads!