Olga Nikolaeva | Topic started by: Daewoo
Daewoo Nexia optics..pros and cons
- (Tudor) WHILE RIDING A DAUGHTER NEXIA CAR, I CAME TO THE CONCLUSION THAT THE LIGHT COMPLETELY SUCKS. THERE IS SIMPLY NO POSSIBILITY TO DRIVE SAFELY AT NIGHT. THIS IS RELATIVE TO STANDARD HALOGEN LIGHTS. I WANT TO SHARE EXPERIENCE. I PURCHASED HALOGENS FROM THE GERMAN COMPANY OSRAM. I DON'T WANT TO ADVERTISE ANYTHING. BUT THE LIGHT BECAME BETTER FROM REPLACING THE STANDARD BULB. NOT MUCH BETTER BULBS WITH 4200 KELVIN LIGHT FLUX BUT THERE ARE ALSO 5000 KELVIN. YOU SHOULD NOT INSTALL ANY BULB MORE POWERFUL THAN A STANDARD GALAGEN. THE WIRING WILL NOT STAND UP OR THE REFLECTORS WILL FLOAT. IF THERE IS AN OPTION TRY 5000 KELVIN COOL BLUE. I'M OF COURSE NOT VERY SATISFIED WITH THE LIGHT BUT IT'S STILL BETTER THAN THE STOCK LIGHTS. THEIR FILAMENT IS THINner AND THE LIGHT IS BRIGHTER AND THE OPERATION LIFE IS LESS. I WOULD LIKE TO TRY TO INSTALL XENON..BUT INSTALLING IT INTO HALOGEN OPTICS IS NOT AN OPTION. LACK OF LENSES AND PRESENCE OF TRAFFIC RULES THAT YOU CAN’T INSTALL GAS DISCHARGE XENON WHERE IT WAS NOT SUPPLIED BY THE FACTORY. I THINK THERE IS A WAY OUT. THE LAW ALLOWS THE INSTALLATION OF SPARE PARTS AND ELEMENTS FROM OTHER CARS ON THOSE VEHICLES THAT ARE OUT OF PRODUCTION. IF YOU CHOOSE HEADLIGHTS FOR XENON WITH A SIMILAR SIZE AND DESIGN AS NEXIA, THEN YOU CAN INSTALL THEM
— (Tudor) THESE FOGS RIGHT?
— (Tudor) THE LAW PROHIBITS THE INSTALLATION OF XENON IN THE MAIN HEADLIGHTS DESIGNED FOR HALOGEN. BUT. THE LAW ALLOWS THE INSTALLATION OF DISCONTINUED STRUCTURE ELEMENTS ON A CAR, INCLUDING HEADLIGHTS FROM OTHER VEHICLES. THE EXIT IS TO INSTALL HEADLIGHTS SUITABLE IN SIZE AND DESIGN, DESIGNED FOR XENON FROM ANOTHER CAR.
The headlights on the Nexia don't shine well. How to fix it
Fog lights of Daewoo Nexia Headlights
on Nexia shine poorly
.How to fix? — Project assistance: .
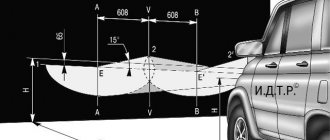
It is better to adjust headlights at night. We install the car on a flat horizontal area at a distance of 5 m from the screen - a light wall of a building, garage, etc. (you can use a sheet of plywood measuring 12m). As it turned out, I had to take out the headlights and adjust the light on the Nexia itself. Tire pressure should be as recommended. We seat assistants in the front seats or place a 75 kg load. How to remove the headlight of a Daewoo without removing the bumper, although this can be done on a Nexia n150. By pressing the front and rear wings in turn, we slightly rock the car to install the suspensions. We measure the distance from the centers of the headlights to the floor and draw horizontal line 1 at this height (see figure) on the screen, and 65 mm below it - horizontal line 2. How to properly install fog lights on a VAZ 2109. Materials and requirements for installation, process carrying out the work, decide on. We draw vertical lines A and B, corresponding to the centers of the headlights, and line 0 at an equal distance from lines A and B. Replacing the headlight on a Renault How to insulate the engine of a Renault Logan car. We set the headlight beam direction control to the “O” position, corresponding to the minimum vehicle load. Cover one of the headlights with a piece of cardboard and turn on the low beam. We adjust the direction of the light beams of the open headlight by alternately rotating the gears of the two adjusting screws with a Phillips screwdriver (at least 125 mm long) through the holes in the upper cross member of the radiator frame.
Headlight adjustment diagram
I spent about 2.5 hours making adjustments and drew chalk on the fence, but it was really worth it! We make the headlights one by one, cover one with a cloth, turn off the PTF.
As it turned out, not only did I drive like a blind kitten, but I also blinded oncoming traffic for six months!
was: neighbor
— shines diffusely forward for a period of 50-120 meters (5-10 meters in front of the car were saved by PTF)
further
— illuminates the tops of trees 30-70 meters above the road
now: neighbor
“illuminates” 10-50 meters in front of the car with a good beam (everything is visible) PTFs capture the sides of the road and the area directly in front of the muzzle of my ship =)
further
— illuminates 40 - 150 meters ahead, again, with a good beam of light!
I drive and smile
I used this scheme
There were no problems with horizontal adjustment
but here I had to suffer!
I had to pull out the headlights, adjust them, insert them, see the result, pull them out again, etc... PS: photos for clarity were taken from Yandex =)
Judging by VW Group vehicles, there's no end in sight for owners
The Kangarooing problem with manual 1.5 TSI Evo cars has been going on for seven months; VW admits the problem but has no solution
Ferrari Portofino 2019 review
Ferrari Portofino. this is a super stallion that you will ride every day Maximums Spectacular gearbox with excellent shift mechanics
I spent about 2.5 hours making adjustments and drew chalk on the fence, but it was really worth it! We make the headlights one by one, cover one with a cloth, turn off the PTF.
As it turned out, not only did I drive like a blind kitten, but I also blinded oncoming traffic for six months!
was: neighbor
— shines diffusely forward for a period of 50-120 meters (5-10 meters in front of the car were saved by PTF)
further
— illuminates the tops of trees 30-70 meters above the road
now: neighbor
“illuminates” 10-50 meters in front of the car with a good beam (everything is visible) + PTFs capture the sides of the road and the area directly in front of the muzzle of my ship =)
further
— illuminates 40 - 150 meters ahead, again, with a good beam of light!
Conclusion
Adjusting the headlight beams on the Daewoo Nexia is quite simple and every motorist is able to cope with this simple task on their own within half an hour.
I spent about 2.5 hours making adjustments and drew chalk on the fence, but it was really worth it! We make the headlights one by one, cover one with a cloth, turn off the PTF.
As it turned out, not only did I drive like a blind kitten, but I also blinded oncoming traffic for six months!
was:
near
- shines diffusely forward for a period of 50-120 meters (in front of the car 5-10 meters were saved by PTF)
further
— illuminates the tops of trees 30-70 meters above the road
now:
the near one
“illuminates” with a good beam 10-50 meters in front of the car (everything is visible) + PTFs capture the sides of the road and the area directly in front of the muzzle of my ship =)
further
— illuminates 40 - 150 meters ahead, again, with a good beam of light!
I spent about 2.5 hours making adjustments and drew chalk on the fence, but it was really worth it! We make the headlights one by one, cover one with a cloth, turn off the PTF.
As it turned out, not only did I drive like a blind kitten, but I also blinded oncoming traffic for six months!
Improve headlights on Nexia
Relays and fuses for Daewoo Nexia with block diagrams
Install new headlights. Installing new headlights is a good option if your headlights are completely damaged, for example, with a crack or the reflector has turned black. If everything is fine with them, then try unloading the headlights, that is, installing a relay on the Nexia headlights to improve the voltage on the bulbs, the result will be brighter.
Also, to make the light better, installing xenon in the Nexia will help, then the combination of a lens and xenon lamps will allow you to forget about poor road lighting. If you don’t want to break the law (installing xenon yourself is prohibited in the Russian Federation), then another option will help - install other light bulbs. Yes, there are light bulbs from osram or philips that really improve the light, usually they have special markings on them.
No matter how trivial it may sound, installing additional lighting will help improve lighting. Try installing fog lights if you don't have them or adding external lamps.
If your car is not that old, you can try polishing the headlights. At first, the light will improve and the road will become better visible.
If you know another way to improve the headlights on the Daewoo Nexia, then write in the comments below
A short preface.
This will be a report from several weeks of shopping, so it will be a little long and tedious, but it has pictures and even part numbers for some parts. A film could be made based on it, but I limited myself to writing a story on 30 pages. Please do not judge strictly if I somewhere moved from delirium to complete delirium.
Introduction.
Of course, there is light in the Daewoo Nexia, but it is not what I would like. Driving in my friends' cars with xenon, I wanted to have just such a light. The thought of retrofitting Nexia headlights is firmly stuck in my head. But, of course, you also cannot forget about other people on the road (i.e., do not blind your neighbor, otherwise he will catch up with you and hurt you). Therefore, it was decided to completely modernize the light, i.e. installation of auto-corrector, headlight washers and, of course, lenses in the headlights.
Story.
And so, the thought is there, and this is already a third of the matter. Having enlisted the help of the Internet, I began collecting information about lenses, methods of mounting in a headlight, and prices. According to reviews, I liked the Koito Q5 lenses. In the photographs with comparisons of certain lenses, the light of the Q5 was very bright, but I didn’t discount the other lenses either.
Adjustment process
Many car enthusiasts do not know how to adjust headlights on a Daewoo Nexia, and turn to a car service center, where it is not so cheap. But, this process can be carried out at home, with a minimum amount of necessary materials and tools.
So, to complete the process you will need a garage or just a flat wall, chalk and a little time. In fact, the whole process can be completed in half an hour, if you don’t rush at all. For those who don’t want to go through the hassle of drawing lines, special canvas screens with already drawn lines are sold. Having settled in with everything you need, you can proceed directly to the process.
First you need to draw lines on the wall according to the diagram below:
Scheme for adjusting headlights on Nexia.
The next step is to find the light trigger regulators. These tools are located behind the headlamp on the engine compartment side.
For sedan and station wagon vehicles:
- Regulator of the horizontal plane of the light beam
Rotating this screw adjusts the headlights in the horizontal plane.
Regulator of the vertical plane of the light beam
The screws are accessible without removing the headlights. The indicated screw adjusts the headlights in the vertical plane.
In order to perform manipulations you will need a Phillips screwdriver. So, by moving the regulators, the light beams of the headlights are adjusted. The distance of the car from the wall or screen should be five meters. This indicator is mandatory, since it is in this case that the adjustment will be considered correct.
Adjusted headlights.
External lighting control Daewoo Nexia N150
Repair of the ignition switch contact group on the Daewoo Nexia
Notes:
For ease of use, the handles, buttons and control devices located on the instrument panel and other additional control panels are marked with symbols of their functional purpose.
The steering column switches of the Daewoo Nexia N150 are installed on the steering column. The left steering column switch combines switches for the direction indicators, exterior lighting, low and high beam headlights.
Central light switch
To turn on or off the external lighting devices, turn the handle at the end of the lever of the left steering column switch.
The handle has three positions:
1. External lighting of Daewoo Nexia N150 is turned off;
2. Side lights, license plate lights and instrument panel lights are on;
3. The side lights, license plate lights, instrument panel lights, and low beam headlights of the Daewoo Nexia N150 are turned on.
Note:
If the ignition key is in position “B” - “steering shaft locked” or “I” - “ignition off”, when the driver’s door is opened, a warning sound is heard, reminding you to turn off the lights.
Headlight switch
To turn on the high beam headlights, turn the handle of the central light switch counterclockwise (turn on the low beam) and press the left switch lever away from you. When the high beam headlights are turned on, the corresponding lamp on the instrument panel lights up blue.
To briefly turn on the high beam headlights, regardless of the position of the central lighting switch, move the lever of the left steering column switch towards you. When released, the lever will return to its original position.
Turn signal switch
The turn indicators of the Daewoo Nexia N150 are turned on when the left steering column switch lever is moved up or down until it stops. In the upper position of the switch lever the right turn signal is on, in the lower position the left one is on.
When the steering wheel is returned to the neutral position, the left steering column switch lever is automatically returned to its original position and the turn signal is turned off.
Switch block
Front fog light switch
The front fog lamp switch is located on the instrument panel above the headlight beam direction control.
To turn on the front fog lights, press the button with the exterior lights on. At the same time, the indicator in the switch lights up. By pressing the button again, we turn off the front fog lights of the Daewoo Nexia N150.
Daewoo Nexia headlight design
Early Nexias have block-type headlights, consisting of a lamp with two filaments for short-range and long-range. There is also a light indicator and turning lights. Generations of cars produced after 2008 are equipped with updated headlights with an improved design. In them, lamps of different range modes are installed separately.
The need to adjust the headlights of the car model in question arises mainly after repairs or any work has been carried out on them. As practice shows, even minor interference with the operation of lighting devices can disrupt their settings. Adjustment will also be required if the headlights on the Daewoo Nexia do not shine well when purchasing a used car. Having studied the main reasons for the poor performance of lighting fixtures and repair technology, it is quite possible to correct this problem yourself.
How to adjust headlights on Nexia
How to adjust Daewoo Nexia headlights (Where and what to turn) Adjusting Daewoo Nexia headlights, annotation for dummies. In the instruction book for Nexia I read that to adjust the light I have is just like on. How to remove the headlight block on the Nexia N-150. Don’t be too critical) 1) To adjust the light beam of the headlight up or down, you can turn the bolt on the corrector by hand. 2) For the left or right beam option, you will need a long, narrow screwdriver. Or you can remove the headlight and simply twist the bolt with a Phillips screwdriver. We will be glad to see your likes and comments. Subscribe to the channel
How to adjust Daewoo nexia headlights
(Where and what to turn) Adjusting the headlights of the Daewoo Nexia, annotation for dummies. Don’t be too critical) 1) To adjust the light beam of the headlight up or down, you can turn the bolt on the corrector by hand. 2) For the left or right beam option, you will need a long, narrow screwdriver. Or you can remove the headlight and simply twist the bolt with a Phillips screwdriver. We will be glad to see your likes and comments. Subscribe to the channel
Our group: https://vk.com/tantoa
Yesterday I went to Daewoo dealers to adjust the headlights, including PTF. I’m kind of lazy myself, and I don’t think it’ll work out great on the wall. Adjusting the headlights on a NEXIA from the back of the headlight, after the nut has moved. We adjusted the near, far and PTF on the shield. I replaced the Chinese light bulbs (these ones) with my own standard OSRAM 55Watt ones. Now I’m riding and smiling, everything is visible))
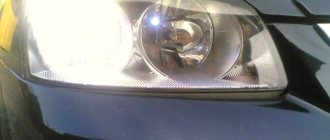
Let's look at the BEFORE and AFTER photos.
PS the photo shows low beam.
After adjustment on the stand. OSRAM 55 Watt.
Similar news
Before adjustment. Mark the screen on the wall as shown for each headlight horizontally (in the photo. Ketai lamps.
Other causes and solutions
One of the factors that the headlights on the model in question do not light well is weak wiring. To solve this problem, it is reasonable to power the lighting system through a separate relay.
The sequence of work in a specific example consists of the following operations:
- Check the voltage at the battery terminals after stopping the engine (12.6 V);
- A similar indicator is read at the headlight connector (10.4 V);
- There is an obvious difference of 2 volts (if you change it back to halogen headlights, the lighting will improve significantly).
To install separate wiring, you will need two copies of a 4-pin relay (30 A), 2 blocks, about 5 meters of wire with a diameter of 2.5 sq. mm. The power contact of the relay should be secured to the safety element using the soldering method. The remaining ends are soldered to the positive of the battery. The relay wires are connected to each other, the remaining parts are extended and attached to the low and high beam lighting system.
A bundle of 600 mm for the left headlight and 1800 mm for the right element is attached to the contacts of both relays by soldering. All connections are carefully insulated. Power comes directly from the battery. The ground is connected to any bolt, and the wiring is connected specifically to the lamp connectors. Installation is carried out using plastic ties to securely secure the wiring. For convenience of work, it is recommended to disconnect and remove the battery before starting work.
Also, car headlights may shine poorly if the contacts oxidize.
. In this case, cleaning the last elements with fine sandpaper and treating with a special compound will help. If the reason for the weak light of the lanterns lies in an incorrectly selected lamp, an alternative option should be installed according to the characteristics specified in the operating instructions.
How to adjust headlights on a Daewoo Nexia with your own hands
Most often, when setting up, standard schemes are used, although if desired, you can use unique adjustment methods. A diagram of the process should be included in the set of documents for the car. The universal procedure involves creating markings on vertically located, flat working surfaces - usually a wall (for example, a building) plays the role of a stand.
How to set low beam headlights on Nexia
After marking is completed, the luminous flux is turned on in a manner that is optimally convenient for adjustment. First, adjust the angle - the parameter ideally coincides with a horizontal line made on the surface of the wall. To obtain an optimal light beam, rotate the adjustment type screws from the back of the headlight inside the engine compartment.
Adjustments are made one at a time, one device is adjusted, the second is covered at this time - for example, with a piece of cardboard. After installing the light beam below the areas marking the center of the optics, we can say that everything was done correctly.
In difficult cases, you can solder circuits
How to set high beam headlights on Daewoo Nexia
The high beam type is adjusted separately from the low beam, and the markings on the wall are changed. Vertically located, pre-prepared surfaces must be smooth, distances must be maintained from 10 m. Sequence of actions:
- The car, fueled and ready for work, is placed on a vertical platform, where the location of the central elements of the headlights is marked.
- To fix real center points, you need to find them on the machine. The points are connected to each other, between them a horizontal ruler is placed 10 cm below the main one.
- After completing the marking process, the car is driven 10 m away, and the light control is immediately set to zero.
As a result, the light beam received from the head optics acts as the upper boundary of the bottom line along the main horizontal line.
How to adjust the fog lights on Nexia
The basic principle of regulating fog lighting is to rotate the optical devices in the horizontal and vertical directions to obtain the optimal angle of inclination. First make the fastening bolts on the fog lamps for the bumper weaker and perform the following actions:
- Place the machine on a flat working surface at a distance of 5-7 m from the vertical axis (the most common example is the wall of a house). The machine should be installed so that its axis is perpendicular to the marking site.
- They test the current pressure inside the tires - it must meet the norm for the springs to stay in place; it is recommended to rock the car from the side.
- Measure the distances from the base of the site and the central section of the anti-fog optical devices.
- Mark a horizontal line taking into account the level of previously made measurements.
- Connect the low beam type, place marks on vertical surfaces, and mark the center of a pair of beams.
- Turn on the low-beam headlights and turn off the fog lights.
The upper limiter of the light beam should be 10 cm less than the height of the horizontal platform. The optics are fixed in a parallel position relative to the longitudinal axis.
Lines are drawn on the walls dividing the car into halves. Additionally, a strip is provided below the first by 10 cm. The distance from the ground to the fog lamp, from the central axis of the car to the main lamp is measured. The intersection of these lines is the center for orientation.
Headlight adjustment
Are the headlights on your Daewoo Nexia bad? This means that immediate elimination of this deficiency is required, since good visibility on the night road is one of the keys to traffic safety. One of the reasons affecting the operation of automotive lighting elements is their correct adjustment.
On the Daewoo Nexia, this procedure is performed as follows:
- The tire pressure is adjusted to normal;
- The machine is placed opposite the wall at a distance of 5 meters;
- A load weighing 5 kg is placed in the luggage compartment, and the driver’s seat is made heavier by 75 kg;
- Then special markings are made on the wall or a screen is mounted to adjust the headlights;
- The axial longitudinal line of the car must be located according to the zero mark of the screen;
- The H value on the screen is equal to the height from the middle of the headlights to the floor;
- The corrector control on the instrument panel is set to mode “0”, which will be close to testing a car with one driver;
- The low beam turns on;
- The headlights are adjusted individually; the unused headlight should be covered with thick canvas or other light-proof material.
On Nexia, released before 2008
, adjustments are made using adjusting screws using a screwdriver until the optimal value is achieved. On models manufactured after this period, adjustment is made with a key set to “10” by rotating the screws located on the back side of the light element.
Olga Nikolaeva | Topic Author: HOME
I want to buy a Daewoo Nexia and only that
SiSishka o̶n̶l̶i̶n̶e̶ ))) why?
Love (Yamama) The price matches! it's true! I also seem to be happy, but the drawback is the doors, winter has just begun and they are already freezing so much.
SiSishka o̶n̶l̶i̶n̶e̶))) I had the same problem. I broke the key even at first
SiSishka o̶n̶l̶i̶n̶e̶))) the car has excellent chassis. but it’s already become a bit cramped for me. two youngsters.
SiSishka o̶n̶l̶i̶n̶e̶ ))) kids
SiSishka o̶n̶l̶i̶n̶e̶ ))) I agree completely
airat (Hemacandra) neighbor recently bought a one-year-old Daewoo, first frost and no such problems. You probably have an older edition, they are cold and cool down quickly. the new model is warm, I had a blast driving it and the new body is absolutely classy
SiSishka o̶n̶l̶i̶n̶e̶ ))) I have 2008
Evgeniy (Dylan) Love, it’s probably not your doors, but your locks that freeze? This is Ksyukha’s disease.
Evgeniy (Dylan) Airat, Daewoo Nexia is only an Opel Kadett in appearance, but inside it is all Uzbek. The metal in Opel was galvanized and 0.5 mm thick, and in Ksyukha it was ordinary iron, 0.4 mm thick. The engine is Korean, but good!
Replacing the low beam lamp on Nexia
Since the headlight unit on the updated model has become larger in shape and replacing the low beam lamp has become more difficult, we will tell you how to do it as quickly as possible.
There is a special attitude towards lighting equipment in our latitudes. Firstly, from autumn to the end of spring it gets dark early, and secondly, street lighting in most cities, frankly speaking, is so-so. Not every car can boast of good stock lighting and the Daewoo Nexia, unfortunately, is no exception. If you don’t want to install expensive semi-legal xenon, then you can choose good low beam lamps for the Nexia.
Characteristics of low beam lamps Daewoo Nexia
Headlight before restyling (2002–2008).
Headlights after restyling (since 2008).
Depending on the year of manufacture and modification, different low beam lamps were installed on the Nexia.
- To modify the N-100, it was planned to install one double-filament lamp for low and high beam with an H4 . Its power was 55 W.
- For Nexia N-150, low beam lamps with an H7 , and for high beam lamps - H1 . Their power is also 55 W.
Double-filament lamp H4 with three contact terminals.
Single-filament H7 lamps with two contacts.
Halogen and diode
Whether it is worth installing LEDs instead of standard halogens, everyone decides for themselves. However, the numbers speak for themselves. For example, a Philips BlueVision produces a light beam with a brightness of 900 Lumens, and not the cheapest lamp with 27 LEDs - no more than 400 Lumens.
For running lights and dimensions, the LED light is quite suitable, but for the head light, given the features of the Nexia ceiling, it is a controversial issue.
Why do the headlights on Nexia shine poorly?
Adjusting the Nexia n150 headlights improves the quality of lighting in the dark (in the evening, late at night). Incorrect settings, on the contrary, reduce visibility on the roads. If the optics are not positioned correctly and the angle of inclination does not meet the optimal requirements, drivers of other vehicles will be blinded by the scattered light flux. This situation increases the risk of accidents during oncoming traffic. Insufficient operating efficiency of light sources reduces the field of view, and this is also a cause of accidents.
Poor visibility at night greatly increases the risk of accidents on the roads
Driving takes place on roads with poor quality and smooth surfaces. As a result, the installation angle of the light sources changes, and the need arises to adjust the direction of the light. Other reasons why adjustment is needed:
- a new headlight, lamp or reflective element has been installed;
- fog lights were installed;
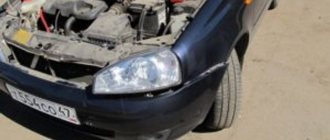
- there was an accident during which the front end of the body was damaged;
- recent repairs, replacement of suspension elements;
- installation of new tires and rims.
Adjusting the Nexia n100 headlights is easy to do on your own; you don’t need a complicated tool for this.
Are the headlights on your Daewoo Nexia bad? Everything is solvable
Many owners of Korean automotive products notice that the headlights on the Daewoo Nexia do not shine well.
There are not many reasons for this shortcoming. Experts assure that it is possible to cope with this problem on your own, but this will require finding out the true factors of the deficiency, and then eliminating the identified malfunction. Novice drivers who do not have at least minimal experience and knowledge of the internal structure of individual components and assemblies are recommended to contact professionals at the nearest service center.
Controls
The fog lights are activated using the power button.
And since headlights are quite powerful current consumers, the operation of the entire circuit is based on a relay:
- pressing the button activates the primary winding of the relay;
- the magnetic field closes the second circuit of contacts;
- current is supplied to PTF incandescent lamps from a battery or generator;
- Pressing the button again interrupts the current supply to the winding and the contacts open.
Note! Thanks to the relay, the button contacts do not burn out, since they work separately from the PTFs themselves. And at the same time, the cost of the solution is quite low
Operating principle of the fog lamp relay
For safety and protection, PTF control components (relay and button) are installed inside the car:
- power relay under the instrument panel;
- control button - on the instrument panel.
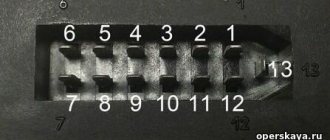
We take the other ends of the wiring that we extended into the cabin and connect the relay to it. The photo below shows that it is most convenient to carry out this operation through the standard place of the air duct in the front panel.
- connect the red wire to pin “30”;
- blue - to pin “86”;
- the wire from the fuse goes to pin “87”.
The process of connecting relays and control buttons inside the car
All that remains is to install the button in place and hide the wiring harness under the dashboard. That's it, the work on installing the PTF is completed.
Headlight adjustment diagram for Daewoo Nexia
To mark correctly, you need to drive 2 m to the wall, then place the car on it and the center of the axial part of the lamps. Next, mark the distance from the surface of the roadway to the specified lighting device. From the center of the light source, you need to mark the distance to the center of the car, then make a line that will go 5 cm lower than the intended one.
Then you will need to move about 7 m away from the wall. The points that correspond to the optical centers of each lighting device are connected by a line. This line is complemented by three more vertically placed segments. When the marking is completed, you can begin making adjustments.
When adjusting, you need to act according to a single scheme
Useful tips
You can adjust the fog light and the headlight according to the same scheme. After carefully studying the sequence of actions, you can complete the setup entirely on your own. It is inappropriate to neglect the need for regular work.
Important! If you correctly adjust the light on the Nexia, the comfort and safety of driving in the dark will increase.
To self-adjust, you must first prepare the car by placing it on a vertically located surface, a fairly flat area, and make the correct markings on the wall.
In Nexia, drivers often complain about poor night light, but this problem can be solved
The working process
If everything is organized correctly, the replacement will be done quickly and without any problems; it is important to be careful and not rush
Preparation
To carry out the work you will need the following:
Low beam lamp for Matiz in the amount of 2 pieces, this model uses H7 type halogen elements with a power of 55 Watts, you should not purchase more powerful options, as this will lead to overheating of the car wiring and other problems in the form of burnt contacts and failed controls. You can opt for LED solutions; they are more expensive, but they also have a resource three times longer.
Read more: Day of Mourning and Remembrance for the Dead
- When carrying out work in the garage, or even on the street, we advise you to stock up on a flashlight; with its help you will clearly examine everything down to the smallest detail, which will help carry out the work faster and easier.
- We also recommend taking a small mirror and having someone to hold it, this will help you see the inside of the body without having to stick your head under the hood. You yourself will appreciate how convenient it is to work while controlling the process through the mirror.
Replacement
The instructions for carrying out the work are quite simple, and you can easily do them yourself; this will not only get a high-quality result, but will also save significant money.
A step-by-step description of the process is as follows:
First of all, you need to disconnect the connecting block of the wires, which is located outside. Everything here is very simple and easy: grab the chip and pull it away from the body, under no circumstances pull the wires, as you will damage them and have to deal with them later, and this is much more difficult than simply replacing a light bulb.
Now nothing prevents you from removing the rubber plug, this is done simply: there is a tab on top that you need to grab and pull, the cover can be removed very easily.
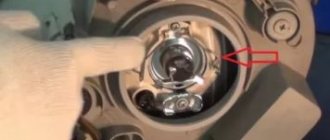
Next, you will need a mirror, with which you can view the location of all internal elements. You need to release the spring clamp, which holds the light bulb and does not allow it to move when vibrating, to do this, press the two antennae, either together or separately, and disengage from the protrusions of the body, do not pull too hard, as you can pull the clamp out of its place of attachment , and putting it in place is not an easy task.
- Then nothing holds the lamp, and it can be easily removed, after which a new one is installed in its place. There is nothing complicated here, the only thing you should remember is that you should not touch the glass, take the product by the base, but if you do touch the flask, then wipe it with a cloth soaked in an alcohol solution.
- Assembly is done in reverse order and takes just a few minutes. (See also the article Fog lights on Gazelle Business: features.)
Workflow Description
Let's look at how to properly organize a replacement in order to carry it out quickly and efficiently; there is nothing complicated here and no special knowledge or professional equipment is required.
Step-by-step description of the work
It is necessary to perform actions in the following sequence:
- First of all, open the hood, secure it and remove the terminal from the battery so that in case of unexpected situations a short circuit does not occur in the system and you do not get an electric shock.
- There is a plug on the back side of the housing behind the low beam reflector; to remove it, you must turn this element counterclockwise; do not try to pull the cover towards yourself, you may damage the threads or even break the housing.
The next part that needs to be disconnected will be the electrical connector; grab its body and, shaking it to the sides, disconnect the contacts. Sometimes this is difficult to do because the elements are stuck to each other, but there is no need to pull them out by force, you can damage something, carefully loosen the knot, this usually helps.
Read more: How to reset the code on a suitcase if you forgot
Then everything is simple: the light bulb is taken out by the base and a new one is put in its place. The most important thing in this case is not to touch the glass part of the product, as particles of fat from the skin will remain on it, which will burn at high temperatures and cause darkening on the flask.
Features of replacement in N150
Replacing the low beam lamp on a Nexia N150 is done in a similar way, with the only difference being that due to the design of the engine, access to the housing is difficult, so the following preparatory work is additionally required:
- Near the right headlight, you need to disconnect the air intake and release the fastenings of the air filter housing, after which these elements are moved to the side and replacement can be carried out.
- As for the left side, everything is a little more complicated here, however, the work is also done quite quickly: first, the fixing elements are released and the battery is removed, after which the three ECU mounting bolts are unscrewed by 10 mm, and this unit is moved to the side.