Ceiling lamp
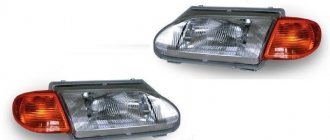
All illumination of the room is carried out by the lampshade into which the lamp is directly installed. It is the lampshade that scatters the light and fully illuminates the license plate of the car. It happens that when dismantling or in the process of replacing lamps, the lampshade may break. If this happens to you, then do not panic, lampshades are sold at any auto parts store.
Catalog number of the Priora lamp: 2170-03717010-00;
Its price is: from 100 to 200 rubles;
You should also not forget about the lampshade gasket; it is necessary to protect against moisture getting into the interior.
Gasket catalog number: 2170-03717012-00;
Cost of laying: from 20 rubles;
The lampshade is the same for all Lada Priora models.
Basic lighting
In a standard way, on the base model the issue of interior lighting on this car is resolved quite simply:
- interior lamp of VAZ 2114;
- individual interior lighting lamp;
- dashboard lighting.
There is also lighting for the glove box and interior lighting of the VAZ 2114, which includes illumination lamps for the front ashtray, heater switches and levers, and the hydraulic corrector scale for the front lamps.
The interior lighting is a simple electrical device. Built into the upholstery in the middle, upper part of the body, above the heads of the driver and passengers. It should light up when the doors are opened and go out when they are closed, a simple electrical signal is supplied from limit switches installed on the door pillars. The interior has switches on the front and rear side pillars on each side for manually turning on the dome light.
There are times when the light in the interior of a VAZ 2114 does not work. Such issues are often discussed on the forums of fans of this car. In fact, there should not be any special problems in fixing such a problem. There is a proven action plan in such cases.
- Check the functionality of the lamp. If it does not light up, the fuse is faulty and should be replaced. If the brake light works properly, then the fuse is fine and you need to look further.
- Check the condition of the light bulb, if it is working, then you need to check the contacts and limit switches on the door pillars. If an LED lamp was installed, then change the polarity; there could be a mix-up during installation.
- It is necessary to measure the current at the contacts, whether it flows or not. If there is no current, then you need to ring the entire circuit; a breakdown in the wiring is possible.
- The limit switches on the door pillars should be checked very carefully; experts and many of those who communicate on the forums say that this is where problems often occur. There may simply be a bad contact that needs to be adjusted.
Lamps
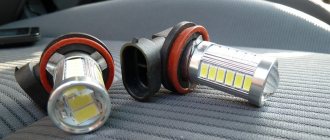
Lamps installed from the manufacturer's factory have a filament. After the first replacement, many install brighter LED lamps in place of the standard ones, which can illuminate the number much more efficiently and prettierly, giving the car a more beautiful look.
Standard lamps have the number W5W. The incandescent lamp has a power of 5W, which is quite enough to illuminate the room.
Cost of W5W lamp: from 20 rubles;
You can also install LED analogues instead of the standard lamp. LEDs consume less electricity and have a higher luminous flux.
It should be noted that according to the law on the safe operation of cars, the consecration of the license plate must allow one to see letters and numbers from a distance of at least 20 meters.
LED license plate illumination, how to install an LED strip, step-by-step instructions
Do-it-yourself car painting: step-by-step instructions and stages of restoring the car’s paintwork (130 photos and videos)
To install the LED strip you will need three resistors and three LED strips. Their color range is extremely diverse, but it is best to give preference to yellow or white tones. To replace conventional backlighting with LED, do the following:
- Solder a resistor to the positive end of the LED strip.
- We attach small wires to its end, as well as the minus side.
- The result is a design that has two contacts that are connected to the wires from the standard backlight.
To give the tape an original design, take a piece of plexiglass and glue the strip onto it with silicone sealant. Then the wires of the tape must be connected to the contacts of standard backlight lamps, after which we make insulation.
Next, you need to prepare the surface for mounting the structure:
- We dismantle the lampshades.
- Degrease the mounting side with solvent.
- Let the surface dry and apply sealant.
- Glue the LED strip.
- We seal the tape along the edges and leave it until completely dry.
- We check the product in action.
Replacement
It is easy to replace the lamps by following the instructions described below.
In hatchback and station wagon bodies, before starting work, it is necessary to remove the plastic trim on the trunk door; it is attached to plastic clips. To dismantle, carefully snap off the clips at the edges and the upholstery will come off.
Work process
- We find the lamp plug in the area of the number, turn it clockwise and pull it towards ourselves. The cartridge will be removed from the lampshade.
- We take out the old lamp by pulling it towards ourselves and install the new one.
- We assemble in reverse order.
- As you can see, there is nothing complicated in the process of replacing license plate lamps.
Important Features
The main culprits for non-working room lighting are burnt out lamps.
However, often the backlight bulbs that have gone out can remain in working condition. To correctly determine the real cause of the breakdown, you need to carefully examine the lamp removed from the socket. The main sign of failure is a darkened bulb or damage to the threads visible to the naked eye. If the lamp is working properly, but the lighting does not work, oxidized contacts may be the likely culprit of the breakdown.
To resume operation of the C5W cylindrical lamp (equipped with end contacts), it is enough to carefully clean and bend them.
The spring contacts do not hold the light bulb - another likely cause of the malfunction. Replacement is also not required. It is enough to return the light bulb to its place.
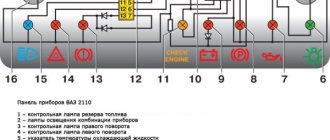
Reasons for turning off the dashboard on the VAZ 2114
Turning off the dashboard lights does not bode well for either the driver or the car. Because this malfunction is usually followed by others. Therefore, the backlight should be repaired immediately.
You should also understand that if the lights on the dashboard go out, then the problem must be looked for somewhere in the on-board electrical system. This means you can’t do without a multimeter, a soldering iron and electrical tape. Here are the main reasons for turning off the backlight:
- fuse burned out;
- the light bulbs have burned out (or LEDs - in later VAZ 2114 models the panel is illuminated by them);
- the wiring in the on-board electrical network is damaged;
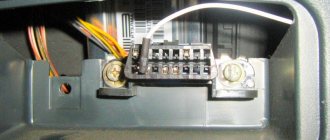
- The common contact board of the instrument panel burned out.
Let's consider these points in more detail.
Burnt fuse
80% of cases when the backlight turns off is due to a blown fuse. It is located in a safety block installed under the steering column of the car. Usually the fuse indicated in the documentation as F10 is lit.
It is he who is responsible for the dashboard lighting, side lights and license plate lighting. On early VAZ 2114 models, fuse F10 was brown or red.
On later cars they started putting green ones. It is not difficult to understand that the fuse has blown. It's enough just to inspect it. The housing of a blown fuse may be slightly blackened or melted, and the conductor inside the housing may be severed. The faulty fuse is replaced with a new one. Typically this solves the problem.
Burnt out light bulbs
Dashboard lights operate under less than ideal conditions. They are regularly exposed to shaking, power surges in the car's electrical network and temperature changes. All this significantly reduces their service life. Especially if these are not LEDs, but ordinary incandescent lamps, which were equipped with the first VAZ 2114 models. There are a total of 19 lamps (but this number also varies depending on the year of manufacture of the car, and the number of lamps should be specified in the technical documentation for the car).
Another reason for light bulbs to burn out is their improper installation. This is most often observed on early VAZ 2114 models, where drivers decide to independently replace obsolete incandescent lamps with new LEDs, making some changes to the electrical circuit. Without proper qualifications, this operation is not so easy to perform. Here's what the sequence for replacing light bulbs looks like.
- The steering column is lowered to the bottom position until it stops. Above it is the dashboard cover with four mounting screws. They are unscrewed with a Phillips screwdriver.
Video: changing light bulbs in the dashboard of a VAZ 2114
Wiring damage
Problems with electrical wiring are the worst case. To figure this out on your own, the driver needs to have serious knowledge of electrical engineering. In particular, he must be able to read automotive electrical circuits well. Not all car enthusiasts can boast of such skills. It is for this reason that it is better to entrust the search for a damaged section of on-board electrical wiring to a qualified auto electrician.
His actions boil down to the following: he determines the key sections of the circuit and sequentially “rings” them using a multimeter until he finds a broken section of the wiring. Completing this work may take several minutes or several hours - it all depends on where exactly the circuit break occurred.
Panel contact board problems
If all of the above measures do not lead to anything, the last option remains: damage to the contact board in the dashboard. This part is a combination of several microcircuits. It is not possible to repair it in a garage without special diagnostic equipment. So the car owner has only one option - to replace the entire board. You can purchase it at any auto parts store. It costs about 400 rubles. Let us list the stages of its replacement.
- First, all the steps mentioned above in the paragraph on replacing light bulbs are performed.
- But instead of unscrewing the bulbs, you should unscrew the four bolts at the corners of the rear wall of the dashboard.
- The back wall is carefully removed along with the board, which is attached to the wall with plastic latches.
So, the owner of a VAZ 2114 can solve most problems with the dashboard lighting on his own. All that is required is the ability to use a screwdriver. The exception is the case of damaged wiring. It is strongly recommended that you contact an electrician to identify the damaged area. This will save a lot of time and nerves, which, as we know, are not restored.
Tips for choosing car light bulbs
At the moment, a large number of spare parts for cars are produced in China, and many motorists believe that there are only low-quality products there. It makes no sense to deny - China often produces inexpensive goods of low quality, but this does not mean that they produce exclusively garbage goods. Many people do not want to pay more for Chinese-made goods, thinking that these are things of the same poor quality at an inflated price. But this is a mistaken opinion. You can purchase a decent Chinese product that will be no worse than other foreign options by paying a decent price for it.
There are different manufacturers of lamps, some make fake ones, but they can be extremely difficult to distinguish from the original. After a breakdown, it is difficult to say for sure why the light bulb burned out. Maybe this is a really low-quality product, or maybe the reason is moisture that got in during reassembly or during very intense driving
Therefore, special attention should be paid to operation - sometimes, without noticing a problem, you can cause a breakdown yourself. If a light bulb burns out within 2-3 years after its installation, then most likely it has simply expired
This service time is quite standard.
On average, the license plate light bulb lasts 1-2 years
Try to purchase light bulbs from the company recommended by your car manufacturer; you can often read about this in the car’s instructions. This way you can be confident in the quality of the products you purchase. Of course, there are no guarantees that you will not buy a fake, so look carefully at the packaging, the inscriptions on it, the markings on the light bulb, the quality of its soldering, etc.
Buy light bulbs in advance, then you won’t have to waste time on this in the future, and if one of them malfunctions, quickly replace it anywhere.
Checking possible reasons for the lack of backlight
The factory assembly provides for the installation of lighting lamps in the lower saber of the luggage compartment. The lampshade is mounted next to the frame intended for the vehicle license plate.
If the lighting device initially functions within normal limits, then over time the following problems may appear:
- there is no lighting at all;
- the backlight does not function correctly;
- the lighting fixture is faulty;
- replacement of lamps or shades was carried out in violation of the rules.
The main cause of problems with room lighting is vibration and shaking. The lighting fixture burns out or its threads are damaged. In addition to vibration, damage can result from:
- incorrect operation of the generator (leads to an increase in voltage in the on-board network and the simultaneous burnout of all backlight lamps);
- severe contamination of the area where the lampshades are attached;
- penetration of liquid and subsequent corrosion of contacts;
- body movements leading to wire fractures at bend points;
- short circuit in one of the circuits.
To eliminate the breakdown, you need to check the possible reasons for the lack of backlight according to the principle “from simple to complex”:
- establish darkening of the lighting fixture, possible deformation of the plastic housing of the lampshade, accumulation of condensation, by cleaning the surface with a piece of rag;
- check the serviceability of the wiring and fuses by turning on the low beam (one lamp should work);
- By tapping on the surface of the lampshade, try to cause the lamp to light up briefly.
If the cause of the backlight not working is faulty devices, they need to be replaced.