PTF for chevrolet lacetti
All motorists know the importance of fog lights. There are no analogues to this equipment.
Neither xenon nor bi-xenon lighting can properly illuminate the road surface in fog, snowfall, or rainy weather.
This is due to the high location of the xenon/bi-xenon headlights and the large thickness of the light beam they create.
Currently, for the Chevrolet Lacetti you can purchase one of the following types of fog lights (PTF):
TypePurposeCost (RUB)
| CVLAT04-072 | intended for sedan | 2012 (for right and left) |
| CVLAT04-070 | headlights are used in hatchbacks | 1658 |
| CVLAT04-073 | used in hatchbacks | 1358 |
| AK-CH50-0200 | fog lights | 1474 |
| AK-CH45-0200 | PTF | 1404 |
| CVLAT04-071 | intended for Chevrolet Lacetti sedan class | 1026 |
| CVLAT04-074 | used in sedans | 1240 |
How the work is carried out
Let us immediately note that the installation instructions do not depend on the type of car, be it a hatchback or a station wagon, everything described below will be relevant and correct. We'll break the workflow down into two steps to make it easier for you to understand the process.
The connection diagram for the front fog lights and rear lights is in every car maintenance book.
Connecting the necessary nodes
Installation proceeds as follows:
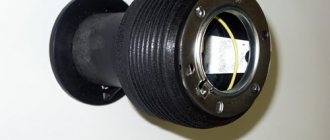
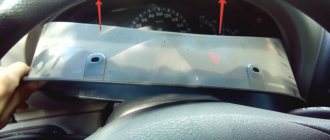
- First of all, you need to remove the old switch and install a new one, to do this, the steering wheel is turned 90 degrees to the left, one screw is unscrewed, then 90 degrees to the right - the second lock is unscrewed. After this, the cover is removed, two latches are pressed, and the structure is carefully removed, after which the two connectors are disconnected. Assembly occurs in reverse order.
This is what the connector with the PTF switch looks like
- Next you need to install the relay and fuse. Everything is very simple here: the required elements are taken, the fuse box under the hood is opened, and the necessary components are inserted into the places indicated in the photo below.
It is in these places that the fuse and relay are inserted
Important! After this, it is worth checking the operation of the installed elements and the switch; for this, all other modes are first checked - turns, lights, dimensions, and then the fog lights are turned on - a special indicator should light up on the panel, which is present there by default.
- Next, you need to make two adapters; for this, the ends of the wires are stripped, and connectors are installed and crimped on them; the connection points are best insulated using heat-shrinkable tubing. After this, a piece of corrugation is put on the adapter, and the contacts are inserted into the connectors; the same unit is made for the second headlight.
This is what the connectors on the PTF look like
- Next, take two pieces of wire about 30 cm long, attach a standard connector to one end, and a bolt-on element to the other, these will be the ground wires, which will be located on the nearest fasteners.
Installing headlights
Chevrolet Lacetti fog lights are installed as follows:
- First, you should remove the plugs, which are secured with three self-tapping screws; you can unscrew them from the bottom. For convenience, it is best to use a short screwdriver, since a standard one does not fit into the free space, the work is simple and does not take much time.
- Next, you should remove the headlight, since it will not be possible to install foglights due to the interfering crankcase protection. Removing the headlight takes 3-5 minutes, so don't be afraid of this process.
- Then the fog lights are attached, the connectors are attached, the grounding is attached to the nearest fasteners, and the wire is laid to the fuse box; it is better to place it in a corrugation to protect it from adverse influences.
- After connecting all the connectors and routing the wires, the headlights can be put back in place and work can continue.
- The corrugation is routed to connector C104 , which can be accessed as follows: the cover of the fuse box is removed, after which the block itself is removed from the clamps, and the connector closest to the wing is disconnected from it, which is what we need.
- It is very important not to confuse which headlight each wire comes from; they are inserted into the connectors marked in the photo, but remember that there are no contacts there, and it is best to purchase them in advance. As a last resort, the ends of the wire are stripped, bent and tightly inserted into the designated cells.
This is where the wires are connected
- The last stage is assembling the fuse box and checking the functionality of the system. If all is well, the work can be considered completed. As noted above, the design is always the same, be it fog lights on a Lacetti sedan, station wagon or hatchback.
You can further improve the appearance of your car by ordering the production of headlight stickers - this is a very simple solution that can literally transform your car at minimal cost.
Replacing a fog lamp on a Chevrolet Lacetti: photos and videos - Behind the wheel
During operation it is impossible to avoid breakdowns. As for the electrical part, car lamps often burn. The fog light on the Chevrolet Lacetti is no exception. How to replace a part with your own hands? – Let’s look at a detailed photo report and visual video materials in this article.
about replacing the lamp in the PTF with a Lacetti below:
PTF replacement process
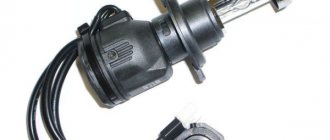
The lamp in the fog lamp is not lit.
The process of replacing a Chevrolet Lacetti fog light bulb with your own hands is not as simple as it seems at first glance. So, you will have to additionally dismantle the parts so as not to remove the front bumper.
So, let’s stock up on tools, in this case you will only need head 10, and you can proceed directly to the process itself:
- Be sure to remove the negative terminal so as not to short-circuit anything.
- We unscrew the headlight mount from the side where the lamp will be replaced. Unscrew the headlight mount. Unscrewed fastenings of the headlight block. Partially removed radiator grille.
- Of course, in order to completely unscrew the headlight mounts, you will have to remove the radiator grille.
Lateral mounting of the headlight unit on the radiator side. - We take out the headlight block.
It is not necessary to disconnect the wire connectors. To complete the process, it is enough to move the part to the side so that it does not interfere. After the headlight is unscrewed, move it to the side. - Find the rear part of the fog lamp.
Fog lamp, top view. - Disconnect the power supply wire connector to the fog lamp.
Remove the wire block from the headlight. - Turn the lamp counterclockwise and remove it from the mounting mount.
We remove the lamp from the PTF housing. - Installation is carried out in reverse order.
Burnt out fog lamp.
Chevrolet Lacetti 5D › Logbook › Installing PTF and xenon on a Lacetti Hatch with your own hands
I finally got around to posting a report on the installation of PTF and xenon lights.
The fogs and switch arrived after the holidays, I spent another week choosing xenon, then waited another week for it to arrive from Samara, since we don’t have anything cheaper than 2500, and in general, the h27 base is very rare. So, we will need: 1) Left fog light (96551092 catalog number, I took the original) 2) Right fog headlight (96551091 catalog number, also original) 3) Turn signal switch with ring for PTF (catalog number 96387324) 4) Fuel relay pump (catalog number 96190187) 5) 15 ampere fuse 6) Wires (I took 1 square cross-section, the same cross-section of the wire on xenon, 5 meters is enough for the eyes, female terminals for connecting to lamps - 4 pcs, bolt-on terminals "for mass - 2 pieces, corrugation for wires) 7) Xenon kit (I took Sho-Me with thin blocks and 5000k lamps) Let's start with! We turn the steering wheel 90 degrees, see the screw, unscrew it, turn the steering wheel in the other direction and repeat the action. We remove the upper trim of the steering column, disconnect the wires from the lever, pull it out, insert a new lever in its place and assemble everything in the reverse order.
Open the hood, remove the terminals from the battery (you can remove the battery altogether, this will make it easier to route the wires into the mounting block.
Remove the radiator grille. It is held on by four screws on top and two latches on the bottom. We insert a screwdriver through the small rectangular holes closer to the edges of the grille and snap off the grille.
We remove the headlights. Everything is simple here, each headlight is held on by 3 bolts, 2 of them are on top of the headlight and 1 was covered by the radiator grille. Don't forget to remove two contact chips on each headlight.
Remove the PTF plugs. You will need a key for 6, but I didn’t have one with me and, after suffering a little, I still unscrewed them using pliers. We insert fog lights in their place.
Now about the wiring. We take the minus: for the right PTF - you can see the place for the “ground” immediately after removing the headlight. For the left PTF it is similar, only the bolt points not to the wing, but to the engine. Plus we pull it into the mounting block between the wing and the ECU. With the left fog everything is clear, but the right one is done differently, I personally moved it past the left one, along the bumper amplifier.
We unclip the latches of the mounting block and lift it. We look from the left wing, take out the right chip closest to us. I didn’t find such small “mothers” and just pushed the wires in there well, in the spring, when it’s warmer, I’ll redo it as needed.
We put the chip in place, the mounting block, in it, in the only free space, a relay and a fuse. We connect the battery, turn on the headlights and fogs.
Everything is working? We rejoice and assemble everything in the reverse order, it is advisable to secure the wires, I used zip ties.
At the same time I changed the low/high beam lamps to Osram Night Braker Plus.
source
Fog lights on a Chevrolet Lacetti: replacement - AutoExpert
14.01.2020
Forum for questions and answers
Task 1:
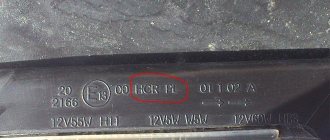
install this switch (the part number is visible on the packaging): We initially have this switch:
We take a standard screwdriver, turn the steering wheel 90 degrees to the left, then to the right, unscrew 2 screws, and remove the cover. Let's look:
We press the clamps on the top and bottom of the old switch and carefully pull it out to the left:
We pull out 2 connectors:
Take a new switch and plug it in in reverse order:
We put everything in place, tighten it, and get beauty: By the way, at the beginning of this whole procedure, the steering wheel can be lowered all the way down - it will be more convenient.
Task 2:
Install the relay and fuse Now let's go under the hood. We climb into the fuse block with prepared relays (catalog number visible) and a 15A fuse:
Let's put everything in place:
Let's go check the operation of the switch. First, we check the operation of all previous operating modes (turn signals, flashing, dimensions, low beam). Then we turn on the fog lights (together with the headlights or low beam). The indicator lights up - everything is done well:
Task 3:
Make adapters for the headlights and prepare connectors. Connectors with pieces of wire (sealed, with a seal) that were perfect for lamps were found and purchased:
We take out the “mother” contacts from the connector, prepare a piece of corrugation (I didn’t bother with any additional insulation of the wires near the connectors, because everywhere under the hood the ends near the connectors are not insulated).
We clean and crimp the ends of the wires onto the contacts (I still insulated the ends with heat shrink):
We put on the corrugation, plug the contacts into the connector, repeat everything a second time, we get two adapters:
We connect the ends of the purple wire to the male contacts.
Looking ahead, I will say that I had 5 meters (4 meters was more than enough) of this wire, I crimped the 2 ends onto the male contacts, passed the wire through the corrugation, quickly laid the corrugation from the right headlight, estimated the length and cut it off: so I ended up with a piece of wire for the left headlight.
We take 2 pieces of black wire - 20 cm (for the right headlight) and 30 cm (for the left one) - we crimp one end of each onto the male contacts, the other onto the bolt terminal. That's it, you can go laying.
If anyone is interested in what Narva 37.5 W lamps look like, here it is:
Task 1:
install this switch (the part number is visible on the packaging):
We initially have this switch:
We take a standard screwdriver, turn the steering wheel 90 degrees to the left, then to the right, unscrew 2 screws, and remove the cover. Let's look:
We press the clamps on the top and bottom of the old switch and carefully pull it out to the left:
We pull out 2 connectors:
Take a new switch and plug it in in reverse order:
We install everything in place, tighten it, and get beauty:
By the way, at the beginning of this whole procedure, you can lower the steering wheel all the way down - it will be more convenient.
Task 2:
Install the relay and fuse Now let's go under the hood. We climb into the fuse block with prepared relays (catalog number visible) and a 15A fuse:
Let's put everything in place:
Let's go check the operation of the switch. First, we check the operation of all previous operating modes (turn signals, flashing, dimensions, low beam). Then we turn on the fog lights (together with the headlights or low beam). The indicator lights up - everything is done well:
Task 3:
Make adapters for the headlights and prepare connectors. Connectors with pieces of wire (sealed, with a seal) that were perfect for lamps were found and purchased:
We take out the “mother” contacts from the connector, prepare a piece of corrugation (I didn’t bother with any additional insulation of the wires near the connectors, because everywhere under the hood the ends near the connectors are not insulated).
We clean and crimp the ends of the wires onto the contacts (I still insulated the ends with heat shrink):
We put on the corrugation, plug the contacts into the connector, repeat everything a second time, we get two adapters:
We connect the ends of the purple wire to the male contacts.
Looking ahead, I will say that I had 5 meters (4 meters was more than enough) of this wire, I crimped the 2 ends onto the male contacts, passed the wire through the corrugation, quickly laid the corrugation from the right headlight, estimated the length and cut it off: so I ended up with a piece of wire for the left headlight.
We take 2 pieces of black wire - 20 cm (for the right headlight) and 30 cm (for the left one) - we crimp one end of each onto the male contacts, the other onto the bolt terminal. That's it, you can go laying.
If anyone is interested in what Narva 37.5 W lamps look like, here it is:
Task 4:
Install the PTF and lay the wiring. Unscrew the plug - 3 self-tapping screws. To do this you need a short screwdriver (I unscrewed everything while lying under the car). We take the fog light and find that there is no way to push it in from below - the crankcase protection is in the way.
Unscrew the headlight (2 bolts and nut, 3 minutes).
We insert the fog lamp and fasten it with the same screws. We repeat the operation for the second headlight.
External inspection allows you to find connections to ground (G102 - for the right headlight, G101 - for the left):
Connect the right headlight.
We connect the “ground” (it does not require corrugation), secure it with clamps:
We lay the corrugation directly along the front wiring harness (until it contacts the “ground” G101):
Connect the left headlight. We put both wires from the connector into a small piece of corrugation:
Here 3 ends of the corrugation meet: from both headlights and to the fuse box. We secure all ends with clamps.
We fasten the “ground” from the left headlight.
You can already screw the main headlights into place. The final push remains - connecting to connector C104. We remove the fuse block (not the cover, but the block - 4 lower side latches), slightly lift the edge closest to the wing, disconnect the outermost connector (this is exactly C104).
Yes, the corrugation must be brought to this block, our 2 wires must be inserted from below. NOTE: it is advisable to mark the wires from the headlights somehow so as not to confuse the right/left when connecting.
Here a not very pleasant surprise awaited me: there were no contacts at places 3 and 8...