What is needed to replace the front pads
Before changing the front pads of the Lada Granta, you need to make sure you have all the necessary tools:
- Pliers;
- Brake fluid;
- A brush that will be used to clean the pad seats;
- Suction of excess brake fluid;
- Open-end wrench 17;
- Flat-head screwdriver or sliding pliers;
- Socket wrench 13.
Also, it is important to take care of the availability of devices for selecting vehicle wheels. You can use wheel chocks or red brick halves as latches.
Preparatory work
Before starting work on replacing the front pads, you must perform the following operations:
- Check the brake fluid level. If the normal value is significantly exceeded, the excess volume is pumped out using suction;
- Secure the rear wheels using wheel chocks or other devices;
- Loosen the fasteners that secure the brake discs;
- Place a jack under the preferred wheel, after which the wheel is dismantled;
- Turn the steering wheel out before the replacement procedure, which will greatly simplify the work.
It should be remembered that brake parts are replaced only in pairs on both wheels of the same axle. If you replace elements one by one, unpleasant consequences and uncoordinated operation of the system may arise, because the efforts will be distributed unevenly.
Replacement process
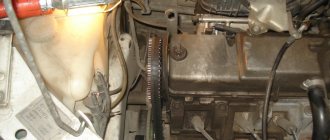
Replacing the front brake pads on a Grant begins with the vehicle owner needing to find a plate with a bend. You should bend the bottom plate, after which it will be more convenient to lift the entire brake mechanism up and successfully replace the brake pad.
The function of the plate is to stop the cylinder fixing bolt and the lower pin. Using pliers, you need to move the edges a little, and then gain access to the bolt itself.
The guide pin is clamped using a 17-mm open-end wrench, and the bolt is removed using a conventional spanner. Once the plate is finally removed, the block is exposed to the owner as soon as the bracket is lifted.
The used parts are dismantled, and all dirt formations are removed from the seat using a brush. The owner of a Lada Granta can use special metal brushes with increased rigidity, but it is also not recommended to go into fanaticism.
Next, new brake pads are installed. In order to put the bracket in its place, you need to push the piston into the cylinder until it stops, which can be done using a hard minus screwdriver or pliers. Next, before pressing in the piston, the bleeder fitting should be loosened so that the brake fluid comes out and not back into the brake system. If you have ABS, this can “kill” the ABS.
All processes must be carried out in strict reverse order. We should not forget that it is necessary to re-form the bend on the plate, which will significantly improve the fixation of the bolt.
Several ways to bleed the brake system
Let us remind you that bleeding the brakes is very important for accident-free situations on the roads; keep an eye on the ABS brake bleeding system. Bleeding ABS brakes is possible in several ways, and their implementation depends on the design of the entire complex. There are two ways to remove air from the brake system, but in any case, you will need an assistant. The process of bleeding a brake system with ABS cannot be considered labor-intensive or complicated.
Method No. 1
After completely disabling the ABS system, you need to do the following:
- First, you need to bleed the unit farthest from the master cylinder - the rear wheel on the right side. You need to put one end of the hose on the fitting, and lower the other end into a bottle of brake fluid. You need to have an assistant behind the wheel who will press the brake with your foot. And press until the air is completely removed.
- While the assistant holds down the gas pedal, you need to unscrew the fitting. After the liquid or air stops flowing, you must immediately tighten the fitting. This operation must be repeated several times if bubbles still come out of the working cylinder.
- Then you can move to the rear left wheel and do the same actions.
- After this, we move to the right front caliper, and finish pumping the brakes on the left front caliper.
- When each slave cylinder has been bled, it's time to look at how much fluid is in the expansion tank. The main thing is not to allow the brake fluid to completely drain from the reservoir, because then air will enter the system.
Method number 2. Using a special pump, bleed the brakes
If it is possible to connect a pump, then you can use this method to pump the brakes, but you will also need a partner for this. It is imperative that after the brake bleeding process is completed, before leaving, you need to check the tightness of the system and the absence of leaks. Check the brake fluid level.
- To bleed the right rear cylinder, you need to put a hose on the fitting on one side, and on the other side, also put the hose in a bottle with brake fluid. Then you need to unscrew the fitting about 1.5 turns.
- The assistant will also press the brake pedal and turn on the engine. The attached pump will create pressure in the brake line and expel all the air. After the bubbles stop flowing into the bottle, you just need to turn off the engine.
- The rear left wheel is pumped a little differently. The hose is attached to the fitting and lowered into the liquid, and the drain must be unscrewed 1 turn.
- Turn on the engine and when the bubbles enter the bottle of liquid, you will need to press the brake pedal about halfway, after which you need to quickly tighten the fitting.
- Then you can release the pedal and turn off the engine.
- The main thing is to add brake fluid to the reservoir on time.
- When bleeding of the brakes has come to an end, you need to tighten all the fittings, screw on the cap on the reservoir and reconnect all previously disconnected connectors. Look under the bottom and check how tight the pipelines, fittings and cylinders are. And if nothing leaks anywhere, then everything is fine with the car and you can drive safely. Good luck in completing the solution to the problem of bleeding brakes with ABS.
When bleeding ABS brakes, during work, care must be taken to ensure that the pump does not run without fluid. Remember that the braking system is an extremely important component, and timely bleeding of the brakes ensures the safety of the car and may not only save your life.
Video tip - Quickly pumping brakes with ABS on BMW 75o:
Design Features
By default, the 11186 engine retains all the design features of the original 21114, from which it originated:
- volume 1.6 l;
- the block height is 2.3 mm greater than that of 2110;
- crankshaft with an increased crank radius by the same 2.3 mm (piston stroke 75.6 mm, respectively);
- ShPG, flywheel and crown from 2110.
Motor design 11186
In addition, a feature for the 11186 engine is the bending of the valves on the pistons when the timing belt drive breaks:
- the piston skirt is reduced here to make it lighter;
- It is physically impossible to make a deep hole for the valve inside the piston.
Diagram of internal combustion engine components 11186
The manufacturer's manual contains a description of the components and parameters of the internal combustion engine, which are most often compared with the characteristics of the 11183 engine, which has the most similar markings. The main differences between these power drives from the same manufacturer are:
- torque is 15 Nm more;
- power 87 l. With. instead of 82 l. With.;
- motor 11186 has been produced since 2011, and its predecessor 11183 since 2004;
- instead of serial pistons from 2110 weighing 350 g, a lightweight version 21116 weighing 240 g is used;
- connecting rod length increased from 121 mm to 133.32 mm;
- the piston skirt has a graphite coating, the metal in the area of the first ring is anodized;
- combustion chamber 30 cm3 instead of 26 cm3;
- compression ratio increased from 9.6 to 10.5;
- The cylinder head gasket is all-metal, its thickness has been reduced from 1.2 mm to 0.43 mm;
- the cylinder head is 1.2 mm higher to compensate for the enlarged combustion chamber;
- the diameter of the bolts was reduced from M12 to M10 to reduce cylinder deformations during tightening;
- the flow channels in the cylinder head have been increased in diameter, nozzles have been installed to cool the piston heads;
- the working chamfer under the valves is maintained longer due to the strengthening of the aluminum alloy using a special technology;
- since the holes in the pistons are not enough to ensure the safety of the valves, a high-strength timing belt from the Gates manufacturer is used;
- the camshaft V-belt received an automatic tensioner, which had not previously been used in VAZ engines;
- the piston system is protected externally from overheating by a cooling jacket integrated into the cylinder block;
- the length of the receiver channels has been increased, the characteristics of the internal combustion engine are close to those of a 16 valve engine;
- the catalytic collector has a flattened block, which made it possible to separate the ducts and get rid of power losses and turbulence;
- the generator is mounted on a bracket, so its drive belt is not overtightened, like 11183, and lasts longer;
- The cabin heat exchanger and expansion tank are included in the thermostat in parallel, the operating error has decreased to 2 degrees instead of 5 degrees.
Crankcase ventilation
Timing belt cover 11186 on the right, improved design
On the right is the catalytic collector 11186 with a rational exhaust circuit
Modified generator mounting unit
New thermostat design
According to the AvtoVAZ plant, the ICE 11186 has a potential of 120 hp. (without resource reduction) or 180 l. With. (the resource will be reduced due to intensive wear of the piston). The manufacturer recommends tuning exclusively through modifications of components and mechanisms without the use of turbines.
How to change the fluid the traditional way?
The replacement technique with bleeding the brake pedal has been practiced by experienced drivers for quite a long time. What is the essence: the assistant sits in the driver’s seat and, at the command of the main performer, presses the brake pedal repeatedly, causing the master cylinder piston to fire and the fluid to move outward through an open circuit.
The work technology is as follows:
- Place the car on a level surface and support the front left wheel with shoes on both sides. Using a jack and wheel wrench, remove the right rear wheel of the car.
- Open the hood, unscrew the cap of the expansion tank, disconnecting the sensor wires. In order not to drive the entire volume of old liquid through the tubes, suck it out of the tank with a syringe.
- Fill the container with new consumables up to the MAX mark and place an assistant behind the wheel.
- Remove the protective cap from the working cylinder fitting, put a spanner on the edge, and then a transparent tube. Place the other end of the hose into the bottle.
- Give the command to the assistant to make a few pumps and fix the pedal in the pressed position. Use a key to loosen the valve 0.5–1 turn, allowing the liquid to flow through the tube into the bottle. When the pressure weakens, lightly tighten the fitting and again command the assistant to continue pumping.
- Repeat the pumping operation until you see completely clean new fluid in the transparent hose. Finally tighten the valve, remove the tube and replace the boot. Then move on to the next wheel.
Pipelines with a liquid medium leading to the working brake cylinders can be connected in a diagonal or parallel pattern. In the first case, the replacement order looks like this: rear right wheel, front left, then rear left and front right. In a parallel pattern, move from the rear right wheel to the rear left wheel, then the front right wheel and then the left wheel.
If an automatic pressure regulator is installed on the circuit supplying the rear wheel cylinders, it must be forcibly opened before bleeding. Use a screwdriver or other pointed tool to secure the valve in the open position.
Summary
You can replace the fluid yourself only on cars with a hydraulic accumulator and valves combined into one unit. List of required equipment:
- syringe with extension tube or bulb;
- transparent containers;
- transparent tube 20-30 cm long;
- open-end wrenches at “8” or “10”.
Briefly about the procedure for replacing brake fluid in a car with ABS on your own:
- replace the composition in the tank with a new one;
- bleed the left and right front brake cylinders;
- bleed the rear right cylinder with the brake pedal depressed and the pump turned on;
- bleed the rear left cylinder with the brake pedal released and the hydraulic pump turned on;
- check the system for leaks.
If there is a drain fitting on the ABS module, you should use the classical method according to the scheme specified by the factory to bleed all 4 brake cylinders, and then “drive” the ABS installation with excess pressure supplied from outside.
The serviceability and reliability of the brakes largely depends on the condition of the fluid in the system circuits. The mentioned consumables are far from eternal and during the operation of the machine they lose their working properties. Replacing brake fluid with your own hands is a completely common operation for experienced car enthusiasts who prefer to personally service the vehicle and thus save on car service costs. The procedure is really simple and accessible to every owner of a budget car.
What do you like
The engine pulls well from the bottom, and the difference with the 16-valve engine in terms of torque is small. At the start there is no big difference between them. You shouldn't look at horsepower, as it doesn't affect acceleration dynamics. The 8-valve unit will not be enough only when the car is heavily loaded and the air conditioning is on. By the way, when it idles, you can feel a strong detonation in the body.
It’s hard to say what will happen to the engine in 5 years. The suspension breaks, but not often. Its reliability is high; owners rarely repair the chassis. I don’t know why the windows are knocking, they are completely closed.
Acceptable wear of brake discs and when to change them
Each car manufacturer has individual parameters, tolerances, and minimum thickness. Exact details are provided in the instruction manual.
- Chevrolet Aveo: 21.5 mm;
- Some Nissan, Renault models: 22.0 mm;
- VAZ: 17.8 mm for ventilated, 10.8 for non-ventilated.
Few car enthusiasts know about the side wear tolerance - it is 1.0 mm. In practice, there are cases of wear of 2.0 mm or more. This significantly reduces braking efficiency and increases vibration during driving. A disk split can happen at any time, after how many kilometers it’s only a matter of time.
Types and properties of fuel fluid
Any brake fluid has 93-98% of the main composition and from 2 to 7% of additives, which, in fact, are the key component for imparting the declared characteristics. In general, if you look at it this way, the properties of brake fluid depend on the combination of its components. Depending on the composition of the base, TJ is divided into 3 groups.
Types of brake fluids:
- Mineral (mineral oil LHM). They consist of alcohol and castor oil.
- Glycolic. Developed on the basis of polyglycols and their esters.
- Silicone. Manufactured from silicon-organic polymer products.
Regardless of the type and composition, all brake fluids are divided into two classifications.
TJ classification:
- By viscosity.
- By boiling point:
- for “dry” liquid (without water);
- “wet”, which contains 3.5% water.
If the boiling point exceeds the permissible norm, then there is a risk of a vapor lock forming in the system (as a result of moisture evaporation), which can lead to breakdown and failure of the brake pedal.
Why update the TZ?
Brake fluid is an incompressible medium with certain physical parameters. Initially, the consumable material has almost zero humidity and is able to operate normally at high temperatures (200–260 °C) without going into a boiling state.
The first step is to clarify why you need to change the fluid in the car’s brake system circuits. Over time, the properties of TF deteriorate due to hygroscopicity - the ability to absorb water vapor contained in the surrounding air. Contact of the working fluid with the air occurs in the expansion tank, into which excess flows during the operation of the brakes.
When the “brake fluid” receives 3% or more additional humidity, the minimum boiling threshold is significantly reduced - to 140–180 ° C. Please note: during normal city driving, the fluid in the car warms up to 150 °C, and during more dynamic driving - up to 180–200 °C. Then the following processes occur in the main circuit of the system:
- In the immediate vicinity of the wheel brake mechanisms, the incompressible medium begins to slowly boil.
- Small air bubbles form, which gradually combine. An air plug appears in the tube, displacing some of the liquid into the expansion tank.
- Since air is a compressible medium, the next time the brakes are applied, the force from the pedal is not transferred to the calipers, and the pads do not close on the disc. The result of a brake system failure is clear - an accident of varying severity.
Hence the conclusion: to the question of whether it is necessary to change the brake fluid, there is only one answer - it is definitely necessary. Otherwise, driving becomes unsafe for the driver, passengers and other road users.
Replacement Regulations
First, it’s worth explaining the need to update this important consumable using an example of real-life operation of the machine:
- The task of the fluid in the system is to transmit the force from pressing the pedal to the pistons of the working cylinders of all four wheels. When the brakes are applied, the discs and drums heat up (sometimes up to 300–400 °C), transferring heat to the circuit tubes and the fluid itself.
- The boiling point of the liquid medium is 230–260 degrees, depending on the brand. Warming up to 150–180 °C, the new material continues to work properly.
- Over time, the hygroscopic liquid becomes saturated with moisture, causing the boiling point to drop to critical levels of 140–180 degrees. The maximum proportion of absorbed moisture by volume is only 3.5%.
- If you do not replace brake fluid that has lost its working properties, then during intense driving it will begin to boil, forming vapor locks in the system. The gas will go into the expansion tank, the amount of substance in the circuit will decrease. At the most crucial moment, the pedal will fail and the brakes will not turn on.
Reference. The car's brake system is sealed, but the liquid medium is still in contact with air through the expansion tank. In this way, the material is gradually saturated with moisture.
When it is necessary to change the fluid in the brake circuits:
- during normal operation or the machine is idle in the garage - at least once every two years;
- when driving in difficult or mountainous conditions with intensive use of brakes - at intervals of 1 year;
- if the consumable material in the expansion tank has significantly changed color - it has become cloudy, blackened or contains small suspended particles (most likely the rubber of soggy cuffs);
- according to the operating instructions, when it specifies a different replacement procedure.
Operating a vehicle in difficult conditions involves driving with a constant full load, towing a trailer and driving in mountainous areas. A change in the color of the consumable may indicate the following facts:
- the service life and resource of the material have been exhausted;
- a liquid that does not meet the requirements has entered the system (counterfeit, incompatible brand);
- Along with the liquid medium, dirt or particles of unusable rubber seals travel along the circuits.
Replacing brake fluid on Lada Granta
The Volzhsky Automobile Plant gave recommendations for replacing the brake fluid in the hydraulic brakes of Grants - this is 45,000 kilometers or after 3 years (whichever comes first). If your car is under warranty and is being serviced at a service station, this procedure is performed by employees. When the car has already been supported, and it is no longer under warranty, you can replace the brake fluid on the car yourself.
- a size 8 wrench for the pipeline nuts, - brake fluid, - a rubber or transparent hose, - a transparent vessel, - a syringe or rubber bulb.
Let us remind you that in the previous article we looked at how to replace the front brake pads on a Grant with your own hands. If you do everything without the help of a friend, the time to work is about 1-2 hours.
At TO-1 (after every 15,000 km) you must do the following:
- Change engine oil and oil filter
- Replace engine air filter
- Lubricate hinges and door stops
- Make sure there is no extraneous noise when the engine is running.
- Check the tightness of the engine mounts
- Make sure there are no engine oil leaks through the seals and oil seals of the engine
- Check the functionality of the engine management system (if there are error codes)
- Make sure there are no extraneous sounds when engaging and disengaging the clutch
- Check the smoothness of gear shifting, make sure there is no extraneous noise when the gearbox is operating
- Make sure there is no extraneous noise in the front wheel drive joints when driving in a straight line and in turns.
- Check that there are no knocks or creaks in the front and rear suspension when driving over uneven surfaces.
- Check wheel alignment angles
- Make sure there are no brake fluid leaks, check the condition of the brake system hydraulic hoses and pipes
- Check and, if necessary, adjust the position of the brake light switch
- Check the operation of the hand brake
- Check the effectiveness of the brakes
- Check the brake fluid level
- Check the operation of the vacuum brake booster
- Make sure that the lighting lamps, light alarm and sound signal are in good condition
- Check the operation of the electric headlight corrector
- Check and, if necessary, adjust headlights
- Check the tightness of the exhaust system and the condition of the muffler suspension
- Check the condition and tension of the accessory drive belt
- Check the condition and tension of the timing belt
- Make sure there are no coolant leaks, check the condition of the hoses and radiator of the engine cooling system
- Check the coolant level in the reservoir
- Check the tightness of fuel lines and hoses
- Check the fluid level in the power steering electric pump reservoir
- Check the amount of play in the steering
- Check the condition of the steering rod boots and steering rack
- Check the condition of the front and rear suspension parts
- Check the wear of the front brake pads
- Check the wear of the rear brake pads through the inspection window.
- Check the oil level in the gearbox
- Make sure there are no leaks through the seals and seals of the gearbox
- Check the condition of the protective covers of the gear shift drive
- Check the condition of the protective covers of the front wheel drive joints
- Check the level and density of electrolyte in the battery
- Clean and lubricate battery terminals and terminals
- Make sure the generator is working properly
- Check the operation of the windshield wipers and washers
- Check the serviceability of the rear window heating
- Check the operation of power windows and exterior mirrors
- Check the serviceability of heated seats
- Make sure the door and hood locks are in good condition
- Clean the drainage hole in doors and thresholds
- Check the serviceability of the climate control system (air conditioning or climate control)
Articles about Lada X Ray Cross
Lada Xray Cross Concept presented in Moscow
Details about the Lada Xray Cross engine have become known
Lada Xray Cross prices, technical specifications
Lada X Ray Cross 4x4 will appear no earlier than 2018
After every 30,000 km, it is necessary to perform all the operations performed every 15,000 km, as well as:
- Replace the cabin filter
- Replace spark plugs
- Lubricate door and hood locks
- Check the condition of tires and rims
- Check and, if necessary, balance the wheels
After every 45,000 km
- Replace the brake fluid in the hydraulic brake system
- Remove the brake drum and check the condition of the brake pads and drum
- Lubricate the hood lock drive cable
After every 90,000 km, it is necessary to perform all the operations performed every 30,000 km, as well as:
- Replace coolant in the engine cooling system
- Replace accessory drive belt
After every 105,000 km, it is necessary to perform all the operations performed during every 15,000 km, as well as:
Check the technical condition of the timing belt, guide and tension rollers
After every 180,000 km, it is necessary to perform all the operations performed every 90,000 km, as well as:
Replace the timing belt, tension and guide rollers (for VAZ 21129 and 21179 engines)
Note: Every 3 years the following must be replaced:
- backup battery in the control unit of the ERA-GLONASS system
- brake and coolant fluids (if during this period the car’s mileage is less than specified above)
Recommendations
From the farthest wheel you can release 100 grams. Next, move to the next wheel according to the diagram below. It is enough to drain 50 grams (about 0.5 tank) from the front wheel, since it has the shortest tube.
You can use an assistant. He will pump fluid by pressing the brake pedal with his foot. This is the second way to replace the brake fluid. In this case, an inflated tire will not be needed.
With each roll, you need to loosen the valve on the wheel, draining the fluid, and tighten it when the pedal moves back.
At the end of the work, you get pumped out old yellow brake fluid, almost a full bottle.
Now add liquid to the tank, taking into account that when installing a float with a plug, part of the volume will be displaced. Replace the plug and insert the block with wires. It is so easy and simple to change the brake fluid on the Lada Grant.
https://xn--80aal0a.xn--80asehdb/do-my-self/repair/repair-lada-vesta/1118-zamena-tormoznoy-zhidkosti-v-avtomobilyah-lada-raznye-sposoby.htmlhttps:// zapchasti.expert/zhidkosti/tormoznaya-zhidkost/tormoznaya-zhidkost-na-lada-granta.htmlhttps://www.zr.ru/content/articles/832559-menyaem-zhidkost-v-gidroprivode-tormozov-lada-granta/ https://mashinapro.ru/1233-tormozuha.htmlhttps://zen.yandex.com/media/vuem/zamena-tormoznoi-jidkosti-na-lade-grante-bystro-lichnaia-instrukciia-5dc104fa1ee34f00b29fa937?feed_exp=ordinary_feed&from= channel&rid=1138006041.479.1574091858440.47777&integration=publishers_platform_yandex
Braking system design Grants
Brake linings
Before you start adjusting and checking, you should find out what the Lada brake system is like and what its features are. The design includes the following parts:
- brake regulator;
- pipelines;
- brake pads and cylinders;
- amplifier.
To ensure efficient and safe braking, Grant has a double-circuit (diagonal) pipeline system. The tasks of the first circuit include blocking the left rear and right front wheels. The second circuit is designed to block the left front and right rear wheels. The front wheels have disc brakes, and the rear wheels have drum brakes.
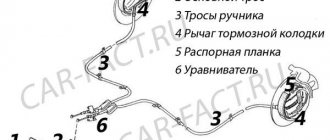
The process of controlling the master cylinder on the Lada Granta is carried out using a vacuum amplifier. This device is designed to improve controllability of the brake system. To do this, you need to press the appropriate pedal. It is necessary to take into account that an anti-lock braking system may be included in the Lada Granta, or ABS will be absent. The Lada Granta system under consideration is equipped with a hand brake that blocks the rear wheels by spreading the corresponding pads in the drums. These parts are moved through levers and by moving a steel cable located inside the vehicle.
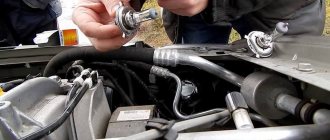
Preparing to replace the brake fluid of a car with ABS: conditions and necessary tools
When servicing a vehicle's deceleration system, free access to the working cylinders of each wheel is necessary. Therefore, the most suitable place for work is an inspection ditch or overpass.
When performing the procedure, you will need an assistant and a set of equipment:
- set of open-end wrenches;
- a large-volume medical syringe and a hose about 10-15 cm long corresponding to the diameter of the tip (an alternative is a pear);
- container for extracted brake fluid;
- tube 20-30 cm long; diameter – slightly smaller than the diameter of the fitting on the brake cylinders (to ensure tension).
Volume of liquid used
accurate information regarding the exact volume of brake fluid in the manual or technical documentation for the car . This depends on its size and the volume of the brake system. However, it is necessary to buy liquid with a small reserve, because replacement involves displacing the old composition from the system, and for this you will need to waste a little of the new liquid. Therefore, buy about one or two liters of TJ.
As practice shows, in passenger car systems with and without ABS (even in off-road vehicles), the volume of brake fluid is approximately the same, and is about 0.6. 0.9 liters.
How to change brake fluid
It is best to do this at specialized service stations. Most modern cars have an ABS system, and this leaves its mark on the procedure. Special equipment is required to pump the system with new fluid.
If you are told that you can change brake fluid without bleeding without special equipment, then do not listen to this advice. Yes, on some wheels the pressure from the reservoir can push through the system, but on all of them this will not happen. As a result, air or old fluid will remain in the system. At service stations, fluid is replaced under pressure, so subsequent pumping is not required.
The replacement procedure itself is as follows. New fluid is poured into the empty expansion tank of the cooling system, after which pumping occurs on each line, during which the new fluid displaces the old one.
The average brake fluid volume ranges from 0.75 to 1.3 liters.
Changing brake fluid without special equipment is clearly described in the video below:
Which liquid to choose and in what cases
The main recommendation when choosing a good brake fluid is to use the brake fluid recommended by the manufacturer of your car. This applies to both the class (DOT 3, DOT 4, DOT 4.5, DOT 4+, DOT 4 SUPER, DOT 5, DOT 5.1) and the base - glycol and mineral.
Most modern cars use DOT4 class fuel fluid . It is made on a glycol basis and contains a package of anti-corrosion and lubricating additives. As for the boiling point, it is +240°C for the “dry” composition, and +160°C for the “wet” (moistened) composition. Its service life is about 2 years. After this it needs to be replaced.
DOT 5 and DOT 5.1 brake fluids are silicone based. They are non-hygroscopic, that is, they do not absorb moisture. Neutral to paint and varnish coatings. DOT 5 class fuel oil should be replaced every 5 years, and DOT 5.1 - every year.
Engine tuning Lada Granta, VAZ 21116, VAZ 11186
Atmospheric tuning of the Grant engine
Let's consider the potential of the 21116 8V engine without replacing the cylinder head with a 16 valve (The 126 16V engine and its modifications are mentioned in a separate article). The first stage, already familiar to us from tuning the 21114 engine, is replacing the camshaft with a Nuzhdin 10.93, installing a split gear, and adjusting the phases. We hang a receiver on top, a 54 mm damper and a 4-2-1 spider exhaust with this kit the engine power will be about 100 hp. With additional modifications and milling of the cylinder head, as well as the intake manifold, we will get about 120 hp.
Compressor for Lada Granta
Another method of obtaining similar output from a 116 engine is to install a PK-23-1 compressor with a pressure of 0.5 bar on the piston drain. With a need shaft of 10.63 or 10.42 the result will be better. The well-known video clearly explains everything that is required for the successful implementation of a project based on 2113; all this can be easily recreated on Grant, Kalina, Priora and other cars.
Attention MAT (18+)
The 8-valve head allows you to increase the power above 120 hp, but at the same time the costs of repairing the VAZ 21116 engine will also rise. The potential can be significantly increased by installing a 16-valve cylinder head, with a receiver, damper and exhaust of the same 120 hp. we get it easily and without loss of resource.
Grant turbo engine
The best option, when installing a turbine, would be to switch to 16 valves (this is done in order to increase the efficiency of the engine) and continue tuning the priors according to the principle of turbocharging. If you want to build a rare example - an 8-valve turbo, you need to take into account that 8V is extremely unstable to detonation when supercharged. So, to build you will need Niva pistons on 121 connecting rods from 2110, Priora gasket, shafts for turbo (STI-2.1 phase 280 lift 11.4, STI-3 11.7 phase 288 or Nuzhdin 11.8 phase 286), BOSCH 360cc injectors, blow-off, damper 54mm, DBP+DTV, turbine from Volkswagen 1.8T for lower location. All this is configured online, blows 1 bar and produces about 170-180 hp. There are ready-made solutions, kits based on Garett 17, they can easily inflate you to 0.5 bar and the power will jump to +\- 130 hp. All this is done with any 8-valve engine for front-wheel drive VAZs.
ENGINE RATING: 3+
The exact volume of oil in the engine according to the passport data (table)
In order to understand what volume of oil needs to be changed specifically for your engine type, we present to your attention a special table that shows specific numbers and indicators for each modification of the Lada Kalina.
| hp | Start of release | End | Oil volume in an internal combustion engine | ||
| 1.4i 16V | VAZ-11194 | 89 | 2007 | 2013 | 3.50 |
| 1.6i | VAZ-21114 | 81 | 2005 | 2013 | 3.50 |
| 1.6i | VAZ-11186 | 87 | 2013 | —> | 3.20(2.90) |
| 1.6i 16V | VAZ-21126 | 98 | 2009 | 2013 | 3.50 |
| 1.6i 16V | VAZ-21126 | 98 | 2013 | —> | 3.20(2.90) with manual transmission 4.40(4.10) with automatic transmission |
| 1.6i 16V | VAZ-21127 | 106 | 2013 | —> | 3.20(2.90) |
A standard 4-liter can of oil should be enough (except for automatic transmissions)! But about choosing oil, read the material: choosing oil for an 8-valve engine, choosing oil for a 16-valve engine.
Thanks to this table, you can quickly and easily find out how much motor oil should be poured into your engine.
For normal engine operation, it is necessary to select high-quality motor oil and fill in the required amount. For frets, 3.5 liters will be enough, leave the rest of the oil for topping up. Use the dipstick to determine the engine oil level.
From my own experience, I’ll say that in winter, fill slightly above the lower mark, in summer, closer to the maximum. In winter, the oil will warm up faster.
For the Lada Kalina car, the manufacturer advises using only high-quality oil from a manufacturer with a good reputation. However, such advice comes not only from AvtoVAZ, but also from other major automakers
In this article, we will look in detail at what you need to pay attention to when choosing the right consumables for a popular budget hatchback. So, let's look at how much oil to fill, how to choose it based on parameters, and also what types of motor oils exist
How to fill brake fluid correctly
The brake reagent on the Lada Granta should be replaced after every 45 thousand kilometers traveled or after 2-3 years of use. It should be said that the replacement can be done with your own hands.
It must be said right away that the reagent is replaced on Grant, which is initially installed on the overpass. First you need to unscrew the cap from the neck of the tank to fill the liquid. Then the spent working fluid is pumped out. This is best done with a syringe or rubber bulb. Only after this is the previously unused brake fluid poured into the container.
During the process of filling brake fluid, you need to be as careful as possible and take special care. If liquid gets on painted surfaces, it will need to be cleaned up quickly as it may damage the paintwork. Then the hydraulic drive is pumped, through which the brake fluid flows
Then the hydraulic drive is pumped, through which the brake fluid flows.
Pumping is carried out until the moment when a liquid lighter than the used liquid comes out of the fittings on all pumped working cylinders. Bleeding is carried out with the engine turned off, first on one circuit, and then on the other.
The replacement procedure is as follows:
- The first to bleed is the brake system located on the right side of the rear wheel.
- Then the left front wheel mechanism is cleaned of the spent reagent.
- Next comes the turn of the left rear wheel system.
- The pumping mechanism ends with the right front wheel.
Before you begin the process of cleansing the system of old brake fluid, you need to check the volume of brake fluid that is in the brake hydraulic reservoir. If the fluid level is insufficient, it needs to be topped up. You will need one more person to bleed the brakes.
First, you should clear the fitting of the right rear wheel from debris and dirt. To clean, first unscrew the cap located on the fitting. Then it is equipped with a hose, and the other end is lowered into a container containing brake fluid. At this time, the partner presses the brake pedal all the way once or twice and leaves it held.
Then you need to unscrew the bleeder fitting halfway, but not completely. At this time, the used brake fluid will flow out.
The assistant must continue to press the brake pedal until the fluid disappears. All this must be repeated until new, clean brake fluid appears. Then the hose is removed, the fitting is thoroughly wiped and the cap protecting it is returned to it. Next, the entire procedure is repeated to free the left front wheel mechanism from the clogged working fluid. The same sequence of pumping the brake mechanism of the next circuit. The only thing you need to monitor is the presence of liquid in the container.
You can replace the brake fluid with another, simpler method. For this procedure, finding a partner is not required. However, the brake fluid supply must be at least a liter.
Replacing the used fluid can only be done on a Lada Granta, which is located on an overpass or has space to approach the tank. The brake fluid is first removed, then new fluid is added to the maximum level, and to make the pumping procedure faster, hoses are put on all branches of the cylinders being pumped.
The free ends of the tubes are in prepared containers. Usually the pumping process ends if 200-250 ml of the reagent used has spilled out. Then the fittings are wrapped well, the protective caps are returned to their place, and the amount of brake fluid in the master brake cylinder is recorded.
After this, the car owner pays attention to the level of brake fluid in the reservoir and understands how much brake fluid still needs to be filled
Replacement sequence
In most cases, brake fluid is replaced according to the following algorithm (the first, so-called sequential method):
Draining fuel fluid from the tank
- The car is driven onto an overpass or lift in such a way that there is normal access to the brake cylinders (their fittings).
- All wheels are removed from the car.
- Place tight hoses on the brake cylinder fittings, the other end of which is placed in plastic bottles.
- Pump out the fuel fluid from the expansion tank using a syringe.
- Unscrew the fittings and make sure that the fuel fluid begins to flow into the bottles (do not unscrew it too much so that the flow is small).
- In this case, it is imperative to monitor the emptying of the expansion tank, and, if necessary, add new fluid to it, so as not to air the brake system.
- Control the amount of liquid in waste bottles. As soon as the new fuel fluid flows (you can easily identify it by its color), you must immediately tighten the fitting. The approximate volume in a bottle of old TJ is 200.300 ml.
- After new fuel fluid has flowed from all fittings, it is necessary to check their tightening torque to ensure the tightness of the system. Don't forget to put on the protective caps!
Replacing a fuel tank on a lift
If you do not have the opportunity to drive the car onto a lift or overpass, then you can remove each wheel one by one, placing the car on a stand (not a jack!). Accordingly, the system of each wheel must be topped up in turn in accordance with the information described (parallel or diagonal diagram). To do this, it is very advisable to drive the car into the inspection hole so that you have normal access to the cylinders.
Replacing brake fluid at Granta
You will need: an 8" wrench for the pipeline nuts, brake fluid, a rubber or transparent hose, a transparent container, a syringe or a rubber bulb.
For reference: Brake fluids used in the hydraulic brake drive system:
| The manufacturer recommends changing the brake fluid in the hydraulic brakes of the Lada Granta after 3 years of operation or 45 thousand km. mileage (whichever comes first). As a rule, this procedure is performed at a service station, but if you wish, you can service the VAZ 2190 brakes yourself. | ||
| ROSDOT | LLC 'Tosol-Sintez', Dzerzhinsk | TU 2451-004-36732629 |
| KAPROS-DOT | LLC 'Sibur-Neftekhim', Dzerzhinsk | TU 2451-030-52470175 |
Security measures
To prevent brake fluid from oxidizing, evaporating, or picking up moisture, it must be stored in an airtight container.
As a rule, they are flammable, so they must be kept away from open flames and high temperatures.
They are poisonous, it is recommended to work with gloves, although there will be no obvious signs of burns if they come into contact with the skin.
Under no circumstances should you drink, even a small amount will lead to poisoning. If liquid gets into your eyes, rinse them thoroughly with clean water and consult a doctor.
Lada Granta Lux Removing the driver's airbag of the Lada Granta Changing the backlight of the instrument panel Lada Granta and Kalina-2 Individual ignition coils for the Lada Granta Rear view camera for the Lada Granta Lada Granta liftback Sports photo