Checking the technical condition of VAZ-2107 starter parts
↑ Anchor
Check with a megger or using a lamp powered by 220 V to see if the armature winding is shorted to ground.
Voltage is supplied through the lamp to the collector plates and to the armature core. The lamp's burning indicates a short circuit between the collector plates and ground. When checking, the megger should show a resistance of at least 10 kOhm. Replace the armature that has a short to ground.
Using a special device, check for short circuits between the armature winding sections and the commutator plates, and also for breaks in the place where the leads of the winding sections are soldered to the commutator plates.
↑ Starter anchor VAZ
Inspect the working surface of the collector. Clean dirty or burnt surfaces with fine-grained sandpaper.
Check the runout of the core relative to the shaft journals. If it is more than 0.08 mm, replace the armature.
Check the condition of the spline surfaces and armature shaft journals. They should be free of nicks, nicks and wear. If yellow marks from the gear bushing appear on the surface of the shaft, remove them with fine-grit sandpaper, as they may cause the gear to stick on the shaft.
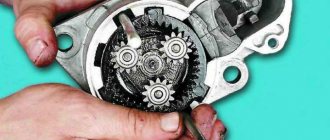
↑ Drive
- The starter drive should move freely on the armature shaft without noticeable jamming.
- The gear must rotate relative to the armature shaft under a torque of no more than 27.4 Ncm (2.8 kgfcm).
- The gear should not turn in the opposite direction.
If there are nicks on the leading part of the gear teeth, grind them with a fine-grained sanding wheel of small diameter.
If drive parts are damaged or significantly worn, replace the drive with a new one.
↑ Stator
Check with a megger or a lamp powered by 220 V to see if the stator winding is shorted to ground. The voltage is supplied through the lamp to the common terminal of the winding and to the starter housing.
If the lamp is on or the megohmmeter shows a resistance of less than 10 kOhm, and also if the windings show signs of overheating (blackening of the insulation), replace the housing with the windings.
↑ Covers
Check the covers for cracks.
- If they are present, replace the covers with new ones.
Check the condition of the cover bushings.
- If they are worn, replace the cap assemblies or just the bushings. After pressing, expand the new bushings to (12.015+0.03) mm.
For the ST-221 starter, to replace the bushing on the commutator side, first remove the plug, and after pressing the bushing in, install the plug in place and open it at three points.
Check the reliability of the brush holders on the cover on the commutator side.
- The brush holders of the positive brushes must not have a short circuit to ground.
- The brushes must move freely in the grooves of the brush holders.
- Replace brushes worn up to 12 mm in height with new ones, having previously ground them to the commutator.
Check the force of the springs on the brushes with a dynamometer, which for new brushes should be 9.8 ± 0.98 N (1 ± 0.1 kgf) and, if necessary, replace the springs with new ones.
↑ Traction relay
Check the ease of movement of the relay armature. Check with an ohmmeter whether the relay contact bolts are closed by the contact plate. Check with an ohmmeter whether there is a break in the windings of the traction relay.
If there is a break in the relay windings, or the relay contact bolts are not closed by the contact plate, then replace the relay with a new one.
If the relay is dismountable, you can disassemble it and clean the contact bolts and plate with fine-grained sandpaper or a flat velvet file. If the contact bolts are significantly damaged at the point of contact with the contact plate, the bolts can be rotated 180°.
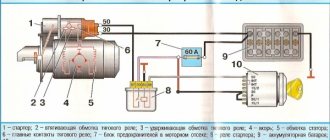
Why do you need a VAZ 2107 starter relay?
The starter traction relay on all classic models, except the VAZ 2107, was switched on directly through the ignition switch. The problem is that when it is turned on, a current of more than 15A passes through the contacts on the ignition switch, which over time leads to their oxidation, heating and failure. To reduce the current passing through the ignition switch when the starter is turned on, the designers of the “Seven” provided an additional element - the VAZ 2107 starter relay. The small current required for its operation does not harm the contacts of the ignition switch, and the relay itself more reliably switches the power to the starter traction relay . Often, owners of older “classic” models, tired of regularly changing the contact group of the ignition switch, independently install an additional relay that allows them to increase the service life of the contacts responsible for turning on the starter.
Where is the starter relay located on the VAZ 2107
The designers provided for the installation of a starter relay on the VAZ 2107 on the right side of the engine compartment. It is attached directly to the right wing, for which a stud is installed on the wing, onto which the relay mounting nut is screwed.
The easiest way to find it is to trace where the wires from the starter traction relay go.
Why do you need a starter and its design features?
Where is the starter located on a VAZ 2107
A starter (from the English word start - to begin) is a mandatory unit for starting the engine, which forcibly rotates the crankshaft flywheel to the speed necessary for independent operation.
It is a 4-pole DC electric motor that takes energy from a battery. The starter is necessary to start the engine of any vehicle and receives power from the battery when the key is turned in the ignition.
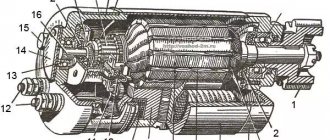
Main components of the starter:
- housing - a cylinder-shaped steel part in which the winding and cores are located;
- anchor - has the shape of an axis and is made of high-strength steel, collector plates and windings are fixed in it;
- a solenoid relay that supplies power to the starter when the key is turned in the ignition and pushes out the bendix;
- brushes and brush holders - supply the necessary voltage to the armature commutator unit, increasing the motor power when the engine spins up;
- drive gear and bendix (overrunning clutch).
Despite the huge range of electric motors, there are only two types, distinguished by the presence of a gearbox.
The most modern version of the electromagnetic motor is the gear motor, the main advantages of which include the ability to operate even with a low battery charge and the presence of permanent magnets that reduce problems with the winding.
The main disadvantages of such a unit are the low strength of the gear and the impossibility of repair, which leads to an expensive purchase in the event of a breakdown.
Starters that do not contain a gearbox in their design directly act on the rotating gear.
The main advantages of this type of starter are:
- simultaneous engagement of the flywheel with the gear, allowing you to start the internal combustion engine as quickly as possible;
- durability and long-term operation;
- the ability to independently repair breakdowns and the availability of necessary spare parts in almost any auto shop;
- practically independent of the influence of electric current, which reduces the possibility of breakdowns.
The disadvantages of gearless starters include:
- difficulty starting in extreme cold;
- significant mass of the unit;
- high energy consumption, leading in some cases (if there are faults in the starting system or other components) to a strong discharge of the battery and the impossibility of starting the internal combustion engine without recharging;
- quite high prices for spare parts.
Device malfunctions
One of the main types of starter malfunctions is brush wear. This is due to the fact that every time the engine starts, the brushes come into contact with the armature. Current passes through the brushes, and when the armature jams, the value of this current increases to 600 Amperes. This amount of current can cause a fire in electrical wires. The wear of the brushes can be determined by the rotation of the rotor. If the rotation speed decreases or the armature does not rotate at all, then it is necessary to check the condition of the brushes.
A retractor relay is attached to the starter housing, which is often the reason for the inability to start the engine. Some of the main reasons for the failure of the solenoid relay are:
- Open circuit in the relay winding.
- Destruction of any of the component parts of the device.
- Carbon accumulation or plate melting.
Guide to dismantling and installing the mechanism
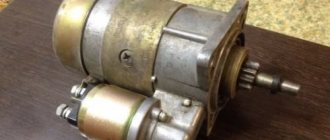
If the VAZ 2107 does not start due to a breakdown of the starter, then it is replaced with a new unit. Depending on the model, a gear starter can be installed on a VAZ.
The replacement procedure consists of the following steps:.
- First of all, the power to the car is turned off by disconnecting the negative terminal from the battery.
- Next, on a car with an injector, you need to remove the protective shield from dirt.
- Then you should first unscrew the two bolts at the top, and then the bolt located at the bottom. When all the bolts are unscrewed, the unit is moved forward. For engines with an injector, it is necessary to remove two extensions of the intake manifold.
- For engines with a carburetor, the air intake, air filter and air duct must be removed.
- At the next stage, you need to unscrew the nut securing the tip of the wire, which connects the output of the solenoid relay to the positive of the battery, using a “13” wrench.
- Before removing the unit, you need to disconnect the wires from terminal “50”. The device should be dismantled through the top, inserting it between the clutch housing and the exhaust pipe.
- Installation is carried out in reverse order.
During repairs, either the VAZ 2107 starter or its components that have failed are replaced. To replace parts, the device must be disassembled. The disassembled starter is reassembled in the reverse order. When connecting wires, use the connection diagram.
The diagnostic procedure is simple and can be performed by any car enthusiast, which will make it possible to save on car service costs.
Conclusion
Every driver is interested in how much a regular and gear starter costs. In fact, the price is almost identical. The price of a regular one fluctuates around 3,500 rubles, and a geared one – 4,000 rubles. Considering this fact, it is of course more profitable to purchase a device that can breathe new life into the car. Considering that the installation and dismantling process will be carried out with your own hands, you will be able to save a lot.
A car starter is the main element of the engine starting system, and is designed to start it by cranking the crankshaft.
Essentially, it is a direct current electric motor driven by closing an electrical circuit by turning the ignition key. The autostarter consists of a stator, an armature (rotor), a brush holder with brushes, as well as a traction relay and a drive.
In all VAZ classic models, incl. and in the “seven”, it is located at the bottom of the engine, and is attached to the clutch housing.
Checking the VAZ 2107 starter
Before checking the starter, it is necessary to thoroughly clean it of dirt.
Then you should make sure that the traction relay is working. To do this, you need to apply “minus” to the starter housing and “50” to the terminal. A working retractor (traction) relay will push the starter gear forward, and a characteristic click will occur. If the relay is working properly, you need to check the starter windings using a multimeter. To access the winding, the brush assembly must be removed. The check is carried out in two stages:
- Check for short circuit. Connect one probe to the body, and touch the winding terminals in series with the second. If the winding is not closed, the resistance must be at least 10 kOhm.
- Check for a break. Connect the probes of the device to the terminals of the windings. In case of a break, the multimeter will show “infinity”.
Next you need to check the armature winding. If the armature is not closed, the resistance between the housing and the contact plates should be above 10 kOhm.
If the VAZ 2107 starter (carburetor, injector) has shorted or broken windings, it needs to be replaced. It is practically impossible to rewind the winding in a workshop.
Models, characteristics, location
The designers did not borrow a starter from other VAZ models, but made a new one - for Oka engines. The impossibility of unifying starters for owners of this small car often results in problems, since the “native” starter is not a particularly reliable unit.
It is noteworthy that Oka’s power electric motors were produced by several manufacturers. The most common is the unit with the factory index 39.3708 (KZATE Samara plant), which we will consider in the future. Also, the VAZ-1111 was equipped with Belarusian-made components (1111-3708010-5) and Slovenian ones - AZE-1517.
The main characteristics of model 39.3708 are as follows:
- Power – 0.9 kW;
- Current consumption – 230A;
- Weight – 5 kg;
This unit is mounted on the left side of the engine (in the direction of travel) above the gearbox, and the thermostat housing is located above it. Fixation is carried out with only two fasteners - a bolt and a nut, with which the starter is attracted to the clutch housing. This arrangement is convenient because you can dismantle the unit from the car without removing anything additional.
Causes of malfunction
Any part can fail. But it’s not enough to just do it. We also need to find out what caused the malfunction and prevent it from happening again. After all, the reason may not be in the part itself, but for example, the fault may be hidden in a circuit that is located even before it. Let's think about the reasons for the malfunction. There may be several of them:
- One of the reasons may be wear on the commutator brushes and their loose fit. In this case, check how freely they move in the brush holder. The price of a new brush is low; drivers often prefer to simply replace them.
- Often the cause of a starter malfunction lies in the relay : the winding burns out or the contacts burn out. Sometimes corrosion of the anchor causes it to jam. In the case when, when starting the engine, the starter rotates along with the flywheel, the relay is also at fault. These malfunctions are most typical for the starter solenoid relay - repairing a VAZ 2107 is rarely complete without replacing it.
- If the starter turns the engine, but very slowly, the generator is most likely to blame. Its diagnostics are carried out on a stand, where the voltage, which should not exceed 14.5V, and the generator turn-on current are determined. Be sure to check the tension of the drive belt. If it slips, the generator cannot develop full power, which inevitably drains the battery.
- The most common breakdown occurs: there is a break in the circuit supplying power to the relay winding. Then you need to check the connection of the wires, tighten the bolts that secure the wire going to ground and check the starter control connector, the so-called 50 pin. The connector may need to be replaced.
Advice! In case of a problem with the contact, crimp the wire with a round copper tip and, together with the fastener, screw the ground to the relay. This will be the simplest solution to this problem.
After making sure that both the relay and the ignition switch are in order, when repairing the VAZ 2107, the starter is carefully examined. To do this, you need to remove it and perform a visual inspection of the contacts on the solenoid relay. Sometimes the cause of poor contact is loosely tightened nuts. In this case, the terminals heat up and burn. How to determine the working capacity of the solenoid relay?
Advice! It’s easier to do this this way: take a piece of wire with a cross-section of 8-10mm2 and connect it to the positive terminal. Place the starter on the battery, resting its body against the negative terminal. Touch the other end of the wire to the terminal on the solenoid relay.
Attention: If after such manipulation the starter starts working, then the cause of the problem is in the relay. If there is no reaction, we can assume that the problem lies in the brushes.
There is one more problem for all cars, not just the VAZ 2107: the starter, which needs to be repaired, has excessive energy consumption. This may be indicated by a strong decrease in instrument panel lighting and lamp brightness. There are three possible problems that may arise here:
- Insufficient wire contact
- Increased mechanical resistance
- Low resistance.
Advice! If cleaning the external contacts of the electrical circuit does not help eliminate the breakdown, you need to check the contacts inside the starter, as well as the brush units.
There are also mechanical reasons that prevent the smooth operation of the starter:
Wear of the bushings promotes short circuits between the windings and jams the moving elements.
Main signs of starter malfunction
Failure rarely occurs instantly. Very often, malfunctions, especially in the mechanical components of a car, are indicated by extraneous abnormal sounds, untimely operation, and foreign odors. Let's look at the most common cases.
The engine rotates inconsistently
Although the starter motor always rotates. When the start is skipped, a metallic crackling or grinding noise is heard.
Possible malfunctions: fork wear, damper spring failure, gear wear. Further diagnostics and determination of the exact cause of the malfunction is possible only after removing the starter.
Constantly rotates at start, but does not rotate the engine
At the same time, no extraneous noise is heard.
Most likely the plug has failed. The starter needs to be removed and the fork replaced. The plug itself is inexpensive (about 1000 rubles), you can replace it yourself.
Starts the engine, but when the engine is running, a metallic buzzing sound is heard
The engine must be turned off immediately. Probable causes of the malfunction are a stuck retractor relay, a jammed fork or gear. Further determination of the cause of the malfunction requires removal of the starter.
It may periodically fire and start the engine, or it may be inoperable.
In this case, you need to lightly tap the back of the starter housing with a hammer or other metal object. If the engine starts to start, the starter requires replacement of the brushes due to their high wear.
The starter relay clicks but the starter does not turn over.
The most likely cause is insufficient battery charge. The voltage at the battery terminals is enough to activate the solenoid relay, but the contact plate does not close the contacts, and no voltage is supplied to the starter motor.
If the voltage on the battery is normal, the nickels may burn or there may be no voltage on the power wire.
Video - when the starter solenoid relay clicks, but the starter itself does not turn:
This situation also occurs when the battery capacity is lost.
The bushings may be worn out, or there may be contamination in the internal space of the starter motor.
Presence of an electrical burning smell during start-up
As a rule, this indicates burning of the solenoid relay winding, less often the armature winding. This may be accompanied by heating of the wires going to the starter.
Solenoid relay does not operate, starter does not rotate
The most common cause is a malfunction in the vehicle's electrical circuit. In this case, it is necessary to start by monitoring the serviceability of the vehicle's electrical wiring, the correct functioning of the engine control unit and other electrical components of the vehicle.
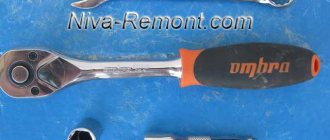
Replacement
- socket wrench 10;
- socket wrench with extension 13;
- screwdriver.
Work order
- We place the car on a viewing hole or overpass and secure it with the parking brake.
- Open the hood and disconnect the ground wire from the battery.
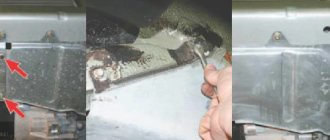
- Using a 10mm socket, unscrew the bolt of the lower fastening of the starter heat shield.
- We dismantle the air filter housing and the warm air supply hose (for injection units, remove the fastenings of the intake pipeline).
- Using a socket wrench with a 13 mm extension, unscrew the 3 bolts securing the starter housing. It is better to unscrew the bottom bolt from the inspection hole.
- Using a 13mm wrench, unscrew the nut (on the injection engine there are two nuts) securing the starter shield. Let's take it out.
- Using a socket wrench with a 13 mm extension, unscrew the 3 bolts securing the starter housing. It is better to unscrew the bottom bolt from the inspection hole.
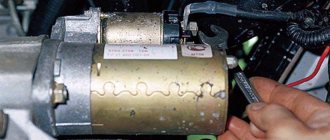
- Using the same tool, unscrew the nut securing the tip of the wire going to the “+” battery.
- Disconnect the start relay wire.
- We remove the starter from the rear wall of the engine compartment.
- We install a new starter in its place.
- We carry out installation work in reverse order.