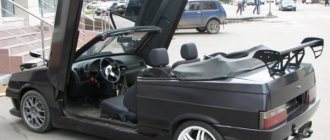
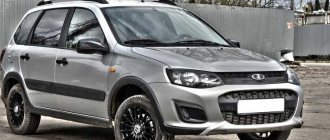
Torpedo from Priora on VAZ 2110
There are many ways to update the boring interior design of your car. You can reupholster the interior and seats, add some additional options and bells and whistles. And if you want to change something on the VAZ 2110, then the best option is to put dozens of elements from the Lada Priora into the interior. The convenience lies in the fact that almost all elements of the Priora (seats, panels, plastic) fit perfectly into the top ten. Having installed some parts of the interior from other cars (for example, from a foreign car), you will have to cut, sharpen, adjust and tear out something. And most of the interior elements of the Priors fit the VAZ 2110 without any problems.
We install a new panel on a VAZ 2110
An important part of the car interior is the panel. The torpedo from the VAZ 2110 is morally outdated, although of course most drivers are still happy with it. Installing a torpedo from a Lada Priora to a ten is a troublesome task, but it’s worth it. The VAZ 21104 panel is more modern and convenient, although the quality of the plastic leaves much to be desired. The exception is wiring. You'll have to tinker with it a little longer. But we'll talk about this later.
Removing a panel from tens turns out to be not an easy task. And you can’t just pull one out and put the other in. But it’s quite possible to remove the old panel yourself. To do this, you will need several types of screwdrivers (two Phillips with a long and short blade and one simple), a 10mm deep socket, wire cutters, and a flashlight.
When starting removal, the first thing you need to do is disconnect the negative terminal from the battery. For additional convenience, you can remove the two front wheels, this will provide additional space for such labor-intensive work.
We immediately take out the simplest elements from the VAZ 2110 dashboard, such as: the standard clock, the heater control unit, the display unit, as well as the central deflector and radio. Then we unscrew the screws located on the sides that hold the tunnel. Remove the housing from the gearshift lever and take it out. Next we dismantle the steering wheel casing and steering wheel. To do this, unscrew the self-tapping screws and fixing screws.
The steering wheel usually fits very tightly, so to remove it you need to rock it from side to side. Remove the switches located under the steering wheel. Next comes the glove compartment. We remove the fasteners and remove it from the seat. Then we dismantle the mounting block. You need to pull out and disconnect all relays and connectors. Remove the panel and rack covers. It is very important at this stage to release the fasteners of the hydraulic headlight range control. We remove the torpedo. You need to unscrew the screws and studs holding it. Then we free the panel from the steering shaft and air duct. We pull it towards ourselves and the job is done. Assembly is carried out in reverse order.
When purchasing a new panel, you need to take into account that part of the wiring is included with the torpedo. Here you can partially save on wiring. You will also need noise insulation and panel mounting in the area of the electronic control unit. This will be required so that the torpedo from Priora fits tightly onto the VAZ 2110 without any complaints. The entire standard panel from Priora fits into the top ten without any problems, all fastenings and seats fit. You can also install a euro torpedo on the VAZ 2110. There are no comrades here for taste and color. It also looks modern and respectable. It will be very interesting for friends and acquaintances to see this innovation. The price of panels ranges from 5 to 8 thousand rubles.
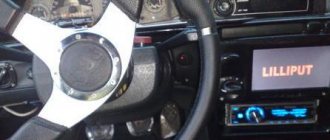
IMPROVING INSTRUMENT PANEL LIGHTING
The VAZ 2112 dashboards have always had one problem: dim lighting. This was especially noticeable at night. So the first thing tuning enthusiasts do is change the light bulbs in the instrument panel. Initially, there are simple and extremely weak incandescent lamps. They are being replaced by white LEDs, which have two advantages: some are durable and economical. Here's what you'll need to get started:
- 8 white LEDs;
- medium sized flathead screwdriver.
SEQUENCE OF OPERATIONS
To remove incandescent lamps from the VAZ 2112 instrument unit, you will have to unscrew it and pull it out.
- The steering wheel moves down all the way.
- Above the dashboard there is a visor into which a pair of screws are screwed. They are removed using a screwdriver.
The location of the screws holding the panel is shown by arrows - The visor is pulled out from the panel. To do this, you need to slightly push it towards you, and then pull it forward and up.
- Under the visor there are 2 more screws, which are unscrewed with the same screwdriver.
- The block with instruments is removed from the niche. The wires located on the rear wall of the unit are disconnected. There are also light bulbs there. They are unscrewed and previously prepared LEDs are installed in their place.
Light bulbs are unscrewed from the printed circuit board by hand, their location is shown by arrows - The wires are connected to the block, it is installed in a niche and screwed together with a decorative visor.
VIDEO: REMOVAL OF THE INSTRUMENT PANEL ON A VAZ 2112
Wiring from Lada Priora to VAZ 2110
The wiring has the most problems.
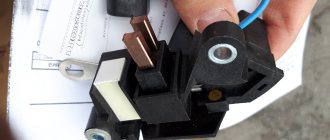
The fact is that the wiring of the priors is different from the wiring of the tens. And before you start connecting, you need to carefully study the instructions for the electrical part of both machines. Connectors and chips from cars do not fit each other. Therefore, there are two options for the development of events. On the top ten, you can install all the wiring from the VAZ 21104, located under the hood and in the cabin. But you can go the other way, try connecting the wiring of both machines. In this case, you will need to replace and resolder all connectors. You will also have to replace the mounting block, and you may have to install an electric drive in the stove.
The Lada Priora control unit (2110-3763040), which is responsible for the entire electrical component of the car, can of course be set to ten, but it is not economically profitable. That's why they usually don't install it. The price of such a block is 2500-4000 rubles. The cost of wiring is 1300-1700 rubles. You can buy it cheaper somewhere at a salvage yard.
Car differences
Lada Priora and VAZ 2110 are of course identical cars, but they also have differences.
Car enthusiasts often find it difficult to decide which model to give preference to. But in any case, the Priora is a more modern car. Thus, the electric power steering gives greater comfort when driving a Lada Priora than driving a ten. In dozens, power steering was introduced only in 2006, and the VAZ-21104 immediately came from the factory with an electric power steering wheel. If someone comes across a ten with electric power steering, then know that it was installed by someone in a car service center. A feature of the Priora steering is a large amount of play in the steering wheel, which takes some getting used to. At high speed, you have to “catch the car on the road,” as it were. Therefore, many drivers at the time gave preference to the VAZ 2110, which behaves more confidently at speed. But still, when cornering and when driving in a zigzag manner, the VAZ 21104’s movement is more comfortable and confident than that of its predecessor. The Priora behaves more dynamically at speed if an appropriate brace is installed between the supports of the front struts. In this case, drivers note improved handling.
Experts' opinion
Vitaly. The design of an internal combustion engine is quite complex; many works require high precision and high-quality execution. Making a mistake can cause the engine structure to become deformed when starting the engine. Some work can be done with a little experience in disassembling the engine, while others should be performed exclusively by professionals in their field. The main thing is not to overestimate your capabilities, as this can be very expensive.
Michael. Changing the exterior of a car requires certain investments, but today there are quite a large number of plastic kits on sale that are inexpensive. I am a consultant in an online store and I can say that when choosing the appropriate kit, it will fit without any problems.
What is suitable from Priora for VAZ 2110
Continuity of parts from dozens to Priora
AlexMAE
: The question is generally simple, is it possible to move my tuning parts from 2111 to Priora? The list is as follows: 1. As far as I understand, the SS20 rear shock absorbers are the same, but what's the difference in the front ones? 2. Front strut support 2110 MASTER 3. Rear brake drum Pilenga 4. Vacuum brake booster sport 2110 10-inch Lucas (from a 2-liter Shnivy) 5. Ventilated brake disc R14 Brembo MAX with caliper and pads 6. Gearbox 7. Body reinforcement 2111, 2112 8. Front panel reinforcement (steering rack) 2110
dydezzz
: the vacuum cleaner on the Prior is already “tuning”