You don’t need practically anything from a tool; you just need a flat-head screwdriver to pry up the plastic clips that secure the hood trim, and perhaps pliers to tighten the nuts of the jets themselves.
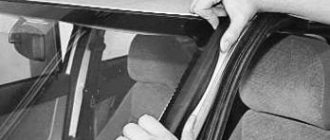
- The first step is to open the hood and use a screwdriver to remove the clips securing the hood trim in the places where the jets are located. It is not necessary to completely remove the trim; everything can be done by bending the edges.
- After this, we put our hand under the trim, bending it a little, and remove the hose from the washer nozzle, after which we remove the nozzle from the hood.
- We insert a new one, tighten the nut that secures it, in my case I needed a 12mm wrench, and put the hose back on.
- And this is what it looks like after installing these accessories.
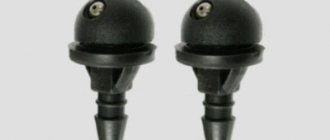
These things are very convenient, since the direction of water flow is adjustable in all directions, unlike cheap options. By the way, I forgot to say about the price: I paid 120 rubles for a couple of these pieces. Adjustable with a thin screwdriver, as I already said, in all directions: right, left and up, down.
After setting up the sprinklers, the effect is simply amazing. Can't compare with factory sprinklers, which were no good at all. Now, when the washer is turned on, the entire glass is completely covered with water and is cleaned instantly over the entire area of the wipers. I think that in the video attached above, the difference between the standard and new fans is noticeable.
My first modification to the car. Two Chinese windshield washer nozzles with the letter “G” on the body were purchased at an auto parts store for 25 rubles each.
Reviews
Delivery of goods is carried out throughout Russia and the CIS:
1. Russian Post (from 350 rubles and above)
Delivery to all regions of the Russian Federation and CIS countries
2. Transport Companies (from 350 rubles and above)
Delivery throughout Russia and the Republic of Kazakhstan
- TK Energy (nrg-tk.ru)
- TC Business Lines (dellin.ru)
- TC SDEK (www.cdek.ru)
- TK PEK (pecom.ru)
- TK KIT (tk-kit.ru)
3. Pickup
The order can be picked up at the office at Tolyatti, 40 Let Pobedy 38, TD “Malachite”, 1st floor.
The waiting time for sending an order in our online store is approximately 2-7 working days, large orders 7-14 working days. days; color of bumpers, mirrors, body parts, spoilers, etc. 7-14 work. days; sewing covers, upholstery, steering wheels, gear knobs, EVA mats, etc. 7-14 work. days.
During this period, we will send you a tracking number by email. email to track the parcel en route.
Payment can be made in the following ways:
1. Payment to a Sberbank card
You can pay using the SBERBANK-Online application and other Bank applications.
After placing an order, making payment, do not indicate comments , we ourselves will understand by the amount of the order and the name of the sender. After receiving the funds, the status of your order will be changed to paid until 17.00 of the current day, or from 9.00 of the next Moscow time.
2. By bank card
Automatic acceptance of payments using MIR Bank cards, VISA International, Mastercard.
You can also pay with credit cards with a grace period.
To select payment for goods using a bank card, on the corresponding page you must click the “Pay for order by bank card” button.
2. Payment to QIWI wallet 89272115207
3. Payment on Yandex.Money 410013993950891
5. Payment to a bank account for legal entities and individual entrepreneurs (commission 6%)
Send your organization's details to [email protected] for invoicing. After paying the bill, be sure to send a payment order.
4. Cash on delivery of Russian Post (commission from 4%)
IMPORTANT! When sending by cash on delivery, RUSSIAN POST will take a commission for providing the cash on delivery service of 150-300 rubles, and the delivery cost also increases due to the evaluation of the goods.
Cash on delivery delivery is possible only within Russia.
ATTENTION! When choosing cash on delivery, the delivery cost is paid in advance before shipment, for the product itself upon receipt.
The amount of the order by cash on delivery should not exceed 5000 rubles; also, painted parts, goods made to order, covers, upholstery, door inserts, EVA mats, steering wheels, etc. are not sent by cash on delivery. (minimum 50% prepayment).
Be sure to save the payment receipt or a screenshot of the transfer.
The best guarantee of order fulfillment and quality is the feedback from our customers.
Reviews of our work can be found in our VKontakte group https://vk.com/topic-136384247_36675422?offset=180
Chevrolet Niva Number One › Logbook › Transfer of washer nozzles to the wiper blades
I present to you an article about how to transfer windshield washer nozzles from the hood to the windshield wiper arms. This modification was prompted by the purchase of a new fiberglass hood, on which holes were not specially drilled for installing standard nozzles. I suggest you immediately watch the video, where I explain in detail and concisely told and showed what and how to do to transfer the injectors to the leads of the windshield wiper blades.
Catalog numbers of the original components I used: 1. Bosh injector: 3 398 699 (
400 rubles);2. Hose, to injector: A (
250 rubles);3. Connector (angle): A (
Original numbers of alternative components: 1. Corner from Kia: 98661-4E0002. MAN injector: 81264820037 (335072/24401/105884/1606839)3. Injector ZIL: 4331-5208040 (1102-5208040)
Three goals that I pursued: 1. Reducing washer fluid consumption. It is no secret that in order to properly clean the glass, you have to catch the moment of supply of washer fluid so that it hits above the wipers, because everything that falls under them, they simply sweep down almost in vain. Also, due to the fact that the nozzles are located quite far from the surface of the windshield, a long stream of liquid after splashing hits everything that is in its path. And also the remaining fluid from the injectors spreads over the hood, leaving marks.2. To improve the quality of windshield cleaning by ensuring uniform distribution of washer fluid. Since the nozzles will be tied to the brushes, they will always pour over the brushes in any position.3. A controversial and not relevant point for everyone is that what remains is a clean, beautiful hood with nothing superfluous on it. In my case, I ordered a fiberglass hood that does not have holes for the injectors.
Brief installation instructions:
In order for the hose to have minimal deformation loads when the windshield wipers move, we make one turn around the axis of the lever clockwise, so that when the brushes operate, the hose works in extension. And choose the optimal position for the corner.
The Mercedes corner connectors that I used have fittings of different diameters. The output, the one that goes to the hose up to the nozzle, has a smaller diameter and requires the use of a thinner hose. In order not to waste time searching and selecting, I bought the original hose that is used with these injectors. The inlet hose, the one that will be hidden under the panel, can be left standard, because it has the right diameter. The standard hose is not long enough, so you will have to buy another one. I bought a silicone hose for VAZ 2110/2170.1. We hide the standard hose. We hide the pulleys under the panel and connect them to the standard tee without changes. The tee will be in the middle of the hood, in front of the front passenger’s “windshield wiper.”2. Cut off a small piece of hose from the tee to the nozzle for the right windshield wiper.3. Then measure and cut the hose to the required length for the corner connector of the left windshield wiper.4. It is advisable to leave the hoses as short as possible so that the washer fluid reaches the nozzles faster. But at the same time, they should be left in a slightly loose state, without unnecessary tension and tension.5. The hoses must be secured under the panel so that they do not dangle loosely, as they can get caught under the moving trapezoid of the wiper blades. I secured the hoses with regular nylon clamps. They are still not visible under the panel. I also secured the hoses on the windshield wiper arms themselves with nylon clamps. But it is better to replace them with special hose holders that are used on the same Mercedes. I will do just that in the near future. There is one important nuance with these nozzles. As I showed in the video, they are designed to be mounted on blade arms that are located high, for example, like on a rear windshield wiper arm. In order for these nozzles to be adjusted correctly, they had to be secured parallel to the brushes directly at the mounting location. Since the lever itself immediately begins to bend at the attachment point, it will not be possible to snap the nozzle onto it so that it is completely inside the nozzle groove. But as practice has shown, the nozzle is held tightly enough and does not move at high speed. Each nozzle block has three nozzles. After installation, do not forget to adjust them so that the washer fluid is sprayed as evenly as possible across the glass in the area where the brush operates.
What types of malfunctions are there?
In fact, there are not so many problems, and they are divided into electrical and mechanical. Most often, problems arise in the mechanical part. Mechanical problems are simple, the first problem is lack of fluid. That is, it either simply ran out in the tank, or froze due to the low temperature. In the first case, you just need to top it up, and in the second, warm up the engine well, and its heat will defrost the liquid.
The hose could also have come off; it needs to be installed back, and the problem is solved. And the most common problem is clogged injectors. They can become clogged due to the use of low-quality fluid or due to the ingress of dust and weight.
Poor flow can also be due to problems with the pump or seals, so you should find out what the problem is.
Features of work
There is nothing complicated about the operation of the injectors. This device is designed to supply water or a special washer fluid to the windshield of a car.
All nozzles are divided into two types.
- Jet. They release a stream of water and that’s it. Basic principle, nothing special. Mainly used on older cars;
- Fan. Their feature is the uniform distribution of water or liquid over the surface of the lobovka. Such devices extend the life of the wipers because they allow them to glide over a constantly moistened glass surface.
They are characterized by several situations that require mandatory driver intervention.
- Lack of liquid. Usually it simply runs out in the tank, and the driver simply does not notice this and does not add a new portion in time. Check regularly how much liquid is in the container and monitor the level;
- A hose that has come off. I think you won't need instructional videos or photos with instructions here. Just put the hose in place and that's it. The renovation is complete;
- Freezing of liquid. Usually occurs due to low temperature and the use of ordinary water instead of a special washer. Warm up the engine more. Due to the generated heat, the liquid will defrost;
- Clogging. The most common trouble that you can deal with yourself. Everything is done quickly and without any difficulties.
Possible damage to the windshield washer
Washer failures are divided into electrical and mechanical. Mechanical faults are much more common than electrical faults, however, and they are much easier to fix.
We list the malfunctions that arise for mechanical reasons:
- The washer fluid in the reservoir has run out. If there is no fluid in the reservoir due to damage, it is recommended to replace it immediately. In addition, the fluid can freeze if it is selected incorrectly (for example, when using washer fluid in winter intended for use in summer).
- Perhaps the hose came off the jets, or it was crushed.
- Liquid cannot pass through the nozzles. This is possible if there are any foreign impurities in the washer fluid, but it happens that the injectors are simply clogged with dirt.
The second group of reasons leading to incorrect operation of the washer includes electrical faults. Let's list them:
- Blown fuse.
- The washer motor is not receiving power. In this case, the cause of the breakdown lies in the washer terminals, which will oxidize over time and sometimes fall off. Such a malfunction is detected by visual inspection.
- Broken relay, faulty wiring, switch or washer motor. Such a breakdown can be calculated using a multimeter connected to the terminals of the electric motor. The absence of voltage will confirm the presence of a breakdown. In cases where there is voltage, but the washer still does not function, we can conclude that its motor is broken, which will need to be replaced immediately.
- The pump terminals are oxidized. As noted just above, the terminals oxidize during operation, which in turn leads to the cessation of fluid pumping due to a failed motor. It is possible to restore their functionality; for this purpose, the oxidized terminals must either be cleaned or replaced with new ones.
What to do if the anti-freeze is frozen?
Frozen washer fluid is a fairly serious problem, as it deprives the car owner of the opportunity to properly clean the windshield, thereby reducing visibility and preventing the driver from adequately assessing the situation on the road. Also, such a situation directly threatens the washer pump.
If you find that the anti-freeze has frozen, you can take the following actions:
- Park the car in a heated parking lot and wait for the ice to melt naturally. Note that this method will require not only time, but also the presence of a heated parking lot nearby, and therefore is not suitable for everyone.
- If the first method does not suit you, then it is better to remove the tank and take it to any heated room to defrost.
- Another technique is to pour heated water into the tank. Despite its apparent effectiveness, this method has obvious flaws. Therefore, let’s immediately clarify that if there is not enough hot water, then the ice simply will not melt, and if there is a lot of it, then the risk of damage to the tank itself, made from low-temperature varieties of plastic, will significantly increase. In addition, even with melted ice in the tank, you will not get rid of ice in the tubes and jets. Consequently, within half an hour the temperature of the liquid in the tank will drop so much that ice will begin to form in it again. As a result, the problems will only get worse, and therefore this method cannot be recommended.
- Let's describe one more method. Turn off the engine, take a bottle of cheap vodka and pour it into the washer reservoir. The alcohol will help dissolve the antifreeze without deteriorating its properties. If you don’t have anything containing alcohol on hand, you can heat one to two liters of high-quality low-temperature anti-freeze to a temperature of 40-60C by placing the container with it in boiling water. After heating, the liquid should be poured into the washer reservoir (with the engine off, of course). Then the engine needs to be started, after which the injectors are watered with water heated to 30-40C. After a few minutes, press the washer control lever and, if there is no damage to the pump, streams of anti-freeze will spray out of the jets.
Fresh questions for auto repair shops (replacing windshield washer nozzles for vaz lada granta) in Moscow
I want to write a review about this service. I am repairing my Zafira there, the most important thing is that there is no deception there, they don’t impose anything, they don’t scam me. Vice versa! Warn against unnecessary spending! About the quality, I can say something about what they did.
Good afternoon do you have a vibration stand?
Hello! I need to replace the rear brake pads on a Peugeot Partner Teepee. Is it possible to do this at your place and what is the price for such work? Thank you.
Hello, please tell me how much it costs to repair the front axle gearbox of a 2005 Tuareg? And when can you come?
Installation procedure and required tools
You don’t need practically anything from a tool; you just need a flat-head screwdriver to pry up the plastic clips that secure the hood trim, and perhaps pliers to tighten the nuts of the jets themselves.
- The first step is to open the hood and use a screwdriver to remove the clips securing the hood trim in the places where the jets are located. It is not necessary to completely remove the trim; everything can be done by bending the edges.
- After this, we put our hand under the trim, bending it a little, and remove the hose from the washer nozzle, after which we remove the nozzle from the hood.
- We insert a new one, tighten the nut that secures it, in my case I needed a 12mm wrench, and put the hose back on.
- And this is what it looks like after installing these accessories.
These things are very convenient, since the direction of water flow is adjustable in all directions, unlike cheap options. By the way, I forgot to say about the price: I paid 120 rubles for a couple of these pieces. Adjustable with a thin screwdriver, as I already said, in all directions: right, left and up, down.
After setting up the sprinklers, the effect is simply amazing. Can't compare with factory sprinklers, which were no good at all. Now, when the washer is turned on, the entire glass is completely covered with water and is cleaned instantly over the entire area of the wipers. I think that in the video attached above, the difference between the standard and new fans is noticeable.
Adjustment
To understand how the nozzles on the Vesta are adjusted, you need to understand the design of the device. The mechanism is housed in a plastic case. The basis is made up of nozzles through which liquid is supplied and sprayed onto the glass under pressure. The desired direction is given using a regular needle.
The process of setting up the Vesta washer nozzles comes down to the following: carefully place the needle inside the hole, adjust the angle of inclination, changing the direction of the jet. At the same time, it is important not to overdo it, without underestimating or significantly increasing the indicator.
Methods for cleaning injectors yourself
In practice, the procedure for cleaning the nozzles yourself is not particularly difficult, but first you should make sure that the windshield washers really work poorly due to clogging, since often the cause of deterioration in performance is a violation of the tightness and malfunction of the pump that provides the supply. liquid from the reservoir.
What are fan injectors on a car?
Often modern car manufacturers prefer to use just such nozzles for cleaning glass in their cars. The main difference between fan devices and their analogues is the water supply technology, which involves applying it to the glass for cleaning in an area of small drops instead of several separate jets.
The most common fan type glass cleaners are those from Volvo, but there are many alternatives. For example, Toyota business class models, which also contain such devices, have recently become popular. It is worth noting that the kit always includes only one nozzle, and therefore in the process of selecting a suitable product from the catalog you will need to place two orders at once.
Dismantling
It will be much better if you remove the nozzle, as this will be more convenient for adjustment. This will also be useful if you just want to replace it with a new one. In order to do this, you must first remove all suitable hoses. There is a nut for fastening, you need to unscrew it and then calmly remove the washer.
If it gets hard, it’s better to spray in WD-40 and wait a little, as too much force can break the washer. Putting it back is more difficult and you need to be even more careful here than when removing it.
New injectors will cost you about 300 rubles, and for AvtoVAZ models you only need to pay 60 rubles. The price may be slightly different due to the brand of the car; of course, they will cost more for expensive cars.
Adjusting the windshield washers is not difficult, but the main thing is to do it all carefully. For more information, watch the video instructions.
Types of nozzles and their differences
There are 2 main types of washer nozzles installed on modern cars - jet and fan.
Jet nozzles work on the principle of a hollow cylinder that sends a stream of water to a specific point. They are typical for all older cars, as well as for some modern domestic cars.
Jet and fan nozzles VAZ 2114In turn, fan nozzles have not one, but many channels, from which water falls on different areas of the windshield, thus covering a large area. In addition, due to the fact that the nozzles of fan nozzles have a smaller diameter than jet nozzles, water comes out of them with greater pressure, which means it removes contaminants better.