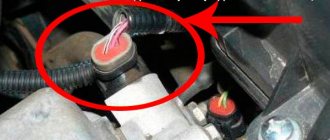
Modern motors are equipped with such a useful element of the on-board control system as a phase sensor. It is located on the left side of the Lada Kalina engine head with 16 valves and is designed to determine the angle of rotation of the camshaft at a given moment. Information from the sensor is sent to the ECU, where it is processed, after which the controller performs control or corrective actions. Without the presence of such a sensor, it is almost impossible to achieve proper operation of the engine in the Lada Kalina 16 valves, because the valve timing will not be correctly adjusted.
After receiving information from the sensor, the control function of the ECU is reduced to setting the correct ignition timing and timely supply of the required volume of fuel to each cylinder individually in Lada Kalina 16 valves. All this functionality ensures smooth, stable operation of the engine at different speeds and when using fuel of different quality.
Alternator belt whistles on Kalina
Replacing the Kalina stove radiator
How to change the low beam lamp on Kalina
Purpose and functional load
Sensors on Kalina 8 valves are designed to constantly monitor the angular part of the timing belt in the position of the power unit from the crankshaft. The control mechanism receives the necessary information and then processes it. As a result, fuel is injected and the ignition is controlled.
The product is based on the Hall principle - measuring movement (direction), changing charge carriers. Then, during the period of time when the magnetic field is crossed by the semiconductor, the information received is recorded. The field is generated by a magnet located in the device. The shaft wheel has a metal tooth that runs near the device. At this time, a pulse appears, transmitted to the electronic control unit.
The ECU helps receive pulses arriving at different time intervals, analyzes them, recognizes the location of the VIT piston in space, and then issues commands for injection and ignition of the fuel mixture.
The mechanism begins to work from a spark hitting the spark plugs when the exhaust gases are compressed and released. These systems depend on the functions that the crankshaft sensor performs.
Device design
The phase sensor of the Priora and any other car is an integral mechanism, the functions of which include obtaining all kinds of information about the engine operating cycle, as well as transmitting a signal to the electronic control unit using special pulses. The sensor design consists of 2 parts.
This is a Hall effect sensing element and a small transducer. The sensitive element responds to changes in the magnetic field. The sensor is located at the end of the cylinder block, not far from the air filter. There is a metal disk on the camshaft that is necessary for the sensor to function properly.
If the car suddenly loses power and throttle response, fuel consumption increases, or the check engine light comes on, it is necessary to conduct a comprehensive engine check. The method of such checking is described in the article (Injector diagnostics).
Description of the camshaft sensor on the Lada Kalina: where it is located, price, part numbers
Where is it located: in the Lada Kalina family car, the DPRV is located to the right of the valve cover, near the filler neck.
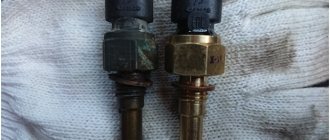
During the systematic operation of the technical device, the controller wears out and becomes unsuitable for further use. Considering that the sensor is non-separable, it must be replaced entirely.
Installing a new DPRV is not at all difficult. The task is feasible for a car enthusiast without technical equipment maintenance skills.
The electronic engine control unit systematically monitors the position of the camshaft through the camshaft. The dosage of fuel equipment and the firing of a spark in the combustion chamber of the cylinders depend on the accuracy of the readings and timely transmission.
Also, the DPRV affects the dynamics of acceleration, the stability of the engine at idle, and the concentration of emissions in the exhaust gases.
Signs of DPRV malfunction:
- Unstable engine operation at idle speed;
- Restarting the engine after stopping it;
- Increased fuel consumption;
- Reduced power of the power unit;
- Passive acceleration dynamics;
- Indicators on the dashboard indicate the presence of system errors;
- The transmission is locked at one speed mode. Switching off the gear after deactivating the ignition. Repeat once, cyclically;
- The car moves jerkily;
- The maximum speed of the car is limited to 80 km/h;
- The engine stalls periodically;
- Misfires when ignition is activated;
- The engine does not start after stopping.
Reasons for wear of the DPRV:
- Expiration of service life;
- Damage to the controller housing;
- Open circuit;
- Short circuit of contacts;
- Sensor break due to impact or collision;
- Incorrect operation of the electronic engine control unit (ECU).
What is a camshaft sensor
Before moving on to the question of checking the camshaft position sensor, you need to find out what kind of device it is, what it is needed for and on what principle it works. This will help clarify the details of the audit in the future.
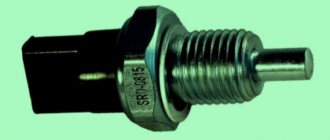
A camshaft sensor is a device that records the angular position of a specified shaft at a specific point in time. The information obtained with its help is transmitted to the electronic engine control unit (ECU), and on its basis this control element issues commands for fuel injection and ignition of the air-fuel mixture in each cylinder at a specific point in time.
The operation of the camshaft position sensor is based on the Hall effect. So, directly on the camshaft there is a metal tooth, which, when the shaft rotates, changes the magnetic field in a nearby sensor. This tooth is called rapper. The sensor detects a change in the magnetic field, which is converted into a low voltage electrical signal. This signal is sent to the electronic control unit.
In fact, the camshaft position sensor only registers one position, corresponding to the position of the piston of the first cylinder at top dead center. Next, phased fuel injection is performed in the firing sequence of the cylinders. Typically this is a 1-3-4-2 system.
Camshaft position sensors have been installed on engines with split (phased) fuel injection since approximately 2005.
If the camshaft sensor fails (the electronic control unit receives incorrect information from it or does not receive it at all), then it is programmed to switch to emergency mode. It involves the use of pairwise-parallel (group) fuel supply to the engine. This leads to two negative consequences:
- A slight loss of engine power, especially when driving in critical modes (acceleration, driving under load).
- Increase in fuel consumption by approximately 10...20% (depending on engine power, its design features, as well as operating conditions).
As for diesel engines, camshaft position sensors are designed similarly, but there is one difference. It lies in the fact that the sensor records the position of not only the first cylinder, but all of them. This is done due to the fact that the drive disk has a separate tooth for each cylinder.
Thus, if a sensor fails, it makes sense to diagnose it as quickly as possible and, if necessary, replace it.
Smart choice
The Lada Kalina 8 valve has certain differences from the 16 valve engine. However, automotive specialists sometimes install a mechanism with 8 valves to 16, and the engine works correctly.
The main differences between similar system elements:
The Kalina 8 cl phase sensor may be distinguished by the absence of a special slot required for the signal disk. This product cannot be installed on an engine with sixteen valves. It operates with a pin mounted on the camshaft (at the very end).
To avoid situations of inconsistency, purchase a mechanism according to the characteristics of the engine. No need to pay attention to the manufacturer's markings. The spare part number according to the VAZ catalog (Granta, Largus, Kalina, Priora) will always be the same:
- engine with eight valves - 21110370604000;
- 16-valve – 21120370604000.
We recommend: Replacing the Lada Priora heater radiator without air conditioning
The phase sensor (PF) is one of the many sensors that ensure engine operation.
The phase sensor is also called the “camshaft position sensor (CPS)”. This sensor is not installed in a carburetor engine, or even in the first models of VAZ injectors. The sensor is present in all 16-valve AvtoVAZ engines; On 8 valves with Euro-3 toxicity standards and with phased, sequentially distributed fuel injection;
The phase sensor is designed to determine the engine operating cycle and generate a pulse signal. Phase sensor with an integral sensor, i.e. includes a sensitive element and a secondary signal-to-pulse converter. The sensor's sensitive element operates according to the Hall principle, responding to changes in the magnetic field.
The secondary element of the sensor contains a bridge circuit, an operational amplifier, and an output stage. The output stage is designed as an open collector. The operation of the phase sensor represents the choice of stroke for the first cylinder: the camshaft determines which valve is open and which valve timing. Carburetor engines do not have this sensor.
The fact is that a carburetor engine supplies a spark plug at the moment of compression and at the end of the exhaust gases, and for this principle of operation the readings of the crankshaft position sensor (CPS) are sufficient. This type of engine operation is called the “ignition system”. On injection engines, when the phase sensor (DF) dies, the check light comes on and the engine switches from phased injection to the ignition system, that is, relying only on the DPKV readings.
The phased injection system is designed as follows: the phase sensor transmits a pulse to the ECM. which controls the fuel supply and the injector injects gasoline into the cylinder just before the intake valve opens. When the valve opens, air is drawn into the intake valve and the fuel is actively mixed with the air.
Definition of failure
The device is located close to the cylinder head, on the power unit. It is easy to understand the first signs of poor functioning of the mechanism, especially for an experienced car enthusiast.
Here are the main criteria for recognizing a breakdown:
- a light comes on and goes out, designed to constantly monitor the engine while turning the ignition key in the car;
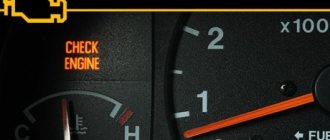
- “Check engine” lights up on the dashboard after the starter makes three to four revolutions and the engine comes into action. The sensor will be triggered if the electronic control unit does not receive the necessary information and has to use data from the DPKV;
- engine dynamics become worse - the vehicle slowly picks up speed (this is easy to notice when driving downhill). In this case, there are three reasons for the problem. The first - the camshaft sensor is broken, the second - the mass air flow sensor is broken, the third - the compression is reduced;
- high fuel consumption - this “symptom” is not very accurate and has a number of possible causes. You shouldn’t take it as a separate criterion for a problem, but you can use it as one of several.
If the mechanism fails, the “Check engine” will light up, and the system will display error “P0340”. Such a moment means a 100% malfunction. If this happens, you need to check the device. After a detailed diagnosis, it is recommended to replace the faulty parts.
Selecting, troubleshooting and replacing the phase sensor on Kalina
The car engine is equipped with a special element that supports the system as a whole - this is a phase sensor. Its location is an area on the engine head, on the left side. Function – determination at a specific moment of the rotating angle of the camshaft Kalina 8 valves (or 16). While carrying out its activities, the device wears out and becomes unusable, so it has to be replaced. This happens for many reasons. To understand how to choose a new product, dismantle a broken one and install a new part, you need to study the information below.
If the mechanism is not replaced in a timely manner, problems arise with the correct functioning of the engine. This leads to additional waste and resulting problems in the system.
- Purpose and functional load
- Smart choice
- Definition of failure
- Features during diagnosis
- Do-it-yourself troubleshooting
- Replacing the device with a new one
- We recommend watching:
Purpose and functional load
Sensors on Kalina 8 valves are designed to constantly monitor the angular part of the timing belt in the position of the power unit from the crankshaft. The control mechanism receives the necessary information and then processes it. As a result, fuel is injected and the ignition is controlled.
The product is based on the Hall principle - measuring movement (direction), changing charge carriers. Then, during the period of time when the magnetic field is crossed by the semiconductor, the information received is recorded. The field is generated by a magnet located in the device. The shaft wheel has a metal tooth that runs near the device. At this time, a pulse appears, transmitted to the electronic control unit.
The ECU helps receive pulses arriving at different time intervals, analyzes them, recognizes the location of the VIT piston in space, and then issues commands for injection and ignition of the fuel mixture.
The mechanism begins to work from a spark hitting the spark plugs when the exhaust gases are compressed and released. These systems depend on the functions that the crankshaft sensor performs.
Smart choice
The Lada Kalina 8 valve has certain differences from the 16 valve engine. However, automotive specialists sometimes install a mechanism with 8 valves to 16, and the engine works correctly.
The main differences between similar system elements:
- form;
- connector size.
The Kalina 8 cl phase sensor may be distinguished by the absence of a special slot required for the signal disk. This product cannot be installed on an engine with sixteen valves. It operates with a pin mounted on the camshaft (at the very end).
To avoid situations of inconsistency, purchase a mechanism according to the characteristics of the engine. No need to pay attention to the manufacturer's markings. The spare part number according to the VAZ catalog (Granta, Largus, Kalina, Priora) will always be the same:
- engine with eight valves - 21110370604000;
- 16-valve – 21120370604000.
Definition of failure
The device is located close to the cylinder head, on the power unit. It is easy to understand the first signs of poor functioning of the mechanism, especially for an experienced car enthusiast.
Here are the main criteria for recognizing a breakdown:
- a light comes on and goes out, designed to constantly monitor the engine while turning the ignition key in the car;
- “Check engine” lights up on the dashboard after the starter makes three to four revolutions and the engine comes into action. The sensor will be triggered if the electronic control unit does not receive the necessary information and has to use data from the DPKV;
- engine dynamics become worse - the vehicle slowly picks up speed (this is easy to notice when driving downhill). In this case, there are three reasons for the problem. The first - the camshaft sensor is broken, the second - the mass air flow sensor is broken, the third - the compression is reduced;
- high fuel consumption - this “symptom” is not very accurate and has a number of possible causes. You shouldn’t take it as a separate criterion for a problem, but you can use it as one of several.
If the mechanism fails, the “Check engine” will light up, and the system will display error “P0340”. Such a moment means a 100% malfunction. If this happens, you need to check the device. After a detailed diagnosis, it is recommended to replace the faulty parts.
Features during diagnosis
When the first suspicions arise, it is recommended to proceed with a thorough examination. If you cannot do this, it is recommended that you turn to professionals.
The first thing to do is to find out the primary cause of the breakdown. There may be several of them:
- there is a short circuit in the circuit;
- the temperature of the power unit rises;
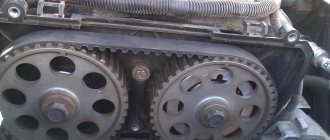
- the toothed disc is broken or damaged;
- the mounting lugs are damaged;
- phase sensor Kalina 8 cells or 16 cells offset.
If the “Check” lights up, which gives one of two errors - 0340, 0343, then the fault definitely lies with the phase device. Perhaps the reason is in the connections.
Do-it-yourself troubleshooting
An operational problem should prompt a system check. You can do it yourself in a relatively short time. If you are a novice driver or do not understand the intricacies, the best solution would be to contact a professional service center. There, the specialists will help eliminate all problems and breakdowns of the mechanism.
The crankshaft and camshaft sensors are diagnosed using a special tester. The cables are connected to the required terminal (A, B) in the appropriate order. The car starts, you should wait until it stops. It is important to carefully monitor changes in voltage.
In the first ten seconds, the voltage value should be equal to the on-board type value. In this case, the chain is not broken. If this does not happen, then it is closed or broken.
Sometimes there is no voltage when the circuit is intact. Such malfunctions often occur due to the fault of the controller. This is easy to check by connecting terminals A and C to the tester. As a result, there should be on-board voltage when the ignition is on. If this does not happen, then you need to look for a break further.
Replacing the device with a new one
This is an easy process that can be handled by a person with little experience in this type of work. If you don’t have time to do such activities yourself, you can always turn to a competent specialist.
To replace you will need:
- key for ten;
- high quality phase sensor.
Stages of the repair event:
- after squeezing the plastic clips, turn off the power;
- the fastening type bolt is unscrewed;
- removing the device itself;
- analogue is inserted;
- connection to the system.
These manipulations will not take more than an hour. It’s better to take your time to do everything well, and also not to break the plastic clips.
Failure of this mechanism is a rare occurrence. But it can happen to anyone, so it’s better to understand the reasons and know how to troubleshoot.
Signs of breakdown
The camshaft sensor on the Lada Kalina determines the position of the gas distribution mechanism in a short period of time. This is necessary to issue a command to the engine control unit and for fuel to enter the system. The valve sensor determines how the first cylinder is positioned and synchronizes the ignition. You can understand that it is faulty by the following points:
- unstable operation of the motor,
- restarting the engine after stopping,
- increased fuel consumption,
- reduction in engine power,
- inactive acceleration dynamics.
It can be argued that the phase position sensor is broken and the phase sensor needs to be replaced if:
- the transmission is locked at one speed,
- indicators on the panel indicate system errors,
- The car moves jerkily and periodically stalls.
A malfunction is also indicated by the car accelerating to 80 kilometers per hour and the lack of engine starting after stopping.
Important! If error 0340, 0342 appears, then you don’t have to look for other symptoms of a malfunction. The fault lies with the measuring device located in the engine area. Even after the user has already changed it, there is a risk of lost connections.
Symptoms of a faulty camshaft sensor.
Just like any part or component of your car, this CMP sensor will eventually simply stop working due to wear and tear. This happens in any case as soon as its maximum service life has expired. This usually occurs due to wear on the internal wire wrap or associated component.
Typically, in this case, the engine begins to run erratically, and the symptoms of the malfunction may vary depending on the type of wear on the sensor. For example, the same connector in the sensor may wear out, the same internal circuit of the sensor may fail, or a component associated with the sensor may fail.
—
On some types of cars, if the camshaft position sensor is faulty, the transmission may be blocked in one of the gears, and will be blocked until you turn off the engine and start it back.
This can be repeated with a certain cyclicity. — If the camshaft sensor begins to work incorrectly while the car is moving , then you can immediately feel that your car has begun to move jerkily and lose speed.
— If the camshaft sensor is faulty, you may experience a noticeable loss of power from the engine itself. For example, your car will not be able to simply accelerate over 60 km/h.
— The engine may stall intermittently, and all this is due to a malfunction of the CMR sensor.
— If the sensor fails, you will notice poor engine performance, it will have a loss of dynamism, misfires when turning on the ignition, jolts during acceleration, popping noises in the exhaust system, etc. irregularities in work.
— On some car models, if the camshaft sensor is faulty, the ignition spark may completely disappear, which will ultimately lead to failure and the engine being unable to start.
Once your car's computer detects a faulty camshaft position sensor, which will (usually) cause the Check Engine light to appear (light up) on the dashboard. After detecting such poor performance of the CMR sensor, the computer will automatically record the sensor’s “error code” in its memory. In order to accurately determine the cause of the malfunction of this camshaft sensor, it is necessary to conduct computer diagnostics of the car, i.e. by connecting special equipment to the diagnostic connector of the machine. Then, using a special computer program, you can read the “error code”. Below, dear motorists, we present to you a table of diagnostic “error codes” that are directly related to wear on the camshaft sensor.
Replacing the sensor
To personally change the sensor on a Lada Kalina, you need to take: the 10th key, a new consumable, a rag, a Phillips screwdriver and an additional light source. Then follow the instructions:
- Open the hood.
- Find the controller to the right of the filler neck.
- Using a screwdriver, unclip the conductor block.
- Use the tenth key to unscrew the fasteners.
- Remove the controller and carry out troubleshooting to seat the consumable.
- Clear space for a new consumable, insert a new device.
- Put on the block with wires.
The controller replacement is complete. All that remains is to start the engine and check how the new equipment works. If you follow the regulations for installing a new consumable, then on average it will last 90,000 kilometers. All manipulations will require 1 hour. It is better not to try to make the procedure faster to avoid breaking the plastic clamps.
As a result, the phase sensor on the Lada Kalina is a necessary part for normal engine operation. It rarely breaks, but you need to know the signs and causes of the breakdown, and also remember the step-by-step instructions for fixing it.
Recommended: Why You Should Never Follow Each Other While Driving
Removal and replacement
The phase sensor on the VAZ 2114 is a complex electronic structure, repairing which on your own will not give any meaningful results. If any problems are detected, you must immediately replace the device with a new one . Fortunately, it is not expensive: the price varies from 300 to 500 rubles, depending on the region.
To replace the DF you will need a ratchet wrench with a 10mm head. The algorithm of actions is as follows:
- Turn off the battery power;
- Using a ratchet, unscrew the bolt that secures the DF to the engine cylinder block and disconnect the block of wires connected to it;
- We take out the sensor and install a new one, do not forget to clean the contacts of the block from oxidation.
If the device is installed correctly, then all errors previously displayed on the on-board computer disappear.
As you can see, the work here takes about 10 minutes at most. Have a good ride without any breakdowns!
Features during diagnosis
When the first suspicions arise, it is recommended to proceed with a thorough examination. If you cannot do this, it is recommended that you turn to professionals.
The first thing to do is to find out the primary cause of the breakdown. There may be several of them:
- there is a short circuit in the circuit;
- the temperature of the power unit rises;
- the toothed disc is broken or damaged;
- the mounting lugs are damaged;
- phase sensor Kalina 8 cells or 16 cells offset.
If the “Check” lights up, which gives one of two errors - 0340, 0343, then the fault definitely lies with the phase device. Perhaps the reason is in the connections.
Phase sensor (camshaft position)
Camshaft sensor
You will find this part on the cylinder head on the left side. The operating principle is quite simple. There is a special pin on the camshaft itself. When it passes by the sensor, but sends a signal to it. This moment corresponds to compression of the piston of the first cylinder.
The controller determines the camshaft angle. This is important information for machine systems and sensor failure has certain consequences. The information is sent to the vehicle's ECU, which uses it to control the ignition and fuel supply to each cylinder.
In what situations is replacement required?
If this part fails, you will see a “Check” indicator on the vehicle’s instrument panel. This is how the ECU signals the driver that the engine needs to be checked. At the same time, the fuel supply pattern changes - it goes to all cylinders simultaneously and, as a result, consumption increases.
The cause of the breakdown may be mechanical damage, as well as other things. There is no point in trying to repair the old unit itself - it costs little and you will waste more nerves and time.
In the video below you will find instructions for replacing this part (the author of the video is Alexandr V).
Replacement instructions
To replace the camshaft sensor, you only need a "10" key . It is better to use a socket with a collar or a ratchet. It will be inconvenient to work with a regular key, although it is still quite possible.
The dismantling and installation procedure is as follows:
- First, disconnect the block with wires by pressing the latch and slightly pulling it up;
- now, using the key, unscrew the part itself;
- it can be pulled out by slightly pulling towards the windshield;
- installation is carried out in the reverse order of steps.
There are no difficulties in this process, but be careful not to damage both the block with wires and the connector for the controller itself on the cylinder block.
Phase sensor errors on VAZ 2114: identifying faults, checking and replacing the sensor
Checking the functionality of the internal combustion engine phase sensor is carried out using a diagnostic tool, as well as using an electronic multimeter capable of operating in DC voltage measurement mode. We will discuss an example of a test for phase sensors of a VAZ-2114 car. On models with a 16-valve engine, a sensor model 21120-3706040 is installed, and on 8-valve engines - 21110-3706040.
First of all, before diagnostics, the sensors must be removed from their mounting location. After this, you need to visually inspect the DF housing, as well as its contacts and terminal block. If there is dirt and/or debris on the contacts, it must be removed with alcohol or gasoline.
To check the sensor of the 8-valve engine 21110-3706040, it must be connected to a battery and an electronic multimeter according to the diagram shown in the figure.
Next, the verification algorithm will be as follows:
- Set the supply voltage to 13.5±0.5 Volts (you can use a regular car battery for power supply).
- In this case, the voltage between the signal wire and ground must be at least 90% of the supply (that is, 0.9V). If it is lower, and even more so equal or close to zero, then the sensor is faulty.
- Bring a steel plate to the end of the sensor (with which it is directed towards the camshaft reference).
- If the sensor is working properly, then the voltage between the signal wire and ground should be no more than 0.4 Volts. If more, it means the sensor is faulty.
- Remove the steel plate from the end of the sensor, the voltage on the signal wire should again return to the original 90% of the supply voltage.
To check the phase sensor of a 16-valve engine 21120-3706040, it must be connected to a power supply and a multimeter according to the diagram shown in the second figure.
To test the corresponding phase sensor, you will need a metal piece with a width of at least 20 mm, a length of at least 80 mm and a thickness of 0.5 mm. The verification algorithm will be similar, however, with other voltage values:
- Set the supply voltage on the sensor to 13.5±0.5 Volts.
- In this case, if the sensor is working properly, then the voltage between the signal wire and ground should not exceed 0.4 Volts.
- Place a pre-prepared steel piece into the sensor slot where the camshaft reference is placed.
- If the sensor is working properly, then the voltage on the signal wire should be at least 90% of the supply voltage.
- Remove the plate from the sensor, and the voltage should again drop to a value of no more than 0.4 Volts.
In principle, such checks can be performed without removing the sensor from its mounting location. However, to inspect it, it is better to remove it. Often, when checking a sensor, it makes sense to check the integrity of the wires, as well as the quality of the contacts. For example, there are cases when the chip does not hold the contact tightly, which is why the sensor does not receive a signal to the electronic control unit. Also, if possible, it is advisable to “ring” the wires going from the sensor to the ECU and to the relay (power wire).
In addition to checking with a multimeter, you need to check for relevant sensor errors using a diagnostic tool. If such errors are detected for the first time, you can try to reset them using software, or simply by disconnecting the negative terminal of the battery for a few seconds. If the error appears again, additional diagnostics are needed using the above algorithms.
Typical phase sensor errors:
- P0340 - no camshaft position sensor signal;
- P0341 - valve timing does not coincide with the compression/intake strokes of the cylinder-piston group;
- P0342 - the signal level in the electrical circuit of the DPRV is too low (detected when there is a short to ground);
- P0343 - the signal level from the meter exceeds the norm (usually occurs when the wiring is broken);
- P0339 - an intermittent signal is received from the sensor.
Thus, if these errors are detected, it is advisable to perform additional diagnostics as quickly as possible so that the engine operates in optimal operating mode.
Crankshaft position sensor
Crankshaft position corrector separately
Although this controller rarely fails, its failure can lead to the most unpleasant consequences. You may simply end up in the middle of the road with no way to continue driving.
This element is installed on the oil pump cover. The DPKV transmits information to the ECU so that it can synchronize the fuel supply. Inductive type sensor. As mentioned above, it rarely fails, but this becomes a big problem.
In what situations is replacement required?
If this DPKV is completely out of order, you will not be able to start the engine at all.
But even if it just works intermittently, this can be recognized by a number of signs:
- poor engine starting;
- unstable work;
- power reduction;
- detonation with increasing load.
If you notice such signs and there are no other reasons for them, change the sensor. You can check it by testing the resistance of the windings. If the ohmmeter readings differ from 550-570, then the part is faulty. Fortunately, it costs little and replacement can be done very quickly.
We recommend: Restoration or replacement of rights. Is this a long procedure?
Replacement instructions
To replace this part, you will again need a "10" key and nothing else.
- Turn off the ignition. Then disconnect the wire block by pressing the latch.
- Now, using a wrench, unscrew the fastening bolt.
- All that remains is to remove the old DPKV and install the new one in the reverse order.
1. Disconnected crankshaft position sensor
2. In the process of replacing the crankshaft corrector
3. Checking the crankshaft sensor
How to check the crankshaft sensor
Modern cars are equipped with a large number of sensors, among which the crankshaft position sensor plays an important role. It provides synchronous fuel supply and ignites the mixture in the chamber. The article talks about the main functions, symptoms of a faulty crankshaft sensor, as well as the main ways to eliminate them.
The transition from carburetor to fuel injection was a real revolution in the automotive industry. The operation of modern car engines is highly dependent on the electronic components of the car. Information about the functioning of the entire system is accumulated in the control unit. After its analysis, the operation of individual nodes is adjusted. To collect such information, the car is “stuffed” with hundreds of sensors, one of which is the crankshaft position sensor (CPS, or synchronization sensor). His area of responsibility is the reliable operation of the engine. Below we will talk about checking the crankshaft sensor using a multimeter and an oscilloscope.
Purpose of the crankshaft sensor
This unit ensures synchronization of ignition and injectors in injection engines. If it malfunctions, ignition will occur either too early or too late. Because of this, the engine will run intermittently. In addition, incomplete combustion of the fuel mixture can even cause engine failure.
Symptoms of a bad timing sensor
A breakdown of the crankshaft sensor is manifested by:
— a noticeable decrease in engine power;
— “floating” engine speeds;
— detonation triggered in the engine during active movement;
- absence of signs of life in the sensor, when it is impossible to start the car.
The presence of such problems indicates the need to check the crankshaft position sensor.
Incorrect operation of the DPKV is manifested by:
- a noticeable deterioration in its dynamic characteristics when driving the car (the reasons for this problem may be different, but if the malfunction concerns the synchronization sensor, then “check engine” will appear on the instrument panel).
— spontaneous decrease or increase in speed;
— lack of stability in speed;
— the phenomenon of detonation in the engine accompanying dynamic load;
- inability to start the engine.
This is only an incomplete list of characteristic symptoms of crankshaft speed sensor malfunctions.
It is important to understand how you can check the functionality of a given unit in order to be absolutely sure that it is working properly. This check should always be carried out first, and here's why. Despite the rather inconvenient location of the crankshaft sensor in most cars, the process of checking it is relatively simple. But you will know for sure whether the sensor needs to be changed or not.
How to check the timing sensor?
There are several ways to check the serviceability of the DPKV, each of which involves the use of certain devices. Let's look at the three most commonly implemented methods for checking the performance of the crankshaft speed sensor.
First of all, before checking the sensor, it must be dismantled. In this case, it is necessary to put marks showing how it was located on the engine. The removed sensor should be inspected to identify damage and assess the condition of the contact block and contact core. Detected contaminants must be removed with alcohol or gasoline so that the crankshaft sensor contacts are clean.
When dismantling, the distance between the sensor core and the synchronization disk should be established. It should be 0.6-1.5 mm. Then you can start troubleshooting the electrical circuit of the device.
How to test a sensor using an ohmmeter
This method is the simplest, but it does not guarantee detection of a breakdown. The resistance of the crankshaft sensor winding can be measured with a multimeter by switching it to ohmmeter mode. For a working sensor, its value is 550-750 Ohms.
Do-it-yourself troubleshooting
An operational problem should prompt a system check. You can do it yourself in a relatively short time. If you are a novice driver or do not understand the intricacies, the best solution would be to contact a professional service center. There, the specialists will help eliminate all problems and breakdowns of the mechanism.
The crankshaft and camshaft sensors are diagnosed using a special tester. The cables are connected to the required terminal (A, B) in the appropriate order. The car starts, you should wait until it stops. It is important to carefully monitor changes in voltage.
In the first ten seconds, the voltage value should be equal to the on-board type value. In this case, the chain is not broken. If this does not happen, then it is closed or broken.
Sometimes there is no voltage when the circuit is intact. Such malfunctions often occur due to the fault of the controller. This is easy to check by connecting terminals A and C to the tester. As a result, there should be on-board voltage when the ignition is on. If this does not happen, then you need to look for a break further.
Replacing the camshaft sensor on a Lada Kalina car
Preparatory stage:
- Key to "10";
- New camshaft position sensor;
- Rags;
- Phillips head screwdriver;
- Additional lighting (optional).
Step by step guide:
- Open the hood;
- A controller is pre-installed to the right of the oil filler neck. Using a screwdriver, carefully unclip the block with wires;
- Using a “10” wrench, unscrew the fastening bolt;
- We remove the controller;
- We carry out troubleshooting of the seat, clean it from dirt;
- We insert a new sensor;
- We put on the block with wires.
The controller replacement is complete. We start the engine and check the functionality of the device.
Self check
A common malfunction of an internal combustion engine with electronic injection is a malfunction of the camshaft position sensor. The list of signs indicating problems with the sensor includes:
- difficult starting;
- unstable engine operation;
- the engine shakes and runs intermittently;
- “check” light may light up on the instrument panel;
- The first step is to locate the DPRV mounting socket, which is installed in the cylinder head area. You must find a special O-ring at the installation site. This ring must be inspected, since damage to its integrity and other deformations can lead to sensor malfunctions.
- Additionally, you will need to inspect the sensor housing itself, as well as the gear rotor. The presence of damage or the presence of metal shavings also indicates a sensor failure.
- Next you need to examine the connector itself. Such a connector must have contacts: positive contact, negative ground, contact for signal transmission.
- Then you need to turn on the ignition, after which a voltmeter is used to measure the voltage at the positive contact of the camshaft position sensor. The tester ground must be connected to the engine ground. This voltage measurement should be similar to the voltage at the battery terminals. If there are deviations in the voltage readings compared to the power supply, we can conclude that there is a malfunction in the electrical power supply circuit of the camshaft position sensor.
- The voltage at the sensor ground is measured in a similar way. The voltage at the specified contact should be zero.
- Then you need to connect the positive and negative wires of the sensor. The middle contact of the sensor is connected through the tester. It turns out that one voltmeter probe is applied to the signal terminal of the sensor, and the other is powered to the input of the control system. To solve this problem, it is not uncommon for the signal wire to be cut and the multimeter probe to be applied to the exposed wires.
- The engine is then cranked by the starter. The working sensor will show voltage, which can range from 0.4 to 5 volts. Deviations from the specified values indicate the need to replace the DPRV.
To replace the camshaft position sensor yourself, you will need to disconnect the leads from it, remove the fasteners and remove the device from its seat. Connecting a working element is carried out in the reverse order.
How to check
Camshaft position sensor
Greetings
, friends, to the DIY car repair website. Sensor
Camshaft position (CPR) is a small but very important detail.
Not only in the domestic line of VAZ cars, but also in foreign cars. Therefore, the sensor is defined as part of the timing belt of the motor, on which its functionality depends.
How to check the camshaft sensor
Diagnostics on an eight-valve engine
Please note that sensors for 8 and 16 valve engines are not interchangeable. Therefore, when purchasing, pay attention to this nuance. To diagnose phase sensors, you must perform the following manipulations:
- Connect a 13.5 Volt constant voltage source to contact “E”.
- There should be a voltage of 0.9 V at pin “B”.
- After bringing a metal object to the active part of the device, the voltage will decrease to 0.4 V.
- If you remove the metal device, the voltage will return to 0.9 V.
Symptoms and check
Signs of a malfunctioning camshaft sensor, by which you can determine that the device has failed, are as follows:
- Increased fuel consumption;
- Problems in the vehicle self-diagnosis mode;
- Reduced acceleration dynamics;
- The “Check Engine” sign or errors 0343 or 0340 appear on the dashboard.
The “Check Engine” icon, as a rule, lights up when the DF is completely out of order. The following happens: you turn on the ignition, after which the starter starts working, at this time a signal should be sent to the ECU from the sensor, but since the DF is broken, it is not there, and the electronic control switches the engine to twin injection mode (based solely on the data received from the DKPV ), turning off the phased injection of the fuel mixture.
If you find any signs of malfunction, you need to check the DF. You can do this yourself; you only need a tester (multimeter), which can be purchased at any car store for 400-600 rubles. The device is inexpensive, but useful - you will need it several times when diagnosing a car.
On fourteenths with a 16-valve engine, DF models 21120-3706040 are installed, on 8-valve engines - 21110-3706040 . Checking each of them has some features.
Checking the phase sensor of a VAZ 2114 with an 8-valve engine:
- On the multimeter probe (V1 mode), which will be connected to contact “E” on the sensor, set the voltage to 13.5 V. on the second probe (connect to contact “B”) - 0.9 V;
- We close the probes on the corresponding contacts. We bring a metal plate to the end part of the DF (a screwdriver will do). If the device is working normally, the multimeter will show that the voltage at pin “B” has dropped to 0.4 V (should return to 0.9 when the plate is removed). Differences in readings indicate a replacement sensor.
Checking the DF of a 16-valve engine:
Scheme (for 16 cells)
- We switch the tester to V2 mode. On the probe of contact “E” we set the voltage to 13.5 V, on contact “B” - 0.4 V;
- Insert a screwdriver into the hole at the end of the DF housing. When the sensor is working, the voltage at contact “B” will rise to 0.9 W and drop back if the screwdriver is removed.
If the VAZ 2114 is equipped with an on-board computer, if the device malfunctions, it will display one of the errors with code 0340 or 0343. Let’s analyze each of them in more detail.
- FAZ sensor error 0340 - indicates the absence of a DF signal. The cause of this error can be anything from oxidized contacts to mechanical damage to the device. Solved by replacing the part with a new one.
- Error 0343 - high signal level of the phase sensor. Its cause, as a rule, is damage to the wiring itself or the terminals in the contact block, or their loose/oxidized connection.
Errors in the VAZ 2115 phase sensor are completely similar to the errors that occur on the fourteenth.
It is worth noting that in addition to a malfunction of the DF itself, the cause of errors may be a slipped timing belt or a loose crankshaft gear.
Let's sum it up
It will take no more than 1 hour to complete the entire complex of manipulations. No need to rush! Plastic clamps break easily, so we avoid strong tugging on their frames.
Note that when a camshaft sensor fails, this is an extremely rare occurrence, but in such an unpleasant circumstance, the owner of a Lada Kalina 8 valve must show all his experience and maximum care, and then the replacement will be successful.
Sources
- https://nadouchest.ru/datchik-faz-kalina-8-kl-priznaki-neispravnosti/
- https://zapchasti.expert/datchiki/datchik-raspredvala/datchik-raspredvala-lada-kalina.html
- https://osensorax.ru/posiciya/datchik-faz-kalina-8-klapanov
- https://vaz.today/vybor-ustranenie-nepoladok-i-zamena-datchika-faz-na-kaline
- https://avtozam.com/vaz/lada-kalina/datchiki-raspredvala-i-kolenvala/
- https://FB.ru/article/357432/datchik-faz-kalina-zamena-datchika-faz
- https://Vaz-Lada-Granta.com/kalina/motor-i-korobka/datchik-raspredvala.html
Can it be replaced?
Replacing the phase sensor is a fairly simple procedure that most car enthusiasts prefer to entrust to professionals. However, situations are different, and in case of emergency, you will have to carry out the manipulations yourself.
The main tool that will be required for the work is a 10mm wrench, and if the replacement is being done for the first time, you will also need detailed instructions on further actions.
Another equally important point is the purchase of a new phase sensor. It is advisable to do this from an official dealer, who guarantees the quality of the product provided and gives a guarantee on it. In all other cases, the product is purchased at the car owner’s own risk.
And the whole process will be carried out in the following order:
- disconnecting the power plug by first squeezing the plastic latch;
- unscrewing the fastening bolt;
- removing the phase sensor;
- installing a new one in its place and similarly securing it in its original place.
With maximum attention, all work can be completed in about an hour, but there is no need to rush. Plastic clips are easy to break if you don't pull them carefully or pull them too hard. Haste in this matter is strictly prohibited!
Of course, the phase sensor on Kalina fails quite rarely, but this phenomenon does occur. That is why every motorist should be able to cope with the problem.
tweet
back How the Kalina immobilizer works
Next Procedure for replacing a low beam lamp on Kalina
Tagsensor, phase sensor, replacement, error, repair