04/27/2021 4,572 Sensors
Author: Ivan Baranov
Modern cars use many different types of controllers and sensors. Such devices can be control and executive. If for some reason the controller fails, it can cause inconvenience in terms of driving. What is a reverse sensor and what functions does it perform? The answers to these and other questions are presented below.
[Hide]
Symptoms and malfunctions of the reverse sensor
You put the vehicle in reverse, but the rear lights do not work. There are three options here: the reverse light has expired, the power fuse has blown, or the sensor itself has failed. But how can you check the reverse sensor and make sure that it is the one that is faulty?
Take a few simple steps:
1. Remove the fuse and check its integrity. In the VAZ 2110 it has number 19 (rated current - 7.5 A). The mounting block itself is located under the instrument panel.
2. Make sure the lamp is intact. If there are also no complaints about it, then you can proceed directly to checking the sensor.
Typical faults and their elimination
So, why might the dimensions not work on the VAZ 2110? There are several reasons, we will list them all:
- The fuse responsible for powering the parking lamps has blown.
- The power cable has broken.
- There was a short circuit in the supply wire to the car body.
- The control relay K1 has failed.
- The light bulbs have burned out.
- The exterior lighting switch is faulty.
Let's try to independently find the problem with the rear lights on the VAZ 2110 and fix it. First of all, let's analyze the situation. As mentioned above, fuse F11 is responsible for the starboard side, and F1 is responsible for the left side.
If only the rear lights do not light up, but the front ones work, then it is logical to assume that the fuses are in order. Otherwise (the side does not light up both front and rear), it makes sense to check the serviceability of the fuses in the mounting block. Where to find it will be described at the end of the article.
Now we need the so-called “control”, which is easy to assemble yourself. You need to take any indicator LED and a resistor with a resistance of 800 Ohms.
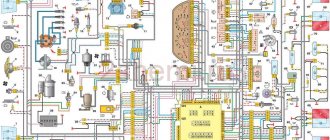
Schematic diagram of the “control” Instead of an LED and a resistor, it is easier to take a low-power 12 V light bulb, for example, from the same dimensions or turn indicators. This scheme, firstly, is simpler, and secondly, when using it, you do not need to observe the polarity of connecting the probes.
Let's start with the rear lights. We open the trunk and find two pockets in the upholstery at the level of the rear lighting fixtures that cover the lights. We bend them and get access to the power connector.
We bend the upholstery and see the back of the lights with the power connector. On the top and bottom of the flashlight we find two latches, squeeze them and remove the board with the lamps from the flashlight.
Removing the VAZ 2110 rear light board Carefully remove the power connector from the board. We connect one “control” probe to the body of the VAZ 2110 car in a place that can provide good electrical contact with the metal. We turn on the dimensions and measure the voltage at the connector socket to which the red (right side) or red-yellow wire (left side) goes.
If there is voltage, then the problem is in the flashlight. We remove the flexible board and carefully inspect the tracks - they often break due to vibration.
Vibration can cause the conductors of the flexible board to break. If everything is in order, then the reason is poor contact of the light bulb with the socket or its failure. We considered the case when there is voltage on the flashlight block. If it is not there, we continue the search.
We find the common power supply for the rear light devices (see diagram) and measure the voltage on it. The wires are still the same - red and yellow-red. If there is voltage, then the cause of the malfunction is a break in the wire going from this connector to the corresponding size. We inspect the harness, find a break, and fix it.
There is no tension - we move on. Now we need a mounting block. Where to find it will be described below. On the back of this block we find connector Ш2 and measure the voltage at the contacts to which the red and yellow-red wires go.
Numbering of the blocks and the color of the wires connected to them. If it is there, then the reason is a break in the wire going from the mounting block to the power block for the rear light devices. We inspect the harness, find it, eliminate it. No voltage? We measure the voltage at the same connector, the wire is black and white.
If it is there, then there are problems with the mounting block - fuses F1 and F11, control relay K1, broken tracks. We check the fuses, inspect the tracks, change the relay or install jumpers instead (see diagram).
Location of jumpers instead of control relay K1 If there is no voltage, the cause of the malfunction is a break in the black and white wire coming from the outdoor lighting switch to the mounting block, or the switch itself.
- Voltage surge in the on-board network.
- Short circuit in power supply circuits.
In the first case, it is enough to replace the blown fuse with a device of the same rating (5A). In the second, the task becomes somewhat more complicated - after replacing the fuse, it burns out again. You will have to find a short circuit of the supply wires to the body, which is the negative power bus.
We inspect the harnesses, find them, and remove them. Most often, insulation damage occurs where wires pass over and through the ribs of the body.
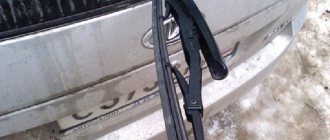
Location and details of checking the sensor
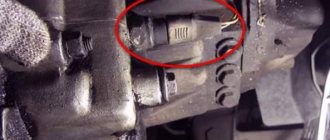
Many novice car enthusiasts do not know where the reverse sensor is located. In fact, everything is simple here. It is necessary to drive the car onto an overpass (pit) and go under it.
A sensor will be installed on the left side of the gearbox (looking towards the rear wheels of the car).
It is very difficult to confuse it with any other unit, because only this element of the gearbox has wires. Now let's move on to the verification.
The sequence of actions is as follows:
- Discard the terminal from the sensor;
- connect a multimeter to the connectors and set the switch to measure resistance;
- move the gearshift knob to the reverse gear position;
- turn on the ignition;
- look at the multimeter readings.
If the display shows a resistance of 0 Ohm and the beeper rings, then everything is normal. If the multimeter shows infinity, then the VAZ 2110 reverse sensor needs to be replaced.
The nuances of replacing the reverse sensor VAZ 2110
Now let's look at how to replace the reverse sensor. Everything is simple here:
Attention! Before unscrewing the sensor, clean it from dirt and dust so that when unscrewing nothing gets into the gearbox oil.
- The machine is already installed on the pit (overpass). Let's leave it that way.
- Remove the crankcase protection.
- Find a small container (you will need it for oil). As a rule, when unscrewing the sensor, a small amount of lubricating fluid spills out.
- Throw wires away from the node.
- Unscrew the sensor and wait for the oil to drain.
- Install a new device.
- Add oil to the required level.
- Return the wires to their place.
- Check the operation of the device.
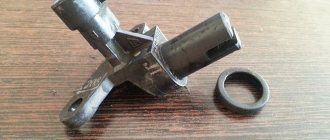
Replacing the reverse frog on a VAZ 2110-2112 and video review
To show this process in the most accessible and visual way, a video was shot that shows all the intricacies of diagnosing and replacing this switch.
If you cannot open the video, regardless of the reason, then below is a photo report of this repair.
First of all, we drive the car into a pit, remove the engine protection and find our frog for turning on the reverse light there. Everything is shown clearly below:
Disconnect the plug from the connector and move it to the side.
And now you can unscrew the frog itself using a 22 key, it is advisable to use a carob or cap:
And finally unscrew this switch by hand.
- Or do everything at a very high speed so that oil loss is minimal
- Or substitute the container and after all the repairs, add the losses back to the gearbox
In principle, if you do everything quickly, then the oil practically does not have time to flow out and no more than 10-20 ml can spill out, so place the container and go ahead. When everything is screwed into place, we connect the plug and that’s it. This procedure can be considered complete.
Ideas for tuning headlights and their implementation
One of the options for tuning VAZ 2112 headlights with your own hands is to install alternative optics. It is reliable, improves the quality of light, increases functionality, and changes the appearance of the car. With the help of design, headlights can be given different shapes. In addition, you can tint the headlights to match chrome, paint them dull black or any other color.
Angel eyes headlights on the VAZ 2112 have become very popular lately. They are built into the headlight unit, giving the car an unusual appearance. They install sticks on dozens of headlights.
Tuning VAZ 2112 headlights can involve installing additional protection in the form of grilles or by gluing armored film. This will protect the optics from mechanical damage. You can install a mesh type plaster.
. Asks: Vasily Polunkin. The essence of the question: the low beam on the VAZ-2112 has stopped working, what should I do?
Good afternoon. I literally just got out of the car and saw darkness. The left low beam light does not light up. On the right it’s burning, but I had some kind of cloudiness there, it’s hard to see. I swapped them, left to right, the right one shines, the left one doesn’t.
Then I wonder why the left headlight does not light up. The far one on the left works, but the near one does not. What to do?
The following two tabs change content below.
An expert on Lada cars with many years of experience. I own a Lada Granta car, I collect cramps based on the Priora. Sometimes I stay overnight in the garage. My wife is more jealous of cars than of women.
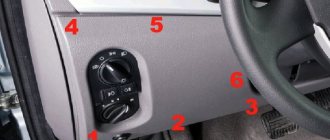
If nothing happens when you turn on the low beam. Nothing, even the indicator on the instrument panel does not light up, which means the power button is faulty.
Fuse
In most cases, if any electrical circuit on a car stops working, the fuse is to blame. Most likely there was a power surge and the fuse was blown.
Location of the fuse for the left and right low beam lamps
- F2 - 7.5A - Left headlight (low beam)
- F12 - 7.5A - Right headlight (low beam)
How to recognize a malfunction of the VAZ 2110 reverse sensor and replace it?
The operating principle of the regulator in question is very simple:
- the driver engages reverse gear;
- when turned on, the plug is pressed against the controller;
- the wire shorts;
- The lamp lights up, indicating that the vehicle is moving backwards.
During the daytime, the driver may not notice the malfunction. But at night it is clearly visible when the lamp does not light up when you engage reverse gear.
In this case, there are 3 causes of failure:
- blown fuse (common cause);
- the lamp burned out;
- The reverse regulator has failed.
In fact, damage to the sensor is much less common than blown bulbs and fuses. Another possible scenario could be damage to the integrity of the wires. Therefore, it is necessary to carry out the appropriate check.
Common optical problems and how to fix them
Problems with automotive optics can be divided into mechanical and electrical problems.
During operation, automotive optics are subject to mechanical stress. It can be damaged by small and large stones, sand, branches of bushes, etc. The easiest way to eliminate damage is to replace the headlight or flashlight. To do this, you need to know how to remove the headlight on a VAZ 2112. But you can restore the optics with your own hands.
The following mechanical problems are possible:
- cracks and scratches on the glass surface;
- damage to fasteners;
- violation of tightness.
Scratches and cracks can be eliminated by grinding and polishing. Destroyed fasteners are replaced with new ones. If the seal is broken, the optics sweat, so it needs to be restored, as visibility deteriorates and the contacts oxidize. For serious mechanical damage in the form of chips, tools are selected depending on the degree of damage.
Before repairing, you should study the material used to make the optics. Depending on this, you can use cold or conventional welding.
When it comes to electrical problems, the most common cause is burnt out light bulbs. In this case, they need to be replaced.
If the reason is not the light bulbs, then the following malfunctions are possible:
- fuse is blown;
- The switching relay does not work;
- contacts are oxidized or burnt;
- switch is faulty;
- The integrity of the wiring is broken; ground is missing.
Replacing blown fuses
If the brake lights of the VAZ 2112 do not light up, the turn signals do not work, or the light has completely disappeared, you need to sequentially check all the elements that are part of the lighting system, including the fuse box and power supplies.
How to determine the cause?
At the first stage, the motorist needs to make sure that it is the controller that is damaged, and not the lamp or fuse. Therefore, you need to check the integrity of the fuse. On the “ten” it is located in the mounting block, directly under the dashboard. The switching device is designed for 7.5 A and is installed at No. 19. Then you need to check the light bulb and wires. If everything is in order with them, then you need to move on to checking the controller.
Before replacing the device in question, you need to determine its location.
To find the sensor you need to:
- drive onto the overpass;
- pay attention to the gearbox. On the left side of this assembly is the reverse controller;
- in this place there is only one sensor with wires from the gearbox. The motorist will not find any other elements in this unit.
Thus, finding the element you are looking for will not be difficult. But before replacing it, you need to make sure that there is no loss of performance.
To do this, you need to perform a number of actions:
- disconnect the terminal from the controller;
- use a multimeter, having previously turned it on in resistance measurement mode;
- connect a multimeter to the controller connectors;
- engage reverse gear;
- start the power unit.
Other causes of rear light malfunctions
But it may also happen that the reverse light on the VAZ 2110 does not light up, and the sensor is not the reason for this. Then it might be a nutritional issue. It also needs to be checked. When turned on, no power is supplied, which means you should look for a break in the wiring. Check the area where the fuse is connected to the sensor and the section where the sensor is connected to the lamp.
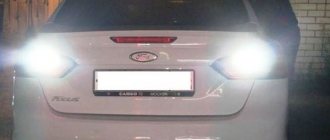
When reverse gear is engaged on a VAZ 2110, the white light bulbs should light up at the same time.
Their purpose is to perform the following functions:
- parking is much more convenient with lit lights;
- burning lights give pedestrians an indication that the car is about to reverse;
- Reversing lights are used to prevent emergency situations.
If a problem arises in which the reverse lights do not turn on, you can try to fix the problem yourself, or contact a car service center.
The problem can be resolved on your own, since the reasons for this, as a rule, are the following situations:
- The light bulb just burned out. In this case, it must be replaced. But before replacing, it is recommended to check the integrity of the wiring in order to eliminate the possibility of a situation in which a short circuit occurs.
- The reason may also be that there is no voltage on the flashlight board.
- The fuse that is installed to protect against short circuit has blown. It just needs to be changed. The fuse doesn't just blow. This means that this is due to some problem in the circuit. To do this, you need to “ring” each section and determine the location of the problem.
- Contacts may burn. Because of this, the light bulb will stop lighting. In this case, the burnt contacts should be cleaned.
- It is possible that the electrical cable is damaged. A malfunction can be detected by visual inspection or instrumentally using a multimeter.
- If the car is operated for a long time in conditions of high humidity, this can lead to oxidation of the contacts. As a result, the reversing lights will no longer work normally.
- The reason may lie in the incorrect operation of the gearbox mechanism. It is this mechanism that should lead to the inclusion of the rear lights.
- The malfunction may be caused by a broken reverse sensor. It is not at all necessary to take your car for professional diagnostics. You can check its performance yourself. To do this, the sensor must be removed and the ends of the wires connected to each other. If the light starts to light up, then the problem is in the sensor.