One not-so-fine day of this rainy summer, you may find a puddle of water in the car’s interior, right under the windshield. If it's condensation, no big deal. But if not, where can water come from in the cabin? There is only one answer: your windshield is leaking.
The windshield is leaking - reasons and what to do
There can be several reasons for a leak:
- if the car has recently been in an accident, this may be a distortion in the geometry of the body;
- if the car is not very new, the seal may have already worn out or the body is corroded;
- perhaps your drainage hole is simply dirty;
- a pebble hit the windshield and a hole or crack appeared in it;
- If you've recently replaced your windshield, it may have been installed incorrectly, or it may not fit your car at all.
What to do if the windshield is leaking - try to fix it yourself or turn to professionals? It is the causes of the leak that are the decisive factor. Let's look at them all in order.
The body is twisted
If it's a matter of body geometry, you can't handle it yourself, unless you're a professional straightener. Straightening the geometry is a very delicate job; even fractions of a millimeter can be important here. If the glass leaks for this reason, there are no options - you need to look for a good straightener and prepare a tidy sum. Of course, it is worth straightening the geometry only if the cost of straightening does not exceed the cost of the car itself (and this also happens). It is worth correcting the body only if your car is new and not cheap.
When to contact service
But there are situations when you shouldn’t fix the leak yourself, but it’s better to contact a service for auto glass repair. The help of service workers will be useful if:
- The body geometry is distorted.
- If the previous glass repair was carried out incorrectly.
In these cases, you will spend a lot of effort and personal time, despite the fact that the result of your own repairs will most likely not satisfy you.
Remember that it is impossible to visually check the windshield for defects. Therefore, do not buy products secondhand from unverified suppliers, because such glass can constantly leak, which will need to be constantly fixed.
The seal is worn out
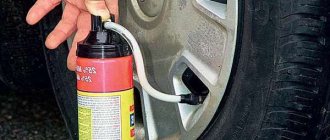
As for the wear of the seal, you can handle it yourself. To work, you will need a little time, as well as materials that can be found in regular stores. First, determine exactly where the glass is leaking. Then wipe the leak area with alcohol to degrease the surface. Using a narrow spatula, carefully pry the seal and lift it up. Coat the resulting gap with sealant or good glue (it is better to give preference to automotive products rather than construction products). Return the seal to its place, press it well. Remove any remaining sealant or adhesive that comes out from the glass immediately. When the glass dries, you can drive out into the rain again.
How to repair a crack in your windshield?
Steps to repair a crack in the windshield:
- Stopping the crack. We described this stage in detail above. Here we note that if the crack is fresh, it must be stopped. If the old one does not grow, you can move on to stage No. 2.
- Preparing and cleaning the crack. The damage must be washed and degreased. There must be no dirt left inside the glass.
- Preparation of the workplace, tools and materials. Material for repairing cracks most often hardens in the light, which means the place should not be in direct sunlight. Prepare napkins for wiping your hands, and for accuracy and quality of crack repair, use a syringe with a needle (it is better to prepare several of them), since the polymer hardens quickly.
- Filling the crack. It is optimal to perform the procedure together. One person is in the car and controls the pouring of the polymer so that it penetrates into all the cracks and does not bake on top, leaving air bubbles inside (if they remain, they will glare later). The second person fills the cracks with polymer, guided by the commands of the first.
- Hardening of the polymer. To make the polymer harden faster, special lamps are usually used.
- Polishing the glass surface.
Incorrect glass installation
If the glass has recently been replaced, it is almost certainly due to its incorrect installation. In this case, you need to send the car to the place where you reinstalled the glass and file a claim. If you screwed it up yourself, there is only one way out of the situation - carefully cut out the windshield again and reinsert it, this time in compliance with all the rules and instructions. Or entrust this matter to a professional if you are not very confident in yourself after a failure. Even if the glass you want to install is “not original,” a professional will cope with the task. An experienced craftsman will not only do the job carefully, he will also be able to fit the glass in such a way that no one will even notice that the glass is not original. And fitting is a rather complicated matter, since here you need to manually select the seal, and sometimes even move the drainage holes by drilling new ones.
Whatever the reason for the windshield leak, it is better not to delay it. It is known that water for a car is a very aggressive environment. By putting off repairs until later, you increase their cost. After all, water not only promotes corrosion, it can also cause a short circuit in car electrical systems. Don't hesitate - come to us! Our technicians will fix windshield leaks quickly, efficiently and at a reasonable price.
What types of chips are there?
- Round Chip (Bull's Eye): A round chip with a deeper mark in the middle. With such damage, several layers of glass are visible.
- Round crack: damage to the upper layers of triplex, from one edge of the chip there is a slight depression to the other.
- Radiation cracks (asterisk). It can appear after a fairly strong point blow from a small object. The spread of “rays” from the middle is characteristic.
- Bilateral crack: formed by an impact and diverges in a thread-like manner in two directions.
- The combined defect consists of a chip and a crack.
Messages 11
1 Topic by AntKuv 2015-04-03 17:54:00
- AntKuv
- Lada2111.rf fan
- Inactive
- From: Tambov
- Registration: 2013-09-01
- Messages: 815 Thanks : 369
- Car: VAZ-2110
Topic: Resolved: Leaking under the windshield (photo)
Today the weather was terrible, it was snowing almost all day. In the evening, as a result, I noticed that the corner of the ceiling near the driver's visor was damp. Apparently it's leaking under the windshield. How to fix a leak? Re-gluing the glass or something less radical? The photo is not mine, I indicated in red where the damp ceiling is. PS: The glass is not original, I changed it in the early summer of 2014.
Carglass › Blog › Windshield leaks - why is this possible and what to do about it?
Windshield leaks - why is this possible and what to do about it?
It happens that the joy of replacing glass is overshadowed by troubles that may await the owner after this procedure.
In this post, we described the main problems that may arise with car glass after replacing it (in addition to mechanical damage). If you have encountered other situations, please share with us, and if possible, send a photo. We can make a selection of interesting cases to show what it makes sense to pay attention to during the operation of auto glass.
The first and most problematic thing is a leaking windshield. Agree, it’s unpleasant when a puddle forms in a car without your consent. It’s one thing to dry out the interior (which is also not always an easy task), but the consequences can be very severe, including the risk of damage to electrical wiring and expensive repairs. Let's name several possible causes of leaks:
A windshield with incorrect geometry will create the same problem. The skill of a specialist, alas, cannot compensate for the lack of a low-quality product, and when trying to “fit the glass into a frame,” the risk of leakage or damage to the glass increases. Using a low-quality/expired sealant or primer (primer) may result in poor adhesion and the glass will not adhere. Here it is worth mentioning the need to properly prepare the surface of the windshield before gluing, making sure to remove factory silicone and other possible contaminants from it. Moreover, even this simple operation must be performed using safe chemicals or using special materials for cleaning silicone.
Violation of the rules for using the car during the first hours after replacing the glass. It's fine if a watch sealant is used, but most glaziers, including dealers, do not use quick-drying sealant. If dealers compensate for this by taking your car away for a day, then specialized glaziers strive to deliver the car as quickly as possible. Therefore, if you are not sure about the material that was used when replacing the windshield on your car, be patient and refrain from operating the car for at least a day after the installation. Be sure to ask the service about the polymerization time of the sealant. If you are very meticulous in these matters, ask to see the description of the sealant - as a rule, the packaging contains this important information.
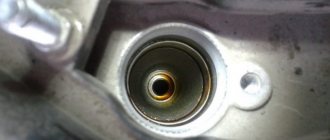
Corrosion of the windshield frame can also lead to leaks in the future, so in case of significant lesions, it is recommended to first remove the rust, restore the paintwork and then replace the glass. Also, corrosion of the windshield frame (photo below) is possible due to the use of a metal string when dismantling the old glass and mechanical damage to the frame with a string or other body frame tool.
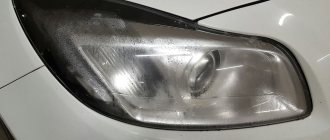
2. Optical distortion. Everything is quite simple here. Typically, slight distortion is acceptable around the perimeter of the windshield near the edge and is a feature of the manufacturing technology of most windshields. If there are distortions before the driver’s eyes, then this is a factory defect or a consequence of poor polishing of scratches. In any case, the only solution is to replace the glass again with a new one.
3. Non-working electric heating, rain, light, fog sensors. There may be several reasons. There are rare cases when the operating mechanism in the car itself is faulty, and the technician did not make sure that the automatic windshield wiper mode or heating system works properly with the old glass before replacing it. Also, if handicraft glass, rather than conveyor glass, is used, then the master, as a rule, begins to rearrange all the fittings from the old glass to the new one. Will re-glue the rear view mirror mount, the sensor element mount and the element itself. Also, in most cases, you will need special tape or gel to fix the sensor element for it to work correctly. On some vehicles it is necessary to adapt the sensor using a diagnostic tool. We also mention the electric heated windshield. There are three types of electric heating on cars - heating of the rest zone of the windshield wiper blades, filament heating in the driver and passenger's viewing area, and the most modern - “film” heating over the entire surface of the windshield - was first used by the VAG concern. The most commonplace troubles are incorrect connection, as well as mechanical damage to the glass electrical wiring loops.
Causes of the problem
As soon as it is discovered that the windshield is leaking, find out why this is happening:
- Incorrect installation. A leak may appear if during installation the technician slightly moves the glass from its normal position. In this case, even with a high-quality sealant, the seam will experience significant loads, and over time, cracks will appear in the sealed layer.
- Violation of body geometry. The body gradually bends due to corrosion of the bottom, pillars and immediately after an impact or collision. As a result, the seam also deteriorates. You can fix the problem yourself if the driver is an experienced straightener and has the necessary tool (laser level) in the garage.
- Poor quality sealant. If the windshield comes off without deformation, they solve the problem themselves or contact a service station.
- The drain is clogged. If debris has accumulated in the drain hole, the leak can be fixed by simply cleaning it.
- Mechanical damage. A crack or hole in the seal or glass is one of the most common causes.
Communities › VAZ: Repair and Improvement › Forum › water under the passenger mat 2114
hello everyone. There is water standing under the passenger carpet in the future, I looked around a lot of sites, went to the service center to change the heater faucet, we thought that the antifreeze was leaking, but no, my beauty threw the same surprise, I lift the carpet during the next cleaning, and there is a swamp, the water is already blooming! I looked at the windshield, there are no cracks, the faucet is also dry, HELP kind people, maybe someone else has the same problem
Maybe the passengers wish you surprises? =) And on the topic - I don’t know how it is on the PP, but on the classics there is a technological point in the thresholds under the front pillar right near the floor, supposedly for ventilation, so on my passenger side it was welded after major bodywork, on the driver’s side there was a threshold ice, so the point remains there and the result is that it’s dry under the passenger, the small fish swim and reproduce. So, see if the drainage holes in the sills are clogged and look in the interior, maybe there is a similar hole on the steamer.
After rain there is especially a lot of water, right?
somehow I didn’t notice it to be honest
the same garbage... it’s absolutely impossible to visually determine the influx of water... I also sinned on the ventilation... but there’s something like a valve plug... everything seems to be ice... I’ll dig further.
oooooh and I know where)))) I changed the Shumka myself because of this, is anyone interested? If so, I’ll explain
be a friend, explain, the lessons are no longer rising, searched
I had a leak through the wires (from the timing side), there the drain from the windshield goes directly to the wires, I cured it with an L-shaped pipe. And now it’s leaking through the torn plugs in the floor.
oooooh and I know where)))) I changed the Shumka myself because of this, is anyone interested? If so, I’ll explain
Can I buy a standard Shumka, if so, where?
oooooh and I know where)))) I changed the Shumka myself because of this, is anyone interested? If so, I’ll explain
Please tell me, friend, I really need to just fuck off already. Help people urgently. Same problem
where exactly does the water collect?
It's probably antifreeze leaking from the heater radiator. There are plugs on the bottom, you pull them all out and drain them and see what accumulates there) I had this problem for a long time, but I solved it just the other day)
the author said that it’s not antifreeze, it’s from the stove, where the motor is under the frill, there’s a type of protection there, it’s held on by 4 screws and sealed with some kind of plasticine, so you take it off, apply sealant on the bottom and screw it back on, then there won’t be a leak. I screwed it up once, took it off completely, it wasn’t hot in the summer, I turned on the heater like an air conditioner)))) but then during the first rain it flooded so much that all the front mats were filled with water and the carpet was slurping, I had to change the Shumka
The problem is this: There is a pitiful semblance of a filter on the plastic casing of the heater; when it rains, water flows into the cabin through this same filter, i.e. the filter just picks up drops like a sponge! The solution is simple: cut it out of 1.5 liters. plastic bottle visor and insert it over this very filter!
+1 I had the same problem after the rain
Thank you, I don’t always manage to visit now because I have a virus, we’ll try
List of leakage locations in Samara In Samara, liquid can enter the cabin in the following ways. Before reading further, check to see if the reason for the appearance of water in the cabin is simple condensation. All of the following assumes that there is enough water in the cabin for small-scale fish farming. Water in the front part (up to the feet of the rear passengers) Front window seal (usually water enters from the lower corners of the glass): • if the glass seal has become hard; • the glass seal has ruptures; • drainage holes in the glass seal and windshield frame are clogged - 2 pcs. at a distance of about 5-7 cm from the lower corners of the seal; • the side of the windshield frame in the area of the drainage holes has rotted; • the frame under the glass seal has rotted; • the glass has incorrect geometric dimensions; • just such a seal. I had to deal with the last reason after replacing the windshield seal. For a couple of months after replacing the seal, there was no water in the cabin. With the beginning of autumn, after each rain we had to remove the plugs from the floor and drain the water. The location of the leak could not be found. I drove it with ice in the cabin all winter. And only in the spring, after removing the torpedo and dancing with a tambourine for two hours, I found the location of the leak - at a distance of 6 cm from the lower corner of the glass. I had to change the seal again. Everything is fine now. At the service station they said that 9 out of 10 Samaras leak in this place. Nobody knows the reason. Heater, motor shield: • the joint “stove body - motor shield” is not coated with non-hardening sealant; • two self-tapping screws of the water-reflective casing of the stove are not seated on the sealant; • “floods” the stove when the drainage holes in the swamp are clogged; • the fan casing seal is missing, torn, “stubby” or has incorrect dimensions; • rubber plugs in the motor shield (coat the wires passing through the motor shield with non-hardening sealant); • rotted or torn out studs in the engine shield; • necessarily d.b. a rubber valve is installed in the drainage hole to the left of the ball, otherwise water gets onto the speedometer cable plug and further into the cabin. Holes in the floor: • there are no rubber plugs in the bottom; • torn covers of the gearshift lever and handbrake cable; • rotten or torn out studs for securing the converter casing; • hidden “threshold-hump” holes - when driving through deep puddles; • holes in the upper part of the sill and under the trim of the rear seat sidewalls on the VAZ-2108 when driving through deep puddles. Antifreeze: • heater tap — throw it out and replace it with two pipes (I did this and don’t regret it); • heater radiator; • clamps and pipes in the passenger compartment (install NORMA clamps and tighten “hot” with a 7 wrench). Water from the rear window washer pipe. The rear window washer tube (for hatchbacks) runs in the upper right corner of the dashboard, through the engine shield and inside the right pillar up to the ceiling, inside the right roof side member. To get to it you need to (under the dashboard) either “bend” the right side of the dashboard or lie on your back at the front passenger’s feet and bend the sound insulation. It is advisable to remove the roof lining. If it is left in a “hanging” position, it can break in the middle: the line connecting the middle fastenings of the handrails is the most flimsy place. Doors: • tightness of the door, integrity and elasticity of the seal; • wires for antennas, taxi lights, etc. passing through the door seal; • drainage holes in the door; • presence of “aprons” inside the door; • integrity and softness of velvet glass; • fastenings of side rear-view mirrors; • close windows and doors in rain and snow. Body corrosion: • windshield frame; • thresholds; • internal arches of the front wheels; • if there are no front lockers, there are no wire plugs to the signal repeaters; • floor, etc. Lack of rubber mats on the floor and holes in the standard carpet - it runs off your feet. CHY - remove and place its seal on the sealant. Rubber seal for hood cable. If the back of the car is lifted, then look at the condition of all kinds of plugs, holes, parts, etc., etc. in the rear of the car. Sunroof, antenna, flashing light in the roof... Water in the rear (from the rear passengers' feet to the rear lights) Body corrosion can lead to water in the cabin! • the presence of containers with liquids in the trunk - check the lids! • rear light seal - place on sealant (adhesive-sealant). I used BODY 920. I recently saw a seal from Audi. It is a black soft sausage about half a meter long. Non-budget price - 190 rubles. Most likely a non-curing sealant. If the gap is large, then IMHO you can use a non-hardening sealant like BODY 999. On older machines, remove the seal, clean it and turn it over to the other side; • holes for license plate; • hole for securing the separator and a small hole under it (most likely for the trim in luxury models; • rubber in the floor of the spare tire; • rubber window seals (especially pay attention to the rear window - lower corners); • clogged drains in the rear door ( for hatchbacks) - periodically clean and additionally drill 4-5 holes with a diameter of 4-4.5 mm; • rubber door seal - replace with a new one and/or adjust the door for a tight fit. It is good to use a piece of thick paper 3-4 cm wide and long 20-25 cm. Place the sheet on the seal, close the door and pull out the sheet. • rubber plugs inside the wings - 2 pcs. Sometimes they fly out, sometimes they don’t. If the lockers at the back do not have “shelves,” then dirt and water get inside the wings through the holes. • through the self-tapping screws of the lockers, when they are screwed through “through the rear arches into the passenger compartment”; • holes in the floor from the “luxury” trim; • 6 or 8 holes in the trunk along the rear side members - only rubber plugs or sealing with something will help; • hatch to the gas tank sensor - secure the hatch correctly, new rubber, sealant...; • 8 holes (4 on each side) in the feet of the rear passengers. From the factory: the bottom is filled with plastisol, the top is filled with bitumen sheet. Relevant for older cars. Install plugs.