Typical headlight malfunctions and methods for eliminating them
During operation, the car headlight is one way or another subject to mechanical damage and exposure to atmospheric factors, so after a certain period of operation it may require repair or restoration.
Glass replacement
To dismantle the VAZ-2107 headlight, you will need an 8-size open-end wrench and a Phillips screwdriver. The sequence of actions when removing the headlight is as follows:
- Under the hood, you should find the power plugs for the lamps and hydraulic corrector and disconnect them.
- On the front side of the headlight, you need to unscrew three bolts with a Phillips screwdriver.
- When unscrewing one of the bolts from the reverse side, you will need to secure the counter nut with a size 8 wrench.
- Remove the headlight from the niche.
The glass is attached to the headlight housing using sealant. If it is necessary to replace the glass, the joint should be cleaned of old sealant, degreased and a new sealing layer applied. Then attach the glass and secure it with masking tape. After 24 hours, the headlight can be replaced.
Video: replacing headlight glass on a VAZ-2107
Replacement of headlight glass VAZ 2107
Replacing lamps
To replace a burnt-out high-low beam lamp in a VAZ-2107 headlight, you must:
- Disconnect the negative battery terminal.
- Remove the headlight unit cover by turning it counterclockwise.
- Disconnect the power supply from the lamp.
- Remove the spring clip from the chuck grooves.
- Remove the lamp from the headlight unit.
- Install the new lamp in reverse order.
When carrying out work to replace lamps, you should remember that when we touch the lamp bulb with our hands, we oil it, and this can lead to premature failure of the lamp.
Replacing side light bulbs and direction indicators, as a rule, does not cause any difficulties: to do this, you need to remove the corresponding socket from the reflector and remove the lamp by rotating it counterclockwise.
Video: replacing the main and side lamps on a VAZ-2107
Replacing the main and side lamps on a VAZ 2107
Glass cleaning
If the headlight glasses have lost their transparency, you can try to restore their appearance and light transmittance by contacting a service station specialist or performing the restoration of the optics yourself. To do this, the car owner will need:
- sandpaper of different grain sizes;
- abrasive and non-abrasive paste;
- masking tape;
- rags;
- grinding machine or grinder with a grinding wheel.
Glass restoration work is carried out in the following sequence:
- The headlight is covered around the perimeter with masking tape or film so that during work the paintwork of the body is not damaged.
- The surface of the glass is treated with sandpaper, starting with coarse sandpaper and ending with fine-grained sandpaper. If grinding is performed mechanically, the surface should be periodically moistened with water.
- The treated surface is thoroughly washed with water.
- The glass is polished with polish and washed again with water.
- The surface is alternately treated with abrasive and non-abrasive paste using a grinding machine with a foam wheel.
Replacing and adjusting lamps and headlights of a VAZ-2107 car
The VAZ-2107 is equipped with two block headlights (the headlight and turn signal are made in a single housing).
The headlight contains a side light lamp and a halogen two-filament low and high beam lamp.
The electrical circuits of the headlamp are protected by fuses, and voltage is supplied to the lamp filaments through a relay.
On some vehicles, the headlight units are equipped with a hydraulic corrector.
It allows you to change the angle of the headlight beam depending on the vehicle load, so as not to dazzle oncoming drivers.
The right and left headlight units are not interchangeable.
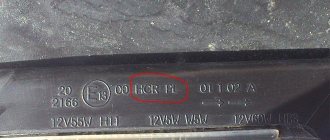
The connection diagram for headlights and fog lights of a VAZ-2107 car can be seen in Figure 1.
Headlight adjustment
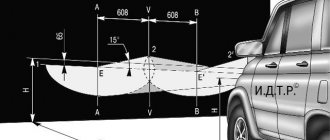
We check the correct adjustment of the headlights by the location of the light stripes on the screen.
We carry out checking and adjustment on a flat horizontal platform. As a screen, you can use a sheet of plywood (about 1.0 m high and 1.7–2.0 m long), a light building wall, a gate, etc.
We place the fully fueled car, with a jack, tools and a spare tire, perpendicular to the screen (at a distance of 5 m between the headlights and the screen).
We check and, if necessary, adjust the tire pressure to normal.
The assistant sits in the driver's seat.
In order for the body to take the desired position relative to the wheels, we swing the car from top to bottom, holding the wing.
We mark the screen with chalk as shown in the figure. The distance between the marks on the screen corresponding to the centers of the headlights should be 936 mm.
If the car is equipped with a hydraulic headlight leveler, set its adjuster to the first position (one driver). Cover one of the headlights with a piece of cardboard or fabric and turn on the low beam.
By rotating the adjusting screw located on the rear wall of the headlamp on the direction indicator side, we align the horizontal border of the light beam with the bottom line on the screen.
By rotating the second adjusting screw located in the opposite upper corner of the headlight housing, we align the point where the light beam breaks (the intersection of the horizontal and inclined boundaries) with the vertical line of the center of the headlight
We adjust the second headlight in a similar way.
It is better to adjust the headlights at night or in cloudy weather.
Replacing headlight unit lamps
Turn the headlight cover counterclockwise and remove it.
To replace the headlight lamp, remove the connecting block from the low beam - high beam lamp terminals
We remove the antennae of the spring clamp from the grooves
We remove the faulty lamp
We install the new lamp in the reverse order.
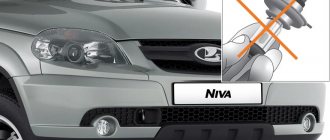
Do not hold the halogen lamp by the glass bulb with your hands, so as not to leave greasy fingerprints.
If this happens, wipe the lamp with alcohol.
Otherwise, the quartz bulb of the lamp may darken when turned on.
To replace the side light bulb, remove the socket.
To replace the turn signal bulb, turn the socket counterclockwise
We take it out together with the faulty lamp
High and low beam lamp - H4 with a power of 60/55 W. Side light bulb T4W
Installing lamps of higher power increases the load on current sources and electrical circuit parts.
It is necessary to install lamps that do not exceed the parameters established by the manufacturer.
Replacing the headlight unit
If we are changing the left headlight unit, then to ensure access we first remove the windshield wiper reservoir; if we are changing the right one, we first remove the battery.
Remove the headlight cleaner brush lever.
Disconnect the hydraulic corrector drive. The replacement is shown using the example of the left headlight unit.
Disconnect the headlight wiring harness
...and a turn signal.
Hold the nut with a wrench or an “8” socket.
... use a Phillips screwdriver to unscrew the screw
Very often, due to corrosion, the nut cannot be unscrewed. To remove the headlight without damaging it, carefully drill out the screw with a drill with a diameter of 5–6 mm.
Holding the headlight with your hand, use a Phillips screwdriver to unscrew the two remaining headlight mounting screws
Install the headlight in the reverse order.
The upper self-tapping screw of the headlight mount is wrapped into a plate nut - make sure that it remains in place.
How to replace low and high beam bulbs
The advantage of the head optics of the seventh model Zhiguli over its counterparts is that it has H4 lamps installed, which are responsible for two types of road lighting. In other models, for example VAZ 2106, separate lamps are used for each light, which, if they need to be replaced, causes unnecessary material and physical costs.
Remove the waterproof protection of the headlight unit. It is made in the form of a plastic casing installed at the rear. It is removed by turning 180 degrees counterclockwise. It is attached with “tongues” that are inserted into the headlight housing and rotated in its grooves.
- How to remove a headlight on a VAZ 2110, 2111, 2112; dismantling and installing a headlight unit
Disconnect the wiring block. It consists of three sockets: ground, low beam, high beam.
Unclip the wire retainer. It is made of elastic wire and securely holds the lamp in the reflector socket.
Remove the lamp from the socket. If it burns out, we replace it; if it was removed purely to replace it with an LED one, then it is recommended not to touch the bulb with the filaments with your hands. Otherwise it will become cloudy. Why? - Don't know!
Electrical diagram for connecting VAZ-2107 headlights
The electrical circuit diagram for outdoor lighting includes:
- Block headlights with side lights.
- Engine compartment light lamp.
- Mounting module.
- Illuminated glove compartment.
- Instrument panel lighting.
- Rear lights with dimensions.
- Illuminated license plates.
- Outdoor lighting switch.
- Indicator lamp in the speedometer.
- Ignition.
- Conclusions A - to the generator, B - to the backlight lamps of devices and switches.
Headlights are part of the car's exterior lighting system, which is controlled by buttons on the dashboard
The operating diagram of the rear lights and fog lights consists of:
- Block lights.
- Mounting module.
- Three lever switch.
- External lighting switch.
- Fog light switch.
- Rear lights.
- Fuse.
- Indicator lamp for fog lights.
- High beam warning lamp.
- Ignition key.
- High beam (P5) and low beam (P6) relay.
The circuit for the rear lights and fog lights is mounted on a separate module
Understeering's shifter
The VAZ-2107 steering column switch is three-lever and performs the following functions:
- high and low beam control;
- turning on the direction indicators;
- windshield washer control.
The location of the switch allows the driver to control vehicle devices without being distracted from the road. The most typical malfunctions of the steering column switch (also called the tube) are considered to be failure of the contacts responsible for the operation of turns, low and high beams, as well as mechanical damage to one of the levers.
Group of contacts 53 in the connection diagram of the VAZ-2107 steering column switch is responsible for the windshield washer, the remaining contacts are for controlling the lighting devices.
Group of contacts 53 in the connection diagram of the VAZ-2107 steering column switch is responsible for the windshield washer system, the remaining contacts are for controlling the lighting devices
Tuning front and rear lights on a VAZ 2107
Headlight relays and fuses
Responsible for the protection of lighting fixtures are the fuses located in the new type block and are responsible for:
- F1 - reversing lamps;
- F8 - direction indicators in “emergency” mode;
- F9 - fog lights;
- F10 — instrument panel illumination;
- F11 - brake lights;
- F12 - high beam of the right headlight;
- F13 - high beam of the left headlight;
- F14 - dimensions (front left, rear right), license plate and engine compartment lighting;
- F15 — dimensions (front right, rear left), glove compartment lighting;
- F16 - low beam of the right headlight;
- F17 - low beam of the left headlight.
The VAZ-2107 fuse and relay box is located under the hood near the windshield opposite the passenger seat
The operation of lighting devices is regulated using a relay:
- 5 — high beam;
- 6 — low beam.
Daytime Running Lights
Daytime running lights (DRLs) should not be confused with running lights: they are lighting devices designed to improve daytime visibility. As a rule, DRLs are made with LEDs, which provide bright light and have a long service life. It is not recommended to turn on the DRLs at the same time as the low beam or fog lights. To install DRLs on your car, you don’t have to go to a service station; you can do it yourself
It is important to take into account that:
- lighting devices must be installed in accordance with the requirements of GOST R 41.48–2004;
- Not all DRLs are suitable for the “seven”. Many car owners install lights like Philips Led Daylight 9;
- most often, DRLs are placed on the bumper or air intake;
- lighting devices should be at a height of 250–1500 mm from the ground;
- the distance between the two visible edges of the devices must be at least 600 mm;
- DRLs can only be located at the front of the car, and the light beam must be directed only forward;
- The overall brightness of the light should be between 150–330 lumens.
The DRL connection diagram provides for the presence of a five-pin relay type M4 012–1Z2G.
To connect the DRL you will need a five-pin relay type M4 012–1Z2G
The relay is connected as follows:
- contact No. 30 must be connected to the ignition “plus”;
- No. 86 connects to the button for turning on the headlights and low beam;
- No. 87 remains unconnected;
- No. 85 - mass;
- No. 88 (87A) - output to DRL.
There are several options for connecting DRLs, one of which is designed to turn them off when the engine starts.
One of the DRL connection diagrams is designed to turn them off when the engine starts
How to change light bulbs and remove the headlight of a VAZ-2123 car
In this case, the contacts are connected as follows:
- minus DRL goes to the body;
- plus - to relay contact No. 30;
- pin 87 is connected to the battery positive;
- contact 85 - with ground;
- contact 86 is connected to a reed switch, the second contact of which is connected to the positive terminal of the generator.
VAZ-2107 fuses
F1 (10 A) - lamps in the reversing lights, heater (heater electric motor), heated rear window . If your reverse light does not work, check this fuse, then the lamp itself, and it may also be the reverse light switch (on the rocker or gearbox). If the heater does not work, but this fuse is intact, the fault may be in the wiring or in the heater motor itself, as well as in the switch on the panel.
F2 (10 A) - electric motors for windshield wipers, headlight cleaners, windshield washer pumps and headlights . If the wipers or washer do not work, check this fuse and connector 1 for the relay. A relay or jumper must be installed in it. It could also be the wiring or the wiper motor itself.
If the windshield washer does not work, check the fluid level in the washer reservoir. In winter, poor-quality or untimely replaced fluid can freeze in the washer system pipes. The washer nozzles may also become clogged. Or the issue may be in the pump itself (located in the washer reservoir), if, for example, it has already served its purpose or was often turned on without windshield wiper fluid.
F3 (10 A) - reserve
F4 (10 A) - reserve
F5 (20 A) - rear window heating element and relay contacts for its activation . If the rear window heating does not work, also check relay R1. If the relay and fuse are working, check the tightness of the connection on the contacts of the heater and the integrity of its elements (no breaks).
F6 (10 A) - cigarette lighter, clock . If the cigarette lighter does not work and this fuse is intact, the problem may be in the contacts of the connector itself. Disassemble the panel with the connector to access the contacts and check their condition.
F7 (20 A) - sound signals and their relays, cooling fan . If the sound signal does not work and this fuse is intact, check the signal device itself. The problem may be in its windings or contacts. Also check the condition of the contacts on the steering wheel (in the signal switch). Another reason may be hidden in the relay. Check connector 2. It should have a working relay installed or, if it is missing, a jumper.
How to remove a headlight on a VAZ 2107
Replacing and gluing glass on a VAZ-2107, 2105 and 2104 headlight
Hi all! Today we will tell you how to change the glass on a VAZ-2107, VAZ-2105 or VAZ-2104 headlight yourself. This may be needed if the glass on your headlight is cracked, you break it, or the headlight starts to sweat. Yes, it’s sweating - headlights sweat when they are not sealed. And depressurization of the headlight is possible only if there is a crack in the housing (worst option), you forgot or did not close the back cover on the headlight tightly when replacing the lamps (best option), or you have problems with the glass (poorly glued, broken, cracked). So we will tell you how to independently glue glass into the headlight of a VAZ and similar “square” VAZs.
We remove the headlight from the car, to do this we remove two pads from the back (turning and light):
. and unscrew the headlight, three screws in front, one on top in the middle and two on the bottom on the sides, unscrew them and the headlight unit falls right into our hands. We take her and take her home. We unscrew the two headlight wiper stops, they will interfere:
Now, in any case, we will first need to get rid of the remnants of the old glass, or, if we are simply re-gluing the glass, then carefully remove it without breaking it. To do this we will need a sharp knife, something like this:
Non-standard lamps led to overheating and cracking of the headlight
head light. The video shows the installation.
I broke the headlight / How to glue the headlight glass on a VAZ 2107
Today, I’ll tell you how you can literally glue in a new VAZ 2107 headlight
. Pay attention.
Carefully use it along the contour to cut the factory sealant (if the headlight has never been repaired) or silicone or other sealant, depending on the imagination of the person who glued the glass there before you. I have seen headlights with glass that was firmly glued in, that is, essentially unrepairable. And after that we carefully squeeze it out by prying the glass towards ourselves with something. If you cut it well it will come out quickly. Don't overdo it so it doesn't burst. Then we thoroughly clean everything from the old sealant so that only plastic remains:
We prepare the glass for the headlight and try it on. The glass must be “native” to your headlight; Kirzhach and OSVAR are different from each other.
You can buy a special sealant for headlights on the market, but we used regular silicone:
It’s just that black sealant will look a little prettier, but we neglected this. We carefully apply it around the perimeter of the body of our headlight, something like this:
We insert the glass and apply sealant or silicone around the perimeter; if there is not enough and there are gaps left, do not overdo it. We remove the excess and wrap the headlight with masking tape so that the sealant hardens properly and the glass does not move. Let it dry, ideally overnight:
After the sealant has hardened, remove the masking tape (painting tape simply does not leave marks like regular tape) and install the headlight back on the car, plug it in and enjoy. Do not touch the reflector while working, it is very easily damaged and try not to stain it with anything. That's all, you have learned how to independently replace and glue glass into the headlights of VAZ-2107, 2105 and 2104, but if you still have questions, we will be glad to see you in our club of VAZ-2107 lovers.
Work order
Some headlight repair operations should be performed indoors to avoid water and debris getting into the bonding area. In general, replacing a damaged element includes the following steps:
- Disconnecting the unit from the on-board network of the VAZ 2107 by uncoupling the connectors of the turn signal and the headlight lamp.
- Removing the body from the body opening using a Phillips screwdriver.
- Removing shards of broken glass, in this part of the operation you should be careful not to cut yourself.
- From the junction of the parts, it is necessary to remove the remaining adhesive mass using a flat screwdriver.
- The next step is to clean the unit and degrease it with a solvent.
- Using a dispenser syringe, apply a small amount of glue along the contour evenly without gaps or breaks.
- We place the transparent element in its intended place, press it and fix it using disposable devices or tape.
This is interesting: Scheduled maintenance for Mitsubishi Lancer X: regulations, cost, maintenance schedule
As the glue dries, the headlight element of the VAZ 2107 is installed in place; it is recommended to change both parts at the same time; during operation they tend to become cloudy and this will become noticeable even with a cursory inspection. The new transparent glass on the headlight of a VAZ 2107 car, which was replaced on our own, is pleasing to the eye. At night, better road lighting is provided.
I broke the headlight / How to glue the headlight glass on a VAZ 2107
Adjusting the headlights of a VAZ 2105 Zhiguli
- Repair manuals
- Repair manual for VAZ 2105 (Zhiguli) 1980-1992.
- Adjusting the headlights
View of the headlight from the engine compartment
| 1 – screw for adjusting the light beam in the horizontal direction; 2 – headlight casing; 3 – plug block; | 4 – setscrew; 5 – screw for adjusting the light beam in the vertical direction |
Headlight adjustment diagram
The direction of the light beams of the headlights should be such that the road in front of the car is well illuminated, and oncoming drivers are not blinded when the low beam is turned on.
EXECUTION ORDER ↓ Comments ↓ 1. Vehicle operation 1.0 Vehicle operation 1.1
Starting the engine 1.2 Controlling the gearbox 1.3 Driving the vehicle 1.4 Braking and parking 1.5 Operating a new vehicle 1.6 Adjusting the ignition timing 1.7 Precautions when operating the vehicle 1.8 Caring for the body 1.9 Storing the vehicle 2. Vehicle maintenance 2.0 Vehicle maintenance 2.1 Maintenance operations 3
General data 3.0 General data 3.1 Technical characteristics of vehicles 3.2. Controls 3.3. Control of interior ventilation and heating 3.4 Tightening torques for threaded connections 3.5 Tools for repair and maintenance 3.6 Used fuels, lubricants and operating fluids 3.7 Basic data for adjustments and control 4. Engine 4.0 Engine 4.1 Possible malfunctions, their causes and methods of elimination 4.2 Removal and engine installation 4.3 Engine disassembly 4.4 Engine assembly 4.5 Engine bench testing 4.6 Checking the engine on a car 4.7. Cylinder block 4.8. Pistons and connecting rods 4.9. Crankshaft and flywheel 4.10. Cylinder head and valve mechanism 4.11. Camshaft and its drive 4.12. Cooling system 4.13. Lubrication system 4.14. Power system 4.15. Carburetor 2105-1107010 4.16. Carburetor 21051-1107010
5. Transmission 5.0 Transmission 5.1. Clutch 5.2. Gearbox 5.3. Cardan transmission 5.4. Rear axle 6. Chassis 6.0 Chassis 6.1. Front suspension 6.2. Rear suspension 6.3. Shock absorbers 7. Steering 7.0 Steering 7.1 Possible malfunctions, their causes and methods of elimination 7.2. Inspection, check and adjustment of the steering 7.3. Steering mechanism 7.4 Rods and ball joints of the steering mechanism 7.5 Bracket for the pendulum arm 8. Brakes 8.0 Brakes 8.1 Possible malfunctions, their causes and methods of elimination 8.2. Checking and adjusting the brakes 8.3 Clutch and brake pedal bracket 8.4 Vacuum booster 8.5. Main cylinder 8.6. Front brakes 8.7. Rear brakes 8.8. Rear brake pressure regulator 8.9. Parking brake 9. Electrical equipment 9.0 Electrical equipment 9.1 Possible malfunctions, their causes and methods of elimination 9.2 Circuits protected by fuses 9.3. Battery 9.4. Generator 9.5. Starter 9.6. Ignition system 9.7. Lighting and light signaling 9.8. Sound signals 9.9. Windshield cleaner 9.11. Heater fan electric motor 9.12. Control devices 9.13. Carburetor pneumatic valve control system 10. Body 10.0 Body 10.1 Possible malfunctions, their causes and methods of elimination 10.2. Doors 10.3. Hood, trunk lid, bumpers 10.4. Body glazing, windshield and headlight glass washers 10.5 Instrument panel 10.6. Seats 10.7. Heater 10.8. Body frame repair 10.9. Paint coatings 10.10. Anti-corrosion protection of the body 11. Vehicle modifications 11.0 Vehicle modifications 11.1. Features of repair of VAZ-21051 and VAZ-21053 cars 11.2. Features of repair of VAZ-2104 and VAZ-21043 cars 11.3 VAZ-21044 cars with a fuel injection system 11.4. Design of the central fuel injection system 12. Electrical diagrams 12.0 Electrical diagrams 12.1 Interactive electrical diagram of the VAZ-2105 car 12.2 Electrical diagram of the VAZ-2104 car 12.3 Electrical connection diagram of the injection system 12.4 Connection diagram of the instrument cluster 12.5 Connection diagram of the brake system warning lamps 12.6 Connection diagram of the headlight cleaners and washers 12. 7 Connection diagram for the electric motor of the heater fan 12.8 Connection diagram for the windshield wiper and washer 12.9 Connection diagram for the turn indicators and hazard warning lights
↑ Diagram for turning on headlights and fog lights in the rear lights with a breaker relay
1 — block headlights; 2 — mounting block; 3 - headlight switch in a three-lever switch; 4 — external lighting switch; 5 — rear fog light switch; 6 — rear lights; 7 - rear fog light circuit fuse; 8 — fog light indicator lamp, located in the indicator lamp block; 9 — indicator lamp for high beam headlights, located in the speedometer; 10 — ignition switch;
- P5 - headlight high beam relay;
- P6 - relay for turning on the low beam headlights.
↑ A - view of the headlight plug connector
1 — low beam plug; 2 — high beam plug; 3 — ground plug; 4 — side light plug;
- B - to terminal “30” of the generator.
↑ B – terminals of the rear light printed circuit board (numbering of terminals from the edge of the board):
1 - to ground; 2 - to the brake light lamp; 3 - to the side light lamp; 4 - to the fog light lamp; 5 - to the reversing lamp; 6 - to the turn signal lamp
To turn on the headlights, relays P5 and P6 of type 113.3747 are used, installed in the mounting block. The same relays are used to turn on the engine cooling fan motor and to turn on the heated rear window and sound signals.
The relay switching voltage at a temperature of (23±5)°C is no more than 8 V, and the winding resistance is (85±8.5) Ohm at 20°C.
Instead of relay 113.3747, you can use new interchangeable relays type 90.3747-11, which have a plastic cover and slightly increased dimensions. And instead of relays 113.3747-10, which have a mounting bracket on the cover, you can use relays 90.3747-10 (with bracket). The characteristics of the new relays are the same as those of relay type 113.3747.
How to replace the lamp in the headlight unit on a VAZ 2104, VAZ 2105, VAZ 2107?
Replacing the low and high beam lamps, as well as the side lamp:
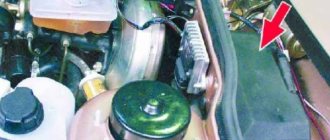
It couldn’t be easier to replace, you will first need to open the hood and after that you can immediately begin replacing, to do this, twist the lid and immediately remove it (see small photo), when it is gone you will have excellent access to two lamps at once , namely to the halogen lamp and to the side lamp, in order to get the halogen lamp, you will need to disconnect the wire block from it (Indicated by the red arrow) at the beginning, and then pry off the retainer (It is metal, if you take a closer look you will immediately see it, it is like a bracket goes) and remove it from the lamp and after which you can pull out the lamp itself, simply by pulling it, to do this, install the new lamp in the reverse order, now let’s say a little about the side light lamp, it is even easier to change, you just need to grab the socket with your hand (Indicated by a blue arrow) and after that, by pulling the socket you will need to pull out the lamp, and when you have it in your hands with the socket, you will have to press the lamp (Push it into the inside of the socket) and turn it counterclockwise and it will come out of the socket .
Replacing the turn signal lamp:
On the new classic (this is the one we are disassembling), turn lamps of type A12-21-3 (P21W) are installed, when purchasing them, be sure to indicate the markings, otherwise they will not suit you, they are changed in the same way, under the headlight unit you will need to crawl up from the back side and there you will find a protruding cartridge, next to it there is also a hydraulic headlight leveler installed (It is indicated by a red arrow, it was installed exclusively on cars of approximately 20005, perhaps even on early models it was present), so this cartridge you will need to turn it counterclockwise and remove it together with the lamp from the headlight unit, and then turn the lamp itself in it (It turns in the same way as the side light lamp, that is, you will need to press on it and turn it counterclockwise, see small photo, this lamp is inserted into the socket in the reverse order).
Additional video: A detailed video with instructions for replacing halogen lamps can be found below:
How to remove glass from a VAZ 2109 headlight
1200 rub. for the photo report
We pay for photo reports on car repairs. Earnings from 10,000 rubles/month.
Write:
The principle of replacing glass in a VAZ headlight, whether on the 2107 or on the VAZ 2114, or in this case on the VAZ 2109/08, is the same. Glass installation is carried out using sealant. But when choosing it, you need to be very careful and not stick it on anything, otherwise your headlight will quickly fall apart.
Before applying glue (sealant), you need to clean and degrease the surface. It is more convenient to change the glass on a removed headlight, of course, but you can install new glass on a mounted headlight without much difficulty. This quick method of replacing glass on a Lada Samara headlight will come in handy on the road.
VAZ 2109: replacing the headlight housing in the house
As a rule, on a VAZ 2109, headlight glass replacement is performed quite often. The cause could be any small thing that gets into the headlights, and then leads to damage to the entire glass. Replacing glass in a VAZ 2109 headlight is so simple that any car enthusiast can handle it.
Tinting headlights with paint or varnish
You can tint both the rear and front headlights of a VAZ 2021 car in a workshop, but many people prefer to do it themselves. You just need to remember that you cannot darken the front lights too much. Otherwise, it will become unsafe to drive on the roads at dusk and at night. Plus, the car owner will face permanent fines for administrative violations. To avoid this, you can make sure that the tint does not cover the entire surface of the headlight, but only a part.
Varnishing or painting involves preliminary dismantling of the headlights. To do this you need to do the following:
- open the lid in the trunk trim;
- remove the board with lamps;
- find and disconnect the connector;
- unscrew the nuts securing the lamp;
- extract it.
Before painting the headlights yourself, you need to remove the old coating, if any, wash and degrease the surface. The prepared lantern is placed on a solid base and the first coat of paint is applied. In total you need to do 5-6 approaches. When all the layers are dry, the headlight is assembled and put in place.
Do not forget that tinted headlights will produce less light the more layers are applied. After completing the painting work, uniform tinting can be achieved by thorough polishing.
It’s not difficult to bring your favorite car to perfection with your own hands. You just need to arm yourself with knowledge, patience and be willing to spend a little money and time. You can make tuning the windows and headlights of your VAZ 2021 extraordinary by choosing the color scheme and other parameters to suit your tastes and capabilities.
Which lamps to choose for fog lights
Today we have three options:
- Halogen.
- LED.
- Xenon.
But before you make a choice, let's talk about color temperature. The higher it is (within reasonable limits), the better the road illumination and the less eye fatigue. But light with a temperature of 4,000-6,000 K is only good in clear weather. It will be an excellent addition to headlights. But in bad weather the situation changes dramatically.
White light is strongly scattered in water particles, and the illumination range drops catastrophically. Light of a lower color temperature penetrates better through fog and rain, but illuminates the road less well in clear weather.
Thus, here you need to choose the optimal color temperature specifically for your “habitat”. If the weather in our area is predominantly dry and clear, then it makes sense to install cooler lamps - 3,500-4,300 K. If you often have to drive in rain or fog, then the optimal color temperature for PTF lamps will be in the range of 2,500-3,000 K. Light at this temperature will have a yellowish tint, but it penetrates well through fog and rain, providing the maximum possible visibility range with a minimum of glare.
Important! Lamps with a color temperature above 6000 K are prohibited for use worldwide, not only in fog lamps, but also in headlights. As a rule, they are installed on exhibition cars to create a more presentable appearance.
Now let's talk about the types of lamps and their features.
Xenon
These light sources are produced with a color temperature of 3,000 K and higher, but the most common are 4,300 K. In principle, xenon can also be installed in the PTF, but it is quite difficult to find a lamp with a temperature of 3,000 K, and the rest are not suitable for driving in bad weather.
In addition, the vast majority of PTFs for VAZ are designed to work with incandescent and halogen lamps and are in no way suitable for working with xenon. Installing a xenon light source instead of a halogen one, firstly, threatens problems with the traffic police (deprivation of the right to drive a vehicle for up to a year), and secondly, such headlights will blind oncoming drivers, no matter how you adjust them. And if we decide to install xenon, then we will have to select flashlights designed for xenon lamps.
Halogen
Bulbs of this type have a color temperature of 2,800-3,500 K, which means they are excellent for use in fog lights. It is for them that VAZ fog lights are designed. Another advantage they have over xenon is cost. A xenon lamp costs several times more than a halogen lamp; moreover, a xenon light source requires the installation of a high-voltage driver - the so-called ignition unit. A halogen light bulb can be connected directly to the car’s on-board network. In addition, halogen bulbs with a yellow bulb are available, which are specifically designed to create anti-fog light.
LED
The color temperature of LED lamps can be almost any, so choosing a suitable bulb for fog lights is not difficult. The only thing is that not all LED bulbs will work correctly in halogen headlights, but nevertheless, most of them create a light beam similar to that of a halogen lamp. Perhaps the only drawback of an LED light source is its high cost.
Glass
When converting factory headlight units, acrylic or polycarbonate elements are used instead of tempered, heavy glass. When choosing, you should take into account the diameter of the new glass, adjusting it to the size of the standard blocks.
Acrylic headlights are made by heat shrinking using old glass as a matrix. The minimum thickness of a new plexiglass headlight is 4 mm. The advantages of an acrylic block are low cost and the ability to be manufactured in a workshop. The disadvantages include rapid wear of the part. Acrylic quickly becomes covered with microcracks after being hit by gravel thrown out from under the wheels of a vehicle in front, and loses transparency after overheating. It is recommended to additionally protect the headlights with armored film.
Polycarbonate headlights are two times lighter than glass and are characterized by increased resistance to mechanical damage. Compared to acrylic glass, polycarbonate glass does not become cloudy over time, does not lose light transmission, and is resistant to temperature changes.
How to disassemble conventionally non-separable headlights on a hard sealant without cutting or damaging the edging. We replace the glass on a VAZ 2101 headlight.
Replacing rear lights
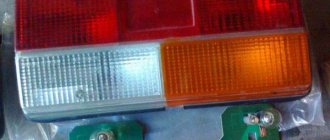
The VAZ taillights have 4 bulbs inside (from side to number).
- Turn signal (closest to the side behind the orange glass).
- Reverse (in the center behind the white glass).
- Side lighting (under the reverse light behind the red glass).
- Stop sign (closest to the sign behind the red glass).
The networks to which these bulbs are connected are protected by fuses F1, F7, F8, F9 and F16. If the standard optics of the VAZ Classic do not suit you, then you can make a small tuning, namely, replace the standard taillights with LED lighting devices.
How to disassemble a headlight without a hair dryer
how to unsolder glass
separately from the reflector without a hair dryer. Be careful not to get burned...
We replace glass on a VAZ 2101 headlight.
If you broke glass
on the headlight, or the reflector has already become rusty, or you want
glass
with the inscription USSR, you can...
There are a huge number of ready-made LED lights on the market from various domestic manufacturers. To install them, it is enough to remove the standard headlights and replace them with tuned ones. Algorithm for removing rear lights.
- First, remove the negative terminal from the battery or remove the fuses mentioned above.
- Then we open the trunk and take out everything that might get in the way.
- Unscrew all the screws and remove the trunk trim.
- We take out the license plate light bulb socket.
- We unscrew the screws securing the plastic housing of the license plate lamp and remove it.
- We disconnect the wiring from the lamp, having previously remembered what is connected to what.
- Unscrew the 4 nuts securing the lamp to the body and remove it.
After dismantling the standard flashlight, it is necessary to install the tuned one in the reverse order. It is important not to forget when installing to connect the ground wires to the inner lower stud of the left lamp and to the inner lower, as well as the outer upper stud of the right lamp.
Do-it-yourself LED tuning of VAZ 2107 headlights
For the “Seven” you can easily find, buy and install non-standard headlights or individual lighting elements. The cheapest solution is to install LEDs instead of standard lamps or in addition to them. This allows you to transform the appearance of your car at a minimum cost.
Tuning the rear lights of a VAZ 2107 is also often done by changing lamp lighting to LED.
For tuning with LEDs you will need:
- resistors;
- panel or box for mounting lighting elements (LEDs);
- drill;
- drill;
- sealant;
- wires;
- LEDs.
DIY LED taillights VAZ-2107
Important: when connecting LEDs, you must take into account the polarity. In addition to the original appearance, tuning with LEDs has other advantages:
In addition to the original appearance, tuning with LEDs has other advantages:
- low power and, as a result, low load on the on-board network;
- durability and reliability;
- diffused light that does not blind other road users.
Front LED headlights VAZ 2107 (Black).
tuning headlights VAZ 2107
Replacing the headlight
Let's first consider the situation when the old headlamp has outlived its usefulness and needs to be replaced. Such cases occur when water gets inside and causes corrosion processes on the reflector or its darkening, as well as when the headlight is completely damaged. Replacement requires the presence of a basic tool and disconnecting the car from the battery. After this, we proceed to removing the unusable headlight:
- All power wires are disconnected by removing the plugs;
- Removing the hydraulic corrector. To do this, press the plastic lock, turn it clockwise 90 degrees and pull it towards you.
- From the outside, the headlight unit is attached to the body of the VAZ-2107 car using three bolts. One is located on top and in the middle, and the other two are located below - on the sides. There may be a problem with unscrewing the bottom bolt closest to the grille. On the other side of this mount there is a fixing nut, which must be held with a key “8”.
- The headlight can now be removed to the outside of the vehicle.
- The seat for installing a new headlight is cleaned, all fastening bolts are lubricated and installed in the reverse order of removal.
There is no difficulty at all, and the procedure for replacing one side will take no more than 15 minutes. The cost of a regular block headlight on a VAZ-2107 ranges from 1,500 to 2,500 rubles.
Glass replacement
It is known that the headlights have a glass coating, and it is a rather fragile element. And the front part of the car is the most susceptible to physical destructive actions. Such actions occur primarily due to a pebble jumping out from under the wheels of an oncoming car, as well as during collisions with foreign objects. Replacing the headlight glass on a VAZ-2107 is a pressing question that owners of “Sevens” ask themselves. After all, there is no need to replace a complete set of headlights when replacing glass will cost 150-300 rubles. To replace glass you will need the following tool:
- screwdriver;
- pliers;
- sealant;
- degreaser or acetone.
Sequence of glass removal and installation:
- There is no way to remove the glass without removing the headlight, so you need to follow the sequence of actions described in the previous section.
- When the headlight is removed, its surface must be cleaned and try to remove the glass yourself, always wearing gloves. Glass can be easily removed when it shows significant damage.
- If the glass is not damaged, then you can go in two ways: a) break it if it is no longer needed; b) warm it up with a hairdryer and carefully remove it, but this will take much longer. You can watch a video about this method on the Internet if anyone is interested in this type of withdrawal.
- Having decided that glass removal will be carried out according to method a), we proceed to its implementation. We break the glass with a hammer and all the fragments are removed.
- The glass seat is cleaned of old sealant and degreased.
- Once everything is ready to install the new glass, you need to apply sealant around the perimeter of the headlight. It is better to use a special transparent sealant so that its release is not visible.
- We apply the glass to an even layer of sealant and press it using tape or rope. Leave it to dry in this form for about a day. After drying, you can install it, which will take no more than 5 minutes.
Replacing the hydraulic corrector
The purpose of the hydraulic corrector is known, but to replace it you need to understand its design. It consists of a main cylinder, which is a switch, and actuator cylinders. The mechanisms are connected using special tubes with liquid. Any breakdown of one of the elements of the hydraulic corrector entails its complete replacement, since its design is non-separable.
Removing and disassembling the headlamp, replacing lamps
Disconnect the negative cable from the battery.
Disconnect the two electrical connectors of the headlight unit.
Using a 10mm wrench, unscrew the two bolts of the upper headlight mounting.
Remove the radiator grille.
Unscrew the lower mounting bolt.
Carefully pry off the decorative trim with a screwdriver.
We move the trim to the center of the car and remove it.
Using a 10mm socket, unscrew the nut securing the headlight unit to the bracket
Quite often, motorists have to deal with such a problem as damage to the headlight glass. As a rule, assembled headlight units are installed on VAZ cars. It is sealed, the glass is firmly glued to the body, and many car enthusiasts, if the glazing is damaged, simply replace the headlight assembly. Such repair of VAZ-21099 headlights, like other models (2105, 2107, 2108, 2109, etc.), as they say, “will cost a pretty penny.” A more profitable option is to replace the glazing. This procedure is easy to do yourself.