While driving on the road, stones fly out from under the wheels of the vehicle in front, which can cause mechanical damage to the headlights. To protect the optics, a special film for car headlights is glued to it. What is she? How to stick it on, care for it and remove it? The article provides answers to these questions.
Characteristics of protective film for headlights
Protecting optics from small stones, midges and other materials that can cause damage has always been a hot topic. Previously, metal grilles were installed on optics. But they looked natural on SUVs and sports models, while they spoiled the appearance of luxury cars. The situation changed with the advent of protective films that are glued to car headlights (video author – AvesAuto).
Armored protection does not have high strength qualities, but has the following advantages:
- reduces impact force;
- easily removed from the surface;
- protects against dust and dirt;
- protects the glass surface from minor damage.
If a large stone hits, the force of the impact spreads over the entire surface, which makes the impact not so strong. Even if the headlight does break, the glass will not crumble inside the housing, but will remain on the film. It makes cleaning the optics easier, since it is easier and faster to wash off dirt from a smooth surface than from a ribbed surface.
Film gluing areas
Types of material
There are currently two types of protection:
Film for headlights made of polyurethane is more often used for optics of complex configurations. It is stronger, more durable, but, however, more expensive than vinyl.
Vinyl protection is more popular. Its advantage is low cost, density, wide range of colors, and the ability to choose thickness. The advantage of vinyl coating is better light transmission than polyurethane, it ranges from 97 to 99%. In addition, it stretches well and makes it possible to reserve headlights at home.
Popular manufacturers
One of the popular manufacturers is the Canadian company Ricochet. The material has good strength and transparency. Ricochet film protects against small stones, scratches, and piercing objects. The material has increased elasticity, which allows it to be used for optics of complex configurations.
Ricochet protection
Polyurethane film from the American company Venture Shield provides reliable protection for headlights and other body elements from scratches, chips and cracks. The manufacturer provides a 5-year warranty on its products. At the same time, the material retains its qualities: it does not turn yellow, does not delaminate, and does not slip. A special feature of the Venture Shield material is its resistance to ultraviolet rays.
Anti-gravel products from Vissbon reliably protect optics from stones, branches, gravel, hail and other mechanical influences. The transparency of the material makes it possible to use it for light optics and mirrors. It protects not only from damage through mechanical impact, but also from corrosion, dirt and dust.
Do-it-yourself headlight reservation with film
Of course, in the event of a strong impact, the armor will not save the headlight from damage, but even if it breaks, the fragments will not scatter, but will stick to the film. You will be able to drive to the garage and subsequently replace the headlight with a new one.
About additional benefits of booking
The armored film applied to the headlights protects the surface from dust and dirt, which can cause damage when washing the glass. In addition, the film will greatly facilitate the process of washing headlights, which will allow you to keep them clean, and clean headlights illuminate the roadway much better at night.
Types of films
There are different types of armor films for covering headlights, which must be selected taking into account the material (glass or plastic). For example, for fog lights, which are most often made of glass, films of increased thickness are suitable - up to 3-4 mm.
The surface of such armor for headlights may have a special adhesive layer that can withstand high temperatures and fix the film well on the glass surface.
Such a film for armoring can provide protection for fog lights even from the impact of fairly large stones.
- vinyl;
- polyurethane.
Their thickness is approximately the same, but vinyl coatings are less durable, so they are always cheaper. As for polyurethane armor films, they are stronger and have a longer service life, and also provide better protection for the base.
Buy a suitable film with a thickness of at least 100 microns for plastic headlights and at least 1 mm for glass ones. Consider the shape of your car's headlights when purchasing, as the thicker the headlights, the more difficult it will be for you to fit them over all the curves and protrusions. However, do not forget that a thin film will not provide adequate protection.
What do you need to make a reservation?
- film;
- rubber spatula;
- construction hair dryer;
- clean rags;
- scissors or blade;
- degreaser (alcohol will do).
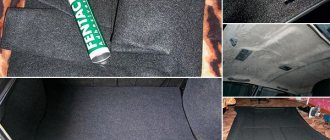
Preparatory work
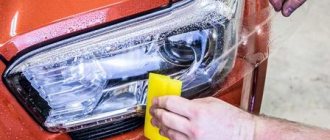
Before armoring headlights with film, they must be thoroughly washed and degreased. Use a cloth with detergent to remove any dirt, then wipe the surfaces dry and dry. Degrease with alcohol, which should not leave streaks. We recommend wiping the surface of the headlights with alcohol 2-3 times to be safe.
If possible, carry out work in a garage or other room so that dust does not fall on the headlights after cleaning. If you want to stick a film on the fog lights, it is better to first dismantle them and do the work separately.
Glue the film
Carefully remove the protective layer from the back of the film when the film has cooled after heating. Remove about 3-4 cm from one edge and apply the adhesive side to the headlight. Make sure that no air bubbles form. They must be removed immediately with a spatula. Next, heat the next segment of the film, tear off the backing and glue the section. Repeat moving in this direction until you have glued all the film to the headlight.
Trim off the excess along the edges, leaving a margin of about 5 mm. For a better fit of the film, small cuts can be made in the invisible parts of the headlight at the corners.
Instructions for covering headlights
Reserving headlights with film is a simple procedure and consists of a sequence of steps:
- Before gluing, you need to wash and dry the headlights.
- Then the surface of the glass should be degreased using industrial alcohol.
- Next, you need to cut out the blanks with an overlap of about 2 cm at the edges.
- Before gluing, the prepared blanks must be heated with a hairdryer until they become elastic.
- When removing the backing, you should immediately glue the protection before it loses its elastic properties. In this case, use a spatula to remove bubbles from under the material. It is recommended to heat 4 cm sections and glue each one sequentially.
- The remains are trimmed with scissors.
- At the end of the work, you need to warm up the entire surface with a hairdryer again and work with a spatula, finally leveling the surface.
Leveling the material with a spatula
Methods of covering a car with protective film
There are two ways to wrap a car: wet or dry. They are very similar, the only difference is in the technique of applying vinyl. With the dry method, a protective coating is applied to the body. It is not necessary to prepare the surface for this. The paster's movements must be confident and precise.
The adhesive layer adheres quickly and reliably. Therefore, you can only remove the protective layer from the film, and not the film itself.
The advantages of this method:
- High quality adhesion.
- Save time. No drying.
However, we recommend using the dry method only to those craftsmen who already have experience in performing such work.
The wet method is the application of an adhesive base to a surface previously treated with soapy water. This method corrects mistakes made when applying the film.
It is also suitable for beginners for tuning cars with vinyl film. If you are planning to style your car, then decide in advance: to apply vinyl to the entire body or only to its individual elements.
Service workers often offer two options - apply vinyl coating to the entire area of the car or only to part of it:
- bumper (front or rear);
- roof;
- hood;
- wings;
- doors.
Following the advice of the experts, it is necessary to cover the entire body with a protective film. This will protect the car from ultraviolet exposure.
How to cover a car with dry film with your own hands?
The difference between this method is that the vinyl is applied to a dry surface. First you need to remove the backing. If you choose the dry method, it is better to invite an assistant.
To properly and reliably glue vinyl film to a car, you must sequentially perform the following steps:
- Make precise markings to more accurately apply the material to the car. Then make a cut, providing for overlaps.
- Without removing the backing, attach the pattern and mark the edges with masking tape.
- Having spread the piece on a flat surface, remove the backing, avoiding gluing.
- It is better to start applying the film from the part with the smallest radius of curvature.
This method makes it possible to “tighten” the protective layer. If suddenly the body tuning was done incorrectly with your own hands, then how to stick it straight?
To do this, take a hairdryer and slightly heat the vinyl. Then remove the coating and repeat the process. After wrapping the car, all air bubbles must be expelled.
Film on a car using the wet method: how to glue?
The wet pasting technology is more suitable for beginners, because it is much simpler. Read the instructions to understand how to properly apply the film:
- Make a pattern. Without opening the adhesive layer, mark the future cut.
- Carry out cutting according to the marked markings, laying out the measured piece on a flat surface and cutting off all the parts exactly with a stationery knife. At the same time, leave a small margin on each side.
- Spray soapy water from a spray bottle over the entire area of the body. In this case, there should be no dry places left.
- Lay the cut face down, then remove the backing. Place the film on all elements of the body as accurately as possible, pulling it up and fixing it in places where it bends.
- If it doesn’t work out the first time, then you need to lift the material and correct all the inaccuracies.
- Use a squeegee to smooth out any wrinkles, removing any air. Start from the middle and work towards the edge, pushing out the liquid.
- When the water is removed, arm yourself with a hairdryer and do the same procedure. When heating the vinyl and smoothing it, work strictly from the center to the edges. The temperature of the hair dryer is within 50-70 degrees Celsius. Direct the hot air stream at an angle of 45 degrees at a distance of at least 20 cm.
- Cut off the excess edges of the film, leaving a margin of 5 mm, then coat it with primer, fold it and glue it to the end, smoothing it with a squeegee.
- Wipe the entire body with soft, lint-free cloths. Leave to dry for a day.
To ensure good adhesion, you need to wait at least 4 days. For the first 10 days, you cannot drive at high speeds and wash the car yourself or at a car wash.
When the body wrap is completed, let's figure out what kind of film to glue to the headlights.
Tips for removing film
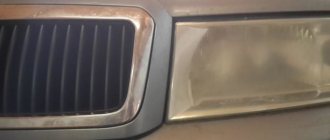
Although some manufacturers provide a 7-year warranty on their products. Due to poor-quality road surfaces, the film has to be changed after 3-4 years. High-quality branded film can be removed from the glass surface without any problems.
Removing headlight protection
If the material is of poor quality, then after removal, an adhesive base remains on the surface. The adhesive is removed mechanically using chemicals.
Price issue
Why do you need tint?
Typically, headlight tinting with film is done to improve the aesthetic characteristics of a car. Changing the color of the lighting fixtures allows the car to stand out among other cars and emphasize the originality of the exterior.
In addition, the tint film for headlights performs protective functions. It can protect the surface of lighting fixtures from the following damage:
- scratches;
- chips;
- microcracks;
- cloudiness.
Under the influence of ultraviolet rays and after exposure to small pebbles, sand, dust and dirt, glass loses its light transmittance over time, and the film helps maintain its condition.
Film for tinting headlights is available in a wide range on the market. It may differ in the following characteristics:
- color;
- thick;
- transparency.
Important! The wrong choice of material can cause an emergency on the road. Options with dark colors and low light transmission are especially dangerous.
Video “Simple instructions for applying protection stickers to headlights”
This video demonstrates how to stick a protective film on the headlights of your car with your own hands (the author of the video is VAPILA).
A tuning product such as headlight tint film helps give your car an original appearance. It will help to slightly change the shade of the lighting color of car optics, highlighting the car in the traffic.
Quite often, when installing tinting on headlights, it turns out that the car already has factory tinting. It typically has a very high light transmittance (about 95% or higher) and is spray-applied at the manufacturer, which ensures certification. With such minor tinting, you definitely won’t get a fine. But if you want to put a protective coating on your optics yourself, the first thing you need to consider is whether the light transmission coefficient meets legal standards.
You can safely apply a protective coating to prevent scratching and clouding of the lamp glasses as long as the light transmittance is at least 85%.
Today, materials for protecting automotive optics differ depending on colors and manufacturers. You need to choose such products based on three main parameters:
- thickness. It determines how well the material will protect the glass of the optics from sand, gravel and other abrasives, as well as exposure to moisture and chemicals;
- light transmittance. Typically depends on the thickness. Before purchasing, be sure to find out the factory light transmittance of your optics so as not to violate domestic legislation;
- percent elongation. Allows you to determine the required amount of consumables.
Types of films for car wrapping
Manufacturers often make car films based on vinyl and polyurethane. Vinyl flooring comes in many colors and designs.
Vinyl protects the body from exposure to ultraviolet radiation and minor scratches. But it is inferior to polyurethane anti-gravel materials in protective properties.
Vinyl coating is usually used for car tuning. This is explained by the fact that the choice of colors and textures is large, and the price is affordable.
According to the production method, they are calendered and cast. The second type is high quality, with a long service life. Such films have a whole catalog of colors. However, their price is much higher than that of calendered ones.
If you carry out the pasting yourself, we recommend choosing the second option, because it is easier to work with cast coatings. All of them come in several types:
- Transparent.
- Bright color.
- With matte finish.
- With gloss or mother-of-pearl.
- Graphic.
- Textural. With texture for different materials (for example, carbon film on a car).
- Chameleon.
The choice is wide, and it depends on your preferences. But we advise you to buy films from well-known manufacturers to avoid difficulties with application.
It is true that the service life of the material should also be taken into account in this matter. The following brands are popular: 3M Scotchprint , Hexis and Oracal .
Before buying material, you need to calculate its consumption for a specific make of car. It is difficult to accurately calculate the area of all body elements. Therefore, the calculation is approximate, depending on what class the car belongs to:
- for a compact car 21 sq.m will be used;
- for the middle class - 24 sq.m;
- large cars for a family −27 sq.m;
- for business class - 30 sq.m;
- sports coupe - 34 sq.m;
- large SUVs - 37 sq.m.
We recommend taking vinyl in rolls one and a half meters wide in order to cover large body parts without joints.
Advantages and disadvantages
The obvious advantages of gluing the film with your own hands include:
- saving money when gluing the product;
- excellent protective properties of tuning, preventing the occurrence of cracks and scratches;
- restoration of the original appearance of the headlight glass;
- uniformity of light transmission;
- the ability to choose a product of any color for gluing;
- carrying out polishing work (for some types of coatings);
- no wear or fading of color during use;
- perfectly smooth glass surface.
Despite the numerous advantages, pay attention to some of the disadvantages present in the material:
- when the side lights are turned off, the car will become almost invisible;
- the material is expensive.
Advantages and disadvantages of covering headlights with film
Important nuances
- After you have booked your car headlights, you need to avoid getting the film wet for two days. Do not wash your car or leave it outside in rainy weather.
- The film will deteriorate faster if you wash the surface with powder or abrasive agents, so use soap for washing. Also, do not direct the jet of a high-pressure apparatus at the headlights.
- Global manufacturers promise that the material will last about 5–7 years, but in Russian road conditions this period is reduced to 3–4 years.
To correctly make headlight film reservations with your own hands, we recommend that you first watch training videos.
Necessary materials
To do the gluing yourself you will need:
- stationery knife;
- squeegee made of rubber or plastic coated with felt (felt);
- spray;
- car shampoo (detergent);
- clean rags;
- construction hair dryer;
- degreaser (alcohol, white spirit, window cleaner).
Before you start working, familiarize yourself with the characteristics of the material and decide whether its color matches the color of the cars.
Also, decide how exactly you will apply the film. As a rule, it is glued evenly, occupying the entire area of the glass of automotive optics. However, if you wish, you can tint only the “eyelashes on the headlights” or combine several colors of the material.
Which film to choose
Based on their composition, the coating is divided into two types:
- Vinyl.
- Polyurethane.
The choice should be made by studying the characteristics of each material.
Advantages and disadvantages of vinyl
Vinyl films have a wide range of applications. Previously, they were used to protect street advertising posters, so they differ from polyurethane ones in their smaller thickness. Such films prevented fading and damage to paper material from rain. Recently, similar technology has been used in the production of protection for optics.
Negative characteristics:
- Formation of a cloudy yellow coating over time.
- It does not withstand severe frosts; when it gets cold, it cracks and peels off.
- Too hard and it will be difficult to shape, especially for complex headlight shapes.
The vinyl film is applied to the headlights by heating. It is easy to purchase the material. The price is affordable. Suitable for economy class cars.
Advantages and disadvantages of polyurethane
They are a durable coating and are twice as thick as vinyl. The material was originally used in the construction of helicopters. The coating protects the helicopter blades from air containing fine sand, etc.
Polyurethane headlight film can withstand any weather. Tolerates heat and cold. It is possible to paste headlights of any shape, since the material can withstand changes stably.
Of the minuses note:
- Transmits light less well. Lighting, unlike vinyl ones, may be worse. Xenon equipment will shine consistently brightly regardless of the material.
- The cost is higher due to the complex production technology.
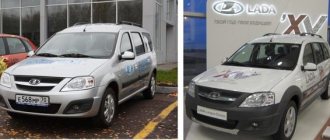
It is recommended to cover the optics of the Soviet automobile industry with vinyl, since the cost of polyurethane film will be about 5 times more.
Main manufacturers
Eagle Eyes (Taiwan) is a manufacturer of automotive optics. Produces accessories for a wide range of car brands.
Noble (China) – manufacturer of auto parts. The range includes auto electronics, as well as high quality protective elements.
Sonar (Taiwan) is a manufacturer of automotive optics. A popular manufacturer producing high-quality auto parts.
Auto Parts Industrial Ltd - produces both body parts and small accessories.
What to choose
You only need to pay attention to the financial condition and characteristics of the optics. With a simple form, you can purchase vinyl ones. If there are large bends, polyurethane has priority.
The applied polyurethane film must dry thoroughly before operating the vehicle. Vinyl leaves marks after removal.
Polyurethane is preferred for SUVs and off-road enthusiasts.