Everything about the clutch master cylinder
One of the elements of the hydraulic clutch system is the clutch master cylinder (MCC), which is involved in transmitting force from the pedal to the clutch release fork, which presses the bearing against the leaf spring of the basket. This is one of two cylinders that ensure the operation of the entire hydraulic drive.
Design and principle of operation of the GCS
In principle, the design of the master cylinder is quite simple:
- force is transmitted from the pedal through the pusher (10) to the rod (8),
- the piston (14) moves forward, while closing the valve (C), from which liquid from the compressible part of the cylinder can flow into the tank (1),
- the fluid in the cylinder is compressed and pushed through the fitting (19) into the hydraulic line to the working cylinder, which directly drives the fork,
- when the pedal returns to its original position, the piston returns back using a spring (18).
The operation of a hydraulic drive (no matter whether it relates to the clutch system, brake system or any other) is based on the fact that the fluid under pressure is practically not compressed, but at the same time instantly transmits force through the system of pipes to the desired point.
Specifications
In the specifications for the master cylinder, manufacturers indicate the following parameters:
- side of the steering wheel (left, right) – important for asymmetric mounting,
- Is there a tank included (GCS can be sold with or without a tank),
- connection method (left, top, etc.) – help with selection if non-standard parts are installed in the hydraulic drive,
- body material: cast iron, aluminum, steel, polymer,
- dimensions of the body and structural elements (nozzle diameter, rod length).
These characteristics can be taken into account as auxiliary information when selecting a master cylinder for your car. Car enthusiasts pay special attention to manufacturing materials: the most common today are cast iron and aluminum, and there are also quite a few offers of cylinders with polymer bodies. Steel cases are quite rare, since steel combines high price and difficulty in processing.
Clutch master cylinder failure
The simple design and the absence of complex “filling” make the clutch master cylinder resistant to damage. Its main enemy is time, since even very high-quality parts wear out from constant loads (and the load on the clutch during city driving is an order of magnitude higher than during long trips).
The first thing that fails is the rubber parts. These are boots that fit onto the rod and protect the cylinder from abrasive particles, as well as sealing collars that prevent fluid from leaking out.
The weak point is also the spring inside the cylinder, which bears a serious load. Due to work and exposure to brake fluid, the quality of the metal deteriorates over time and the spring bursts (sometimes falling apart into several parts).
To replace worn parts, they sell special repair kits for the cylinder head, which contain everything necessary for updating and further operation of the cylinder.
Repair kit GCS
If problems arise with the operation (torn seals were not replaced in time, installed incorrectly, the fluid was not changed, etc.), the cylinder mirror wears out: abrasions and scuffs appear on the metal, corrosion, after which the master cylinder begins to provide various “special effects” to the car enthusiast. In advanced cases, no repair will help, only replacing the entire spare part.
Signs of a GCS malfunction
When problems begin with the master cylinder, it most often manifests itself as a hydraulic fluid leak. When the clutch pedal begins to work poorly, the first stage of diagnosis will be a visual inspection: any leaks on the cylinder and even just slightly moistened seals are a sign of a problem that needs to be solved.
Basically, when there are problems with the cylinder, the clutch pedal begins to sink or move slowly, and the pedal “sticks” in the lower position.
Another problem with the GCS is clogging of the holes in the tank lid. For normal operation, the level in the cylinder reservoir must rise and fall freely, and for this purpose, ventilation holes are provided in the cover. If they become clogged with dirt, the hydraulic drive begins to work with difficulty: the pedal becomes stiffer and does not return well to its original position.
A few words about hydraulic fluid
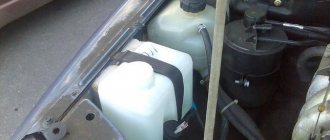
The hydraulic clutch usually uses brake fluid that has a set of characteristics that are optimally suited for the given task. For the operation of the system, what is primarily important is a sufficient fluid level, which can be determined by looking at the reservoir on the master cylinder. If for some reason there is less brake fluid, top it up without waiting for problems to appear.
When working, you need to remember that brake fluid is quite aggressive to plastic, fabric, paintwork and even leather. So you need to work with it carefully, and immediately wipe off any drips or drops on parts or the car body with a clean napkin. For the same reason, you need to monitor the condition of rubber parts that come into contact with the brake fluid: they can deteriorate very quickly and literally dry out under the influence of aggressive chemicals for which they are not intended.
And, of course, you need to add brake fluid to the system in a clean, closed room (garage or auto repair shop) so that dust does not get inside.
An interesting property of brake fluid is its very good penetrating effect, due to which it seeps out through microscratches on the cylinder surface or piston, even if the rubber seals are replaced. For this reason, the repair kit includes a new piston, and scratches and abrasions inside the cylinder become a clear indication for replacing the entire part.
Interesting fact: where does sand come from in the clutch drive?
Sometimes auto mechanics repairing the clutch drive see a sediment in the brake fluid that resembles small grains of sand. There seems to be nowhere to get sand in such quantities.
The reason for the appearance of sediment is that most brands of brake fluid are unstable to electrical influence, and when exposed to even very low voltage, some components of the fluid precipitate (crystallize). But where does the electricity come from in the system if the wiring is in good condition?
Characteristics
Basic requirements for brake fluid:
- Should not destroy rubber seals in the system. Maybe someone remembers red BSK brake fluid. Only the factory rubber bands remained alive. She ate all the “co-op and China” like a crocodile.
- Brake fluid must have lubricating properties. This applies to the surfaces of the brake pistons in the cylinders.
- Must have stable characteristics at low and high temperatures. This issue will be discussed in a separate paragraph below.
Classification of brake fluids
Let's decipher the mysterious abbreviation - DOT. It's simple - Department of Transportation, US Department of Transportation. In the USSR and Russia there have never been GOSTs for these products, so everything is produced in accordance with the specifications. And this is translated for the average user, “some to the forest, some to get firewood.” Maybe something has changed in 2021, but I doubt it. Further after the abbreviation DOT, there are also some mysterious “numbers”. Their translation into Russian is as follows:
- DOT3 – mineral base. 50% - alcohol, 50% - castor or camphor oil. Accumulates moisture relatively quickly. My personal opinion: can be applied and used in dry climates.
- DOT4 is the most common option today. The base is glycol. To bind the condensate, boric acid is added. The most versatile option.
- DOT1 is an improved version of DOT4. The boiling point is slightly increased and the viscosity at low temperatures is reduced. Relevant for the north and other “resort places” of our homeland.
- DOT5 – silicone base. Does not absorb moisture from the air. But as always, if there are pros, there are also cons. Accumulated water can collect in the lower parts of the brakes and freeze there. Applicability: sports cars and motorcycles.
Bleeding a car clutch: symptoms, preparation, stages
Clutch “diseases” can lead to problems at the start and when braking. Unfortunately, it is impossible to diagnose system problems based on external signs. Monitor its operation, pay attention to your own sensations when pressing the pedal, and if you notice jerks when starting the engine and switching the gearbox, go for diagnostics.
Car clutch system
When is clutch bleeding required?
The operation of the clutch system is based on the laws of physics - the properties of hydraulic/brake fluid to compress/decompress under load. If air gets into the system, its properties change. As a result: the hydraulics stop responding to pressure or react late, which leads to jerks and jolts when pressing the pedal.
Signs of “airing” of the system
If the following symptoms appear, it's time to change the hydraulic fluid:
- the pedal is depressed too easily, but the gear does not change;
- the pedal moves normally, but the gear engages with vibration or delay;
- the clutch pedal “sticks” to the floor, slowly returning to the top position.
Even one of these signs is enough to check the system.
“Sinking” can also be caused by a broken return spring.
Before bleeding the clutch, find out that the spring mechanism is not the cause of the malfunction.
In what cases is the clutch hydraulic drive pumped?
Bleeding of the clutch and braking systems is mandatory if:
- the liquid used has already served its purpose
. Changes in physical and mechanical properties over time are the norm. The recommended period of use for hydraulics is 1-2 years (as a rule, the period is indicated on the container).The liquid loses its properties, even if stored in an airtight container.
- the clutch or brake system is being repaired
. When cuffs, seals, seals are changed, leaks are eliminated, depressurization occurs. Result: leakage of working fluid and airing. Needs replacement.It is easy to speed up new bleeding if you loosely tighten the fastenings of the clutch mechanism units. Air leaks freely through the micro-holes.
- Clutch/braking system components are severely worn
.In case of wear of parts, only bleeding is not enough, because the cause of airing does not disappear. To fix the problem, you must first repair or change the functional elements, and then change the working fluid.
What is required for pumping?
- tools: keys, screwdrivers, pliers;
- elastic transparent hose for draining old fluid. Make sure that the diameter of the tube connection matches the drain fitting connector;
- a reservoir into which the liquid will be drained;
- new working fluid;
- personal protective equipment: gloves, sleeves, goggles. Technical fluids are chemically aggressive; if they come into contact with the skin and mucous membranes, they can cause burns.
Ideally, bleeding the clutch system should be carried out by two people. One person presses the pedal, the second drains the fluid and diagnoses faults. If necessary, you can do without an assistant. In this case, you will need a reliable means to secure the pedal.
For example, a suitable size stone or brick.
Is it possible to cope with the procedure on your own?
Are you sure that you can quickly and efficiently bleed the clutch yourself? Even if you have the slightest doubt, contact a professional service center.
Without knowing the nuances, you may simply not notice the defect, so repairs will be pointless.
Preparing for pumping
Preparing to bleed the clutch
The fluid from the hydraulic system is not “poured out”, but is pushed out thanks to the cylinder piston pusher.
Preparation is carried out in stages:
- checking the volume of liquid in the expansion tank - the level should be within normal limits. If it reaches the desired level, you need to top it up;
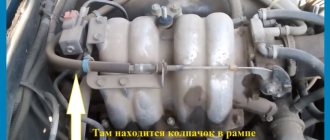
- cleaning the valve cap on the cylinder from accumulated contaminants;
- removing the cap from the air inlet valve on the working cylinder;
- connecting the drain hose to the valve fitting.
The second end of the hose is lowered into a container into which fresh working fluid is poured. The end of the tube should be immersed 5-10 cm into it.
Do not remove the hose from the tank until work is completed.
After the preparatory work, the clutch is adjusted. This allows you to make sure that the movement is free and, in addition to airing the system, there are no other malfunctions.
Stages of pumping the system
After adjustment, bleeding the clutch is carried out in several stages:
- pressure is pumped into the system. To do this, the pedal is depressed 3-4 times sharply and all the way, with an interval of 2 seconds. In this way its maximum stroke is achieved.
- the pedal is fixed in the clamped position.
- The liquid is drained by turning the cylinder fitting (with the tube in place) half a turn. Air is “squeezed out” along with the technical fluid.
The amount of air is judged by the number of bubbles that form in the container. As the system is freed from air, the pedal lowers.
4. When the pedal falls to the floor, the fitting closes quickly. Do not release the pedal until the valve closes.
It is better to repeat the pumping procedure 3-4 times. When the system is cleared of air, there are no bubbles left in the drain tank.
To prevent the work from being ineffective, when pumping it is important to monitor the level of working fluid in the expansion tank. It should not fall below 3.5 cm.
5. Tighten the fitting, make sure the system is tight and remove the hose.
Drain fitting
To check the system, the pedal is pressed all the way, and the stroke of the piston pusher is measured. The norm is 2.7 - 2.8 mm (for some cars the norms change; they are indicated in the operating manual).
Source: https://www.tts.ru/blog/transmissiya/kak-prokachat-stseplenie-podgotovka-i-etapy/
Design of the working hydraulic system
In order to increase the reliability and safety of control, the hydraulic brake system of the Chevrolet Niva is built according to a dual-circuit diagonal design. The first hydraulic drive circuit drives the front right and rear left wheels, and the second drive drives the front left and rear right wheels. Thus, controllability is maintained in the event of failure of one of the hydraulic drive circuits. The hydraulic braking system includes:
- brake pedal located in the cabin under the driver’s right foot;
- vacuum pedal pressure booster;
- master cylinder with reservoir for filling brake fluid;
- dual-circuit hydraulic drive pipeline;
- working brake cylinders of the rear and front wheels;
- pressure regulator with actuating lever.
Also interesting: How to bleed the brakes on a Chevrolet Niva correctly
The pressure of the driver's foot on the brake pedal is increased by a vacuum booster and transmitted to the piston of the master cylinder, which, moving, compresses the brake fluid. The fluid pressure increases and is transmitted through pipelines to the working cylinders of the front wheels and the brake pressure regulator of the rear wheels.
Chevrolet Niva - replacing brake fluid - Behind the wheel magazine
Such things - I began to notice that the clutch on my Niva Chevrolet behaves very unstable - several times already the pedal fell almost to the floor and it was very difficult to drive. The first, second, third were turned on, but the rear one was no longer there, it was grinding, bless you. However, somehow miraculously the clutch was restored and everything worked again. However, this time it did not recover and after waiting a couple of days, I decided to crawl under the hood and look for something there)) And what did I see there? The clutch brake fluid reservoir burst. That's how it is, brother.
There was no brake fluid inside at all, it turns out that those millimeters that I could press on the pedal were maintained only by the fluid in the clutch system itself - in the cylinders.
Required Tools
In order to change the brake fluid on a Chevrolet Niva, you need the tools from the table below.
Table - List of tools required to change brake fluid
| Tools | Note |
| Spanner | "at 8" |
| Transparent hose | Up to a meter long |
| Rags | To clean dirt |
| Syringe | Can be replaced with a rubber bulb |
| Tara | Can be replaced with a rubber bulb |
To carry out work, access from the bottom is required. Therefore, an inspection hole or overpass will be required. It is more convenient to replace the vehicle with a partner, but there are ways to carry out the task alone.
Also interesting: How to bleed the brakes of a Niva Chevrolet
The procedure for repairing or replacing components and mechanisms
In fact, according to the observations and assessments of specialists, repairing the master cylinder in a garage rarely leads to the desired result - increasing the efficiency of the brakes.
The recommendation is simple - it is easier to replace the master brake cylinder assembly, if we are not just talking about replacing the rubber seals.
When replacing the master cylinder reservoir, it is recommended to change the sealing gaskets, having first lightly lubricated them with brake fluid.
When completely replacing or dismantling the master cylinder for repair, first pump out the brake fluid from the reservoir and plug the pipelines.
It is strictly forbidden to repair the pressure regulator of the master cylinder. The characteristics of the regulator are set by the manufacturer during manufacture, so the pressure regulators are replaced as a set.
After repairing the brake cylinder, do not forget to bleed the brake system.
Good luck with your brake master cylinder repair.
Design Features
The front wheel brake mechanism (Fig. 1) is a disc with a floating three-piston caliper.
Cylinder block 1 is fixed in the caliper on two guides and secured with a spring retainer.
Brake pads 2 with steel bases having a figured shape, ensuring their tight fit to the pad guide.
When installing the pads, spring-loaded levers 3 press the caliper 7 to the ends of the pads, which ensures constant pressing of the pads to the guide grooves.
Brake disc 8 is made of cast iron.