Installing camshafts yourself
The camshaft is part of the timing system of any engine. The task of the camshaft is to synchronize the operating strokes of the internal combustion engine (orderly opening and closing of valves for the intake of the combustible mixture and the exhaust gases). The operation of the engine and the serviceability of many car parts depend on it.
The camshaft can be placed either above or below. Some engines have two camshafts.
Content:
The camshaft rotates by transmitting torque from the crankshaft through a chain or belt drive. In this case, the angular displacement of the camshaft is directly proportional to the angular displacement of the crankshaft. The correspondence of angular displacements affects the operation of the engine - if they do not correspond to each other, then the order of operation of the cylinders will be disrupted, and as a result, the internal combustion engine will not work.
Negative consequences of late camshaft replacement
Due to poor functioning of the camshaft, there is a loss of engine power and, as a result, its early failure, including due to jamming caused by poor lubrication.
If you do not replace even a simple camshaft gear in a timely manner, then you should mentally prepare yourself for replacing the cylinder head valves and early wear of the exhaust pipe.
Determining the need to replace the camshaft
The need to repair or replace the camshaft can only be determined after troubleshooting it, which is only possible with the camshaft removed and special tools available.
Before removing the camshaft from its bed, you need to check it for axial displacement. To do this, you need to lightly tap on the bed and if a knock appears, then most likely the camshaft is faulty.
In general, camshaft diagnostics can be carried out visually without a special tool. However, this method allows you to identify only visual defects (scratches, burrs, cracks, wear of the cams in the form of a “cut”), while
Using a micrometer, check the diameter of the camshaft housing bearing journals and bearings. If the dimensions deviate from the permissible ones, they can be repaired, but very often it is easier to buy new spare parts, since restoring the repair dimensions is more expensive.
Indications for replacing the camshaft
The condition of the camshaft must be monitored regularly and carefully. Its malfunction can also cause large-scale damage to the engine of a Japanese car itself. Usually the camshaft begins to “mope” with a dull knock when the engine starts. On cold engines, noise can be heard in the valve cover area.
Experienced drivers understand the inner voice of their car, quickly identify the rumbling of the engine and “left”, uncharacteristic noises. They are able to immediately distinguish the quiet and even sound of the camshaft, which changes frequency depending on the engine speed. If a part is faulty, this is accompanied by dull tapping sounds reminiscent of hammer blows.
malfunctions also indicate:
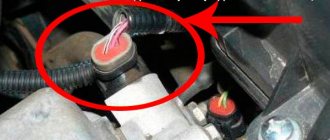
Particular attention is paid to the camshaft seals - they should not have ruptures, cracks or abrasions. The integrity of the drive must also be inspected. However, it is difficult to determine camshaft wear by indirect signs. It is much easier to do this on a removed part, inspecting it visually from all sides. There should be no potholes, scuffs, or aluminum leaks from the bearings anywhere. A sign of undoubted wear is grooves and irregularities on the surfaces of the rocker arms and cams.
Checking camshaft wear
When dismantled, the camshaft can also be listened to. To do this, you need to hold it parallel to the ground with one hand, and tap on top with the other. There should be no knocking. A mandatory condition: the camshaft should not “walk” on the bed! Otherwise, clinging to the limiter, it will inevitably create noise, which can be mistaken for a malfunction.
High-quality camshafts are rarely damaged prematurely. But Chinese products or those repackaged in this country have a hardness 1.5 times lower than that of the original ones. A good shaft is made from forged steel.
Necessary tools for work
When removing and installing the camshaft, you will need the following tools:
The procedure for replacing and installing a camshaft using the example of a “classic” from the Volzhsky Automobile Plant
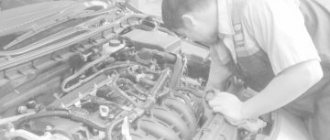
Replacing the camshaft with your own hands is not particularly difficult, but it requires care and attention. If installed incorrectly, the order of operation of the cylinders will be disrupted, which will immediately affect the performance of the engine.
Steps to replace the camshaft:
1. Removing engine attachments.
To remove the camshaft, first of all, it is worth removing the interfering attachments:
To prevent anything from getting into the carburetor and then into the combustion chamber (for example, a nut, washer, etc.), cover it with a rag or plug the carburetor holes with it.
2. Removing the valve cover of the power unit.
We unscrew the 8 nuts securing the valve cover to the cylinder head, remove and wash it.
When installing the valve cover, it is recommended to replace the valve cover gasket. This is due to the fact that after assembly, engine oil may be forced through it. When choosing a gasket, you should give preference to rubber-cork.
3. Removing the internal combustion engine camshaft.
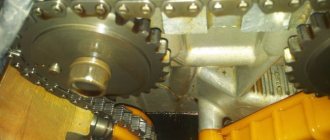
Before removing the camshaft, you must first align the mark on the drive gear with the protrusion on the camshaft bed.
To remove the camshaft, you first need to free its gear from the timing chain. For this:
4. Defective internal combustion engine camshaft.
Before buying a new camshaft, it is necessary to check the defective one (see “Determining the need to replace the camshaft”), because it may not be the fault of the internal combustion engine.
5. Installation of the camshaft and engine assembly.
The camshaft is installed in the reverse order of removal. To avoid distortion when installing the camshaft bed, the bolts are tightened in the order specified by the manufacturer and with a certain force (for the “classic” VAZ this is 18.3 N/m).
After replacing the camshaft, it is necessary to adjust the timing chain tension and valve adjustment, otherwise you will have to repair them in the future.
After the work has been carried out, first inspect the engine and listen to its operation, and if something happens, immediately eliminate any defects found in the repairs.
Steps to replace the camshaft on Lada 2114
We warn you that the actions described below imply interference with key vehicle systems. Ignoring the proposed algorithm and accompanying recommendations will lead to irreversible consequences - in particular, to the failure of the internal combustion engine. If you are not confident in your abilities, then it is better to seek qualified help from professional auto mechanics. The material presented below is aimed at experienced car enthusiasts who understand the structure of a car.
To replace the VAZ 2114 camshaft seals or the camshaft itself, the car owner will need:
- A set of wrenches: spanners, open-end wrenches, socket heads - everything will be used;
- Containers for fasteners and chalk parts;
- Screwdriver Set;
- Sealant;
- Dynamometer wrench (picture below).
Repair algorithm:
- We dismantle the camshaft pulley;
- We remove the pulley key from the camshaft groove;
- Unscrew the nut securing the gas distribution system;
- Remove the nuts securing the bracket to the cable;
- We dismantle the crankcase gas exhaust hoses, having first loosened the clamps;
- We dismantle the engine valve cover by unscrewing the nuts;
- Remove the gasket under the cover;
- Unscrew the bolts and nuts and then remove the plug;
- The camshaft bearing housing nuts are unscrewed. Under no circumstances should you unscrew the nut right away - they need to be loosened gradually in order to avoid breaking the fasteners and reduce the tension of the springs. We do this: slightly loosen one nut and move on to another. And we continue like this until we unscrew all ten pieces.
- We remove the camshaft housing and remove the timing belt drive cover from the cylinder head;
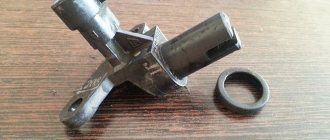
- Remove the camshaft;
- Remove the camshaft oil seal;
- Before installing a new part, we clean the shaft cavity from carbon deposits, lubricant and sealant residues. You also need to clean the contacting elements of the cylinder head and bearings;
- Apply fresh lubricant to the camshaft supports and “cams”;
- We place the shaft in the cylinder head supports. The cams of the 1st cylinder should be directed upward;
- Apply fresh sealant to the contact points between the cylinder head and bearings;
- We place the cylinder head housing cover and tighten the nuts in several circles, gradually increasing the tension of the springs and the fit of the bearings to the cylinder head;
- The final degree of tightening of the nuts should not exceed 2.2 kg/cm;
- We wipe off any excess sealant and install the oil seal;
- Install the belt drive and toothed pulley;
- Rotate the crankshaft clockwise until the installation marks on the crankshaft pulley and the rear timing belt drive cover coincide;
- Rotate the crankshaft so that the camshaft pulley “steps” approximately 2-3 teeth;
- We measure the gaps of the 1st and 3rd cams. The clearance for the intake valves is 0.2 mm, for the exhaust valves - 0.35 mm.
- Replacement of the camshaft on the “fourteenth” is completed.
Of course, to perform the described manipulations, dismantling the internal combustion engine is required. Carry out work in a dry and well-lit garage. After replacing the camshaft, be sure to fill the engine with new oil. The lubricant must be new, regardless of the timing of the previous replacement.
If after the work the engine began to run smoother, fuel consumption returned to normal, and extraneous noise and vibration disappeared, then the repair complex was completed successfully. If used carefully, the new camshaft will last at least 80,000 km.
If you still have questions about the procedure for replacing the camshaft VAZ 2114 8 valves, then check out the useful thematic video
How to install camshafts on a 4s engine
Sponsored links. Shown only to unregistered users
please help me install the shafts, I can’t figure it out from the book. doesn't stand up as it says in the book
Added after 2 minutes 21 seconds: how to check if the assembly is correct?
| Sponsored Links: |
| moderator |
Registered:
27 Oct 2008, 04:00
Messages:
12302
Topics:
15
From:
Vyatka
Car:
Toyota Vista Ardeo
About the car:
3S-FSE, 1999
Reputation: 1996
| Amateur |
Registered:
30 Nov 2012, 06:39
Messages:
67
Topics:
5
Car:
Toyota Vista
About the car:
sv 40
Reputation: 0
| moderator |
Registered:
27 Oct 2008, 04:00
Messages:
12302
Topics:
15
From:
Vyatka
Car:
Toyota Vista Ardeo
About the car:
3S-FSE, 1999
Reputation: 1996
| Amateur |
Registered:
30 Nov 2012, 06:39
Messages:
67
Topics:
5
Car:
Toyota Vista
About the car:
sv 40
Reputation: 0
| moderator |
Registered:
27 Oct 2008, 04:00
Messages:
12302
Topics:
15
From:
Vyatka
Car:
Toyota Vista Ardeo
About the car:
3S-FSE, 1999
Reputation: 1996
_________________ Vista Ardeo 1999, SV50, D4, Cartoon, TV.
to come back to the beginning| Amateur |
Registered:
30 Nov 2012, 06:39
Messages:
67
Topics:
5
Car:
Toyota Vista
About the car:
sv 40
Reputation: 0
| local moderator |
Registered:
12 Feb 2009, 04:00
Messages:
7539
Topics:
100
From:
Khabarovsk
Blog:
View blog (6)
Car:
Toyota Vista Ardeo
About the car:
silver with eyelashes
Reputation: 1743
| Amateur |
Registered:
30 Nov 2012, 06:39
Messages:
67
Topics:
5
Car:
Toyota Vista
About the car:
sv 40
Reputation: 0
| local moderator |
Registered:
12 Feb 2009, 04:00
Messages:
7539
Topics:
100
From:
Khabarovsk
Blog:
View blog (6)
Car:
Toyota Vista Ardeo
About the car:
silver with eyelashes
Reputation: 1743
I’ll add a picture about adjusting the gaps on camshafts 3S 4S
| Amateur |
Registered:
30 Nov 2012, 06:39
Messages:
67
Topics:
5
Car:
Toyota Vista
About the car:
sv 40
Reputation: 0
| moderator |
Registered:
27 Oct 2008, 04:00
Messages:
12302
Topics:
15
From:
Vyatka
Car:
Toyota Vista Ardeo
About the car:
3S-FSE, 1999
Reputation: 1996
| Amateur |
Registered:
30 Nov 2012, 06:39
Messages:
67
Topics:
5
Car:
Toyota Vista
About the car:
sv 40
Reputation: 0
| moderator |
Registered:
27 Oct 2008, 04:00
Messages:
12302
Topics:
15
From:
Vyatka
Car:
Toyota Vista Ardeo
About the car:
3S-FSE, 1999
Reputation: 1996
| Amateur |
Registered:
30 Nov 2012, 06:39
Messages:
67
Topics:
5
Car:
Toyota Vista
About the car:
sv 40
Reputation: 0
| Sponsored Links: |
Necessary parameters after camshaft repair
The restored camshaft must have the following mandatory parameters:
- permissible surface roughness of the product is not lower than class 8;
- taper and ovality of camshaft elements no more than 0.01 mm;
- restored surfaces must have a hardness of NKS 54-62.
Camshaft repair is accompanied by mandatory replacement of new, worn ones: rollers, axles, bearings, pusher bushings.
Good luck with your camshaft rebuild. Don't rush into buying a new camshaft if you didn't intend to.
Home → Maintenance and Repair → Engine →
The shafts of most engines are made by stamping from steel 40 and 45 or by casting from special cast iron (ZIL-130 engine).
Main camshaft defects:
- shaft bend
- wear and chipping of cams and bearing journals
- wear of the keyway and seat for the timing gear
- thread wear or damage
The shaft is rejected if there are cracks, emergency bending or twisting, or metal breaks at the top of the cam exceeding 3 mm of its width.
Shaft bending is eliminated by cold straightening on prisms under pressure. The permissible runout of the middle support journals relative to the outer ones is no more than 0.05 mm for most engines and no more than 0.10 mm for the A-41 and A-01M engines. Runout of the journal under the timing gear is allowed no more than 0.03 mm.
The camshaft support journals are ground to a reduced repair size in the centers of a special 3A433 machine or on cylindrical grinding machines with electrocorundum wheels with a grain size of 46-60 and a hardness of CM. Before grinding, the oil holes are countersunk and the oil channels are deepened. In this case, repair size bushings must be installed in the cylinder block.
In case of significant wear of the support journals, they are fused in a carbon dioxide environment by vibratory blowing or plasma surfacing, and expanded by iron plating or gas-thermal spraying. Before surfacing, oil channels are protected with graphite inserts, and before ironing - with lead. The welded necks are ground. If necessary, after rough grinding, hardening is carried out to a depth of 2-3 mm.
The worn journal for the timing gear is restored by surfacing in a carbon dioxide environment or by ironing and processing to the nominal size. The keyway is melted with an E42 electrode or in a carbon dioxide environment with Sv-18KhGSA wire and milled to the nominal size. The displacement of the keyway relative to the diametrical plane is allowed no more than 0.05 mm.
A worn keyway can be restored by milling to a larger key size. The repair key is made of steel 45 and heat treated to a hardness of HRC3 40-50.
Worn cams are ground using a 3A433 machine until traces of wear are removed and the profile is restored. After grinding the cam, the valve lift height does not change. When the cams are worn at a height greater than the permissible value, they are surfaced using manual arc welding with a T-590 or T-630 electrode, automatic surfacing in a carbon dioxide environment with flux-cored wire using a special copying device with shaft cooling during the surfacing process. When using manual electric arc or gas surfacing, protective screens made of copper or graphite are installed on the sides of the cams. The camshaft is placed in a bath of water on stands so that half the diameter of the shaft is in water. After surfacing, check the bend of the shaft and adjust if necessary. Then the deposited cams are pre-treated with an abrasive wheel according to a template, and after that they are finally ground on a 3A433 machine using a pattern.
The restored camshaft must have a surface hardness of the cams and journals of HRC3 54-62, a roughness Ra of 0.63-0.32 microns.