- Clutch device
- Clutch basket
- Replacing the clutch of a VAZ 2110
- Replacing the VAZ 2110 clutch: adjustment
- Video instructions for replacement
Owners of domestic cars often have to contact a car workshop with a request to adjust or repair the clutch. In foreign cars, the unit has a simpler structure, and accordingly, it requires repairs less often. But you can contact the service only if the mechanism is seriously damaged, for example, if you need to replace the clutch of a VAZ 2110. In other cases, you can handle it yourself: this includes replacing, repairing some elements, and adjusting the cable. You will learn about all of the above after reading this material.
Clutch device
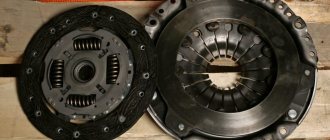
To begin with, the VAZ 2110 has a dry type of clutch. The clutch itself includes only 2 discs, which are treated with friction material to withstand prolonged friction. Each disk is made of organic material mixed with wire, which performs a heat-dissipating function during operation. Each disc interacts with other car mechanisms, for example, with the gearbox. There are other parts between the disks that are held together by a casing. It's called the "clutch basket". You need to stop there.
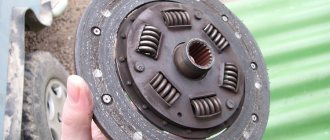
Two clutch discs from a modern clutch kit.
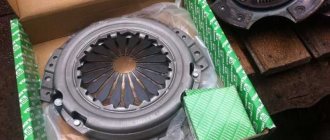
Clutch basket
The cart includes the following items:
- Flywheel. This element receives torque from the engine, and the basket is attached to it.
- Pressure and driven disk. They work as follows: when the driver depresses the clutch pedal, the pressure plate contacts the driven one; when the pedal is pressed, the parts are released.
- Gearbox input shaft. It transfers torque from the engine to the gearbox.
- Shutdown forks. Forks are needed to compress and unclench the discs. The pedal is pressed - the forks separate the parts, the forks are released - they move together.
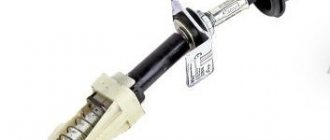
- Cable. It is the connecting link between the mechanism and the clutch pedal. When changing the length of the cable, the stroke length changes.
As for the wet clutch, it is always immersed in oil. Due to this, less wear occurs - the discs rub less, and their surface always remains cool and clean.
A visual diagram of the clutch basket design.
Replacing a worn mechanism
Replacement is carried out under the following conditions:
- wear of the pressure spring components is more than a centimeter;
- a decrease in the force applied to the pedals when the clutch is disengaged (the stroke increases), which is a sign that the main part of the surface on the drive disk is worn out or the spring is upset.
A driven disk and a spring-friction vibration damper are installed on the splines of the gearbox input shaft. Its change occurs when the disc imbalance in the lining area increases by more than half a centimeter, in the case of cracks, lifting or uneven thinning, in addition, if the distance between the rivets and linings is reduced below 0.3 millimeters.
The properties of the clutch damper and pressure springs of the 12th model are somewhat different. In the spring petals there are slots marked with paint, which are a distinctive feature. The third part of the springs is smaller in size and placed closer to the base compared to older models.
Late machine rims are the same size as earlier ones, but a stronger pressure plate helps produce higher torque. You can install new wheels on a VAZ 2110, but you cannot install wheels from an older one on a new model.
Read our material about how to choose the right car!
Technical features
Cars of this series have a cable-type, backlash-free clutch drive (must be engaged for movement). The axle requires a special bracket for securing and installing the clutch pedal. The upper part is attached to the end of the cable. Its other part engages with a bracket on the power unit located inside the engine compartment. The conductive line of the cable is connected to the fork, which disengages the car's clutch. At the end of the cable there is a rubber boot for protection.
Adjustment
The drive adjustment involves 2 nuts, which are then tightened together. At the end of the clutch change process, the travel of the pedal responsible for it is corrected. In proportion to the mileage, wear on the driven disc linings increases and the pedal stroke becomes longer. However, it should not exceed the maximum, which is 150 millimeters.
Replacing the VAZ 2110 clutch: adjustment
Adjusting the length of the clutch cable. To work, you need to take a ruler or tape measure.
The adjustment consists of changing the length of the cable:
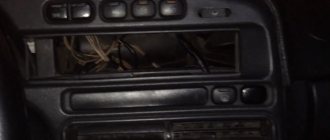
- You need to place a ruler or tape measure next to the clutch pedal area. It is better to take a ruler, since now you need to rest it on the car floor mat. Next, we need to measure the distance from the surface of the rubber pedal pad to the mat. If the ruler shows that the distance is more than 130 millimeters, then adjustment is needed. If the distance is less than 130 mm, then setting the cable length is also required.
- The next step is to loosen the locknut that secures the cable. By rotating the nut, we change the length of the cable. We need to ensure that it is in the range of 125-130 millimeters.
- We measure again. If the result is successful, you can slide the restrictor sleeve into the fork. Ready.
How to adjust the clutch on a VAZ-2110 photo and video
On VAZ cars of the tenth family, regardless of engine size and type of gas distribution mechanism (8 or 16 valves), a mechanical clutch drive is used. Unlike classic Zhiguli cars, where a hydraulic clutch mechanism is installed, a cable drive is easier to maintain and cheaper. It has some disadvantages, but for engines of this size and power these disadvantages practically do not matter. The only thing that may require attention during operation is adjusting the VAZ-2110 clutch drive.
When is clutch adjustment necessary on a VAZ-2110
As the friction linings on the clutch driven disc wear out, the free and working stroke of the pedal increases.
This may result in the clutch not fully disengaging when the pedal is fully depressed. As a result, the clutch will “drive”, and difficulties may occur when engaging first and reverse gears, or when changing gears on the go. This situation creates additional stress on the gears, shafts and synchronizers of the gearbox, which leads to premature wear of the gearbox.
The factory stipulates the permissible backlash, free travel and working travel of the clutch pedal, which must be adhered to during vehicle operation.
- The nominal full travel of the clutch pedal is 120 mm.
- The maximum allowable is 160 mm.
The full travel of the clutch pedal (all the way) should be in the range from 120 to 130 mm.
However, it is better not to reach 160 mm, since this threatens increased wear of the clutches and gearbox elements, and in addition, difficulties with shifting and engaging gears may arise at any time. To measure the clutch pedal travel, we need a regular ruler. We rest it on the floor under the pedal and measure the distance to the rubber pad.
Clutch adjustment algorithm
To make adjustments, we only need two 13mm open-end wrenches and the same ruler to control the pedal travel. If the pedal stroke is more than the permissible 150-160 mm, let's get to work:
- Place the car on a level surface and tighten the handbrake.
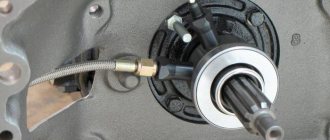
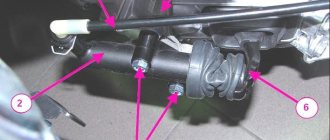
We put the car on the handbrake and open the hood. - Open the hood and find the release fork on the clutch housing, into which the threaded end of the cable is threaded.
The nuts we need are located behind the air housing and above the clutch housing. - The cable is secured with two nuts.
We loosen the locknut, holding the thrust nut with a 13mm wrench. This is what the nuts look like on a new engine and in good lighting. - Loosen the thrust nut a few turns.
We go to the salon and check the pedal travel, after pressing the pedal several times. We measure the pedal stroke with a ruler. - By tightening the thrust nut, we increase the free play of the pedal, and by releasing it, we decrease it.
- We continue the adjustment until we achieve a nominal stroke of 120 mm.
- Tighten the locknut, holding the thrust nut with a wrench.
Tighten the nuts. - At the same time, we evaluate the condition of the clutch cable. Its replacement will be necessary if there are signs of obvious external damage.
- We move the protective corrugated casing until it stops against the fork.
Having assessed the condition of the cable, we pull the rubber casing back.
Conclusion
This way you can literally adjust the clutch on a VAZ-2110 with an 8 and 16 valve engine in just 15 minutes. Successful work to everyone and good luck on the roads!
Advice. It will be much more convenient to twist the nuts if you take the time to remove the battery and unfasten the air filter housing.
Clutch faults VAZ 2107
The main signs of a faulty VAZ 2107 clutch are:
- it is difficult to change gears;
- the driven disk slips;
- vibration appears;
- The pressure bearing whistles;
- the clutch is hard to disengage;
- The pedal does not return from the lower position.
Almost any malfunction is accompanied by extraneous sounds - noise, knocking, whistling, etc.
Gears won't shift
If the gears are difficult to shift, an experienced driver will immediately tell that the clutch is moving. In other words, the clutch does not disengage completely. As a result, when starting from a stop, it is difficult to engage first gear, and when the pedal is pressed, the car moves slowly. The reasons for this situation may be:
- Increased distance between the thrust bearing support surface and the heel of the basket. It must be set within 4–5 mm, changing the length of the working cylinder rod.
- The spring sectors of the driven disk are warped. The disk needs to be replaced with a new one.
- The thickness of the driven disk has increased due to the stretching of the rivets securing the friction linings. The disk needs to be replaced with a new one.
- Jamming of the driven disk on the splines of the gearbox drive shaft. Both parts are defective and, if necessary, replaced with new ones.
- Lack of brake fluid in the master cylinder reservoir or accumulation of air bubbles in the hydraulic drive system. The working fluid is added to the required level, and the clutch hydraulics are pumped.
The clutch is slipping
The clutch may start to slip for the following reasons:
- there is no gap between the pressure bearing and the fifth basket;
- the clutch drive is not adjusted;
- oil got on the rubbing surfaces;
Such malfunctions are eliminated by adjusting the drive, replacing oil seals, cleaning the channel with wire, and identifying and correcting the causes of pedal sticking.
Clutch is jerky
If the clutch starts to jerk, it may be caused by the following:
- the driven disk is jammed on the splines of the gearbox drive shaft;
- oily areas have formed on the friction linings;
- the clutch hydraulic drive is not adjusted;
- the steel disk of the basket is warped, some friction springs have lost their elasticity;
- The driven disk is faulty.
In such situations, a complete clutch replacement is most often required.
Noise when engaging clutch
The appearance of grinding and rattling noises when releasing the clutch pedal may be due to the following:
- the pressure bearing is jammed due to lack of lubrication;
- The gearbox drive shaft bearing is jammed in the flywheel.
In both cases, the problem is solved by replacing the bearing.
Noise when disengaging the clutch
When you press the clutch pedal, you hear a knocking, clanging, rattling sound, and you can feel vibration on the gear lever. The reasons may be the following:
- the damper part of the driven disk (springs, sockets) is faulty;
In all cases, worn elements should be replaced with new ones.
The pedal returns but the clutch does not work
Sometimes it happens that the clutch does not work, but the pedal returns to its original position. This may be due to the following situations:
- air entering the hydraulic drive system;
- wear of the sealing rings of the main and working cylinders;
- lack of working fluid in the tank.
In these cases, you should bleed the hydraulic drive, replace the rubber rings with new ones and add working fluid to the reservoir.
Tight grip
The softness of the clutch is determined by the force of pressure on the heel of the basket to retract the pressure plate. The magnitude of the force depends on the elasticity of the damper springs. Baskets from many manufacturers, including foreign ones, are suitable for the VAZ 2107 clutch. A tight pedal signals to the driver that the basket's life is coming to an end.
The pedal disengages the clutch at the beginning/end of its stroke
When you press the pedal, the clutch may disengage at the very beginning or, conversely, at the very end. In such situations, adjustment of the free and working travel of the pedal will be required. The free stroke is regulated by changing the length of the pedal limit screw, and the working stroke is regulated by changing the length of the working cylinder rod. In addition, increased free play may be a consequence of wear on the driven disk linings.
Video: main clutch problems and their solution
Clutch VAZ 2107
The vehicle's handling largely depends on the serviceability of the VAZ 2107 clutch mechanism. How often this mechanism will have to be repaired is influenced by the quality of the roads and the driver’s experience. For beginners, as a rule, the clutch fails quite quickly, and repairing and replacing the unit is quite labor-intensive.
Purpose of the clutch
The main task of the clutch is to transmit torque from the engine to the drive wheels of the car.
Initially, it was intended for short-term separation of the engine and the main gear during smooth starting and gear shifting. The VAZ 2107 clutch has the following characteristic properties:
- has the smallest permissible moment of inertia of the driven disk;
- removes heat from rubbing surfaces;
- protects the transmission from dynamic overloads;
- does not require a lot of pressure on the pedal when controlling the clutch;
- It is compact, maintainable, quiet, easy to maintain and maintain.
The design and principle of operation of the VAZ 2107 clutch
Clutch VAZ 2107:
- mechanical (driven by mechanical forces);
- frictional and dry (torque is transmitted due to dry friction);
- single-disk (one slave disk is used);
- closed type (the clutch is constantly on).
Cohesion can be roughly represented in the form of four components:
- driving or active part (crankshaft flywheel 6, basket with casing 8 and steel pressure disk 7);
- driven or passive part (slave or passive disk 1);
- inclusion elements (springs 3);
- shutdown elements (levers 9, fork 10 and pressure bearing 4).
The basket casing 8 is bolted to the flywheel, connected by damper plates 2 to the pressure disk 7. This creates conditions for transmitting constant torque from the flywheel through the casing to the pressure disk, and also ensures that the latter moves along the axis when the clutch is turned on and off. The driving part rotates constantly when the engine is running. The passive disk moves freely along the splines of the input shaft 12 of the gearbox. The hub is connected to the driven disk through damper springs 3 and due to this has the possibility of a certain elastic rotation. This connection dampens torsional vibrations that occur in the transmission due to engine operation at different speeds and corresponding dynamic loads.
When the pedal 5 is depressed, the passive disk 1, with the help of springs 3, is clamped between the flywheel 6 and the pressure disk 7. The clutch is engaged and rotates together with the crankshaft as a single unit. The rotational force is transmitted from the active to the passive part due to the friction that occurs on the surface of the friction linings of the driven disc, flywheel and pressure plate.
When pedal 5 is pressed, the hydraulic fork moves the clutch with the pressure bearing towards the crankshaft. Levers 9 are pressed inward and pull pressure plate 7 away from driven disk 1. Springs 3 are compressed. The active rotating part is disconnected from the passive one, no torque is transmitted, and the clutch is disengaged.
When the clutch is engaged, the driven disc slips relative to the smooth surfaces of the flywheel and pressure plate, so the torque increases gradually. This allows the car to move away smoothly and protects transmission components during overloads.
Clutch hydraulic drive device
The transmission of torque from the engine to the drive wheels is carried out using a hydraulic drive.
The hydraulic drive plays an important role when starting the vehicle and changing gears. It includes:
- pedal;
- master and slave cylinders;
- pipeline and hose;
- pusher;
- clutch engagement and release fork.
The hydraulic drive allows you to smoothly engage and disengage the clutch without exerting much effort when pressing the pedal.
Clutch master cylinder
The clutch master cylinder (MCC) increases the pressure of the working fluid when you press the pedal. Due to this pressure, the clutch fork rod moves.
The pusher piston 3 and the master cylinder piston 5 are located in the main cylinder body. The use of an additional pusher piston reduces the radial force on the main cylinder piston when the pedal is pressed. In this case, the sealing ring 4 is pressed against the walls of the cylinder mirror and improves the sealing of the pistons. To ensure tightness inside the cylinder, there is an o-ring 12 located in the groove of the piston 5.
For additional sealing of the piston, an axial hole is drilled in its guide part 9, connected to the ring groove by 12 radial channels. As the pressure in the working space of the GCS increases, it reaches the inner part of the ring 12 and expands it. Due to this, the tightness of the master cylinder piston increases. At the same time, ring 12 acts as a bypass valve, through which the working part of the cylinder is connected to the reservoir with the working fluid. When the pistons reach their extreme position at the plug 11, the sealing ring 12 opens the compensation hole.
Through this hole, when the clutch is engaged (when the RCS piston creates excess back pressure), part of the fluid passes into the reservoir. The pistons are returned to their original position by a spring 10, which at one end presses on the plug 11, and with the other on the guide 9 of the piston 5. All internal parts of the GCS are fixed with a retaining ring 2. On the mounting side, a protective cover is put on the GCS, protecting the working part of the cylinder from dirt. .
Most often, the o-rings on the master cylinder wear out. They can always be replaced from the repair kit. In case of more serious malfunctions, the GCS changes entirely.
If the compensation hole becomes clogged, excess pressure will be created inside the drive system, which will not allow the clutch to fully engage. She will slip.
Clutch slave cylinder
The clutch slave cylinder (CLC) is attached with two bolts to the gearbox housing in the area of the clutch housing. This arrangement of the RCS leads to the fact that dirt, water, and stones often get on it from the road. As a result, the protective cap is destroyed and wear of the O-rings is accelerated.
When you press the pedal, pressure is created in the clutch hydraulic drive, which is transmitted to piston 6. The piston, moving inside the cylinder, moves the pusher 12, which, in turn, turns the clutch engagement and release fork on a ball joint.
It is very important to observe the dimensions of the internal mirror of the main and working cylinders. When factory assembled, they are equal to each other - 19.05+0.025–0.015 mm. Therefore, the sealing rings on the pistons of both cylinders are completely interchangeable. If you need to make the clutch pedal softer, you need to buy a foreign analogue of the working cylinder with a smaller diameter of the working cavity. If the diameter is larger, then the pressure on it will be less. Therefore, in order to overcome the elastic force of the basket friction springs, greater force must be applied. Therefore the pedal will be tighter.
Composition of the VAZ 2107 clutch kit
The VAZ 2107 clutch kit consists of:
- baskets;
- driven disk;
- pressure bearing.
According to VAZ regulations, these elements are not repaired, but are immediately replaced with new ones.
Basket
The basket has the most complex device in the clutch kit. It consists of many parts that require correct and precise assembly. The basket is assembled only in factory conditions and is not repaired even in specialized car repair shops. If wear or serious defects are detected, the basket is replaced with a new one. Main cart malfunctions:
- loss of elasticity due to sagging springs;
- mechanical damage and fracture of damper plates;
- the appearance of wear marks on the surface of the pressure plate;
- kinks and cracks in the basket casing;
- other.
The service life of the clutch is determined by the life of the basket, driven disk or pressure bearing. Therefore, to avoid the cost of repeated repairs, the coupling is always replaced as a set.
Driven disk
The driven disk is designed to transmit torque from the engine flywheel to the transmission input shaft and can briefly disconnect the gearbox from the engine. The technology for manufacturing such disks is quite complex and requires the use of special equipment. Therefore, it is impossible to repair the disk yourself. It is replaced with a new one when:
- wear of friction linings;
- wear of the internal splines of the hub;
- detecting defects in damper springs;
- loosening the sockets under the springs.
Pressure bearing
The pressure bearing is designed to retract the pressure plate from the driven one and is activated when the clutch pedal is pressed. Its malfunctions are usually accompanied by whistling, knocking and other sounds. When the rollers jam, the supporting working surface or the seat in the cup wears out, the pressure bearing assembly is replaced.
Replacing the clutch cable
Purchasing spare parts will cost quite a round sum, and for work at a service station they will charge the same amount. Therefore, it is better to deal with this problem yourself, saving your money.
Changing the cable is not that difficult. The only difficulty is pulling it from under the hood into the cabin. The hole is small, not very convenient, but everything can be solved and is quite doable. It only takes 5 minutes to secure the cable to the fork and pedal. The whole process will take about half an hour.
Replacing a release bearing is quite labor-intensive work, and in order to avoid having to deal with this again, experts strongly recommend replacing all parts of the clutch with new ones. After carefully reading this material, you can replace worn parts yourself.