Replacing the clutch pedal position sensor
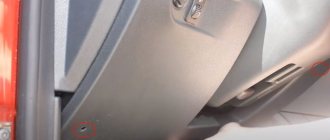
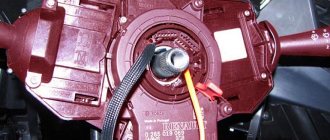
On Lada Vesta and XRAY cars, removal and installation of the sensor is performed in the same way. It is located in the area of the clutch pedal, next to the steering shaft: Procedure :
- Disconnect the block with wires (green) by pressing the latch.
- Remove the sensor by turning it counterclockwise 90°.
Installation is carried out in the reverse order, with the brake pedal in its highest position.
Checking the clutch pedal position sensor
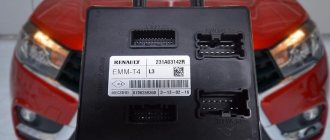
Vesta and XRAY got the sensor from Renault (article 253250007R). To check it, you will need a multimeter (in ohmmeter mode). Procedure :
- Move the rod lock to the right position using a flat-head screwdriver.
- Connect the multimeter probes to sensor terminals No. 3 and No. 4.
- When the rod is in the free position, the circuit should be open (the resistance value approaches infinity).
- When you press the rod, the circuit should close (the resistance value is close to zero).
We replace the faulty sensor with a new one. Let us remind you that we previously talked about the brake pedal position sensor and the electronic gas pedal. Categories of products that may be of interest to you based on the article “Replacing and checking the clutch pedal position sensor on Lada Vesta and XRAY”: Products from the Dustershop77 range on the topic of the article:
| Name | Manufacturer | Price | Availability | Add to cart |
| intro iso ant-1 | Antenna adapter Intro iso ant-1 | INTRO | 500 / 350 rub. Discount: 300 rub. | 2 |
| DC307-ASAM.30587 | Silent bolt (silent lock) ASAM 30587 | ASAM | 700 / 500 rub. Discount: 350 rub. | >10 |
| OBD-BT01 | Bluetooth OBDII - adapter for diagnostics | China | 1500 / 1000 rub. Discount: 900 rub. | 2 |
| DC1167 | Large shock absorber support cup cover | Analogue | 1000 / 700 rub. Discount: 600 rub. | 8 |
| multi-vc731 | On-board computer Multitronics vc731 | Multitronics | 8500 / 7900 rub. Discount: 7600 rub. | 1 |
| DC909 | Oil filter cup puller | Analogue | 500 / 450 rub. Discount: 400 rub. | 7 |
| multi-c590 | On-board computer Multitronics C590 | Multitronics | 7500 / 6600 rub. Discount: 6200 rub. | 1 |
| DC303 | 8mm L-shaped key for Renault oil plug | RF | 200 / 100 rub. Discount: 70 rub. | >10 |
| multi-cl590 |
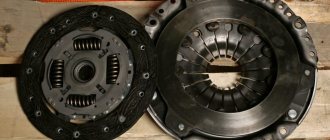
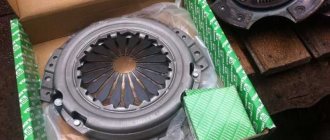
Clutch device
On the Lada Vesta, as well as on all its modifications, including the X-RAY crossover and Cross versions, a standard unit with one disk is installed. The contact of the friction and drive disk occurs under the action of a spring. The main difference between the Vesta clutch and other AvtoVAZ models is the drive.
A hydraulic drive is installed on the mechanics, and an electromechanical drive on the robot.
Structurally, the Vesta clutch is designed according to the standard type and consists of a pressure and driven disc that interact with each other. A pressure disk is installed in the basket; the basket itself is a steel body. The pressure plate in the basket is pressed using a special device in the form of a spring. The clutch basket is installed directly on the flywheel of the power unit and is firmly attached to bolted connections.
A disc with friction linings is placed between the flywheel and the drive disc. The driven clutch disc is also called a friction disc due to special linings attached to both sides. A damper with springs is installed in the center of the hole, designed to eliminate vibrations when the clutch is engaged. The friction disc is mounted through the hub onto the engine input shaft.
Features of the Vesta clutch hydraulic drive
The hydraulic drive consists of pipelines and two cylinders (worker and main). From the master cylinder, the pressure from the rod is transferred to the working one. This, in turn, exerts an influence on the clamping device through pipelines. The working cylinder is a module where the release bearing is also located. All this is mounted in the clutch housing.
Brake fluid performs the functions of working fluid. To ensure the reliability and performance of the hydraulic drive, it is necessary to promptly change the working fluid in accordance with the regulations. Problems with the hydraulic drive most often result from air in the system. In advanced cases, it will simply be impossible to change gears on the car.
Features of the electric clutch drive on Vesta
The electric drive, unlike the hydraulic one, is designed slightly differently; it acts directly on the clutch fork. When the fork is turned, the force puts pressure on the release bearing, which, in turn, presses on the petals of the pressure plate spring. The release bearing is reinforced and is constantly in operation, and the spring is always pressed against the coupling due to the absence of any gaps.
The release bearing does not require periodic maintenance, i.e. no lubrication is needed, the manufacturer took care of this too. The bearing lasts a long time and is simply replaced if it fails. You can recognize this by the characteristic noise. The release plate must also be replaced when replacing the driven or pressure disks, regardless of whether the bearing is in good condition or not.
Malfunctions in the operation of the hydraulic drive can be easily eliminated with your own hands; often it is enough to bleed the system and get rid of the air. But with an electromechanical drive, troubleshooting is much more complicated. A similar procedure on automatic and robotic gearboxes is called adaptation, and it is impossible to perform it without knowledge, skills and equipment. In such cases, the only correct decision is to contact an official dealer.
Today, the AvtoVAZ plant is actively introducing modern technologies into its cars, this also applies to clutches. Nowadays, structural elements that meet international quality standards are used for this. Friction linings and springs are much more reliable and durable.
The introduction of modern technologies and materials makes it possible to ensure a soft start and make gear shifts clearer and smoother.
What is a hydraulic clutch
The working and master cylinders, as well as the pipeline, together make up the hydraulic clutch engagement drive. Pressure is supplied to the working cylinder through a pipeline. The cylinder then transmits pressure to the clutch spring. The slave cylinder is assembled into a single unit together with the release bearing and installed in the clutch housing.
Brake fluid is used as the working fluid. It flows from the brake master cylinder to the clutch master cylinder. The working fluid on LADA Vesta must be constantly changed to ensure full functionality of the vehicle’s clutch system.
The driver must ensure that there is no air in the clutch system, otherwise it may lead to malfunctions. In the worst case scenario, you simply won't be able to change gear. To correct the problem and remove air, it is necessary to bleed the hydraulic drive.
Clutch faults
Vesta, depending on the type of transmission, may have a different drive. Accordingly, their problems may be different.
Problems with the hydraulic clutch
The brake fluid enters the working cylinder from the master cylinder through pipelines. The following malfunctions occur with these two main parts of the mechanism:
- excessive wear of rubber cuffs in cylinders;
- brake fluid leakage (lack of tightness at the pipe connections);
- damage to cylinders, pipelines, etc., which causes cracks to appear.
The hydraulic drive is highly reliable, but it can also fail if air gets into the system. The main sign of airing: incomplete disengagement of the clutch. Because of this, the gears will either be switched on with great difficulty or will be almost impossible to do. Typically, air enters the system when the level of brake fluid in the master cylinder reservoir is critically low, or due to loss of tightness. To troubleshoot problems, it is enough to bleed the system; a special fitting is provided for this.
There is no need to adjust the hydraulic clutch drive while the vehicle is in use.
The durability of the system depends on the driving style of the owner and operating conditions. A working clutch will not slip and fully transmit torque from the engine to the gearbox when the pedal is released. When the pedal is depressed, the transmission must be completely disconnected from the power plant.
You can check the performance of the hydraulic drive of the Lada Vesta manual transmission yourself, following a certain algorithm.
Reviews
| № | Positive |
| 1. | Semyon (www.zr.ru): mileage 70,000 km, clutch is normal. |
| 2. | Andrey (autobann.su): the pedal travel is natural, not increased. I noticed that in severe frosts the PS becomes a little tight. |
| 3. | Georgy (lada-vesta.net): there are no comments on the DS, it works as usual. |
| 4. | Stepan (otzovik.com): standard pedal travel, 68,000 km of active drive without maintenance and repairs. |
| 5. | Vladimir (www.zr.ru): positive review, no comments. |
| 6. | Alexander (autobann.su): I have a pre-installed DS with a stock from Renault Logan, I heard that the quality of the French is better than the domestic one. |
| 7. | Mikhalych (https://forumvesta.ru): all standard units and components are working properly, without any violations. |
| 8. | Vitaly (lada-vesta.net): Lada Vesta is assembled with high quality, I have no complaints. |
| 9. | Timofey (otzovik.com): in four years of operation, I replaced the sensor once, I don’t consider it a defect or defect. |
| 10. | Stanislav (www.zr.ru): I use Lada myself and recommend it to others. |
| 11. | Gennady (autobann.su): mileage 85,000 km without repairs or equipment replacement. |
| 12. | Alexey (https://forumvesta.ru): soon 100,000 km, the condition of the car is a solid “4”. Much depends on the driver, how he observes the technical inspection deadlines. |
| Negative | |
| 13. | Konstantin (www.zr.ru): the Russian sensor served for two years, after which the rod failed. Replaced it with a French one from Renault Logan. |
| 14. | Vitaly (otzovik.com): the DS is not tightly fixed, periodically it turns out of the grooves. |
| 15. | Grigory (autobann.su): after a year of using the car, the DS flew. Fortunately, it was under warranty and was replaced free of charge. |
| 16. | Kirill (lada-vesta.net): I pumped the system several times, but to no avail. |
Replacing the clutch on Lada Vesta
This is not an easy job, no matter what type of transmission is installed. The further operation of the car will depend on the quality of the operations performed, and therefore it is better to entrust this to qualified specialists. The cost of such work is quite high and, depending on the complexity and type of transmission, can vary from 3,500 to 15,000 rubles. Of course, replacing the clutch of a Lada Vesta robot, and especially on a manual one, is quite possible. But this requires a wealth of experience and skills, and in the case of a robotic gearbox, also special software, without which it is impossible to adjust the transmission (adaptation).
Replacing the clutch on an AMT
To change it on a Vesta with a robotic transmission, you will need to completely dismantle the gearbox. The further algorithm of actions is as follows.
- If replacing the pressure plate is not included in the plans, then its position relative to the basket should be marked with paint so that there are no problems during assembly.
- Using a 8mm wrench, unscrew the bolts securing the basket to the flywheel of the power plant, remove the pressure and friction disc.
- Remove the release bearing along with the drive.
- All failed elements must be replaced, after which assembly is carried out in the reverse order of disassembly. Also, to install the basket, you will need a mandrel to center the friction disc.
In order not to carry out the labor-intensive process of dismantling the clutch several times, it is recommended to immediately change all the assembled parts.
Adjustment will require special equipment and knowledge. You definitely can’t do without specialists here.
Replacing the clutch on a manual transmission
Structurally, this mechanical unit is no different from an automated transmission, with the exception of some nuances. The replacement process is identical, however, in the case of a hydraulic drive, a procedure for bleeding the system from air will be required. This work is performed as follows.
- Remove the battery, its shelf, and the dust shield of the power unit.
- Unscrew the cap of the master cylinder reservoir and add brake fluid to the maximum level.
- Remove the protective plug from the fitting and put a suitable size hose on it (preferably transparent). The other end of the hose is released into a container with working fluid.
- Displace the fitting tube tip by lifting the clamp.
- Wait until air stops flowing along with the brake fluid through the tube, then release the lock and remove the hose from the fitting.
- Add fluid to the reservoir to the optimal level.
Even a beginner can identify clutch faults on a Vesta, be it a manual gearbox or a robotic one, if you follow all the instructions. Another thing is replacing the clutch. Not only a beginner, but also many experienced car enthusiasts cannot cope with this. The fact is that, in addition to the tool, you will need special equipment, as well as a lot of experience.
It’s easier to save a lot of time and nerves by trusting professionals. In addition, you can receive a quality guarantee for such work, which means you can be confident in further operation without any problems.
With a working engine, an impeccable gearbox, and a new chassis, the car will not go anywhere without a clutch. On the Lada Vesta this is one of the most important components. The task of a mechanical clutch is to connect the internal combustion engine and manual transmission, transmitting torque from the engine to the chassis, and also to separate them when changing gears (if you leave the gearbox input shaft rotating through the internal combustion engine, the gears will inevitably be damaged).
The Lada Vesta clutch on a manual transmission (mechanical) consists of one disc, engagement is made mechanically (dry, permanently closed type), the drive is hydraulic. The latter means that the unit is driven by fluid pressure and is adjusted manually (by foot) by the driver. In addition, the fluid system acts as a pedal booster. After all, simply pressing with your foot is not enough to set in motion the structure, which engages with the shaft while rotating several thousand revolutions. Therefore, there is no need for hydraulics on an AMT. Read the article to the end and you will learn the intricacies of this knot! Find out the problems that often happen and the clutch drive fails: the release bearing or the basket as a whole is broken. It's time to change, or adjust enough, precise adjustment is important for good operation of the unit. Replacement at the dealer at 9 TO.
Adjusting the clutch travel sensor on Lada Vesta and Largus
During the operation of the car, some owners note the appearance of pecks, jerks or twitches when switching to 1st, 2nd or 3rd gear. The cause of this problem may be the clutch pedal travel sensor, which can be adjusted with your own hands in a couple of minutes.
Attention! Depending on the vehicle equipment, the clutch pedal travel sensor may differ. Next we are talking about the Renault 253250007R sensor with a rectangular rod, which has risks
How to remove the clutch sensor
:
- Disconnect the clutch pedal travel sensor connector.
- Turn the clutch pedal sensor 1/4 turn counterclockwise.
How to adjust the clutch sensor
:
Measure the X dimension of the stem protrusion
If dimension X is less than 17mm, adjust it by gently pulling the end of the rod. Dimension X must be between 17 mm (no less) and 18 mm (no more)
Clutch Sensor Installation
done in reverse order. Press the clutch pedal with your hand. Install the sensor on the pedal assembly. Lock the sensor by turning it 1/4 turn clockwise. When returning the clutch pedal to its original position, support it with your hand. Connect the connector.
Note
: The clutch pedal travel sensor is adjusted automatically depending on the pedal position. During automatic adjustment, clicks of transition through fixed positions are heard.
ps On the Lada XRAY the clutch travel sensor is not adjustable.
Let us remind you that if the clutch pedal position sensor is faulty, engine operation may be unstable (speeds fluctuate, jerks when releasing the gas), and error P0830 will appear. Before replacing the sensor, it is recommended to check it with a multimeter.
Source
Clutch replacement on Lada Vesta cars under warranty
You can replace the clutch on a Lada Vesta under warranty. A similar procedure can be carried out when the car breaks down during the first 20,000 kilometers. If it is proven that neither the driver nor third-party manipulations are involved in the malfunction of the unit, the service center will carry out repairs free of charge. After the replacement, the brakes will also be bled. This is a mandatory process for a hydraulic drive, since after the intervention air cavities (plugs) are formed in the system. For a robotic gearbox, another manipulation is carried out - adaptation.
Under warranty: replacement of the clutch mechanism is also included in the list of TO9 works for the Lada Vesta. Even if the unit is working, it will have to be replaced. There is no need to worry about this; the life of the part has come to an end anyway, and it will not last long.
Gearbox 21807
Removal and installation of gearboxes 21807
Removing gearbox 21807
1. Place the car on a two-post lift, apply the parking brake, turn off the ignition, open the hood and disconnect the ground wire terminal from the battery.
2. front Remove the wheels from the car.
3. Unscrew the thirteen fastening bolts 1 and remove the engine mudguard 2 (knob head 10, replaceable and extension).
Engine splash guard:
- mudguard bolt;
- engine mounts
4. Disconnect the pipes of the resonator 1 of the air intake from the intake and the air filter housing, unscrew the two fastening bolts and remove the resonator (knob head 10, replaceable).
Intake resonator:
- intake resonator;
- air filter pipe;
- air intake pipe
5. Unscrew the fasteners 1 clamp and disconnect the upper hose 3 of the ventilation pipe from the housing of the cylinder head cover 7 (pliers).
Air filter with intake pipe hose assembly:
- fastening the clamp of the upper crankcase ventilation hose;
- fastening the intake pipe hose clamp;
- upper crankcase ventilation hose;
- intake pipe hose;
- air filter mounting bolt;
- air filter;
- cylinder heads
6. Loosen the clamp 2 fastenings and disconnect the hose 4 inlet pipes from the throttle pipe (Phillips screwdriver).
7. Unscrew bolt 5 securing the air filter and remove the air filter 6 assembled with hose 4 of the intake pipe (replaceable head 10, knob).
8. Press in the latches 2 buttons of the cable ends and disconnect the shift ends 4 of the cable and gear selection cable 5 from the shift levers 6 of the gear mechanism.
Disconnecting the drive cables from the gearbox:
- shell fastening clamp button;
- cable for securing the cable end;
- fastening the cable box control drive cable bracket;
- gear shifting;
- cable selection mechanism;
- gear shifting
9. Move the clamps 1 of the cable fastening shells in the direction indicated by the arrow, remove the cable shells from the fastening bracket 3 and remove the cables and gear shift from the area where the cables are to be removed.
10. Work on the harness of 4 wires of the ignition system from the harness of block 1 of the oxygen sensor wires.
Disconnecting the diagnostic oxygen sensor harness wires:
- oxygen sensor wiring harness;
- oxygen sensor harness mounting bracket;
- bracket for fastening the wiring block of the oxygen sensor harness;
- ignition system wiring harness
11. Disconnect the harness block 1 of the oxygen sensor wires from the mounting bracket 3, remove the oxygen sensor wiring harness from the bracket 2 of the mounting and remove the zones from the work harness.
12. Disconnect the ignition system harness wire block from the reverse light switch 4.
Disconnecting the bracket for securing the transmission hose from the gearbox output:
- mounting bracket bolt;
- fastening the exhaust hose bracket;
- hose outlet switch;
- reversing light radiator
13. Unscrew bracket 1 bolt 2 securing the outlet hose (knob head 13, replaceable).
14. Unscrew two bolts 1 of the fastening, remove the cylinder 2 of the hydraulic clutch, without disconnecting it from the tube 3, hang it, and hang the hydraulic cylinder on the technological hook (key head 13, replaceable ratchet, technological hook).
Removing the clutch hydraulic cylinder:
- bolt;
- clutch hydraulic drive cylinder;
- clutch hydraulic tube;
- mounting bracket for hydraulic clutch cylinder;
- box plug;
- clutch release gear
15. Unscrew the three, remove 1, remove the bolts, bracket 2, securing the hydraulic drive cylinder, remove the clutch starter 3 and hang it on the technological head (replaceable Torx E10 hook, extension, ratchet wrench, technological hook).
Removing the starter:
- bracket;
- clutch hydraulic cylinder mounting bolt;
- Unscrew
16. starter fastening nut 1, remove ground terminal 2 “reins” from the stud and remove the wire from the work area (replaceable head 17, knob).
Disconnecting the ground “wire” from the gearbox:
17. Unscrew plug 1 and drain the oil from gearbox 3 (ring key 17, installation type ALFA “24164” (Italy) for collecting waste plug).
oil holes for changing the oil in the gearbox:
- drain plug plug;
- oil holes for filling oil;
- gear box
18. Degrease the threads in the case of the box plug and on the gearbox, apply white (spirit sealant, consumption rate 2 g; PS-1 sealant, valid in accordance with the “Codifier of basic and auxiliary materials for applied maintenance and repair of LADA vehicles” to the threaded part of the plug. K 3100.00018.25100, consumption rate 1 g).
19. Screw plug 1 into the oil drain hole in the crankcase of box 3. Moment. gears, plug tightening 29…46 Nm (replaceable head 17, wrench, torque wrench).
20. Unscrew bolts 3 and 5 of the fastening and remove 4 brackets and rod 1 of the rear suspension engine support (replaceable head 18, knob).
Removing the rear engine mount:
- rod rear bolt;
- rear support bracket mounting supports;
- rod bolt fastening;
- rear bracket reinforcement bolt;
- bracket amplifier mounting supports;
- rear support bracket bolt;
- rear engine mount bracket
- rear support bracket mounting bolt;
21. Unscrew bolts 2, 6 and 8 of the fastening and remove supports 7 for the rear engine mount bracket (knob heads 16 and 18, replaceable).
22. Unscrew the three bolts 1 of the fastening and remove the cover 2 of the lower clutch housing (knob head 8, replaceable).
Removing the lower crankcase cover bolts:
- cover fastening clutch;
- lower clutch housing cover
23. Knock out and remove the internal hinges of the front wheel drives from the gears of the differential axle shafts and install transport plugs on them (transport plug 1700030-2108-00 – 2 pcs., mounting blade).
24. Install eye 1 for the lifting motor on the upper thermostat mounting stud and secure it with a nut (technological lifting eye for the engine 2111-1001074-10, technological nut M8, replaceable head 13, ratchet wrench).
traverses Installation for hanging the engine:
- lifting eye for engine 2111-1001074-10;
- engine suspension beam
25. Place the engine-hanging crossbar on the engine compartment, hook the eye-hook onto the engine-lifting cross-beams and hang out the cross-beam (engine for hanging the engine).
26. Loosen the 1 bolt of the air filter bracket 2 and remove the left one from the engine mount support bracket 3 (extension head 16, replaceable, knob).
Removing the air bolt bracket:
- filter;
- air filter bracket;
- left suspension engine mount
27. Unscrew and remove two fastenings 1 bolt of bracket 3 to the left support 2 of the suspension head (replacement engine 18, extension, knob).
Removing the left engine mount bracket:
- bolts of the left fastening of the support to the bracket;
- left engine mount suspension;
- left suspension support bracket bolts;
- engine mounting of the left support bracket to the gearbox
28. Unscrew and remove three bolts 4 of the bracket securing 3 of the left engine mount to the gearbox and remove the bracket (replaceable E12 Torx head, extension, wrench).
29. Unscrew and remove the top two bolts 2 assembled with spring washers of the gearbox mounting to the engine and remove bracket 1 in the wiring harness from the work area (replacement head 19, extension, ratchet wrench).
Disconnecting the gearbox from the engine:
- upper harness mounting bracket;
- wires bolt securing the gearbox to the bottom;
- engine bolt securing the gearbox to the Disconnection
to the gearbox engine from the engine:
- wire harness bracket;
- upper bolt securing the gearbox to the engine;
- nut securing the engine box to the gears
30. Lower the power unit on the engine hanging crossbeam so that the rear gearbox cover drops slightly below the crossbeam (engine hanging beam).
31. Bring the supporting part of the hydraulic transmission rack all the way to the gearbox (hydraulic transmission rack type SG-1 “Unscrew”).
32. GARO and remove the lower bolt assembly with a spring washer and the nut with a spring washer securing the gearbox to the engine (replaceable head 19, extension, ratchet wrench).
Clutch adjustment on Lada Vesta cars
Since the knot is constantly engaged/disengaged, it needs fine adjustment. Adjustments are made on site during installation. The driven disk is centered, the basket, and the release bearing are also centered - they must fit exactly into the splines of the flywheel and the input shaft of the gearbox.
In the future, you can adjust the position of the clutch cable so that the pedal is softer/harder, so that it responds better to the command (during operation, the cable may stretch).
On a Lada with a robotic gearbox, the clutch is regulated by special programs. Adaptation can only be completed at an official dealer. However, the service life of the AMT clutch is significantly longer than that of a manual transmission.
Adjusting the Clutch Sensor Step by Step
Required tool: ruler or caliper.
This is done as follows:
- Turn off the ignition and raise the parking brake lever.
- Disconnect the wire block from the sensor.
- Turn the element counterclockwise a quarter turn.
- Measure the distance from the body to the cap at the end of the rod. It should be 17-18 mm. To adjust, you need to pull the rod away from the body.
- Reinstall the sensor.
- If you have difficulties, look at the picture at the beginning of the article
Analogs
The manufacturers themselves recommend 826818 VALEO 2180 for Vesta. Owners note that when using the model, the pedal becomes noticeably softer and the car starts easily. The note applies to the original set; fakes are often found. The spare part costs four thousand eight hundred rubles.
The original part of the Lada Vesta is not suitable for the 21129 engine in terms of power; it is designed for lower speeds, for example, such as 2112. For 106 horsepower and above, TS-00001321 would not be a bad match. Price – five thousand six hundred rubles.
Lada Vesta. Clutch pedal position sensor. Why is it needed?
Adjusting the Lada Vesta clutch sensor will solve the problem of jerking and slipping Read more
Lada Vesta CLUTCH SENSOR. THERE IS NO SENSE IN ADJUSTING! More details
Adjusting the clutch sensor. The dips and jerking have disappeared. Lada Vesta More details
Vesta clutch pedal sensor. More details
Do this and the car will move. Replacing the clutch sensor. Lada Vesta More details
Adjustment of the clutch sensor, clutch limit switch, jerks during acceleration Read more
Lada Vesta. Do not do that! Handle cap for clutch sensor? Educational program-anti-obscurity Read more
Clutch sensor review after modification of Lada Vesta St. Cross after 2000 km Read more
Lada news. About jerks when switching. Clutch pedal sensor. More details
Lada Vesta. Clutch sensor. More details
Lada Vesta!!!Clutch sensor!!! More details
Refinement of the clutch pedal end switch Lada Vesta Read more
Clutch limit switch, clutch sensor, what's inside? Symptoms and solution to the problem. More details
Vesta Clutch adjustment Read more
LADA VESTA SV CROSS|| “The brake pedal position sensor is screwed up.” More details
VESTA SV - CLUTCH SENSOR: OBSERVATION ON REFINEMENT! More details
Clutch sensor or Error P0830 on Niva 21214 Read more
OMEGA-A. Why is a clutch pedal switch needed? More details
VESTA clutch sensor disassembled. What's inside? and HOW SHOULD HE ELIMINATE THE JERKINGS? More details
Signs of clutch failure
The occurrence of malfunctions in the Vesta clutch mechanism is most often associated with improper operation (inexperience of the driver, aggressive driving style), an initial defect in the part, or breakdown of other components interacting with it. Of course, you will immediately notice problems with the clutch - the car will begin to behave differently:
- Gears are difficult to shift/do not work at all;
- Pedal too soft/hard;
- The car jerks;
- The device is activated in the upper position of the pedal.
There can be many reasons for this behavior of Vesta, and not all of them are related to the intermediate part between the internal combustion engine and the gearbox. Often the problem comes from the fluid system. There may be a malfunction of the brake master cylinder, clutch slave cylinder, damaged hoses, a simply low DOT4 level or an air lock. Such problems (especially problems with the cylinder of the unit) have exactly the same effect as the failure of the entire unit. The clutch consists of a housing cast together with the drive/pressure plate (basket) and the driven disc. The release bearing of the Lada Vesta acts on the petals of the basket, which, in turn, with the help of damper springs, press the inner disk away from the flywheel - the clutch opens. The bearing moves either under the influence of the hydraulic pedal drive (manually) - manual gearbox, or from the actuator (automatically) - manual gearbox. These parts can fail: more often - the release mechanism, less often - the basket body. Let's take a closer look at the most common “breakdowns”.
Total
If it clicks when you release or squeeze the clutch of a Lada Vesta in the cabin, the reason may be in the limit switch, pedal support or hydraulic cylinder design. Knocks in the engine compartment are more serious - the dealer is less likely to refuse to find out their cause, since this may indicate a malfunction of important parts - springs, release bearings, working cylinder.
As a temporary solution to a serious knock, drivers use the accelerator. You need to get used to this: when the clutch is released, the driver applies more gas and the knocking disappears. Typically, such actions indicate defects in the release support guide.
The clutch does not disengage (drives)
Often, the Lada mechanism does not fully release due to the hydraulic clutch release. This could be due to poor drive adjustment, leaking fluid system, or cable wedge. Such breakdowns are easily eliminated. It is much more difficult when one of the elements of the main device breaks down.
If the mechanism does not completely disengage, it means that something is holding it: a deformed driven circle, the formation of dirt, rust in the spline joint, flywheel wear, as well as a change in the shape of the release fork, weakening of the pressure plate. In all cases, the disk will need to be replaced.
Jerks when starting off
If you notice that the movement is accompanied by twitching, this is a serious reason to seek help from specialists. The Lada Vesta can shake for various reasons (for example, ignition failures), but if it is the clutch mechanism that gives the effect, we are talking about scrap parts. Obsolescence will never be accompanied by jerks, but destruction, the breaking off of pieces of metal, manifests itself this way. The presence of freely moving debris can cause great damage to other Vesta nodes. It is recommended to carry out repairs immediately.
Noise when disengaging or engaging the clutch
The Vesta device is considered to be turned off when the pedal is lowered to the floor. It is always on when the driver's lever is in the free position - the internal combustion engine transmits torque to the transmission.
A noise similar to rustling, grinding, a slight hum, or howling appears when the unit is turned off. When turned on, it disappears. With almost one hundred percent probability we can say that the release bearing has worn out. Replacing it does not require removing the entire component. However, its untimely replacement leads to failure of the entire mechanism. A squelching, whistling sound when you press the pedal is associated with wear on the master or slave cylinders. There is pressure, the broken part does not hold it - the liquid breaks through further, making noise. The noise in the box disappears only when the clutch is disengaged.
The second type of sound is constant, disappears only when the gear is disengaged, and is located in the area of the gearbox. The nature of the “tinkling” of Lada Vesta is a weakened connection between the three main nodes.
Lada Vesta from 2015, bleeding the clutch hydraulic drive instructions online
Payment for goods and downloading of the book in electronic form (PDF format) is made on the website.
To do this, you need to find the book you are interested in and click on the “Buy” button. The price of the book is indicated on the button.
For convenience, the price on the website for residents of Russia, Belarus and Kazakhstan is presented in rubles.
For residents of Ukraine in hryvnias, and for all other countries - dollars.
After clicking on the “BUY” button, a payment window will open where you can select a payment system with which you can pay for the selected book using any bank card (Visa, MasterCard, MIR, etc.)
When you click on the “Pay by bank card” button, the Portmone payment system will open, which is the easiest way to make a payment.
In addition, the website offers four payment systems for payment:
- Yandex (payment from any bank cards, Yandex Money account, QIWI Wallet, terminals, etc.);
- Portmone (payment from any bank cards, Portmone account);
- PayPal (payment from any bank cards, PayPal account);
- WebMoney (payment from any bank cards, payment from WebMoney wallets).
Payment via Yandex Cashier
After selecting payment via Yandex, the Yandex Cashier payment system will launch, where you need to select a convenient payment method (bank card, QIWI, Yandex Money account, etc.)
After specifying payment details and confirming payment, payment for the goods will occur.
[/su_box]
If you have a bank card in a currency other than the ruble, then the money will be debited from the card at the rate of the Central Bank of Russia at the time of the purchase.
This payment method is optimal for residents of Russia, Kazakhstan and Belarus.
Official website of the Yandex Kassa payment system https://kassa.yandex.ru
Payment via Portmone
After selecting payment through Portmone, the payment system will launch, where you need to select the payment method: bank card or Portmone account.
The price in the Portmone payment system is converted into dollars at the exchange rate of the Central Bank of the country where you are located.
If you have a bank card in a currency other than the dollar, then the money will be debited from the card at the rate of the Central Bank of your country at the time of the purchase.
After specifying payment details and confirming payment, payment for the goods will occur.
[/su_box]
Official website of the Portmone payment system https://www.portmone.com
Payment via PayPal
After selecting payment via PayPal, the PayPal payment system will launch, where you need to select the payment method: bank card or PayPal account.
If you already have a PayPal account, then you need to log into it and make a payment.
If you do not have a PayPal account and you want to pay using a bank card via PayPal, you need to click on the “Create an Account” button - shown with an arrow in the picture.
PayPal will then prompt you to select your country and provide your credit card information.
After specifying the information required to make the payment, you must click on the “Pay Now” button.
Official website of the PayPal payment system https://www.paypal.com
Payment via WebMoney
After selecting payment via WebMoney, the payment system will launch, where you need to select the payment method: bank card or WebMoney wallet.
If you already have a WebMoney wallet, then you need to log into it and make a payment.
If you do not have a WebMoney wallet and you want to pay in another way, you need to select any of the methods that WebMoney offers and make the payment
After specifying payment details and confirming payment, payment for the goods will occur.
[/su_box]
Official website of the WebMoney payment system https://www.webmoney.ru/
Downloading a book
After successfully completing the payment (by any method) and returning to the KrutilVertel store from the payment system website, you will be taken to the successful payment page:
On this page you need to indicate your e-mail, where access to download the book will be sent.
If you are already registered on our website, then simply follow the link to your personal account.
The book you purchased will be in your personal account, from where you can always download it.
Please note that after making the payment, you need to return back from the payment system website to the KrutilVertel website.
If for some reason you did not return back to the site and closed the payment system tab with a message about the successful completion of the payment, please let us know - we will send you a letter indicating access to download the book.
Messages 13
1 Topic from Andre-y 2016-09-04 12:43:27
- Andrey
- New member
- Inactive
- Messages: 3
- Thank you: 0
Topic: Vesta clutch adjustment
Hello to everyone who will come.
I’ve driven the West for 1000 km and I can’t get used to the clutch, just when I’m moving off, well, the clutch grabs at the very end, so you still have to release it very slowly and for a long time in order to start normally and not stall the engine, and keep the speed at least 1500-1700. Is it so hard for everyone to start moving and is it possible to adjust the clutch? Before this I had a Priora, even if I let go of the clutch more frequently, I still pulled away confidently, but in the West the engine stalled.
2 Reply from Fan 2016-09-04 19:07:49
- Fan
- Moderator
- Inactive
- From: Smolensk region
- Messages: 1,017
- Thank you: 204
Re: Vesta clutch adjustment
I got into the Vesta in the cabin and immediately took off and drove off. You probably don’t have enough experience; you need to feel when the engine is choke. And don’t forget that Vesta, unlike Priora, has a hydraulic clutch, not a cable.
3 Reply from Andre-y 2016-09-04 19:42:03
- Andrey
- New member
- Inactive
- Messages: 3
- Thank you: 0
Re: Vesta clutch adjustment
I got into the Vesta in the cabin and immediately took off and drove off. You probably don’t have enough experience; you need to feel when the engine is choke. And don’t forget that Vesta, unlike Priora, has a hydraulic clutch, not a cable.
I went for a test drive, and somehow I didn’t feel any grip, so I sat down and drove off. And when I bought the Westa, I started driving, and that’s where it all began. Maybe during the test drive the clutch was adjusted a little better and grabbed in the middle, but on mine it was at the very end.
4 Reply from rvs 2016-09-04 21:55:00 (2016-09-04 21:55:29 edited by rvs)
- rvs
- Participant
- Inactive
- Messages: 97
- Thank you: 31
Re: Vesta clutch adjustment
Maybe during the test drive the clutch was adjusted a little better and grabbed in the middle
How can you adjust the hydraulic clutch drive? Someone invented the know-how.
5 Reply from Andre-y 2016-09-05 18:14:41
- Andrey
- New member
- Inactive
- Messages: 3
- Thank you: 0
Re: Vesta clutch adjustment
Essentially no one answers my question. Does anyone even ride West?
6 Reply from rvs 2016-09-05 20:41:53
- rvs
- Participant
- Inactive
- Messages: 97
- Thank you: 31
Re: Vesta clutch adjustment
Nobody actually answers my question.
What answer are you expecting? The clutch is adjustable only on a cable drive. Vesta has a hydraulic drive. What can be adjusted there?
7 Reply from Klyuv 2016-09-06 09:15:23
- Beak
- Participant
- Inactive
- From: Moscow region
- Messages: 301
- Thank you: 46
Re: Vesta clutch adjustment
The clutch is adjustable only on a cable drive. Vesta has a hydraulic drive. What can be adjusted there?
Wait, what seems so strange and impossible to you? I don’t know, maybe specifically on Vesta they made the unit unregulated, but in general the free play is adjusted in the same way on hydraulically driven systems. There is no fundamental difference.
8 Reply from rvs 2016-09-06 12:44:33
- rvs
- Participant
- Inactive
- Messages: 97
- Thank you: 31
Re: Vesta clutch adjustment
but in general, free play is adjusted in the same way on hydraulically driven systems. There is no fundamental difference.
Front-wheel drive VAZs have had a backlash-free clutch for 30 years (or whatever has passed since the release of the first eight). If its drive is cable, then adjustment is made with nuts on the cable; if the drive is hydraulic, then there is no adjustment. In general, there is no need to confuse the hydraulic clutch drive on the classics, where the clutch (free play) was adjusted between the nut on the pusher and the fork.
9 Reply from Klyuv 2016-09-06 16:40:01
- Beak
- Participant
- Inactive
- From: Moscow region
- Messages: 301
- Thank you: 46
Re: Vesta clutch adjustment
It’s not just the classics that have used and still use a hydraulic drive with adjustable pedal travel. If you know for sure that this is not provided for on Vesta, then that means it is. But this is not because “it can be adjusted on a hydraulic drive.”
10 Reply from Lumi 2016-09-21 20:13:55
- Lumi
- Moderator
- Inactive
- From: St. Petersburg
- Messages: 580
- Thank you: 102
Re: Vesta clutch adjustment
you need to feel when the engine is choking.
Injection at 1.5 thousand?
I feel the problem may be in the check valve, which, when the brake is suddenly released, does not allow the brake fluid to quickly flow back.
11 Reply from antifashist 2016-09-22 12:49:33
- anti-fascist
- Moderator
- Inactive
- From: Salavat, Bashkortostan
- Messages: 708
- Thank you: 73
Re: Vesta clutch adjustment
I’ve driven the West for 1000 km and I can’t get used to the clutch, just when I’m moving off, well, the clutch grabs at the very end, so you still have to release it very slowly and for a long time in order to start normally and not stall the engine, and keep the speed at least 1500-1700. Is it so hard for everyone to start moving and is it possible to adjust the clutch? Before this I had a Priora, even if I let go of the clutch more frequently, I still pulled away confidently, but in the West the engine stalled.
What does the dealer say? Must check.
12 Reply from Sergey Kurdyukov 2018-08-06 14:05:06
- Sergey Kurdyukov
- New member
- Inactive
- Messages: 1
- Thank you: 0
Re: Vesta clutch adjustment
I drove the West for 1000 km and can’t get used to the clutch
I've already driven 16 thousand in a year and a half and I can't get used to the clutch. Before that I had Kalina, and although its clutch is stiffer, I got used to its clutch in a couple of weeks. Moreover, in Kalina I could shift in any gear without a transmission jerk. On Vesta it works normally only at 3rd and higher.
| Turn off the engine and press the clutch pedal two or three times. | There should be no jamming, creaking, knocking or any other extraneous sounds in the drive mechanism. |
| Start the engine. | If at the same time a howling sound is heard from the manual transmission, which becomes more distinct when the pedal is depressed, it means that the release bearing is badly worn and needs to be replaced. |
| With the engine running, depress the clutch pedal and engage any speed. | At the same time, there should be no creaks, knocks, or crunches. Otherwise, extraneous sounds indicate incomplete disengagement of the clutch. This usually indicates airing of the system. If there is no air, it means there is a malfunction of the master or working cylinder, or a broken diaphragm spring. |
| With the engine running, turn on the speed and smoothly release the clutch pedal. | When the car starts to move, there should be no jerking or extraneous noise. Otherwise, the cause of failure may be damage to the discs, damper, or oil getting on the discs. |
| While driving, you need to press the accelerator pedal sharply. | If the revolutions have increased, but the car has barely accelerated, it means the clutch is slipping. It is easy to understand about slipping by the characteristic burning smell from the friction linings of the disc in the cabin. The problem is solved by replacing the disks. |
Another clutch replacement. Replacing the stabilizer.
On February 11, 2021, a significant event occurred in the operation of my Vesta. The original Valeo clutch was replaced with a Sachs (3000951033)
Now let's talk about everything in order. Somehow, before the New Year, OD offered a free replacement of the anti-roll bar. He gave his consent, but he himself figured that it wouldn’t be a bad idea to change the clutch at the same time. The work is carried out on the same “front”, and this will at least save time and, at maximum, money. The stabilizer has already arrived, but I don’t have time for this, it’s weekends/vacations/holidays. In short, I held out until February, and then the end of the guarantee was just around the corner - February 27th.
And so, after driving in the trunk of Vesta for six months, the German clutch began to work. I stopped by the service station at 12.15 and paid for the work at 19.19.
The first thing in line was the stabilizer.
It was not difficult to remove it; a new one with already welded bushings took its place at about 14.00. The next item on our program was removing the gearbox. And this was already more interesting. The master eventually removed the entire subframe with the stabilizer installed on it)))
They pulled out the drive, unscrewed the bolts, took off the box and changed the clutch. Here it is necessary to mention one nuance, in my kit there was a release valve that goes with Priora, it is not suitable for Vesta.
I had to work separately on the issue of this release. It turned out cool, in the OD store it cost something like 1200 rubles, the master offered me the same new one (he checked it himself) for a more humane 500 rubles, and settled on it. Here's a greeting from the Soviet past...
A few words about the removed clutch.
The mileage on this coupling is 56,000 km, the disc has almost no wear and tear, but the basket is really bad. Several petals have cracks and are sagging.
At the checkpoint it was decided to change the oil. I already filled it with time-tested NGN 75W90 GL 4/5, about 2.5 liters came in. The drained oil could still work, according to the master. Then everything went in reverse order. Time was really tight and there were fears that the car would stay overnight at the service station. This was especially felt when the hub on the right drive was not put on; in the end, everything fell into place. Fresh NGN 5W30 AGATE engine oil was poured into the engine, a new MANN W914/2 was installed in place of the old oil filter, and Vesta did not go anywhere to calibrate the AMT, the master of calibration and other matters himself came to Vesta, like Mohammed... (if the mountain does not move to Mohammed, then Mohammed goes to the mountain). The AMT was adjusted, and I quickly went to pay for the work, I was already the last client.
The cost of all work is 5296.27, of which work on replacing the clutch is 4417.02, plus AMT calibration - 323 rubles. I think the price is good.
While driving, the behavior of the car changed, the squeaks of the bushings disappeared. The gearbox shifts smoothly and clearly, there is no hint of jerking when starting off. Well, the goal has been achieved.
PS In the morning I discovered a flaw - the steering wheel is slightly to the left, not a problem, but not pleasant. And later, having already looked under the hood, I discovered an air duct running from the filter to the engine that was not tightened with a clamp. This, of course, can be attributed to haste, but, nevertheless, it shows the level of attitude towards the work being performed
By the way, it is important to say that I was next to the machine while the work was being carried out, I only left a couple of times, and controlled the process. I will come to the OD before the end of the warranty and they will install the steering wheel correctly, and at the same time change the vacuum tubes, but more on that next time