Engines of VAZ "Oka"
Let us immediately note that the Eye model received different power plants at different times. At the development stage, they planned to equip the car with a Japanese engine, which was intended for Daihatsu subcompacts. This power unit is 2-cylinder, power is about 30 hp. A little later, the first pre-production versions of the Oka, designed for testing and trials, appeared with such an engine.
- Although the engine was tested and “run in” by Toyota engineers, domestic designers were unable to successfully copy it. The fact is that the main obstacle was the high requirements for the quality of manufacturing parts, as well as the subsequent assembly of the internal combustion engine itself.
Also, the car plant did not seek to launch production of a completely new engine, which would inevitably affect the final price of the Oka and delay the start of serial production of the car. The result is that the Japanese engine never made it under the hood of the compact.
The specified Oka engine has a displacement of 650 “cubes” and is actually half of the VAZ 2108 engine. This approach allowed us to avoid the costs of developing a new block and timing belt for a small-volume engine. So, the engine is in-line, gasoline, two-cylinder, with an overhead camshaft and 2 valves per cylinder.
It is noteworthy that the working process is implemented in 2 crankshaft revolutions, that is, such an engine is quite heavily vibration-loaded. To compensate for this drawback, as many as 2 balancing shafts were introduced into the design to reduce vibrations.
The power of such a unit is almost 30 hp, the torque characteristic is 44.1 Nm at 3400 rpm. Carburetor engine, mechanically driven fuel pump.
- Next, the VAZ 11113 engine appeared. The appearance of this version is due to the fact that the “base,” that is, the base engine on the VAZ 2108, was modified and the volume was increased to 1.5 liters. At the same time, half of the new internal combustion engine was again used for the Oka, which led to an increase in the volume of the small car to 750 “cubes”. The piston diameter (from 76 to 81 mm), engine block, etc. also changed.
It is noteworthy that this engine, although it has become more modern and powerful, produces 35 hp. and 52 Newtons of torque, it also had cooling problems. After the appearance of the first versions, the pistons could jam from overheating, scuff marks appeared on the cylinder walls, etc.
Main malfunctions of VAZ Oka engines
As for the frequent problems of both the first and second versions (650 and 750 “cubes”), vibration and noise levels should be highlighted. In this case, noise is normal, especially on a cold engine when warming up. The valve mechanism is also noisy, especially if the thermal clearances of the valves are not adjusted.
Let's move on. On such engines, the cylinder head gasket often burns out. The problem is both in the quality of the gaskets themselves and in the incorrect tightening of the head during engine repair. There is also a problem with starting a hot 750 cc internal combustion engine, which is directly related to the fuel pump diaphragm and the layout of the engine compartment.
It is also noted on these engines that the ignition spark disappears. The reason is a contactless circuit with an ignition coil, and the coil is positioned in such a way that when driving through puddles, water can get in there.
As for the cooling system, the pump often fails and the engine overheats. The thermostat is also not very reliable. Failures of temperature and other sensors are also possible due to their poor quality and poor assembly, when the sensors are not securely attached to the engine.
Basic faults
In the early days of the 1111/11113's existence, Oka owners often complained about increased annoying vibration and noise from the engine compartment. The noise was especially loud when the engine was warming up; the balancer shafts mentioned above were to blame for it. This phenomenon worries car owners, but is not considered a malfunction. The engine may also be noisy due to too large valve clearances. The problem is eliminated by adjusting them. Vibration is a design feature, since the engine only has two pistons. A fairly common problem with engines is burnout of the cylinder head gasket. Its main reasons:
- factory production flaws, when the gasket was manufactured with inaccuracies;
- Incorrect tightening of the cylinder head, in which the gasket is not fully compressed.
If the motor is repaired, the seal is replaced and cannot be reused.
Important: if there are burrs on the new gasket, it is also not recommended to install it in the engine.
The Oka 11113 engine may have difficulty starting “hot” after a short stop. The reason for this is the layout of the engine compartment and problems with the fuel pump diaphragm. In a hot VAZ 11113 engine, fuel vapors are formed, including in the cavities of the fuel pump, and this unit is not intended for pumping gases and can “fail” when starting the engine before it cools down. The aperture can be changed.
Important: if a problem with the motor occurs on the road, you can simply place a damp cloth on the pump as a temporary measure. This will cool the unit somewhat and allow you to get to the place where the diaphragm can be replaced.
Other possible problems:
The ignition coils are located in such a way that water can enter them, for example, when the car crosses puddles. Water causes the voltage booster module to fail, and as a result, the engine cannot be started. There may also be general wiring problems associated with poor build quality and poor-quality wires, which are typical for VAZ engines in general.
- Damage to the engine cooling system.
Most often the pump fails due to poor assembly and low quality components. If the pump fails, the engine overheats and breaks down, so you need to monitor the temperature of the unit and change the pump promptly, if necessary. The engine thermostat is also not of high quality and may fail, with subsequent replacement.
- Electronic sensor failures.
Read also:
There are many ways to improve the power and dynamics of a car. Most importantly, it is necessary to improve the engine (parts such as piston, crankshaft, connecting rod, balancing, etc.) When considering
If you decide to independently manufacture carbon parts for tuning using the vacuum infusion method? Then this instruction will be a good first lesson. Photos and videos of vacuum forming using the example of a simple product will clearly show the entire process from start to finish.
If you want to do tuning of the VAZ 21079 with your own hands, then check out this material. If we consider this model of Zhiguli, then, of course, there will be those car enthusiasts who
Category: Maintenance
Vehicle characteristics: The dimensions of the car are as follows: length - 3007, width - 1100, height - 1023 mm. The wheelbase is 2213 mm. Ground clearance 124 mm. The car is equipped with a hybrid power unit. The 4-cylinder engine is equipped with a system that provides engine power output. There are 4 valves per cylinder. The diameter of one cylinder is 79 mm, the piston stroke is 79 mm. The engine crankshaft accelerates to 2000 rpm. Maximum torque is maintained up to 2000 rpm.
Posted by admin: at Tenjin's request
Watch the VIDEO about converting the oka engine to an injector.
Reasoning from a car owner named Alberic: Excellent city car Good car dynamics, with relatively low consumption Nice design Good stove Heated brush area - they won’t freeze to the windshield Not a bad power steering Normal Mouzon with a USB flash drive and 2 cigarette lighters
Original title: Wijziging van de motor en de tijd op de injector
Release date: 04/14/2021
Laughter on topic: A man differs from a woman in that before making a mistake he thinks everything through carefully.
Technical characteristics of VAZ 1111, 11113
| Engine | 0.65 l | 0.75 l |
| Length, mm | 3200 | 3200 |
| Width, mm | 1420 | 1420 |
| Height, mm | 1400 | 1400 |
| Wheelbase, mm | 2180 | 2180 |
| Front track, mm | 1210 | 1210 |
| Rear track, mm | 1200 | 1200 |
| Ground clearance, mm | 150 | 150 |
| Minimum trunk volume, l | 210 | 210 |
| Maximum trunk volume, l | 650 | 650 |
| Body type/number of doors | Hatchback/3 | |
| Engine location | Front, transverse | |
| Engine capacity, cm 3 | 649 | 750 |
| Cylinder type | Row | |
| Number of cylinders | 2 | 2 |
| Piston stroke, mm | 71 | 71 |
| Cylinder diameter, mm | 76 | 82 |
| Compression ratio | 9.9 | 9.6 |
| Number of valves per cylinder | 2 | 2 |
| Supply system | Carburetor | |
| Power, hp/rev. min. | 29/5600 | 35/5600 |
| Torque | 44.1/3400 | 52/3200 |
| Fuel type | AI-92 | AI-92 |
| Drive unit | Front | Front |
| Gearbox type / number of gears | 4 | 4 |
| Gear ratio of the main pair | 4.54 | 4.3 |
| Front suspension type | Shock absorber | |
| Rear suspension type | Helical spring | |
| Steering type | Rack and pinion | |
| Fuel tank volume, l | 30 | 30 |
| Maximum speed, km/h | 120 | 130 |
| Vehicle curb weight, kg | 635 | 645 |
| Permissible total weight, kg | 975 | 975 |
| Tires | 135/80 R12 | |
| Acceleration time (0-100 km/h), s | 30 | 24 |
| Fuel consumption in the urban cycle, l | 6 | 7 |
| Fuel consumption in the combined cycle, l | 4 | 4.3 |
Fuel consumption Lada 11113
Using the example of the 2000 Oka model with a manual transmission:
| City | 6.3 liters |
| Route | 3.9 liters |
| Mixed | 5.2 liters |
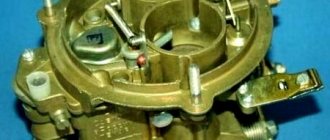
Injection "OKA" with 3-cylinder engine
| OJSC Serpukhov Automobile Plant produces the OKA SeAZ-11116 car with the Chinese TJ 376 QE engine, manufactured by TJ FAW under license from Daihatsu. The FAW Xiali car is also produced with this engine. The Chinese TJ engine is certified and has “Vehicle Type Approval”, and also complies with the EURO – 2 environmental standard. Engine: Type four-stroke, gasoline, with ECM Number and arrangement of cylinders 3, in line Cylinder diameter and piston stroke, mm 76×73 Displacement, l. 0.993 Compression ratio 9.5 Rated power at a crankshaft speed of 6000 rpm, kW (hp) 39 (53) Maximum torque at a crankshaft speed of 3000 rpm, N.m (kgf.m) 77 (7.8) Minimum crankshaft rotation speed at idle, rpm 850 – 900 Cylinder operating order 1 – 2‑3 Mass fraction of carbon monoxide (CO) in exhaust gases at idle, not more than, % 0 ,5 The TJ 376 QE engine has an electronic engine control system (ECM). The engine uses a Bosch control unit. When replacing the control unit, you can obtain exhaust emissions according to Euro 3 standards. Technical characteristics of the OKA - 11116 car:
Additional materials: Electrical circuit diagrams of the ECM Operating and maintenance instructions |
* All technical parameters are manufacturer’s data.
Opinions about the Oka car
There are many conflicting opinions about the VAZ-11113 car - this car has many positive qualities, but the reputation of the vehicle is greatly spoiled by poor build quality and a high percentage of defective parts. Among the positive aspects, car owners note:
- excellent maneuverability - the car can be easily parked almost anywhere, in city traffic it is quite easy to change from one lane to another;
- surprisingly roomy trunk - with the rear seats folded down, a lot of things fit into it;
- good cross-country ability - thanks to the narrow wheel track, small size and light weight, the Oka does not get stuck in snowdrifts and confidently climbs out of shallow mud;
- low fuel consumption.
There are also a lot of disadvantages in a VAZ car:
- the suspension does not cope well with Russian rough roads - it is quite flimsy, the miniature R12 rims bend even from a small impact;
- the car does not have high anti-corrosion resistance; bodies and body parts rust especially quickly on cars produced after 1995;
- Okushka's security is low;
- You need to drive a car through water carefully - the ignition coil stops working if it gets wet, and in rainy weather the spark plugs become damp;
- the quality of spare parts is low, especially if they are non-original parts;
- The original mirrors are small and inconvenient - almost nothing is visible in them.
Pros and cons of a carburetor
Carburetors have been known for a long time. They were used on the first cars. The carburetor mixes fuel and air in a given proportion, supplying the engine with a prepared air-fuel mixture. With a conventional carburetor, the air-fuel ratio depends on the operating mode. When idling, when the gas pedal is not pressed, the idle system operates. When the pedal is depressed, the carburetor operates normally. Pressing the gas pedal sharply causes additional gasoline to be injected into the air flow. When operating at maximum speed and fully pressing the gas pedal, the fuel supply increases. All these systems have rigid settings, and depend on the size of the jets. Therefore, precise adjustment to changes in engine operation is impossible. The carburetor is not able to thoroughly mix air and fuel.
Important
Carburetor engines are simpler than injection engines, but have strict operating modes, so the composition of the air-fuel mixture is less compatible with modes that go beyond standard ones.
What is included in the electrical circuit?
To begin with, we suggest finding out a description of the systems that the Oka electrical circuit includes:
- contactless ignition system;
- switch diagram, as well as ignition relay;
- generator device connection diagram;
- connecting the starter unit;
- lighting activation, including headlights, parking lights, fog lights, turn signals and light alarms, as well as brake lights;
- sound signal;
- glass cleaner;
- rear window heating systems;
- activation of the electric motor of the cooling system fan;
- heating system;
- control panel where all control and measuring instruments are located.
KAMAZ Oka i injector › Logbook › About the Oka injector
Hello everyone, I decided to briefly talk about installing the injector on the eye. Unfortunately, there are no photos of the construction report, except for a few photos in previous blog posts, because... I did everything alone and had no time for the camera. Let's probably start with the costs of spare parts and labor:
Manifold 2111 Receiver 2111 Underhood wiring Dpdz Rxx Air filter housing Fuel rail with injectors Fuel pressure regulator Air filter pipe Throttle valve Tank with pump module All of the above was purchased for 1700 rubles.
ECU January 5.1-41 2300 rub. The VAZ injector crankshaft pulley was in the garage. The Oka crankshaft pulley used my Thermostat 2110 injector plus a used one for 300 rubles. The DMRV housing was given as a gift. Passage speed sensor 280 RUR. Turning work (crossing pulleys) 300 rub. Vacuum tube for VUT 140 RUR. Intake gasket 25r. Argon welding of receiver and collector 1100 RUR. Camshaft plug 300r. Fuel system seals 5x10r. Fuel pipe 350 rub. Fuel hoses 2x250r. Throttle cable with bracket, slightly used, 200 RUR. Dad Nexia 500 rub. Fuel filter Niva 200 rub. Classic hub nut (for dk) 25 rub. All sorts of connectors that were missing in the wiring 300r. dd 250r. Dk bosh 133 used 500r. Dtv gentra 650r. Wiring for injectors 500 RUR. Dpkv 250 rub. Plus all the little things that I didn’t take into account at the end. In total, it took about 11 thousand rubles.
Plus I bought a USB k-line vac com for like 700 rubles.
Video of engine startup and operation at the link
I would especially like to thank v777v and azat246 for their help, advice and detailed instructions on building this project.
That’s all for now, then if possible I’ll upload more photos with a description, and write, ask questions, how I can help if you suddenly decide to switch to an injector.
Source
Powerplant removal method
The sequence of work is as follows:
- We put the car in the garage and immobilize it. For the convenience of carrying out some work, we jack up the front end, completely, and not just one side;
- drain technical fluids (oil, coolant);
- We dismantle the carburetor air filter along with the housing;
- Disconnect the throttle and air damper drive cables from the carburetor, as well as the XX solenoid valve wire;
5. Remove the high-voltage wires (from the spark plugs and coil);
6. Disconnect the wiring going to the spark torque sensor;
7. Loosen the clamp securing the gasoline supply pipe to the gasoline pump and remove it;
9. Loosen the clamps and remove the pipes from the thermostat housing that go to the cooling radiator;
10. Remove the pipes leading to the interior heater;
11. Loosen and disconnect the clutch cable;
12. From the gearbox, disconnect the speedometer drive, the wire of the sensor for turning on the reverse signal, as well as the ground wire put on the stud of the gearbox housing;
13. Disconnect the wiring from the starter and generator;
14. Under the car, loosen the tie clamp at the entry point of the exhaust pipe coming from the manifold into the receiving pipe of the resonator. We move the resonator back, disconnecting the connection;
15. Disconnect the wire leading to the oil pressure sensor;
16. Disconnect the gearshift lever rod leading to the gearbox;
17. Remove the front wheels, unscrew the nuts of the outer CV joint shafts, and pull the hubs off them;
18. Unscrew the bolts securing the steering gear brackets to the subframe;
19. We place the prepared bars under the subframe, after which we carefully lower the jacks, ensuring that the subframe, together with the engine, rests on these bars;
20. Unscrew the bolts securing the subframe to the body;
After this, it is checked whether everything is disconnected, and then, with an assistant, the front end simply rises up (without the motor - it is not heavy) and the body rolls back, and the motor, together with the gearbox, the drive and the subframe, remains lying on the bars.
Well, then further disassembly is carried out, the worn components are rebuilt (for example, replacing the Oka crankshaft), and then the engine is assembled. After the VAZ-11113 engine has been repaired, it is reinstalled in place, for which everything must be done in the reverse order.
Oka engine tuning and swap
There is a group of car enthusiasts for whom the Oka model, due to a number of features, is of particular interest in terms of tuning. Since this car is small and light, and has a weak engine, it is not surprising that increasing the power of such a motor becomes the number one issue.
It is not difficult to guess that a much more effective solution in this case would be a swap, that is, a complete replacement of the internal combustion engine, rather than an attempt to increase the power of the existing factory version. To understand which engine can be installed on the Oka, you need to analyze information about those units that were installed on this model, but for one reason or another were never included in the series.
When auto production in Russia was going through a crisis and AvtoVAZ refused to produce engines for the Oka, in order to maintain production and comply with environmental requirements, attempts were made to install units from other manufacturers on this model. In 2004, a trial batch of 15 cars with an engine from Hyundai Atos was produced; the Ukrainian MeMZ 245 and MeMZ 247.1 engines were also installed on the model.
As a summary, we note that, as in the case of the diesel Niva, the Oka car can also be equipped with a different engine if desired. The easiest way would be to install a motor that the manufacturer himself has already installed on this model as a trial version.
If we talk about a real swap and the installation of an internal combustion engine that has never been installed on this model, in practice compact 3-cylinder Volkswagen diesel engines are well suited to Oka. Even in single copies, tuners installed MeMZ 245 or MeMZ 247.1, after which this engine received additional turbocharging.
Installing a diesel engine on a Niva SUV instead of a gasoline one. What you need to know when replacing the original Niva engine, suitable diesel engines and gearboxes.
Advantages of installing a diesel power unit instead of gasoline or LPG. Choosing a suitable diesel engine for GAZelle and UAZ (UAZ) to replace a gasoline engine.
The range of engines for the Lada X-Ray, available power units. Features and performance indicators of engines on Lada Xray, innovation, reliability.
Restyled Volkswagen Polo sedan with a new engine. The main features of the new Russian-assembled engine CFN E211 on the Polo Sedan from Kaluga.
Tuning the Lada Vesta engine, affordable ways to increase power and improve the characteristics of the Vesta power unit. Chip tuning Lada Vesta, what you need to know.
Lada Vesta: what oil is best to fill in the engine of this car and how to choose the right lubricant. Recommendations, useful tips.
The installation of an injector on the Oka carburetor engine (two-cylinder 11113) was repeatedly discussed on the Okovsky forums. The plant never brought to fruition the injector project for the Oka (test cars existed, this is a fact, but they drove poorly - the engine was never brought to fruition at the factory). We will not be pioneers in this matter; it is known that craftsmen have already done such work on installing an injector on the Oka River; perhaps such examples of work are on the Internet or on forums.
The hardware for the injector on the Oka (intake manifold, ramp, receiver) was ready back in 2009, the author wanted to install the injector on his Oka, but there was still no time, and then the Oka was no more.
The pieces of iron lay there, lay there, and a person appeared on them. I’ll say right away that we didn’t look for help in building the engine on the forums, didn’t spy on others, didn’t ask anyone for advice or help. In general, there is no need to be too clever; what needs to be done has long been known. All layout decisions made in this project are based on our own reasoning, and made without regard to anyone.
This device came to us from Perm. They pulled out the carburetor engine, washed the engine compartment, and covered it with vibroplast. Someone repaired the gearbox, the drive seals were leaking - they replaced it.
We won’t go into detail about the work with the engine in photographs; everything about the Oka has already been chewed over many times in early reports and it’s not interesting to repeat it. In short, the cylinder block was bored out, oil nozzles for cooling the pistons, lightweight 2110 connecting rods and a flywheel were installed. The cylinder head is modified, lightweight valves are installed, a K-POWER camshaft is 11.2 mm with a phase of 262 degrees.
We got confused with the exhaust - we welded a long-eared flange from 2110 with a graphite ring, welded in a vibration compensator corrugation, spent a long time correcting the geometry of the final pipe (the photo below shows the first option), in the end everything was done so that nothing would touch or knock anywhere (disease Oka exhaust). At first they abandoned the resonator, welding a straight pipe to the muffler.
An external fuel pump from the injection Volga was placed behind the rear beam, and a fine filter was also located on the bracket. There was no desire or need to weld the flange from the injection nine into the Okovsky tank (for installing a submersible pump). Thus, we still have the factory fuel intake; we also installed a return line.
Brain used January 5.1-. -41 , we took a new braid of wires from Samara. The ramp is aluminum, with a pressure regulator. The receiver is quite large in volume. The manifold, ramp and receiver are homemade, “cut-welded” from injection Samara. The oil pump housing was replaced with an injection one with a bracket for the DPKV, the generator was converted to a poly-V-belt. They replaced the throttle cable and threw out the choke cable. A day of work for the electrician, and as a result, there was a “wedding” of two braids of wiring (original and injection). The choke light turned into a Check Engine . An injection ignition module is installed (the spark compared to the Okovskaya coil is very powerful, which is visible even to the eye). And the eye is also glad that the hated carburetor system with an ever-flowing fuel pump and an oil-snotting distributor has been thrown out. Instead of all this, a plug is installed. There were big doubts - to collect it on DAD or on DMRV. After consultations with chipmakers, it was decided to assemble using a mass air flow sensor. The injectors are green Boschevsky ones, from the first batches, washed with ultrasound and tested on a bench. Because of the large receiver, the coolant reservoir was moved to the side, secured on a homemade bracket. The injection air filter housing did not want to fit under the hood of the Oka, so a zero was purchased and secured to the spare tire bracket. The spare tire itself has been removed from the compartment for driver safety and ease of installation of the system under the hood. The system did not have an oxygen sensor; we mistakenly thought that it would be possible to configure the controller without it. And there was no harness or wires for the lambda in the wiring, it was a simple braid of wires from earlier versions. The throttle valve was installed by VAZ, with a standard diameter of 46 mm . For this engine, such a damper is even more than enough - there is no need for tuned ones.
A week of work and this is what happened:
Another week was spent on chipping. Here we were greatly let down - they took their time and in the end were unable to configure the controller. The car started, but immediately stalled and would not idle. After waiting about a week, we turned to other people who approached the issue professionally. They rolled the controller online, having previously selected the main calibrations and filtered out noise using the knock sensor (we also installed it on the cylinder block). Of course, to roll back online, an oxygen sensor was also required; I had to weld a nut into the exhaust and unscrew the wiring to pull the wires under the lambda probe. The idle speed was set to 1100 rpm , although the car kept at 950 rpm, but because of the shaft, the idle speed was not very smooth. Of course, the injector does not react in any way to the inclusion of consumers (the problem with the Okovsky carburetor engine) - the idle speed does not sags at all when the headlights, heater fan and cooling system fan are turned on.
Rolling back the online program showed another problem - the exhaust without a resonator turned out to be very noisy, the engine was “shooting” and the muffler giblets were loudly ringing. People turned around on the street. Because time allowed, the exhaust was removed again and a resonator was welded in. The exhaust system immediately calmed down.
Installing a large receiver made it possible to normally roll out the program with the mass air flow sensor - there was air pulsation in the intake tract, but not critical. It’s nice that we hit the mark with this layout solution and didn’t have to switch to DBP.
The Volgov pump made a very loud noise in the first minutes of operation, but after an hour or two it was no longer audible. The layout solution justified itself - the pump runs quietly.
The car starts up perfectly, in the daytime on the street - the heat of June at 35 degrees, a carburetor engine without pressing the gas pedal (without purging from gasoline vapors accumulated in the air filter housing) - you will start with difficulty, and an injection engine - with half a stick.
The character of the engine is completely different than with a carburetor. The longer intake tract did its job - the car starts vigorously and dynamically, and responds quickly to the gas pedal. We put the “carburetor” Okavod behind the wheel and gave it a ride - I immediately noticed that the third and fourth gears had quickened. The main torque is up to 5000 rpm, then there is a decline. However, for our client this is the most valuable result, because... The engine practically does not turn and moves calmly. He prefers the increase in torque at low and medium speeds rather than at the top. An excellent city car. On the highway we easily accelerated to 120 km/h with a strong side wind, but then we were afraid - on small wheels and soft oil shock absorbers - it was quite scary. The last 14 gas pedals have almost no effect on the increase in dynamics, i.e. the postulate about the sufficiency and even redundancy of the standard 46 mm is quite justified.
Update June 29, 2013:
We made a short video of the engine running.
We took down the VSH schedule. It should be noted that after overhauling and assembling the engine, the car drove about 100 km, which is very little for running-in - mechanical friction losses are also increased, which reduce the results, but the car will soon leave for Perm and it is unlikely that we will be able to remove the schedule in the future, Therefore, they violated their rule “not to measure the water supply immediately after a major overhaul” and still filmed the schedule. They still tried to reduce mechanical losses during assembly (in particular, the crankshaft was polished), but we are confident that after running in and running 5-7 thousand km, the results will be much higher.
However, the shape of the torque curve can already be assessed. In the graph below - the dotted blue line - torque, peak 6.6 kg at 2900 rpm ; dotted red line - power, peak value 44 hp. at 6000 rpm For comparison, a graph of a serial Oka carburetor engine with a power of 33 hp is superimposed on the general coordinate grid. (thin red lines). As you can see, the engine runs throughout the entire range up to 6000 rpm, the largest increase in torque is in the most popular “urban” range from 1000 to 3500 rpm, the middle is slightly higher than the standard, and at the top there is a good increase in power. It is quite obvious that such an increase in torque at the bottom is due to a longer injection intake tract.
In the future, if similar projects to switch to an injector are implemented, you can try other configurations of the intake tract; it is possible to install tuning welded receivers with pipes or a cheaper plastic receiver from Samara.
Article written: June 26, 2013 Updated: June 29, 2013 Author of the article, photo-video materials: © Quasar Prohibited without the written permission of the author: reprinting the article in whole or in part, reprinting and use of photo-video materials, as well as their modification and editing for further publication on third-party sites.
Good day! Does this even happen on collective farms? How realistic is this and what will be required for it to work properly with two cylinders? Is there generally distributed injection or single injection?
I’m not at all an expert on injectors and have a vague idea of their design, but I guess that if the injection is distributed, then it will be enough to just make the air flow sensor so that it says that the air flow is 2 times more than it actually is? Well, we need to build the intake manifold (take a piece of figure-eight as a basis?)
Has anyone worked on and implemented this option?
There is no point, it is not economically justified - If you do it, it will be the simplest, i.e. single injection. In this case, you will need to install a fuel pump in the tank (and the return line too), install a single-injection module (with a gasoline pressure regulator, an ignition position sensor, an XX limit switch and an IR position regulator (for XX)), additionally install a coolant temperature sensor, an intake air temperature sensor, a sensor oxygen. And finally, a control controller coordinated with the DH and other sensors and with the corresponding firmware, which is the most complex and time-consuming. Distributed injection will require additional sensors, but there is no guarantee that you will stop there and will not want to play with distribution phases, turbocharging, direct injection, etc. :))) And finally, specifics: https://www.wwwboards.auto.ru/oka/335155.html https://www.wwwboards.auto.ru/oka/339312.html
Thank you! In general, the initial idea was to take everything from the nine, since all the firmware, injector positions, etc. are sharpened for a specific motor, that is, the motor cylinder, in a sense, and ours is a figure-eight one. Hence the idea of distributed injection, so that it would be better scaled from 4 to 2 cylinders :). But since everything is so expensive there and there is almost no effect, then there is no point in doing it.
Thanks for the info!
Yes, distributed, yes, collective farm. Two cylinders are not a hindrance, because they fire simultaneously. The collective farm there is a lot of money, it’s expensive. However, there are also ready-made kits, they seem to cost 20 thousand.
“It’s not that bad, it’s much worse.”
Same power, same consumption. Well, maybe half a liter less, and even then not in all modes.
“It’s not that bad, it’s much worse.”
VAZ 1111 engine - features and design
The 650 cc engine 1111 is “half” of the 2108 engine. To create it, they simply took half of the engine and cylinder block, since it was easier and cheaper to develop equipment for such a solution than for a new unit. Thus, the 1111th is a two-cylinder in-line petrol carburetor engine, with 2 valves per cylinder and an overhead camshaft configuration.
1111 assembled:
Main characteristics of the Oka engine:
- power - 30 forces;
- volume – 649 cubic meters. cm.;
- torque - maximum 44 Nm at 3400 rpm;
- recommended fuel is gasoline with an octane rating of 92;
- cylinders: 2;
- type of food – carburetor;
- valves – 4;
- fuel consumption – about 4.7 liters per 100 km;
- engine cooling – liquid;
- engine environmental standard: Euro-0.
Weight and dimensions of the Oka engine:
- weight – 66.5 kg without gearbox and clutch;
- overall dimensions – 550*640*670 mm.
The entire working process takes place in two revolutions of the crankshaft, due to which the engine experiences severe vibration loads. To compensate for them, two balancing shafts are provided to reduce motor vibration.
Interesting: in the VAZ 1111 engine, the fuel pump is not electric, but mechanically driven from the engine.
The supply of the fuel mixture is controlled by the carburetor. The lubrication system, as in 2108, is created with the installation of a gear pump. Engine oil is taken from the crankcase and supplied to the friction pairs of the camshaft and crankshaft. The cylinders are irrigated with oil mist generated during the operation of the crankshaft, and the engine gas distribution mechanism and valve rods are lubricated by gravity.
Other Oka engine models
After AvtoVAZ practically curtailed its minicar production, the remaining ones attempted to install other engines:
- previously reviewed 11116;
- Korean Hyundai Atos unit (did not go into production);
- MeMZ 245 (went into small-scale production);
- MeMZ motor model 247.1 (can be found very rarely).
Created on the Oka platform, the all-terrain vehicle on tracks is equipped with a unit from the VAZ 2131, and the forced sports version is powered by engines from the Lada Priora.
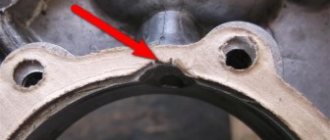
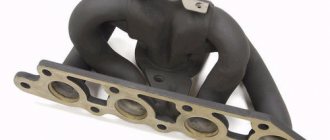
cylinder head
The cylinder head is solid cast aluminum. Since the engine has a timing belt with an overhead camshaft, the cylinder head is equipped with beds for the shaft. To install the camshaft, three beds with covers were made. There are no shaft bearings; their role is played by the working surfaces of the bed and cover (therefore, if the bearings are heavily worn, the entire head must be replaced).
The cylinder head also houses timing valves (2 for each cylinder). As usual, the intake valve, to ensure better filling of the cylinder with the combustible mixture, has a larger diameter than the exhaust valve.
The cylinder head is fixed to the block with 6 bolts. When tightening fasteners, a certain pattern is used, which eliminates the possibility of the head being “skewed.”
Bolts require gradual tightening with increasing tightening torque. The force on the cylinder head mounting bolts has strictly defined values, so tightening must be done with a torque wrench.
timing belt
The camshaft is made of cast iron, has a high degree of processing of the working surfaces - bearing journals and cams. In addition to acting on the valves, the camshaft also drives the vacuum fuel pump, for which there is an eccentric on the rear of it.
Thermal clearances on Oka engines are adjusted using special washers installed between the camshaft cams and valves.
KShM
The crankshaft is a magnesium cast iron casting with subsequent high-precision machining of the working surfaces. It has 3 main journals and 2 connecting rods. 4 shaft cheeks, located between the journals, act as counterweights that reduce motor vibration during operation. The working surfaces of the crankshaft are lubricated through oil channels made inside the shaft.
In the front part of the crankshaft there are seats for the timing gear and the generator drive pulley. At the rear, in addition to the flange for attaching the flywheel, there is a balance shaft gear.
The flywheel is cast from cast iron, the gear rim is mounted “hot” on it.
A special feature of the flywheel is the ability to “flip” it. That is, if the ring is heavily worn on one side, the flywheel can be turned over to start using the unworn part of the teeth.
The friction bearings of the main and connecting rod journals are made of soft tin-containing alloys. The supporting elements of the main journals have special grooves on the working surface for supplying lubricant. For proper installation of bearings, there are special notches on their edges.
Balancer shafts are designed to reduce vibration of the power plant (and it vibrates significantly due to the synchronous stroke of the pistons). They consist of two shafts installed parallel to the crankshaft and interacting with it through gears.
It is noteworthy that the gears are not made of metal, but of textolite or plastic. Since these gears do not experience any special load during operation, they do not require special strength. In addition, the use of textolite and plastic made it possible to reduce the overall weight of the power unit.
The lower connecting rod heads, like the crankshaft supports, are processed together with the caps. To avoid mixing up the covers during assembly and installing them incorrectly, there are marks.
Cylinder-piston group
The piston is made of heat-resistant aluminum alloy; the part is subjected to additional heat treatment during the manufacturing process.
The piston bottom is flat (which makes the engine “plug-in”), but it is possible to install pistons from a VAZ-2108 with grooves on the bottom for the valves.
Number of rings – 3. The top two are compression, the 3rd is oil scraper. A hole is made in the groove for the oil scraper ring to drain the lubricant removed from the cylinder walls.
Compression rings ensure sealing of the combustion chamber (the necessary compression is created in the cylinders). Additionally, they participate in heat exchange - they remove heat from the top of the piston and transfer it to the cylinder walls. The oil scraper ring is equipped with a radial expander to increase the area of contact with the walls.
The finger is a round piece, hollow. The finger is “floating”, that is, during operation it rotates in the bosses.
Converting a carburetor to an injector
At one time, the only possible mechanism for forming the air-fuel mixture was a carburetor. Actually, this process is called carburetion. The device was constantly improved, its productivity increased. Two or even four carburetors were installed on powerful sports engines. However, this method has purely physical limits; moreover, the design has inherent disadvantages that cannot be eliminated:
- Dependence on the quality and purity of the fuel. Since gasoline is absorbed by the air flow (before an aerosol is formed), the diameter of the hole affects the quality of the mixture. The smaller it is, the more vaporous the cloud can be made. Accordingly, the combustion quality will be higher. The other side of the coin is that a small nozzle hole increases the likelihood of clogging;
- Effect of temperature. Cold gasoline evaporates worse, and less fuel enters the float chamber. This causes difficulty starting the engine at sub-zero temperatures;
- All adjustments are mechanical. Fine tuning is time-consuming and requires a certain level of skill. On modern models, an idle air solenoid valve is installed, but this does not fundamentally solve the problem.
Then a mechanical injector was invented, and all modern cars began to be equipped with a new system for forming a gasoline mixture. This device has much wider development horizons: electromagnetic, piezoelectric injectors, improvement of control programs.
Owners of old cars often think about installing an injector instead of a carburetor. Is it possible? It is necessary not only to change the module itself, it is necessary to modify the entire intake system of the engine.
Video - how to remove the engine
The Oka car began to be produced quite a long time ago and has earned considerable popularity among domestic car enthusiasts. Of course, the technical characteristics of the car in question are far from the requirements of a modern car enthusiast. Despite this, at one time Oka was very popular due to its inherent efficiency. Owners of an Oka car from early years of production often encounter engine system malfunctions. This can easily be explained by the service life and operating conditions of the vehicle. One of the most effective ways to return a vehicle to serviceability is a major overhaul of the Oka or VAZ 11113 engine. Carrying out repairs yourself is quite difficult, since many processes will require expensive equipment. In order to save money, you can prepare the Eye for major repairs yourself.
The benefits of a major overhaul are obvious. Large-scale engine repairs will allow you to: increase the service life of the vehicle, increase the service life of the engine and increase its performance.
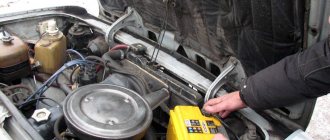
The first stage of a major restoration is a detailed diagnosis of the internal combustion engine. Carrying out an inspection in a garage is quite difficult. In order to determine engine productivity, computer equipment and appropriate skills will be required.
Engine conversion.
You can’t just take an injector and put it on a carburetor engine, if only because there are no holes for the injector on the intake manifold of a carburetor engine. The engine will have to undergo serious modifications. It is necessary to replace the intake manifold, install crankshaft position sensors, for which you will have to either change the crankshaft pulley or come up with something else. To install a knock sensor, you will either have to drill the cylinder head (cylinder head), risking damaging it, or use a cylinder head from an injection engine that is suitable in size. Or you can try to drill the cylinder block, risking drilling a water or oil channel.
Carburetor instead of injector, and vice versa: pros and cons of exchange
Let's start with the good:
- Ecology. The installation of the injector complies with at least the Euro-2 standard, that is, your car will pollute the atmosphere less;
- The owner of an engine with an injector forgets about the painful (and, sadly, regular) procedures for adjusting the idle speed screws, flushing, and other “delights” of the carburetor;
- Fuel consumption is reduced;
- You are no longer dependent on the ambient temperature;
- The re-equipment improves the throttle response of the power plant, especially at the bottom;
- The risk of vibration and detonation is reduced, which has a positive effect on the service life of the motor.
- The first and most important problem is finances. Installing an injector (even with your own hands) is a costly undertaking. A lot of additional components and parts are required;
- The upgrade will take several days (again, if you work alone). All this time you are left without a car;
- You may have to switch to higher octane fuel (at a higher cost). Although this problem is offset by reduced gas mileage;
- Converting a carburetor to an injector is a change in the design of the vehicle. That is, either you ride at your own peril and risk, until the first technical control post, or you spend time and money on legitimizing the procedure.
In any case, it is possible. There are many examples of successful (both technically and legally) implementation of injectors instead of a carburetor.
Differences, technical indicators
A little about how domestically produced Oka engines differ regarding the device. In general, their general design is identical. The only difference is:
As for the operating parameters, they are given below:
| Characteristics of Oka power units 1111 and 11113 | |||
| Parameter | "Oka" 1111 | "Oka" 11113 | "Oka" 11116 |
| Engine displacement | 649 cc cm. | 750 cc cm. | 993 cc |
| Engine power | 29.3 l. With. | 33 hp | 53 hp |
| Torque | 44 Nm | 50 Nm | 77 Nm |
| Engine compression | 9,9 | 9,9 | 9,9 |
| Cooling system type, volume | Liquid, 4.8 l | Liquid, 4.8 l | Liquid, 4.8 l |
| Type of lubrication system, oil volume | Combined, 2.5 l | Combined, 2.5 l | Combined, 2.5 l |
| Power system type | carburetor | carburetor | carburetor |
| Ignition system type | electronic | electronic | electronic |
Article on the topic - Technical characteristics of OKA
All modifications of the Oka power plant were coupled exclusively with a 4-speed manual transmission.
Source
How to replace a carburetor with an injector with your own hands
Half of the cost of re-equipment is the cost of work at a service station, so most car owners decide to do the modification themselves.
Important! If you have the slightest doubt about your own qualifications, contact a specialized service. Incorrect installation of the fuel system can lead to gasoline leaks and fire!
First of all, we make a list of necessary purchases. It’s more convenient to break it into groups - this way there’s less chance of missing something.
- Engine group: new oil pump with the ability to install a crankshaft sensor; sensors: crankshaft, detonation, mass air flow, air and engine temperature. We also change the crankshaft pulley;
- New intake manifold designed for injectors, gasket;
- Fuel group: fuel rail with injectors;
- Main fuel line with fittings. New gas tank, fuel pump. Fuel pressure regulator, fine fuel filter;
- Electrics: Generator with a corresponding pulley (the old one simply cannot withstand the increased load). The controller (ECU) is perhaps the most important part of the system. Ready-made wire braids (harnesses) for controlling injectors, low-voltage ignition part, and fuel pump. High-voltage spark plug wires, ignition module;
- Intake system: new air filter (with housing), throttle flange-pipe. We are redoing the throttle valve drive - we need a new cable;
- Ready plug to replace the distributor.
Of course, you will need the necessary tools, good quality fasteners (not from a building materials store), an electrical installation kit: crimp clamps, ties, mounting clips. Everything must be done carefully and reliably, otherwise you will have to look for faults created by your own hands.
There are ready-made kits: either from your own motor, but of a newer version (the main components are the same, so you don’t have to adjust the parts). You can buy a KIT kit from well-known brands: for example, BOSCH.
Diagnostics "OKA" - injection. TWO TO ONE
Diagnostics "OKA"-injection. TWO TO ONE
It was unified as much as possible with the already well-known four-cylinder VAZ engines. In particular, Oka received a control unit (controller) with a sixteen-bit M10 processor from ELKAR, rather than the outdated eight-bit one.
Of course, the injection Oka differs in many ways from the carburetor, but owners are unlikely to encounter diagnostic problems. After all, most of the faults here are the same as on four-cylinder VAZ engines, and the quality level of certain components is already well known. All that remains is to update the scanner software for the M10 controller.
Captions under the pictures:
1. The modern M10 block from ELCAR was created taking into account increasingly stringent toxicity standards and an ever-expanding list of controlled parameters of the injection system. This simplifies and speeds up troubleshooting. But to read the information you need a suitable scanner. For example, ASKAN-8.
2. ASKAN-8 scanner with OBD-11 connector for engine management diagnostics. The engine's operating parameters are recorded in the non-volatile memory of the unit. By the way, the previous units did not detect “over-torque”, meanwhile, the electronic limiter monitors the speed only under load, and when braking the engine, their limit can be exceeded.
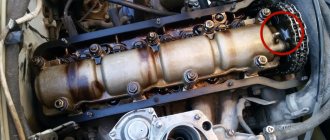
3. Air flow is controlled by a Siemens absolute pressure sensor with a built-in air temperature sensor. Here it is - next to the throttle pipe. Film mass air flow sensor from four-cylinder engines is not suitable here - it is sensitive to strong pulsations of air flow in the intake manifold of the Oka engine.
4. There are two temperature sensors: thermal resistance 1 informs the controller, 2 serves the temperature indicator. The fan is controlled by a controller. There is no risk of engine overheating: if the sensor wire breaks, the electric fan will operate as long as the ignition is on.
5. The crankshaft position sensor (pictured on the right) produces a signal by which the controller determines the crankshaft rotation speed and “links” the injection and ignition phases to it. The pulley and sensor are the same as on the eight-valve VAZ 2111 engine. In case of emergency, there is no need to look for “original” ones for the Oka.
6. The design of the throttle pipe for the Oka is based on a smaller pipe of the VAZ 2112 engine. Throttle position sensor 1 and idle speed controller 2 are those that are well known to owners of VAZ cars with four-cylinder engines. Conveniently located and easy to replace.
7. The oxygen sensor (lambda probe) also performs traditional functions here. Depending on the ratio of the masses of gasoline and air in the combustion chambers (composition of the working mixture), the content of unused oxygen in the exhaust gases changes. The sensor reacts to this by generating a signal and supplies this vital information to the control unit. The sensor is the same as on VAZ engines with the new M7.9.7 injection system.
8. The electric fuel pump is installed in the fuel tank in the same way as on other VAZ vehicles. To access the pump, fuel lines, and electrical connectors, you don’t need to remove the fuel tank - a good VAZ tradition! Raise the back seat, remove the hatch cover and get to work. The picture shows a temporary solution: the hatch is cut into the bottom of a regular carburetor Oka. It will be more beautiful in the series.
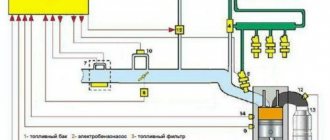
9. Below the throttle body is a new stainless steel fuel rail 1, lightweight and durable. Here is also fitting 2 for checking, if necessary, the fuel pressure in the rail. Access to the fitting is convenient. The return line is visible. The required fuel pressure is created, of course, by the electric fuel pump, but the excess is “cut off” by pressure regulator 3, leaving the required 2.8–3 bar.
Electrical refurbishment.
After this, you will have to thoroughly modify the electrical part of the car. Install an electric fuel pump instead of a mechanical one, connect all sensors to the electronic control unit (ECU) and find the correct ECU firmware. Having dealt with all this, you will have to spend a lot of time setting up the entire system, which is very difficult to do yourself. And turning to specialists will be quite expensive, because not everyone will undertake to set up such a miracle of technology.
Cost of work. A complete set of parts for the injector will cost 15-20 thousand rubles. If you don’t experiment with drilling the cylinder head, you’ll have to add another 5-10 thousand to get a used injection cylinder head at a dismantling station. Add here the cost of setup and the difficulty of registering this miracle of technology with the traffic police. It’s cheaper and easier to take a used injection engine and install it on a car.
Conclusion. You can install an injector on a carburetor engine. But this will be more expensive and more difficult than replacing a carburetor engine with an injection one.
https://auto-garazh.com/zamena/zamena-karbyuratora-na-inzhekt…
Did you like the article? Subscribe to the channel to stay up to date with the most interesting materials
Subscribe
Differences, technical indicators
A little about how domestically produced Oka engines differ regarding the device. In general, their general design is identical. The only difference is:
As for the operating parameters, they are given below:
| Characteristics of Oka power units 1111 and 11113 | |||
| Parameter | "Oka" 1111 | "Oka" 11113 | "Oka" 11116 |
| Engine displacement | 649 cc cm. | 750 cc cm. | 993 cc |
| Engine power | 29.3 l. With. | 33 hp | 53 hp |
| Torque | 44 Nm | 50 Nm | 77 Nm |
| Engine compression | 9,9 | 9,9 | 9,9 |
| Cooling system type, volume | Liquid, 4.8 l | Liquid, 4.8 l | Liquid, 4.8 l |
| Type of lubrication system, oil volume | Combined, 2.5 l | Combined, 2.5 l | Combined, 2.5 l |
| Power system type | carburetor | carburetor | carburetor |
| Ignition system type | electronic | electronic | electronic |
Article on the topic - Technical characteristics of OKA
All modifications of the Oka power plant were coupled exclusively with a 4-speed manual transmission.