VAZ models received one unpleasant feature: with age, backlashes appear in some parts of the car. We are talking about the transmission, engine, and gearbox. There is no need to wait until all the parts of the unit wear out, since a complete replacement will cost more than modernization. In this article we will talk about tuning the gearbox, or more precisely, about installing a short-stroke shifter (SC) instead of the standard one. Here, VAZ 2114 owners have three options: installing a freelance rocker, making the part with their own hands, and also adjusting the standard unit.
Important! Defects in the operation of the gearbox may appear due to the oil seal, the “symptoms” of which are similar to the rocker. A visual inspection is enough to determine whether the seal is working or not. The analysis can be performed according to the scheme from this article.
The short-throw rocker reduces gear shifting time, which is why this part was originally only found in sports cars. Subsequently, almost all automakers included a short-throw rocker in the design of their cars. AvtoVAZ lagged behind foreign cars a little, so the first model of the company with this part was the Lada Kalina, so if you install a freelance element, then it’s from the Kalina.
Why does the gearshift lever rattle on Kalina?
The main reason for this problem lies in the very design of the attachment of the lever to the rod. To put it mildly, it is not perfect, but it can be corrected at minimal cost and in just a few minutes of time.
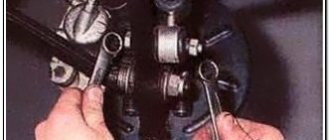
So, first you need to lift up the lever casing, and then unscrew the fastening nut, which is already shown in the photo below almost completed:
When the bolt is removed, we also remove all the washers and the metal sleeve. And this whole damn thing looks like this in parts:
So, the reason for the rattling is that when connecting this entire structure, a small gap appears between the parts, which is the source of strong vibration.
To achieve a smaller gap, it is necessary to slightly grind off the metal bushing, which prevents these washers from being compressed more tightly. I would like to warn you that you need to grind very carefully and very little, literally 1 mm. If you overdo it, then the lever will move with very great effort.
As a result, after connecting the bushing with washers into a single structure, as was shown first, we get a picture when this gap has decreased:
I messed up a little and sanded a little more than necessary (which I warned about above). As a result, when the fastening nut is tightly tightened, the lever moves tightly when switching. But I loosened this nut a little, literally half a turn - it shouldn’t come off!
When everything was done, I started the car and gave good speed, and there were no sounds from the lever. But to be sure, I decided to take a ride. I accelerated to about 70 km/h in third gear and left the gas pedal. Previously, in this situation, the rattling was simply terrible, and the only salvation from this was a hand on the lever! Now there is not a single hint of extraneous sounds or vibration.
Anyone who has not yet eliminated a similar defect on their Kalina can use this advice, just grind the bushing minimally. It’s better to improve it a second time than to screw it up the first time!
Below is material from an old article that talks about a similar problem, but it is easily solvable and is a thing of the past!
Many owners of the Lada Kalina very often have the following problem: when accelerating, as well as when braking the engine, the gear lever begins to rattle. A similar problem arose with my Kalina after about 15,000 km of operation.
At first, these extraneous sounds did not irritate me much, but every day the rattling of the gearbox lever became stronger, and to be honest, it’s not very pleasant to listen to it every day. I decided to tackle this issue. So, eliminating the cause can occur in different ways, depending on the complexity of the problem.
Fortunately, in my case it was enough to pry and remove the upper cover of the lever, on which the gearbox diagram is extruded. It is better to pry off this cover with a thin screwdriver so as not to damage the plastic parts. After we managed to remove it, we wrap its inner circle with a thin strip of electrical tape and insert it back. After this, this lid fits much tighter and does not rattle.
Of course, there are other sources of extraneous sounds, but for me everything worked out as simply and quickly as possible. The picture above shows exactly what needs to be wrapped with electrical tape.
In this article I will talk about possible causes and malfunctions due to which the reverse gear on the Lada Kalina does not engage. You will also learn how to find and fix a malfunction in the reverse gear locking mechanism with your own hands.
- Before you start drastic actions and disassemble “anything and everything”, check the gear shift lever itself, this may be the reason. The linkage and cardan are quite often the cause of this breakdown. The splines could also be worn out or the clamp loosened. In this case, you will need an inspection hole.
- A faulty release bearing is an option. Although it is unlikely, since in this case all gears without exception would be engaged with a characteristic crunch and with great effort.
- Reverse gear may stop engaging due to problems in the reverse gear locking mechanism; in order to confirm or refute this, remove the gear shift knob along with the dashboard between the seats and perform a visual inspection.
Installation of the backstage from "Kalina"
Replacing the VAZ 2110 gearbox
On a VAZ 2110 you can successfully install a slide from Kalina:
Note: when cutting manually, you can ruin the part, since when the temperature of the metal increases, it loses its strength.
Note: adjustment must be carried out in order to later avoid troubles that arise during operation of the vehicle.
Why is it recommended to install a cardan from the new Kalina? On VAZ-2110 models, universal joints made of less resistant material are installed, so they quickly fail. This causes premature play in the rocker, which usually affects the quality of gear shifting while the vehicle is moving. After purchasing a new link, a visual comparison should be made of the old cardan and the purchased one. The comparison will be entirely in favor of the new acquisition. The Kalina cardan is made of better quality material, it is much more wear-resistant.
Gearbox slides for VAZ 2110
After installing a new link, the lever may rattle. Since this link completely eliminates play, that is, the vibration is transmitted completely to the lever.
Fixing lever rattling
It will dampen vibration by holding the lever in the desired position. This will not affect the application of additional forces when turning on the speeds. To get rid of the rattling of the lever, you can install additional plastic washers on the gearbox axle. To do this you will need:
REQUIREMENTS AND SUGGESTIONS
Figuring out what and how we could improve, we agreed on one thing: not to touch the gear part, namely the shafts, gears, and synchronizers. Otherwise, huge financial costs will be required to launch a new gearbox into production - without high-precision equipment, it will not be possible to ensure the proper quality of engagement, operation and synchronization.
Main elements of the VAZ-2181 gearbox:
2 - secondary shaft;
4 — fifth gear fork;
6 — reversing light switch;
8 — gear shift mechanism;
Signs of a bad or falling apart gearbox driveshaft:
- creaking when moving the lever (forward or backward), since the components are not lubricated and there is no oiler, their service life is limited. A torn boot increases the likelihood of moisture penetration. The driveshaft rusts and creaks when rotating. The squeak is usually not heard when driving. The appearance of a squeak is a warning about the upcoming maintenance of the driveshaft and replacement of the boot;
- a ringing sound when moving the shift lever indicates excess clearance that changes the angle of rotation and movement of the cardan shaft;
- Vibration felt throughout the vehicle when moving forward indicates that the driveshaft is worn beyond normal. Manifested by a higher vibration frequency of the gear shift lever. Wear on the driveshaft causes damage to other components of the car.
The gearbox driveshaft is an important part of the car, affecting driving comfort and safety. To reduce wear on the cardan and boot over time, they should be replaced in a timely manner.
I’ll tell you the easiest way to repair the gear shifter on VAZ cars. It's nice to drive a car when it's new and the rocker doesn't wobble. But when the car is used, the rocker is usually loose, and in order to engage reverse gear you have to press it into the seat, and when you engage fifth speed, you hit the passenger on the thigh with your hand, but women may enjoy such attention from the driver, and the driver feels ashamed that The speed link is wobbling so much.
The linkage becomes loose due to the fact that the lever axis wears out, and the holes in the gear shift rod are broken, but plastic bushings usually last a long time.
You can repair the link yourself without even disconnecting it from the gearbox.
To do this, you need to remove the cover from the gear shift knob, and you can remove the panel.
The easiest way is this: replace the lever axis with an M10 bolt and tighten it with a nut, adjust the nut so that it is not too tight and allows the speed lever to move without loosening. Use the second nut to tighten the first nut so that it does not unscrew arbitrarily. Even if the hole in the gear shift rod is broken, the bolt tightens, and at most there will be a millimeter play back and forth.
The whole slide will work like new. Below is a photo report on the repair of the backstage.
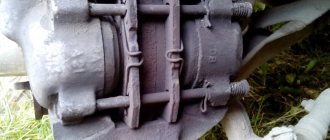
Photo. The link before repair is a view on the right, the arrow shows how the locking bracket can be removed.
Photo. View of the backstage before renovation on the left.
Photo. View of the backstage with the lever axis removed.
Photo. I was not too lazy and removed the lever of the slide, and sharpened one edge of the bushing, since it was worn obliquely, I simply aligned it on the sharpener, by eye. But I did not disconnect the rocker itself from the gearbox.
Photo. The repaired rocker, the arrow shows the locked nuts.
SYNCHRONIZER
The first samples were equipped with a three-cone synchronizer. But calculations have shown that double-cone, cheaper ones, can withstand the required torque with a margin (see pictures). Among other advantages, they made it possible to get rid of the problematic cone on the gears of the first and second gears, which is in contact with the synchronizer ring and requires high precision in manufacturing. The ring set now creates two friction surfaces for smooth and efficient synchronization. In addition, the German manufacturer (Ho¨rbiger) applies an additional coating to the intermediate ring, which reduces wear and ensures stable operating parameters, including the required coefficient of friction.
Structure of VAZ-2110 (A) and -2181 (B) gearbox synchronizers:
2 — intermediate rings;
4 — synchronizer clutch;
6 — clamp;
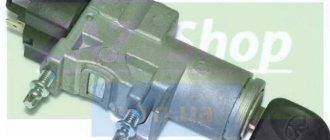
How to remove the old one and install a new gearshift pad with your own hands
After driving a VAZ-1118 for some time, many owners of this car noticed that the Kalina gearbox lever was rattling. Moreover, this rattling sound resembles the sound that was present in earlier cars of this plant (from VAZ-2108 to VAZ-2110). The fact is that the mechanical transmission is structurally controlled according to one type.
Driving a car when the interior is noisy is not very pleasant. Therefore, it is better to get rid of this problem, since the experience of many drivers shows that rattling does not go away on its own. On the contrary, as the mileage increases, it becomes increasingly louder. Ordinary driving turns into real torture for people sitting in Kalina, causing particular discomfort.
The main cause of this problem is an imperfectly executed system for attaching the gearbox lever to the linkage. The car owner can take two ways to correct the situation: fix the problem yourself or have the car repaired at a service station.
SWITCH MECHANISM
The new mechanism is a separate module. It can be installed last and removed if necessary without disassembling the box. This is technologically advanced not only in production, but also in repair. Already at the concept stage developed by the VAZ team, a selector grill appeared in it, clearly repeating the gear shift pattern and setting the lever stroke when selecting gears. The mechanism includes a lock against accidental reverse gear, which is only accessible from neutral.
The characteristics of the mechanism were selected on the original simulation stand. The tester sits down on the seat and begins to go through the gears, while the automatic system imitates the shift pattern, forces and lever strokes implemented on a specific production car. You can also upload your own settings. Don't like an overly tight lever? A couple of taps on the keyboard and the effort is reduced. So, step by step, we selected the optimal settings for the “eighty-one”. The computer processed the data and produced parameters for constructing an accurate mathematical model, according to which those very tricky central plates were made.
Changing gears on a VAZ 2109
The “nine” is equipped with a five-speed manual gearbox (Gearbox). The connection between the gear selection control lever and the gearbox actuators is purely mechanical. For this purpose, a steel rod is used, the lower end of which is fixed to a ball joint in the housing of the gear selection mechanism, and the upper end is equipped with a knob that fits comfortably in the driver’s hand. This lever, not entirely justifiably, is popularly called the “slide”.
In a classic backstage, the levers are connected using a slider that can move along it. It looks especially impressive when driving the drive wheels of a mainline steam locomotive. In an automobile rocker, the elements have a certain freedom; they are connected by a hinge, but the articulation point cannot move along the rocker. Nevertheless, the name stuck.
The gear change lever of the “nine” has two degrees of freedom with three positions in each: “forward - neutral - back” and “left - neutral - right”. This gives 9 selector position options, of which two (rear left and rear right) are not used. The remaining seven correspond to five forward gears, one reverse gear and neutral.
The standard VAZ 2109 rocker is called long-stroke because the attachment point of the rod leading to the gearbox is located quite close to the ball joint. The distance to the attachment point is approximately 4 cm. With a total length of the lever with a knob of 30 cm, in order to move the gearbox rod by only 2 cm, the gearbox handle must be moved by 15 cm. Plus the play - it turns out to be a very long-stroke option, and it cannot be configured otherwise.
The Kalina wing on the VAZ 2109 also improves the situation.
ROPE DRIVE
The single-rod gear shift drive was replaced by a cable. The unpleasant vibrations on the lever are gone, there is less play, and shifting is clearer.
Lightweight aluminum German gear forks are equipped with anti-wear shoes made of plastic. Previous parts were cast from steel, and to reduce wear, a bronze layer was applied to individual parts, which wore off over time and tinted the oil with golden powder.
VAZ-2181 is the first AVTOVAZ gearbox for which a computer calculation of all parts subject to loads was performed: crankcases, forks, levers, etc. Thus, the design was not only optimized, but also made more reliable.
1 — gear selector levers;
3 — selector grid;
5 - central three-dimensional plate.
Gear selection rod viburnum
Hello). Another small repair. Loss of fuel and lubricants in the engine compartment area is a bad thing.
Through long and complex research in a top-secret laboratory, it turned out that the gear selection oil seal (the “rocker” oil seal) had given up... and the transmission quietly, little by little, but constantly, went into protection and then into the ground. “Looking into tomorrow” it became clear that this cannot continue for long, it is necessary to change:
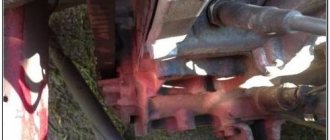
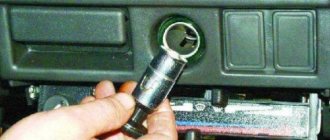
Unscrew the rod and the rocker...:
...and the first surprise - having pulled the boot a little away from the gearbox housing, oil rushed out of it, probably 200-300 grams just leaked out:
It’s good that the substrate was laid in advance, otherwise they would have added a link and a cardan for 3.14):
Because The oil was almost all gone, and the boot was getting in the way a lot, so I threw it away:
Next it was necessary to unscrew and remove the cardan:
...and here is the second surprise - I can’t unscrew it...pzdts)). Firstly, it’s not convenient to climb, hands and keys in the oil-liquid are slippery, and secondly, the bolt has already begun to “lick”, and it’s not simple, but specific - The prospect of following him to the store did not make me happy, and what’s the point if I didn’t unscrew this cardan... The disassembly of the gearbox from below has already begun) ... well, what if I could throw my head on the “8”:
And the **** there)), still can’t get to it. In the end, somehow (I didn’t understand how) I turned it a little with the cap, then completely unscrewed it and removed the cardan:
Then the only thing left to do is to knock out (carefully) the “bucket” from the gearbox, in which this unfortunate oil seal is located. As it turned out, there was no oil seal in it... it was on the gearbox rod, that is, it was stupidly knocked out of its seat... so and such rivers of oil flowed.
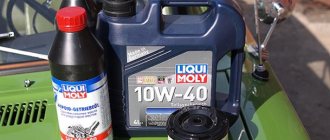
Before all this crap, on the advice of KalinAklubnikov, I bought not one oil seal, but two: Kalinovsky and eight-wheel:
And the duster is also unforgotten:
I did not shorten the springs on the seals, because... if I had gone to remove them, I would definitely have messed up and torn them, from experience, it was...nah, I don’t want to)). I just carefully pressed the Kalinovsky one in first, and then pressed it down with an eight-piece... in size they are just like:
Sealant on the “buckle” from the outside and put everything in the reverse order, replenishing the loss of oil from the gearbox. Nothing complicated, though there is one point: adjusting the rocker so that the speeds turn on normally. Before removing it, someone puts a mark on the driveshaft, and then follows it puts on the drawstring, I completely missed this point, I didn’t put marks, I did it according to the ABC book: when putting the drawstring on the cardan, you need to leave a 13-15 mm gap between them. I didn’t climb there with a ruler, I just measured 1.5 cm using a match and set it up like this...well, you understand, in general, who regulated it)):
But no, not everything, I don’t remember, someone was wondering why the block below was covered in oil. Answer: dry crankcase gas hoses and a rubber seal on the dipstick. 1.5 or 2 years ago I changed everything, this is how it is at the moment, relatively clean:
Issue price: 180 ₽
Repair, features and technical specifications
Inside a VAZ 21118 car, like any other, there is always a gearbox. For a model such as Kalina 1118, this device is a mechanical type design, which is equipped with one reverse stage, as well as 5 forward stages.
Gearbox from Lada Kalina.
In Lada Kalina, the gearbox is structurally combined with a differential, the main gear. Transmission differential repair should also take this into account.
The mechanism body of the VAZ Kalina car is presented in the form of three aluminum copper crankcases:
Special sealants are applied between them when assembling and repairing the gearbox.
Reasons for replacement
There are several situations when the owner of a VAZ 2109 has or wants to get into the design of the gearbox and specifically work with the rocker:
- Oil is leaking due to a damaged rocker seal. It must be replaced;
- The old drawstring was out of order;
- I would like to exchange the long-stroke for a short-stroke in view of its advantages.
Now to the question of when replacing or repairing the backstage is a necessary measure.
- The backlash of the gearbox selector has increased significantly.
- Gears change with difficulty, and when changing speed, extraneous sounds appear.
- It is possible to change gears, but with a lot of effort.
- Speeds change incorrectly. Instead of one, a completely different one turns on.
- It is impossible to turn on all or part of the gears at all.
Technical features of the gearbox
The drive gear block is engaged by the input shaft. This is important to consider when repairing a gearbox. As for the input shaft itself, a constant clutch is created for it with the front gear elements that perform similar functions.
When repairing the secondary shaft, we must remember that it has a hollow structure. It is thanks to this that the oil reaches the driven gears without any problems.
Inside the mechanism you can also find driven bearings and synchronizers. When replacing the backstage on your own, this part can also be replaced. This also requires repairing the gearbox driveshaft.
The design of the gearbox is such that repairs cannot be done without the use of special circuits. In this case, the radial clearance on the roller bearings is no more than 0.07 millimeters.
Repairing the gearbox is also a rather complicated process. Especially considering that 0.04 millimeters should not exceed the same figure, but for ball analogues.
Location of the checkpoint backstage on the Lada Kalina.
The oil sump is responsible for supplying oil. It is located in the area of the front bearing, fixed behind the output shaft. Major repairs often affect such details. If you select the desired thickness of the rings, it will be possible to adjust the tension indicator. The dimensions of the seals are easy to find in the instructions; these parts can be replaced without problems, even at home.
When repairing the gearshift knob, you must remember that the driven gear of the gearbox on this machine is attached to the differential flange. Through the saloon, the atmosphere is combined with the box itself, located at the top of the structure we are considering.
Lever repair is not the only operation that needs to be carried out from time to time. Sometimes it is necessary to replace bearings; this is done when extraneous noise appears. A gearbox repair kit must be purchased if excess noise becomes noticeable when pressing or releasing the clutch pedal.
All control drive elements of the Lada Kalina gearbox.
The repair manual says that the box is controlled using a drive, which consists of several elements:
- Switch rod.
- Spherical bearing.
- Lever arm.
According to the manual, cable structures are always equipped with jet traction, then the gears do not turn off on their own. One of the ends of the rod is connected to the lever, and the other to the motor. If the seals of the internal joints are faulty, it is necessary to carry out independent repair of the gearbox. But before replacing them, you need to completely change the oil. The front wheel drive is completely disconnected.
Servicing the gearbox involves using a screwdriver to remove the necessary parts. But you will need to purchase a mandrel with the necessary parameters in order to carry out the pressing.
Three axes are present on the shift system. One axis is equipped with a three-arm lever for selecting and disengaging gears. There is no gearbox on the second axle, but there are brackets that block rotation. After every 75 thousand kilometers, this design is completely changed. Gearbox lever play should also alert you, as should failure of other parts.
Reasons for replacement
There are several situations when the owner of a VAZ 2109 has or wants to get into the design of the gearbox and specifically work with the rocker:
- Oil is leaking due to a damaged rocker seal. It must be replaced;
- The old drawstring was out of order;
- I would like to exchange the long-stroke for a short-stroke in view of its advantages.
Now to the question of when replacing or repairing the backstage is a necessary measure.
- The backlash of the gearbox selector has increased significantly.
- Gears change with difficulty, and when changing speed, extraneous sounds appear.
- It is possible to change gears, but with a lot of effort.
- Speeds change incorrectly. Instead of one, a completely different one turns on.
- It is impossible to turn on all or part of the gears at all.
Even if the resulting play is still insignificant, it is advisable to immediately begin repairs or completely change the drawstring.
Replacing the oil seal
If you find that the oil in the gearbox is gradually disappearing, you can suspect the rocker seal. There is nothing else left to do but change the element.
- First, buy a new shift rod seal. It costs about 70-100 rubles.
- Drain the oil from the box, having prepared a clean container in advance. This is in case you refill the same oil. Although this is an excellent reason for you to change the transmission lubricant at the same time.
- To make sure the oil flows out better, first unscrew the filler plug or remove the speedometer gear. After draining the oil, screw the cap back on.
- We climb under the car and disconnect the fasteners of the gearbox lever driveshaft.
- Pull the boot off the cardan, unscrew the bolts securing it to the gearshift rod. Problematic fasteners that you will have to tinker with.
- After removing the cardan shaft, remove the rod boot.
- We remove the damaged oil seal using an awl or suitable available tools. The main thing here is the stock itself.
- We install a new one in place of the old oil seal and press it with a tube of the appropriate diameter.
- Put the boot back in place and rotate the driveshaft.
- Please note that the bolt securing the cardan to the rod is an adjustment bolt. Therefore, screw it in exactly the same way as before dismantling. Otherwise, some speeds may not turn on.
Removal and installation of the gearbox
Servicing the gearbox assumes that the mechanism will have to be removed and its position changed. Before doing this, you need to install the vehicle itself on the lift. The ignition must be turned off completely and the parking brake must be used.
How to repair a gearbox? To do this, disconnect the minus terminal from the battery. The hood must be opened completely. Any manual on gearbox repairs writes about this.
The oil filler cap is also removed. It is necessary to install the previous item after the screen is removed. The gearbox requires loosening the clamp responsible for fixing it. The inlet pipe hose must be disconnected from the corresponding sensor. Gearbox lever play requires the same actions in practice. Then you need to unscrew the air intake nut.
The repair progress further depends on the specific malfunction.
Gearbox Lada Kalina after dismantling and disassembly.
The gearbox can be installed in its original place after the 1st speed repair is completed. SHRUS-4 lubricant is applied to the outer surface of the corresponding bushing in the clutch in a very thin layer. This will also help if the gearbox is loose. The pin fixing bolts are removed from the steering knuckles.
Short-stroke link for Priora
Before we consider how to properly install a short-throw rocker on a Priora with our own hands, let’s remember why this is being done.
The essence of a short-stroke rocker is that it reduces the travel of the gearbox lever when switching gears off or on. Moreover, gear shifting in the car becomes clearer.
Unlike the factory standard lever, the short-stroke rocker has slightly different bending angles. Thanks to improved geometry, the gear shifting process brings pleasure to sports driving enthusiasts.
As already mentioned, installing a Priora short-stroke rocker results in the gearshift lever reacting to your movement faster and more responsively, while the actual rocker travel will be less.
If you are a fan of sporty style and want to accelerate the car as quickly as possible, then you will need to change gears quickly. Again, here too a short-throw slide will come in handy.
Source
How to remove the gearbox
The fork fixing bolt and nut must be unscrewed after the input shaft stopper has been removed. The same thing will have to be done if it is necessary to replace the short-throw gearshift link.
The spline must be removed from the secondary shaft. The box assembly diagram assumes the reverse procedure.
Removing the gear shift mechanism drive may be necessary when replacing faulty parts (for example, to replace a torn drive rod boot, damaged drive rod). The sequence and number of operations indicated below can be changed depending on the purpose of the work.
To complete the work, you will need an assistant, as well as an inspection ditch or overpass.
Removal and disassembly
1. We prepare the car for work.
2. Clean the threads of the clamp bolt with a wire brush. We treat the junction of the rod with the hinge and the bolt with penetrating lubricant.
3. 13 mm wrench , loosen the tightening of the clamp bolt nut.
4. Unclench the clamp with a screwdriver and move it along the rod. Unclench the rod with a screwdriver.
5. After wiping the junction of the rod with the hinge with a rag, we mark the relative position of the drive rod and the hinge.
6. Disconnect the rod from the hinge.
7. Disconnect the torque rod from the base of the ball joint of the gear shift lever.
8. Inside the car, use a thin slotted screwdriver to remove the plug from the gear shift lever handle.
9. 13 mm socket wrench , unscrew the nut securing the handle bolt and remove the handle from the gear shift lever.
10. Using a screwdriver, we remove the cover from the floor tunnel lining and turn the cover inside out.
11. Disconnect the wiring harness from the reverse lock solenoid switch.
Loosen or cut the plastic clamp.
12. Remove the switch from the gear shift lever.
13. Remove the floor tunnel lining.
If necessary, you can unscrew the four bolts securing the gearshift lever support to the body (see below) and remove the drive assembly.
14. 13 mm wrench , unscrew the nut of the bolt securing the linkage to the lever, holding the bolt from turning with a second wrench of the same size.
15. Remove the bolt from the lever. We remove the lever from the traction fork. We remove the metal and plastic washers, take out the metal spacer sleeve.
16. To compress the drive rod, lubricate it with soapy water and remove it from the hole in the cover.
17. 13 mm socket , unscrew the three bolts securing the bracket to the body.
We unscrew the fourth bolt securing the bracket with a spanner of the same size (access to it from above is blocked by the air duct).
18. Remove the bracket and drive rod cover. We replace the torn cover.
19. We remove the gear shift lever support from the hole in the floor tunnel.
20. Use a puller to compress the locking ring of the ball joint of the lever and remove it from the base of the support.
21. Remove the lever from the base of the support.
22. Using a screwdriver, remove the top sealing ring.
23. Remove the support from the lever.
Assembly and installation
We assemble and install the drive in the reverse order. Before tightening the gearshift mechanism drive rod clamp, adjust the drive (see below).
Adjustment
1. We loosen the tightening of the drive rod clamp of the gear shift mechanism (see paragraphs 2-4 above).
2. We lift the lower part of the gear shift lever cover (see point 10 above).
3. We move the gear shift lever so that its lower part is perpendicular to the floor surface, and the lever handle is located from the right seat cushion at a distance approximately equal to 1/3 of the distance between the front seats and hold it in this position. In this case, the assistant, moving the clamp 2-3 mm from the end of the rod, tightens the clamp nut.
4. We install the cover in place and, by trying to engage the gears, make sure that the gear shift mechanism drive is working.
Replacing the gear shift rod hinge boot and rod seal
We carry out the work on an inspection ditch or overpass.
We move the joint assembly with the control rod from the gear selector rod.
Using a 10mm spanner, unscrew the hinge locking screw.
. and remove the screw.
We move the joint assembly with the control rod from the gear selector rod.
Remove the protective cover of the hinge from the switch rod
Using a powerful slotted screwdriver, evenly (from different sides) pry the seal ring by the collar.
. and press the race with the oil seal out of the clutch housing socket.
A mandrel of the appropriate size.
. press the oil seal out of the cage. We clean the race and the seat under it in the clutch housing from the old sealant. Select a mandrel (for example, a tool head) with a diameter close to the outer diameter of the oil seal.
. press the oil seal into the cage until it stops (the working edge of the oil seal should face the clutch housing). We apply transmission oil to the working edge of the oil seal, and sealant to the outer surface of the race. We put the cage on the switch rod and press it into the clutch housing socket, resting it with a mandrel of a suitable size on the collar of the oil seal cage. We carry out further assembly in reverse order. We replace the damaged hinge cover. Before assembly, clean and degrease the threads of the hinge locking screw and apply locking (thread) sealant to the threads. Before tightening the screw, we ensure that the holes in the hinge and the gear selector rod match
How to replace the universal joint
In most cases, it is not the rocker itself that fails, but the cardan. Due to its displacement, even a small one, a failure occurs in the gear shift mechanism.
Standard VAZ-2109 scenes are rarely installed during repairs; similar parts from Lada Kalina are used. The replacement looks like this:
- Using two keys set to “13”, unscrew the clamp securing the cardan to the rod.
- Using a screwdriver, pull the boot towards the box housing. If desired, you can remove it completely, and if it has cuts or other damage, replace it with a new one.
- Unscrew the fixing bolt with a “10” key.
- Knock down the cardan with a hammer, strike carefully so as not to damage anything.
- The Kalinovsky universal joint is much more durable and reliable, so install it instead of the standard one.
- Reassemble the entire structure in reverse order. But do not rush to tighten the bolt on the clamp - adjustment is necessary.
Backstage adjustment
There is nothing complicated in the procedure; you can do it yourself, but you will have to run from the pit to the salon.
Yes, it is advisable to do this work in a pit or overpass. You need to act approximately according to this principle:
- Loosen the nut on the clamp.
- Set the gearshift lever to the reverse gear position.
- Set the box rod to the reverse speed position. This is difficult to achieve, so adjustments will have to be made.
- Check how the gears shift. If the rear one is too far to the left, loosen the clamp and turn the cardan counterclockwise. If the fifth speed (including reverse) has gone too far to the right, then the cardan rotates clockwise.
By adjusting the position of the gearshift rocker, you will notice that when the lever is installed in the middle, neutral speed will be engaged. When turning on the fifth gear, the lever should not catch the passenger seat, and when moving in reverse, the driver's seat should not interfere with the movement of the lever.