- Design and principle of operation
- Where is the plus and where is the minus in the cigarette lighter?
- Plug
- Nest
- Why know polarity
- Signs of an incorrect connection
- How to check
- Cigarette lighter connection diagram
Leading automakers began introducing cigarette lighters in their cars back in the 20s. last century. Since then, they have gained great popularity and have become an indispensable accessory on the dashboard of vehicles. The operating principle of the devices has not changed, but the capabilities and functions have been expanded.
Design and principle of operation
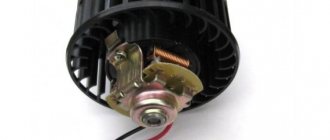
The car cigarette lighter has a simple design and is a small metal cartridge with a plastic handle and button. A nichrome spiral is installed under the body, which is heated by electric current.
There is a special socket on the instrument panel or in another part of the car. If you insert the cigarette lighter into it and press the handle, it will be connected to the on-board network.
The positive contact mates with the central terminal of the socket and the spiral of the device. The negative interacts with the socket base and the plug clamping mechanism. When using the cigarette lighter, current is supplied through the nichrome element, which contributes to its heating.
After reaching the maximum temperature indicators, the thermal relay is activated, and the cigarette lighter is disconnected from the on-board power supply.
To protect the connector from blowing, manufacturers install a 10 A fuse. It is located in the fuse block and is indicated by the “cigar” marking or a cigarette icon.
Since its appearance in the first half of the 20th century. The internal structure of the cigarette lighter has remained virtually unchanged.
The key advantage of the device is the ability to power a variety of electrical appliances, which make long driving comfortable and safe.
However, due to the consumption of a large amount of energy, the structure may fail. In addition, there are other disadvantages of such an accessory. When gadgets are frequently connected, the internal elements of the device are subject to a large mechanical load, which contributes to their wear.
Most fork models have only spring elements and a few pressure forks. Therefore, when driving over rough terrain, natural vibrations are created that disrupt contact and lead to sparks in the cigarette lighter. This phenomenon can cause a short circuit and even lead to a fire.
Advantages and disadvantages of car cigarette lighters
Once a cigarette lighter appears in a car, it remains an integral part of the equipment.
With the development of technology, many devices have appeared that require sufficient power from the vehicle’s on-board network. AP began to be used as a car socket. The operating principle of the device has not changed over the years. But various tees and adapters appeared that expanded the possibilities of using AP (the author of the video is Do It Yourself).
The main advantage of a car cigarette lighter is the ability to connect a large number of different electrical appliances that may be needed on a long trip or will increase the comfort of the trip.
Since large amounts of current pass through the AP, its design is unreliable. In addition, the device constantly experiences additional mechanical stress due to the constant connection of various devices. During the trip, due to vibration, the contact between the AP and the socket is broken. As a result, sparks may appear, which may even cause a short circuit.
Where is the plus and where is the minus in the cigarette lighter?
To understand how the cigarette lighter works, where the plus and where the minus are, it is enough to examine its key components.
The plus point about the cigarette lighter is its handle. When you press the button, the electrical circuit is closed, and the nichrome spiral is heated. When wondering where the minus is on the cigarette lighter, you should pay attention to the side walls of the metal cylinder.
Using the polarity information as a guide, you can begin to repair the damaged part. To restore a failed element you need to:
- Unscrew the nut on the back side and remove the device.
- Find the semiconductor wafer and remove it (if it caused the breakdown).
- Make a small cut on the body and begin assembling the device.
- Strip the wires and crimp the terminals.
- Remove the center console in the car and turn off the backlight.
- Remove the block.
- Connect the wires using connecting clips, observing the diagram and polarity.
- Pull the wires down and connect them to the socket.
- Put the accessory in place.
- Turn on the backlight.
Plug
The plug is designed to transmit 12V/24V voltage through the cigarette lighter socket. Its body is made of plastic and has wires for screws. An 8A fuse is located inside the device, protecting the equipment from power surges.
The technical specifications of the plug are as follows:
- Input voltage indicators - 12V/24V.
- The maximum diameter of the wires used is 7 mm.
- Plug length - 83 mm.
- The current throughput is 8 A.
Nest
Experienced drivers know where the plus is on the cigarette lighter. It is supplied to the central contact of the socket and the clamping feet of the plug. The nominal voltage in the connector of modern machines is 12 V.
The diameter of Soviet nests differed from foreign ones. Therefore, when trying to insert a short plug into such a connector, it did not reach the central contact, and the external device refused to work.
Installing a second cigarette lighter
Many drivers lack an additional socket. There are several ways out of this situation. The simplest one is to install a special splitter that plugs into a standard connector. However, this can put a lot of stress on the circuit and cause the wires and fuse to blow. Therefore, some car owners install an additional car cigarette lighter.
The second method is more difficult, but more reliable. The procedure is carried out as follows.
- We choose a suitable location for the additional device.
- We are purchasing a new spare part. The black wire is the ground that we mount under the bolt on the body. Red is a plus, it goes to the battery, and yellow is responsible for the backlight of the device.
- Cut a hole of suitable diameter.
- We install a new spare part.
- We connect all the wires, remembering where the plus and minus are in the cigarette lighter.
- We remove debris and perform final assembly. Now the owner has two nests at his disposal.
Source
Signs of an incorrect connection
If the cigarette lighter is connected incorrectly, it will malfunction or fail completely. In addition, deviation from the installation rules can cause a short circuit and lead to ignition of the element.
How to check
If the cigarette lighter refuses to conduct electricity, you should make sure that it is connected correctly.
To check the functionality of the device, you need to follow the following algorithm:
- Turn the ignition key and activate the electricity supply.
- Insert the cigarette lighter into the socket.
- Wait a few seconds and check the condition of the element with your hand. If it does not heat up, it means a breakdown has occurred.
Chevrolet Niva cigarette lighter: design, replacement
Most people cannot imagine their life without cigarettes, and for drivers, having a cigarette lighter in their car becomes an indispensable item. The Chevrolet Niva is also equipped with a cigarette lighter. The cigarette lighter is not only used for lighting cigarettes, it becomes useful in various situations, which the article will tell you about. It is the cigarette lighter on the Chevrolet Niva that we will talk about: let’s look at what it is, where it is, how it works and what the product diagram is.
Cigarette lighter connection diagram
The exact connection diagram for a car cigarette lighter depends on its design and the characteristics of the vehicle. However, there are generally accepted rules and conditions that must be observed when installing the part.
The standard arrangement of parts is as follows:
- Battery
- Safety unit.
- Switch.
- Relay.
- Cigarette lighter.
Do not connect the accessory directly to the ignition switch, as the system will not be able to withstand the increased load. After laying the cable under the hood, you need to connect it to the positive contact, and then connect the fuse and attach it to the terminal. If you cannot do this, connect the wire to the starter and attach it to the positive terminal of the relay.
The end of the wire needs to be stripped 1 cm, and then installed on the terminal and clamped with pliers. Next, you should secure the wire to prevent it from loosening. For this purpose, you can use a soldering iron or a suitable terminal. A switch and fuse are installed near the cigarette lighter. Such details will increase the safety of operation of the device.
The switch must withstand operation with a current of 1.5 times the maximum load. If it is missing, you need to install a relay nearby with the appropriate current value. Some drivers place the switch and relay near the ignition switch. The switch is connected to the control contact of the relay, and the cigarette lighter is connected to the power contact.
Before turning on the device, you should make sure the connection is correct. The splitter and relay must be tightly fixed to the housing. Next, you need to make sure that the ignition circuit is turned off and begin testing the device. Using a tester, you can estimate the voltage on an unconnected battery. Next, you should put the minus terminal on the battery terminal and measure the voltage again. If there are no changes, then the connection diagram has been followed.
Proper lighting from someone else's battery
The algorithm recommended by experts consists of several sequential steps:
- equalizing the battery charge on the donor car (5-10 minutes of internal combustion engine operation at 2000-3000 rpm);
- turning off the ignition on both cars and all systems powered from the on-board network;
- connecting the red wire to the positive terminal of the donor battery, and then to the positive terminal of the dead battery;
- connecting the black wire to the negative of the donor battery, followed by fixing the second “crocodile” to an unpainted part of the body or the internal combustion engine block of the recipient car (“ground”).
- starting the recipient engine with mandatory operation for 5-10 minutes at 1500-2000 rpm;
- disconnecting the wires in the reverse order (minus from the recipient - minus from the donor, plus from the recipient - plus from the donor).
It is very important to observe polarity to avoid short circuit. You should not trust the visually symmetrical arrangement of batteries, which may have a design with direct and reverse polarity. The only correct reference point is the factory markings on the case.
Theoretically, lighting a car with a dead battery will be successful even if the negative crocodile is connected not to ground, but to the “–” terminal on the battery. But in practice, such a connection scheme leads to accelerated discharge of the donor battery, especially in cold weather. Another feature of the negative “crocodile” is a strong spark when the starting current is supplied to the starter. If there is oil or gasoline residue under the hood, there is a serious fire hazard. That is why, before lighting, it is necessary to wipe off all suspicious stains on the engine and internal surfaces of the body.
How to properly use a car's cigarette lighter
A car cigarette lighter is a mandatory vehicle accessory. Recently, the malfunction of the cigarette lighter connector is especially noticeable, since it is often loaded with additional functions of powering and charging all kinds of gadgets.
p, blockquote 1,0,0,0,0 —>
p, blockquote 2,0,0,0,0 —>
They are also a possible cause of blown power fuses for the cigarette lighter socket and malfunction of the connector.
p, blockquote 3,0,0,0,0 —>
p, blockquote 4,0,0,0,0 —>
Car cigarette lighter device
p, blockquote 5,0,0,0,0 —>
Despite its apparent simplicity, the car cigarette lighter device is a rather complex technical design:
p, blockquote 6,0,0,0,0 —>
p, blockquote 7,0,0,0,0 —>
The central contact 1 is supplied with a supply voltage of + 12 Volts through a fuse rated 10 - 30 Amps (depending on the type of cigarette lighter and the make of the car). The working element 9 is usually made of a spiral heating nichrome plate. Its central contact is connected to pin 1 (supply voltage) after pressing button 6 of the removable element of the cigarette lighter 5.
p, blockquote 8,0,0,0,0 —>
Bimetallic plates 10 record the moment of pressing the removable element to the cigarette lighter contact. As the electrical element 9 heats up, the temperature of the bimetallic plates increases, they change their geometric dimensions, the fastening of the clamps is weakened, and the spring 3 pushes the removable part out of the socket, thereby signaling the moment of complete heating.
p, blockquote 9,0,0,0,0 —>
Most modern cigarette lighters have a light bulb or LED elements to illuminate the socket at night.
p, blockquote 10,0,0,0,0 —>
Correct wires for lighting a car
Having decided to buy a car battery from Bosch, Delkor, “Beast” or any other brand, you should immediately purchase high-quality ignition cables. This is the most important element of starting an engine from a donor car, which is subject to very stringent requirements for materials and design:
- cross-sectional area – from 16 mm2 (the thickness of a pencil) for the safe passage of strong inrush currents of 200-500 amperes;
- external insulation – dense, thick, flexible, made of PVC or polyethylene for reliable protection of users and trouble-free operation in cold weather;
- current-carrying core – copper stranded core;
- color marking is black and red, spaced to clearly identify the dark “–” and the brighter “+”. There may be other variations of shades (black and yellow, black and green, black and blue, etc.);
- length – 2.0-3.5 meters for convenient connection without critical proximity of machines;
- clamps (“crocodiles”) – copper, brass, bronze or combined with sharp teeth, a strong spring and ergonomic handles with a dielectric coating.
Even in those starter cable kits where both conductors are the same color, the color of the crocodiles is always different. Do not get carried away by the long length of the starter wire. This is the case when convenience harms quality, since each meter “eats” 0.5 volts of voltage. You should also avoid thin models that are subject to accelerated thermoelectric wear. When a current of 300-400 amperes passes through them, the copper core quickly burns out and the outer shell melts. The technical and operational properties of aluminum variations are not much inferior to copper ones in electrical terms, but do not withstand regular fracture loads
.
To make your own cigarette lighter wires, you should use a power cable in non-flammable insulation, for example, VVGng or PVSng, with a cross-section of 20-25 mm2. Instead of “crocodiles”, tips or end loops can be used.
Why the cigarette lighter in the car does not work - the main malfunctions, causes and methods for eliminating them
p, blockquote 11,0,1,0,0 —>
The main malfunctions of car cigarette lighters are:
p, blockquote 12,0,0,0,0 —>
- burnout of the heating element of the removable part;
- burning of the contact areas of the stationary and removable parts;
- untimely release of the removable part at low temperatures;
- lack of fixation of the removable element;
- backlight malfunction;
- lack of voltage on the positive central contact of the cigarette lighter;
- bad mass.
adsp-pro-1 —>
Heating element burnout
is currently much less common than other faults. This is also due to the promotion of a healthy lifestyle, including, but, to a greater extent, the fact that much more often the cigarette lighter socket powers and charges various gadgets than it serves to directly perform its direct duties.
p, blockquote 13,0,0,0,0 —>
The heating element, in principle, can be replaced - they used to do this on Zhiguli cars. But now, with all the variety of car cigarette lighters, it is easier and cheaper to change the design, and, moreover, completely assembled, since it is very difficult to select exactly the elements of the stationary and removable parts.
Recommendations for use
p, blockquote 42,0,0,0,0 —>
Tips for using a car cigarette lighter:
p, blockquote 43,0,0,0,0 —>
- Do not store the removable part in dirty places; dust and dirt falling on the heating zone can cause a fire;
- after purchasing a used car, check whether additional equipment, a radio tape recorder, is connected to the cigarette lighter power supply;
- Use only high-quality splitters, tees and other gadgets installed in the cigarette lighter socket; do not leave them turned on while the vehicle is parked.
If the battery icon on the instrument panel lights up, what to do in this case.
How to properly connect the car towbar connector.
Video - how to make a plus in the cigarette lighter from a key:
p, blockquote 45,0,0,0,0 —> p, blockquote 46,0,0,0,1 —>
Design and operation diagram
The cigarette lighter, in addition to lighting a cigarette, can be used to connect various electronic devices and recharge cell phones. This product is a spiral-shaped structure with a holder, which is installed in a special socket. In the socket, the heating of the spiral is carried out by means of an electric current, thereby causing the heating of the spiral. Once heated to a maximum temperature of over 100 degrees, this coil can be used for various fire lighting needs.
The cigarette lighter also serves as a car DC socket, which can be used to power electronic devices: telephone, coffee maker, vacuum cleaner, etc. Thus, the cigarette lighter has become an indispensable attribute of ordinary everyday life these days.
In order to have information about how the device works, it is necessary to consider its connection diagram.
Cigarette lighter power supply circuit in a Chevrolet Niva car
The operating diagram of the device includes:
- red wire: power supply to the heating element, in the circuit of which the fuse is directly connected;
- black wire: negative, connected to the car body;
- blue wire: power supply for the cigarette lighter, the circuit of which also has a fuse.
Thus, the device diagram shows that when power is supplied to the device, the circuit is closed and the coil is heated. When the coil heats up to a certain temperature, it will turn off.
A little about the fuse
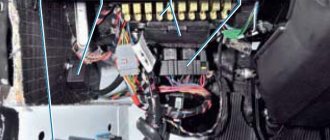
The fuse serves to protect the device from a short circuit if for some reason this happens. Most often, short circuits occur due to the use of equipment plugs that do not fit the diameter of the cigarette lighter socket very well. The fuse is located in the fuse block and trips when the current limit value in the supply wire is reached. On a Chevrolet Niva, the cigarette lighter fuse is located in the passenger compartment under the instrument panel. Below is a diagram of the location of fuses, in which the element highlighted with a marker refers to the protection of the cigarette lighter.
This fuse is designed for an operating current of 15A, so if a higher value is induced in the circuit, it will break the supply circuit by melting the fuse link.
Product replacement
The product is replaced if the fault lies directly in the cigarette lighter socket itself. Initially, if this element does not work, then it is necessary to check the suitability of the fuse and the filament, and only then proceed to replace the socket.
This element is located directly inside the car, and its replacement occurs in the following order:
- The power supply to the Chevrolet Niva SUV from the battery is cut off.
- The cigarette lighter socket is removed.
- The connecting blocks and lighting with wiring must be passed through the hole in the cladding.
- Next, you need to squeeze the socket screen until the tabs come out of the light guide slots, and then remove the screen.
- Using a screwdriver, you need to press the socket latch and disengage it, as shown in the photo.
- The socket is removed from the cladding together with the supply wiring, squeezing the plastic clips on both sides.
The coil must be heated for 20 seconds, after which the cartridge returns to its original position. If the shutdown occurs earlier or, conversely, longer, then it is necessary to make adjustments. Adjustment involves setting the contacts to a certain position, as shown in the photo.
Next, the socket is replaced with a new one, and installation is carried out in the reverse order of removal. When installing the light guide, it is necessary to ensure that the protrusion it has fits into the slot on the cladding.
Don't burn out at work: how to connect several gadgets to the cigarette lighter?
In the summer, their owners usually only connect smartphone chargers and DVRs, which consume a nominal current, to the on-board network of their cars. But in the fall and winter, “pop warmer” capes, remote fan heaters, electric mugs, thermal glass scrapers and other car heating gadgets are plugged into cigarette lighters. All this junk, as a rule, is powered simultaneously through cigarette lighter splitters that have from two to five sockets, as a result of which many car owners encounter problems. And it would be okay if a contact came loose somewhere or a plug melted, but you can also burn your car... How can you not do this?
How to “light” a car correctly
Not a single car owner is insured against an unpleasant surprise in the form of a sudden discharge of the battery. This problem is especially relevant in winter, when after spending the night in a cold garage or in the cold, the starter is not able to spin the engine crankshaft due to the lack of sufficient starting currents. The best way out of the situation is to move the battery to a warm room with further restoration of voltage and capacity with a special charger. If this option is not suitable, you can “light” the dead battery from a battery with similar parameters installed in another car.