Is it worth doing an engine overhaul?
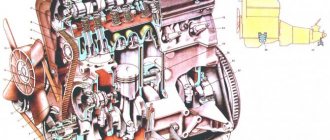
The engine for 2101-2107 was developed by the Italians in the 50s of the last century.
Since then, the design has not changed, only in 2007 the 2107 model was equipped with an injector. The engine is very simple, and if you have a repair book, as well as a set of tools, you can successfully carry out high-quality engine repairs. The cost of capital, even under ideal repair conditions, is inexpensive. Regarding the service life: according to the manufacturer’s statement, the engine runs for 120,000 km, after which the block is bored to the repair size, and so on 2 more times, after which the block can be thrown away.
Subject to high-quality spare parts, proper troubleshooting, the use of high-quality lubricants, and professional assembly, our engine can travel 150-200 thousand, from replacement to oil change and some consumables.
Expert opinion
! Expert adviceAsk a questionVK profileRuslan KonstantinovMore about the expertRuslan Konstantinov – 10 years of professional car repair experience. Graduated from Izhevsk State Technical University named after M.T. Kalashnikov with a degree in OPERATION OF TRANSPORTATION AND TECHNOLOGICAL MACHINES AND COMPLEXES. The specialization of work varies, from diagnostics and repair of engines and transmissions to consultation on the purchase of consumables. Experience in repairing electronic components. On a VAZ 2106, major engine repairs are no longer relevant today. Now it’s easier and cheaper to buy another complete motor. Moreover, according to the new rules, it is considered a spare part, there are no problems with registering the number, etc. Moreover, if you have never had to deal with such a procedure before, there is a risk of not putting the engine back together at all. And again you will have to buy another unit or seek help from someone who can assemble it. This is a waste of time, effort, nerves and money. Although there are those who engage in overhauling for fun - there is nothing to say here, everyone has their own hobbies.
The power plant of a vehicle is considered the main automotive unit, the operation of which gives utility to the mechanical vehicle and benefits from its functioning. The engine of a car must be operated under certain conditions; failure to comply with the rules for its use, such as: the condition of the road surface, extreme driving methods, large differences in temperature values in the atmosphere will significantly reduce the operational life of the vehicle components.
Services
For high-quality repairs, we will need to send the cylinder head and the block itself for grinding. To make the plane even, to ensure a smooth surface and stable operation of the engine, remove 1 mm from the surface of the block, and 2 mm from the surface of the cylinder head. In total, 3 mm will be removed, thereby increasing the compression ratio to 10:1. The engine initially does not have a piston return to TDC of 1.95 mm, and the thickness of the gasket is approximately 1 mm, so you can safely sharpen the block and cylinder head.
The cylinder head must be pressed for pressure testing, checking for the formation of cracks in the channels. If they are not there, then the craftsmen install new valve guides, install valves with seals and grind them in. In total, such work will cost about 50 euros, depending on the region. If desired, you can lighten the flywheel by 1.5 kg by removing the metal around it.
Step-by-step instructions for disassembling the internal combustion engine of a car + Video
- Prepare all the necessary tools and drain the oil from the crankcase.
- Firstly, this will be necessary to lighten the weight of the motor, and secondly, it will help to avoid excess dirt on the workbench. Next, unscrew the oil filter. Also unscrew all the bolts that secure the oil pan. The old gasket can be thrown away as it is no longer suitable for further use.
- Now you need to remove the crankshaft pulley. This is not as easy to do as it seems at first glance, since in this case you will need good physical strength. However, no one has canceled the use of a pipe as a wrench extension. Secure the crankshaft from turning by blocking the flywheel. For this, a special device is used, which can be purchased in the store. Next, use a wrench to unscrew the ratchet and remove the pulley.
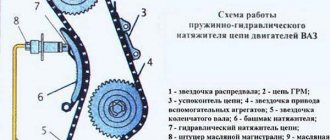
- Unscrew the nuts securing the valve covers and timing chain, remove it and pull out the gasket. Unscrew the bolts securing the camshaft gears, as well as the shaft that drives the engine oil pump. Next in line is the timing chain tensioner. First, loosen the special cap nut, and then unscrew the other two nuts that secure it to the cylinder head. Do not forget to unscrew the bolt securing the shoe, and then remove the tensioner itself, along with the shoe. Then the pin that restricts the chain is unscrewed, the camshaft and oil pump gears are removed, and the chain is removed.
- Now you need to remove the camshaft. To do this, unscrew two nuts located on its studs in the bearing housing. The housing must be removed and the camshaft carefully pulled out. Before pulling it out, do not forget to also remove the special thrust flange.
- Next, the bolts intended to secure the cylinder head to the block itself are unscrewed. The cylinder head is dismantled immediately along with the manifolds, which are not required to be removed (depending on the type of repair being carried out). After removing the head, it is also recommended to replace the gasket. This procedure will help you, in the future, get rid of repeated removal of this element.
- After this, you need to dismantle the oil pump. To pull it out you need to remove the special thrust flange. After this, remove the roller from the cylinder block, which is responsible for driving the oil pump.
- Using a special removable device, remove the gear that fits onto the engine crankshaft. Then remove the nuts located on the connecting rod bolts. Now remove the connecting rod caps and, using the cylindrical opening, pull out the connecting rods along with the pistons.
Overhaul of VAZ 2106 engine
Disassembling the VAZ 2106 engine
Now this long-awaited moment has come for me - work on the engine has begun. The engine has been asking for repairs for a long time, because there were traces. Problems:
— Oil consumption (didn’t smoke, but “ate” quite well... flew into the breather) — Breather (increased output of crankcase gases) — Reduced compression (according to the latest measurements — below 11) — Lost traction (uphill with 2 passengers, switched to low) - Difficult valve adjustment, constant "ringing" - Periodic "left" knocking in the engine at idle - Increased fuel consumption (up to 15 liters in the city in the summer)
+ a number of other problems, such as oil leaks from the pan, a slightly squashed cylinder head gasket, etc. In a word, I must admit, I started the engine. On the advice of colleagues from work, I found a master turner who would take on the main work: boring, grinding, fitting and assembling the ShPG. The cylinder head will also be repaired. He placed the assembly, disassembly and cleaning work on his shoulders. The garage and pit were prepared, and things moved forward. It was decided to disassemble and remove as much as possible from the engine, so that all that was left was to pull out the block, together with an assistant.
I started throwing it around... and the first serious problem I encountered: one head bolt stuck, and I successfully tore off the edges from it (the head and the FORCE ratchet held up). My bolt is set to “12”, with a cast washer - the worst option, as they later said. I had to drill it out, the process is tedious and long, because the fear of damaging the head is great.
There was a fair amount of debris in the head, shavings flew straight onto the valves. A magnet helped.
After much suffering - victory. True, not without small mistakes.
In the process of disassembly
After I removed and unscrewed everything “unnecessary,” my friend and I, with almost no difficulty, pulled the block complete with the piston out of the engine compartment, holding it on both sides. I also didn’t have to unscrew and move the gearbox, just jack it up so it wouldn’t fall.
Next came further disassembly, and the “process of lightening” it in terms of attachments - for the convenience of the turner.
Removing the oil pan revealed heavy oil deposits and a clogged oil pump screen with sealant residue and other debris.
Well, after complete disassembly, I spent a couple of hours cleaning the block and head. The task required a fair amount of PROFOAMa 1000 and AI-92 gasoline
As a result, a ready-made block and head assembly are ready for delivery to the turner, but that will happen next time - in the second part.
Inspection and troubleshooting of the VAZ 2106 engine
I’ll briefly tell you the latest information on the overhaul of my car’s engine that is currently underway.
So, the engine (block with the ShPG) was pulled out, disassembled to the maximum and washed, the same was done with the cylinder head.
Next, the block and cylinder head were handed over to the master turner, who will actually provide services for all complex technical and turning work.
When the “hardware” was delivered, there was a stage of inspection and modification by the master.
Here's what was revealed:
— The piston on my 06 block is “five-point” (with recesses for the valves)
. And the worst news is that it is already the last repair - 79.8 mm. Those. Either change the block or sleeve it. Options for boring at 82 and other “boosts” do not suit me. Therefore, it was decided to use sleeves. The piston will be the same 05th, 79 mm. A mirror in cylinders without visible wear, but an ellipse - according to the bore gauge.
— The crankshaft has axial runout above the tolerances.
Therefore, there was a partial inclination of the connecting rods and pistons along with them - and therefore, visible wear of the liners “along the edges” and a distinct “pattern” of gas breakthrough along the sides of the piston. The general condition of the liners is satisfactory, there are no longitudinal plays. Inserts are already 0.50 sizes - everywhere. It was also revealed that there is wear on some of the HF journals (apparently the result of the “correct” operation of the former owners).
The result of the HF is for grinding to 0.75 liners.
— cylinder head. A number of serious problems have also been identified.
Large oil deposits (apparently formed during the period when the oil seals were worn out and the oil was burning.) Also on some valves there is a partially burnt chamfer plane. The valve stems and guides themselves are within tolerance. There is no play.
Rocker wear and camshaft wear are visible, but not critical. Most likely, all this will change, and a camshaft from the 213th Niva will be installed, as it will be wider for the rise.
New valves and oil scraper valves will be installed. Trim the seats to a triple chamfer and grind them in. Everything is done by hand.
The “hog” will unfold in the same way. His backlash is allowed.
The oil pump is new, for maintenance purposes, the factory milled surface is sanded.
The planes of the cylinder head and block will also be ground.
Well, something like this, a major overhaul is a major overhaul.
Now I'm waiting for news and adjustments from the turner.
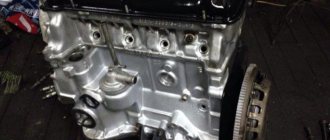
Engine parts and assembly
After some time (or rather, a week), the master turner called me and said that everything was ready. I took all my pieces of iron. Completely finished cylinder block assembled with ShPG:
Let me remind you that the block was bored and lined, and honing was also performed.
The piston group was supplied - “Motordetal” from 2105.79mm, i.e. factory size.
The crankshaft was supplied from the 213rd Niva, used but in excellent condition - all journals were ground for 0.75 repair.
My old KV was badly damaged and required polishing, but the time for this (up to 5 days) did not suit me, my vacation was ending... and my work without a car is not work. Therefore, the master offered me this KV from Niva in exchange for mine. I agreed.
VAZ 2106 engine maintenance
To identify all possible problems in the car, it is necessary to perform a thorough diagnosis of the entire structure. The master and specialist will be able to set operating parameters in each individual mechanism of the entire system.
The complexity of repair work is determined based on the general condition of the engine and existing defects. Detailed force load studies must be performed to make accurate estimates. Also, special attention is paid to all system components.
Disassembling a VAZ 2106 engine requires an exclusively professional approach. More experienced drivers will be able to buy a special book in the form of a manual, which is sold at any car store.
To disassemble and assemble a VAZ 2021 engine, you need to have knowledge and experience, as well as have a full set of tools.
Popular engine breakdowns
- Failure to change oil in a timely manner or use of a lower quality can lead to the fact that after a run of 6 thousand km, the cylinder diameters may increase by approximately 0.15 mm.
- Increased camshaft wear
- Knocking in the VAZ 2106 engine. The most popular solution to the problem is adjusting the valves. Another reason may be detonation; this occurs due to low-octane fuel, carbon deposits in the combustion chamber and incorrect ignition setting. The problem can be solved by appropriately eliminating these defects. If the situation does not improve, then the knocking noise may also be due to improper operation of the piston pins or connecting rod bearings; in this case, it is recommended to contact a service station.
- If the knocking noise comes from the bottom of the engine and there is a drop in oil pressure, this means the main bearings are damaged. In this case, you need to turn off the engine and use a tug to send the car to the service station.
- If the knocking sounds like a squeak, you need to check the damper and timing chain tensioner; if there is a grinding noise, check the pump bearing.
- If your engine suddenly stalls while driving, first check the power or ignition system.
- If it stalls at idle and the idle speed is adjusted normally, try adjusting the air damper.
- Why is the engine shaking? Some of the reasons: incorrectly adjusted valves, or they simply burned out, the cylinder head gasket has failed (additionally, this will be indicated by jumps in coolant temperature and smoke from the exhaust system). Other reasons include low-octane gasoline and an incorrectly adjusted carburetor.
- Motor vibration. The first reason is wear of the pillows. Others are imbalance of the crankshaft and driveshaft, different pistons. We carry out diagnostics at a service station and fix the problem there.
Features of overhaul of the VAZ 2106 car engine
Before carrying out major repairs, it is necessary to carry out dismantling work. To perform this stage of the overhaul, special plumbing and measuring tools are used.
The assembly of the VAZ 2106 engine must be carried out by qualified specialists. The procedure for performing preliminary work:
- Unscrewing the fasteners that are located on the frame.
- Loosening the gas pump hose clamp, as well as dismantling the product.
- Pulling out the gasket plates near the gasoline pump.
- Disconnecting the wires from each spark plug.
- Take out the pressure plate.
- Dismantling work in the distributor.
- Unscrewing fasteners on the generator.
To dismantle the cylinder head casing and flywheel, you must have experience in repair work or seek qualified assistance from a specialist at a service station.
Assembling a VAZ 2106 engine requires certain skills and a little work experience. Sometimes it is almost impossible to independently determine in which part of the engine there is a knock in the VAZ 2106 engine. Disassembling the pins requires a special approach and careful diagnosis.
Repair process
Before installing pistons and connecting rods, they need to be weighed. The difference in weight, in tolerances, should not exceed 3 grams. If the difference is normal, use a piston ring clamp and gently tap with a hammer to press the pistons into the block. After this, we attach the connecting rods to the crankshaft using the journals. During installation of the pistons, the cylinders should be lubricated with oil, as well as the places under the liners. This is required so that in a short period, when the pressure in the system is insufficient, there is no increased friction of parts. We need copper grease to lubricate the connecting rod cap bolts!
Next, we install the oil pump, and pour a little oil into the oil receiver, after which we place the pan on the gasket and sealant.
Engine disassembly process
A major overhaul of a VAZ engine is quite feasible on your own. But you just need to carefully prepare for it. To do this, first of all, you need to carefully familiarize yourself with the structure of the engine, and then read about how the repair process is carried out. And only then can you get down to business. Prepare your working tool:
- adjustable wrenches;
- hammer;
- screwdriver;
- spare motor components.
Engine disassembly looks like this:
- Engine 2106 - the fourth generation of VAZ engines
- First you need to unscrew the bolt that secures the frame. Next, the clamp is released and the hose from the pump through which fuel is supplied is removed.
- The pump is dismantled by unscrewing the nuts securing it.
- There will be a spacer underneath it, which should also be removed.
- There is a layer between the spacer and the cylinder block. She is also removed.
- The wires on the spark plugs are disconnected.
- The pressure plate is removed.
- The hose and vacuum regulator are disconnected from each other.
- The ignition distributor is removed.
- This is followed by unscrewing the nuts, after which the washers, the generator belt and the unit itself are removed.
- To remove the coolant pump, you need to loosen the corresponding bolts.
- Next comes the removal of the carburetor hoses and crankcase ventilation system. This element is also removed from the vacuum system in the ignition distribution regulator.
- The axle is released from the washer.
- The valve flap drive rods are removed.
- Next comes dismantling the oil filter.
- To remove the breather cap, you need to unscrew the nut. At the same time, the oil indicator is removed.
- Next comes removing the lubricant pressure sensor.
- The nut is unscrewed from the engine block mount so that the crankshaft pulley can be removed.
- The bolts and nuts are unscrewed so that it is possible to remove the cover from the cylinder block. It is removed along with the plates, brackets and vacuum hose.
- Next, the gasket is removed.
- The chain tensioner is removed.
- To remove the drive shaft sprocket for auxiliary systems, you need to turn and unscrew the mounting bolt. After this, the chain at the camshaft is also removed. The crankshaft sprocket is also removed.
- Then remove the mounting bolts and the “shoe” at the tensioner to free the bearing frame.
- The cylinder head gasket is removed from the engine.
- The front cover of the clutch housing and the flywheel are dismantled.
- Next, remove the oil sump, oil pump with gasket, and drive shaft.
- After this, the gear in the distributor drive is removed.
- The oil separator, drain pipe, and connecting rod cover in the first cylinder are also removed. If difficulties arise at this stage, you can use a hammer.
- The pistons and connecting rods are removed.
- Having taken out the crankshaft, it is necessary to disassemble it into its component parts.
If the engine overhaul is carried out for the first time with your own hands, then it would be useful to mark the order of disassembly. And lay out all the components in the order in which they were received. Thus, no problem situations should arise during assembly.
Each element must be carefully inspected. Every broken part is replaced with a new one. Inspection is also required in order to prevent breakdown at an early stage. After determining the causes and replacing the malfunction, the motor is reassembled in the reverse order.
Return to contents
Is it necessary to bore the cylinders?
If your engine has completely lost compression, then you will need to bore the cylinders. There are cases when it is impossible to carry it out, since the last repair of the VAZ 2106 engine has been carried out. Then a relining is done. New liners are being installed into the engine block. This work requires professional skills; you cannot do it yourself. If you are boring a block, you have two options - you can use honing, or you can give the liners a mirror look.
You can argue a lot about the advantages and disadvantages of each type of boring, but it is better to choose a mirror. The reason is that honing wears off over time. In addition, it destroys the piston rings, which causes premature loss of compression in the engine. The result is that you get a mirror bore, but at a higher price.
Major breakdowns
All malfunctions in the motor are divided into those that can be eliminated with your own hands, and those that require the intervention of specialists and special equipment. Let's look at minor breakdowns.
Repairing a VAZ 2106 engine does not always require cash costs, and sometimes only a significant amount of time. For example, a very common problem is a lack of fuel level in the carburetor. The reasons for such a breakdown may be that the fuel line is clogged with sediment from the gas tank or pieces of rust. To avoid such an unpleasant situation, change filters on time. If such a breakdown occurs, then you need to blow out and wash the fuel pipes under pressure, clean the gas tank, and blow out the carburetor jets.
Often, rust that travels along the fuel line can damage the fuel pump diaphragm. Then simple blowing won't do. It is necessary to disassemble the pump and change the membrane, as well as replace the liners.
A more problematic situation is when compression is lost in the cylinders and the engine stalls or cannot develop maximum speed and power. The norm for the VAZ 2106 engine is 11 atmospheres. If the compression in the cylinders is less or more, then this indicates a clear breakdown.
But the carburetor may also be the reason that the engine stalls. It can prepare the wrong mixture, which contains more oxygen than it should. This is due to the fact that the liners are not replaced in time, and holes form in them, through which excess air enters the float chamber.
Also, the fuel quality and quantity screws may be incorrectly adjusted. You can easily adjust them yourself. To do this, tighten both screws until they stop, and then alternately unscrew the quality screw by 1.5 turns, and the quantity screw by 4.
If the problem is not in the carburetor, and the compression in the cylinders is normal, then look for the cause of the breakdown in other components. For example, in the cam shaft. They need to be adjusted using a screwdriver. This must be done without removing the mechanism itself from the engine, since it is unlikely that it will be possible to put it back together later on your own.
Dismantling the cylinder head
Let's go back to the situation where there is insufficient compression in the cylinders. The reason for this is often the failure to replace the liners in a timely manner. To eliminate this breakdown, disassemble the engine by removing the cylinder head cover and the gas distribution mechanism. Under them there is a gasket that allows air to pass through. It must be replaced and the engine reassembled in reverse order.
Overhaul of the VAZ 2106 engine is performed very rarely. It involves replacing all parts and bearings that are in constant use with new ones. These include:
- Crankshaft;
- Generator belt;
- Camshaft drive;
- Oil seals;
- Valves (81 pieces);
- Bushings;
- All springs;
- Camshaft;
- Adjusting bolts;
- Camshaft;
- Oil filler neck, sensor and filter;
- Cylinder head;
- Flywheel;
- All candles (4 pieces);
- Pistons and rings (4 pistons, each with 3 rings: 2 compression and 1 oil);
- Crank mechanism;
- Oil pan
Device for mounting the motor on a slipway
Before starting the overhaul, the engine must be removed from the car, and for this, a special device will be required, since the weight of the unit is almost 125 kilograms. Disassembly and assembly is recommended only if you have the appropriate experience. If you have not encountered such problems before, then it is better not to carry out this procedure yourself, otherwise you risk not putting the engine back together.
Block head
We complete the finished head with a camshaft and a split gear. We set the camshaft to the overlap and tighten the star nuts well so that the camshaft phases do not “walk”. The camshaft bed is also well lubricated with oil. After installing the cylinder head gasket, we seat the head and use a torque wrench to properly tighten the head. After installation, we adjust the initial valve clearance. This procedure should be repeated on a warm engine. Now you can install attachments and place the motor on the beam. Before mounting the manifold to the cylinder head, check the evenness of their plane and place it on the sealant. Lubricate the manifold mounting studs with copper grease.
After installing the engine, we put the ignition kit in its place, and set everything to 1 mark, where the piston of the first cylinder is at TDC. We connect everything necessary and fill in the liquids. It is important that before screwing in the oil filter, it must be filled with oil.
Next, we start the engine, first of all we expel the air from the cooling system, and top it up if necessary. Then, with the engine warm, we check the oil level and adjust the valves.
After 1000 km, it is recommended to change the oil and re-press the head and check the connections. Run-in, as a rule, provided that the rings are of high quality, occurs at the first start. A full break-in will require no more than 1000 km. At this stage, the motor shows maximum power and torque. 85 horsepower can be achieved with high-quality repairs. If there is a need to increase power, then you can install a camshaft with a wider phase, a direct-flow exhaust system and a carburetor with increased capacity. As a result, you are guaranteed an honest 100 “horses” and a good resource. Do not forget that the compression ratio of the engine is increased, so fill only with 95-grade gasoline, which will allow you to use all the engine power and achieve minimal fuel consumption.
What kind of oil to pour into Logan
Every car enthusiast dreams that his car’s engine will last as long as possible, and this question directly depends on its operation, or more precisely on the correct choice of engine oil (it is worth saying here that correct maintenance provides a more important component of this process, although changing oil goes right there), which must correspond to a specific car.
THIS IS INTERESTING: How to remove the axle shaft on a VAZ 2107
Engine oil is designed to lubricate and self-cool rubbing engine parts, as well as remove spent particles in friction pairs. The need to monitor the oil level and top it up if it drops below the mark has been confirmed and is known to all car owners who take care of their “iron friend”.
When running a new car, from time to time you can see oil consumption increasing, more than half a liter per thousand kilometers, and this is the norm, as it should be, you should not be afraid of it. When going on a long trip, it is imperative, with great responsibility, to check the engine oil level. When checking, it is also important to pay attention to the fact that when using a motor probe, certain requirements must be observed.
For error-free and reliable control of the oil in the engine system, you just need to turn it off and start the procedure after some time, waiting for the liquid to drain from all parts of the engine in approximately 10-15 minutes.
What types of oils are there?
The oil can be either synthetic or semi-synthetic and, of course, mineral.
The main advantage of synthetic oil is excellent cryogenic (for low temperature) characteristics, as well as accessibility to any friction pairs due to its own structure.
In some cases, mineral oils are used, especially for heavy-duty equipment, although at the moment this is no longer a dogma. But for all motorists who operate a car in a wide range of temperatures, synthetic oils are better suited.
Which oil will best protect the Renault Logan 1.6 engine?
Let's look at the main brand that is best used in Renault Logan 1.6
ELF Evolution SXR 5W40
For this car, “ELF Evolution SXR 5W40” is perfect, an oil that provides the ability to increase performance characteristics under the conditions of enormous challenges when driving on roads and in city mode, at different times of the year.
It is worth adding that this particular oil is recommended by the car manufacturer. Advantages: 1. Increased engine service life and oil change interval. 2. High-quality temperature stability and resistance to oxidation of engine parts, maintaining oil water parameters in severe unusual conditions. 3.
Protection of friction pairs and complete saving of motor power, ensuring high utilization properties.
4. Cleanliness of the car engine. Keeping the more sensitive parts of the engine clean, thanks to the highest technology and modernity of the detergent additive. By filling this type of oil, the car will not only be firmly protected, but will also serve the car enthusiast for a long time.
Elf Evolution SXR 5w30
This motor oil is a high-quality synthetic fluid of a new generation, which provides a real opportunity to increase the resource of the internal combustion engine of a Renault Logan car, due to the fact that it is an all-season consumable material adapted to difficult climatic conditions.
Usually this car oil is sold either in 5 liter containers or 1 liter
Advantages: 1. Highest thermal stability 2. Safety to fuel-oxidation processes in the motor design. 3. Perfection of covering parameters, allowing to save fuel. With impeccable engine operation, the average fuel economy is about 7% when driving, both on the highway and in city mode and in the winter season.
Correct use of oils is a guaranteed protection of the components of an ordinary engine with a huge resource. What kind of oil to pour into the Renault Logan 1.6 engine for an ordinary motorist is definitely a choice for the car owners themselves.
Source: https://avto-melvin.ru/kakoe-maslo-zalivat-v-logan/
Do-it-yourself overhaul of the VAZ 2106 engine.
Disassembling the VAZ 2106 engine So, when your engine is outside, you can completely disassemble it. Do not place the engine on a hard surface. It is best to use an old tire as a support. Disconnect all elements that interfere with disassembly. Then you need to unscrew the nuts that secure the cylinder head cover. Try to carefully place all the nuts, washers, and bolts so that you don’t lose them later. In the future, the VAZ 2106 engine head will be repaired; you will learn about this procedure a little later. Remove the timing cover by unscrewing the fastening nuts. Then remove the intake and exhaust manifolds. Now it's time to remove the cylinder head. Please note that there is no need to use a torque wrench when disassembling the engine. It will be needed when assembling the motor. You have a view of the pistons, pay attention to the amount of carbon deposits and the condition of the cylinders. Is it necessary to bore the cylinders? If your engine has completely lost compression, then you will need to bore the cylinders. There are cases when it is impossible to carry it out, since the last repair of the VAZ 2106 engine has been carried out. Then a relining is done. New liners are being installed into the engine block. This work requires professional skills; you cannot do it yourself. If you are boring a block, you have two options - you can use honing, or you can give the liners a mirror look. You can argue a lot about the advantages and disadvantages of each type of boring, but it is better to choose a mirror. The reason is that honing wears off over time. In addition, it destroys the piston rings, which causes premature loss of compression in the engine. The result is that you get a mirror bore, but at a higher price.
What needs to be done when carrying out engine repairs If you plan to repair the engine on a VAZ 2106 yourself without outside intervention, then you won’t be able to make a boring. The reason is that this procedure must be performed on special equipment. In addition, the person who makes it must have all the necessary skills. If you decide to simply change the rings or pistons, the scope of work is reduced. You need to purchase a set of pistons, rings, pins, and it is also recommended to replace the main and connecting rod bearings. In addition, it is mandatory to grind in the valves in the cylinder head. It is recommended to replace valve guides and seals, so they must be purchased in advance. You must also have the necessary tools, in particular an electric or hand drill. Moreover, it should have a reverse function. You will also need to replace the timing chain, damper, and all gaskets.
How to tune an engine To improve the VAZ 2106 engine, you will need to lighten all components. Namely: Pistons. Flywheel. Crankshaft. In addition, you need to improve the cooling and lubrication systems. As for the pistons, here you need to grind off the inner surface of the skirt. This work should be done by a specialist on a good lathe. Do not forget that the quality of the work performed determines how the engine will function in the future. As for the crankshaft and flywheel, they must be additionally centered after lightening. To do this, you will need to drill holes so that these nodes have the same center of gravity. Tuning other car systems But do not forget that after all these improvements, standard cooling and lubrication will not be enough. Therefore, you will need to carry out all the work to improve the water pump and oil pump. The latter will have to be completely rebuilt to ensure a uniform supply of lubricant to all engine components. The cooling system should function with faster circulation of antifreeze. In addition, it is necessary to improve the radiator airflow system.
Source
How to disassemble the engine
When the engine is removed from the car, it must be disassembled. The engine should not be placed on a hard surface, but rather mounted on an old tire. Remove any obstructing parts and unscrew the fasteners on the cylinder head cover. All fasteners removed from the engine should be placed in one place to avoid loss.
After removing the gas distribution system cover, remove the intake/exhaust manifolds. After this, the cylinder head should be removed. After this, you can see the pistons and inspect what condition they are in.
Electrical equipment diagram of a VAZ 2106 car
The VAZ 2106 car was the real culmination of many years of innovative research and development. This is a machine with reliable mechanical and electrical devices. When developing the VAZ 2106, specialists from the Volzhsky Automobile Plant were guided by the technical specifications for updating and modernizing previous models to European quality standards. Making changes to the exterior, Soviet designers developed a new design for rear lights, side turn indicators and other elements. The most popular and mass-produced car, the VAZ 2106, entered service on domestic roads in February 1976.
Select engine
Almost any VAZ engine is excellent for the VAZ 2106. Here you can control the engine from “Priora”, “Niva”, “Samara”, “Kalina”, etc. The VAZ 2112 engine was also successfully installed. When installing such engines in the traffic police, there will be no serious difficulties in completing the paperwork. Otherwise, you must fill out paperwork to make changes to the car's design. And it's long and expensive.
If, however, a decision is made to get rid of the “soul” of the VAZ in the car, then the engine
from FIAT 124 will be a good replacement.
This engine
is ideal for the VAZ 2106, and it is necessary to carry out installation work with a minimum amount.
Another VAZ 2106 can be turned into a BMW by putting the engine in a 326, 746, 536 or whatever. But since such engines are always quite powerful, it is necessary to strengthen the suspension, braking system, and so on. Otherwise, it would be dangerous to drive a VAZ 2106. In general, it all depends on the fantasies of the owner and wallet.
Electric car VAZ-2106. How to convert a classic to electric power with your own hands. Video
So let's take a step-by-step look at the work done. The guys from Lithuania took an old VAZ-2106, even demonstrated that it works - they installed a battery and started the internal combustion engine. Most likely, the guys used a prototype as an example - VAZ 21029, VAZ 2801 - electric cars developed by VAZ and ISTOK back in the 70s. In principle, a pretty good choice of car, the VAZ 2106 is a fairly light car. At the same time, the car is not the smallest in terms of body size with large offsets relative to the wheel axis at the front and rear. The VAZ has quite a lot of space in the engine compartment and in the trunk - this is where the craftsmen installed a whole battery of batteries.
12 kW (17 hp) electric motor at 120 volts for an electric vehicle
Let's return to the engine. As far as one can judge from the video, they decided to use a 12 kW DC motor for the electric drive, most likely with a supply voltage of 110 Volts. By appearance, one can assume that similar engines are used in electric cars or industrial devices. 12 kW equivalent to approximately 17 hp. - which most likely does not promise great dynamics for the assembled car. However, I would like to note that the internal combustion engine, which essentially makes up 80 percent of the car’s weight, has been removed from the car. The VAZ body itself is not heavy.
I would like to note one not very positive point - the guys decided to use the original VAZ manual gearbox. It is not known whether they had to redo any design features of the gearbox (for example, remove synchronizers), but in the video you can clearly see that gears are switched without connecting or disengaging the clutch.
Specifications
The following main characteristics of VAZ 2106 engines can be distinguished:
| OPTIONS | MEANING |
| Cylinder block material | cast iron |
| Supply system | carburetor/injector |
| Type | in-line |
| Number of cylinders | 4 |
| Valves per cylinder | 2 |
| Piston stroke | 80 mm |
| Cylinder diameter | 79 mm |
| Compression ratio, atmospheres | 8.5 |
| Volume, cm cube. | 1569 |
| Power, l. With. at 5400 rpm | 75 |
| Torque, Nm at 3000 rpm | 116 |
| Fuel | AI 92 |
| Fuel consumption per 100 km, l | |
| - city | 10.3 |
| - track | 7.4 |
| - mixed | 10 |
| Oil consumption per 1000 km, g | 700 |
| Overall dimensions (LxWxH), mm | 565x541x665 |
| Weight, kg | 121 |
| Types of oil | 5W-30, 5W-40, 10W-40, 15W-40 |
| Oil volume, l | 3.75 |
| When replacing, fill, l | 3.5 |
| Engine life, km | |
| 1. According to the factory | 125,000 |
| 2. Actually | 200,000 |
| Tuning (potential/without loss of resource), l/s | 200/80 |
| Candles | A17DVR, A17DV-10, FE65CPR |
| What cars can it be installed on? | VAZ 2106, 2103, 2121, 21053, 2107, VAZ 21074 |
The motor is installed on cars: VAZ 2106, 2103, 2121, 21053, 2107 and 21074.
From the technical characteristics it is clear that the presented motor design has been significantly improved and finalized by engineers.
Video “Assembling the engine of a classic VAZ car”
This video demonstrates the procedure for assembling an engine on a VAZ classic, including installing the crankshaft.
VAZ 2106 engine diagram
In this video, we can take a detailed look at the entire overhaul
engine. The video explains in detail all the nuances and difficult moments during the repair. The engine is considered the heart of any car and its main mechanism. It requires special attention from the car owner, since the performance of the entire car as a whole depends on it.
From the video we watched, we are convinced that engine repair is not such a complicated procedure. Any car enthusiast who knows how to hold a tool in his hands and has a vague understanding of the car’s structure will be able to carry out a major engine overhaul without outside help.
From the video we see that before we begin a major overhaul of the engine, we must remove it, clean it of dirt and remove attachments in order to gain free access to damaged and inoperable mechanisms and parts. Repairing your car yourself will help you save money and time that you spent at a service station. A major engine overhaul means not only the replacement of broken mechanisms and parts, but also the replacement of all parts with new ones that have passed their service life, the replacement of oil, gaskets and other worn-out engine parts.
In order not to get confused while disassembling the engine, it is necessary to write down all operations sequentially and then strictly follow them. The engine assembly will be carried out according to the same principle only in reverse order according to the list. We carefully inspect the disassembled mechanisms and engine parts, paying attention to various deformations, cracks, chips and other damage. During a major overhaul, all parts with detected defects must be replaced. If necessary, we repair the cylinder block and cylinder head.
After completing the repair and installing the engine and its mechanisms in their original place, we run in and tune the engine to operating mode. According to the recommendations of experts, during break-in the engine should not be loaded until the complete process of grinding in the new parts to each other has taken place.
Part 1.
Which oil to choose and how to replace it correctly
Among the large and varied selection you can find synthetic and mineral oil. They differ from each other in that the latter is capable of flushing out all unnecessary and excess deposits from the engine.
But in cars of this brand, spare parts are made of nitrile rubber, which can dissolve in high-quality synthetic oil. To completely prevent this process, it is necessary to replace all rubber parts with similar acrylic parts. They will work with any synthetic oil.
After all components have been replaced, you can switch to a synthetic analogue of oil.
Changing the oil in the VAZ 2106 engine is carried out independently or at a service station, where the technicians will simply drain the old mineral oil and fill in new one; or a specially designed detergent for washing (in case of heavily soiled parts).
In the latter case, the 2106 engine will be started for ten minutes so that the filled liquid can wash away all residual deposits from the use of outdated mineral oil.
- This operating process is necessary to ensure that the new synthetic oil does not mix with particles of used mineral oil.
- Otherwise, you may encounter blockage of the oil channels. To change the oil in VAZ 2106 engines you need to have certain knowledge. Otherwise, such intervention will lead to engine damage.
- If the vehicle has been in use for quite a long time, combustion deposits will form on the liners and gaskets. The holes in oil seals and head gaskets can become clogged.
- Particular attention should be paid to the general condition of all internal parts, especially check the seals and gaskets.
- When excessive pressure is observed inside the system when the supply tube is clogged, an oil leak can be expected.
- Therefore, to change the oil, you need to buy a high-quality brand that has been tested for decades.
Engine for VAZ 2106, technical specifications and repairs
The VAZ 2106 engine is used in small class passenger cars. It has been produced by the Volzhsky Automobile Plant since 1976.
The VAZ 2106 engine cools the system in a closed container using a specially designed liquid. It is located at the very top of the camshaft.
This engine is considered a four-stroke, has a carburetor system and an in-line engine. The liquid inside the motor has forced circulation to quickly cool the container.
The engine has a combined lubrication system. That is, this process occurs under a certain pressure and in the form of splashing. These engines are subject to major overhaul and additional tuning. When the design completely fails, you need to ask how much a new engine for a VAZ 2106 costs and replace it.
Engine tuning technique
Refinement of the VAZ-2106 engine is aimed at improving many characteristics of the “heart” of the car. In particular, adherents of the domestic “six” know that the manufacturer provided the vehicle with a capacity of 75 horsepower.
At the same time, in order to achieve the maximum speed, which again is indicated by the manufacturer, you should take a pause. However, experienced craftsmen point out that tuning the VAZ-2106 engine allows you to increase the power of the engine, help increase the maximum speed of the car, as well as reduce the time at which this speed is achieved.
Of course, such assurances are welcomed by “six” car owners who are ready to turn their “swallow” into a fast and slightly “aggressive beast” on their own. Those who have studied the recommendations on how to improve the VAZ-2106 engine will carry out all manipulations at a high quality level and will be able to surprise others when the “six” begins to easily overtake prestigious and vaunted foreign cars on the highway.
Source
Prerequisites for engine overhaul
In such conditions, repair of the VAZ 2106 engine is inevitable, the extent of which depends on the scale of the defects caused, which can only be assessed with in-depth diagnostics of the power plant and all interacting system components. Correct diagnostics of the motor complex includes not only establishing the performance parameters of the motor mechanisms, but also tests of all associated systems, such as ignition systems, power supply, and other interacting complexes.
Carrying out major engine repairs, a book about which is available for sale in large auto repair stores, is possible for those car enthusiasts who have certain skills in plumbing, a great desire and the necessary set of tools. Such repair of a VAZ 2106 engine, a video report of which is presented on our Internet resource, is possible not only in a stationary service station, but also in a personal garage, which will undoubtedly reduce financial costs.
After all, the cost of an engine overhaul is quite a large amount, and not every car enthusiast is able to shoulder the burden of paying for such expenses. Global repair includes a complete replacement of all components of the unit with updated parts, which requires dismantling the power plant and disassembling all elements into their component parts.