Car body
The body of the VAZ 2107 car is a rear-wheel drive four-door sedan. The assembly diagram of its frame is standard and has the following elements:
- Front parts;
- Front fenders with reinforcements;
- Roofs with glass frames;
- Reinforced floor and rear panel;
- Side parts;
- Hind wings.
Each element is cast from mild steel. Each part has not only its own number, casting pattern, but also its own thickness. For example, for the roof it is 0.9 mm, and for the rear wheel arches - 1.0 mm.
Most parts are connected using non-contact welding, but parts that bear a large load are additionally strengthened by arc welding.
Among the mounted parts it is worth highlighting:
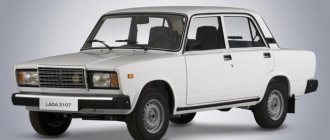
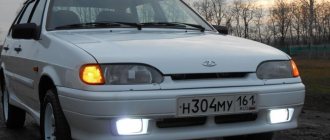
General view
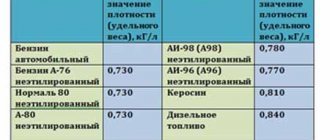
ATTENTION! A completely simple way to reduce fuel consumption has been found! Don't believe me? An auto mechanic with 15 years of experience also didn’t believe it until he tried it. And now he saves 35,000 rubles a year on gasoline! Read more"
The exterior of the “Seven” generally copies other VAZ models, called “classics”. On the other hand, some parts and components of the frame are not the same. They simply will not fit the general exterior due to the fact that they differ in basic parameters.
Let's start with the front. This area of the car includes these components: the hood, the apron with the front bumper (they are considered more decorative elements) and the fenders.
As for the middle part of the car, this includes the roof of the VAZ 2107, sills, and doors.
Finally, the rear of the car includes the fenders, boot lid and rear apron.
Dimensions and specifications
Regardless of the configuration, the VAZ 2107 has the following dimensions:
- curb weight (how much is the weight of the car with equipment and materials) - 1030 kg,
- total weight (how much does a loaded car weigh with passengers and cargo) - 1430 kg
A motorist needs to know not only the standard parameters of his car, but also the control dimensions.
Control dimensions (points) are usually necessary when restoring a car after an accident. If you buy a used car, knowing these control dimensions, you can easily find out whether the car has been in an accident. This geometry will help in restoring the body, as well as other important parts.
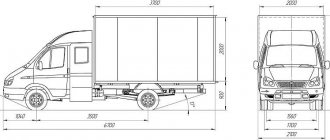
The main control dimensions are described in detail in the diagram below:
The linear dimensions are clearly defined by the following diagram:
Roof
It is part of the metal body - the basis of the body. The task of the roof is not only to protect the interior from above, closing it, but also to absorb impact energy in an emergency. On the VAZ 2107, the roof is reinforced with cross members that act as stiffeners.
The roof of the “seven” is directly related to the overall geometry of the body. After an impact or accident, it is imperative to check whether the roof has “slipped.” To do this, the dimensions of the door diagonals are measured as follows: from the bottom of the rear corner to the top corner of the front. In addition, for things to be more convincing, the diagonal of the roof itself is measured.
The cost of the roof, as a separate element of the body, starts from 3 thousand rubles. Dimensions, mm: 1290x100x1550. Weight – 15.6 kg.
Identification data
The VAZ 2107 car, like any other car, has specific passport data, the liver of which is indicated in the table located under the hood on the air box.
The plate contains information about the vehicle model, engine number and body number, weight data and spare parts number. Above it is the vehicle identification number - VIN.
— The first 3 letters are responsible for the manufacturer’s code;
— 6 subsequent digits are the decoding of the car model;
— A letter or number of the Latin alphabet indicates the year of manufacture of the VAZ 2107 model;
— The last 7 digits are the required body number.
You will find the exact same number in the trunk.
Famous pickup truck
For those who were looking for a spacious, convenient option, a pickup truck in any color was produced based on the VAZ 2107. It is called the VIS-2345 pickup, but it is also no longer produced. But despite this, it is still popular.
This subcompact pickup truck is easy to drive, giving you plenty of flexibility to haul as much stuff as you need. Even a refrigerator will fit into the wide isothermal booth.
The two-seater pickup truck has a fuel-injected engine. It reaches speeds of up to 110 km/h. Due to its convenience and original design, this body type is very common in America and Europe - so it’s a shame that production of this model was stopped.
Body replacement
The VAZ 2107 sedan or pickup truck has not been produced for several years, but drivers can still purchase bodies for their cars if necessary. If you suddenly get into an accident, or the body of your car is in disrepair, you can easily order a new one.
The action plan is simple. First, you will need to decide on the necessary equipment, as well as what type of body you need.
One package includes a new “body assembly”, which includes electrical appliances, wiring, glass, front and rear bumpers;
The other configuration is called “body in metal”. It includes a new body painted in the desired color and treated with anti-corrosion agents.
The factory provided various colors for the VAZ 2107. Each of them has its own name. For example, pale yellow is “melon”, classic red is “viburnum”, and marsh green is “Sochi”.
When ordering a body in the third configuration, you can make it in any color. It may take longer than if you had stuck with plain white paint. But a car with a bright, noticeable color will always be fun to drive.
Characteristics of the VAZ 2107 body
The body of the VAZ 2107 not only has contours similar to all classic VAZ models, but also a number of characteristic features.
Body dimensions
The VAZ 2107 body has the following dimensions:
- length - 412.6 cm;
- width - 162.0 cm;
- height - 143.5 cm.
Body weight
There is a distinction between the mass of a clean body and the mass of a body with equipment and passengers. These parameters for the VAZ 2107 are:
- clean body weight - 287 kg;
- curb weight (with all equipment and materials) - 1030 kg;
- total weight (with all equipment, materials and passengers) - 1430 kg.
Body number location
The body of any car has its own number. The VAZ 2107 body data plate is located under the hood on the bottom shelf of the air intake box.
The same plate contains information about the engine model, body weight and vehicle equipment, and the VIN code is stamped next to the plate.
Basic and additional body elements
There are main and additional body elements. The main elements include:
- front part (front);
- rear part (rear);
- wings;
- roof;
- hood.
Additional elements of the VAZ 2107 body include mirrors, linings (moldings) and some other parts. They are all made of plastic, not metal.
Mirrors
The mirrors are designed to provide the driver with complete control over the road situation. They are often damaged because they extend beyond the dimensions of the body and, if driven carelessly, can hit various obstacles.
My bitter experience of driving for the first time, when I was 17 years old, was connected precisely with mirrors. How many times did I interrupt them when I tried to move in or out of the garage? Gradually I learned to drive carefully. The side mirrors remained intact, even when parking in reverse between two closely parked cars.
The side mirrors of the VAZ 2107 are mounted on a rubber gasket and fixed to the door pillar with screws. By modern standards, the standard mirrors of the 7 are not distinguished by a successful design. Therefore, they are often modified to improve appearance, increase functionality and increase viewing angles. Part of the space around the VAZ 2107 (the so-called dead zone) remains invisible to the driver. To minimize this area, spherical elements are additionally installed on the mirrors, significantly expanding the view.
Residents of the northern regions often tune heated mirrors. To install the system, a self-adhesive heating film is used. It is freely available. You can install it yourself, just arm yourself with a screwdriver, a ruler, wires and masking tape.
Moldings
Plastic door sill covers are called moldings. VAZ 2107 owners usually install them themselves. This is quite easy to do - no special skills or special tools are required. Moldings perform exclusively decorative functions. Some craftsmen make them with their own hands, constructing something like a body kit. However, it is much easier to pick up ready-made overlays in the store or leave standard decorative inserts.
Moldings must meet a number of requirements.
- Moldings should not be made of very hard material such as fiberglass. Otherwise they may crack.
- The material of the moldings must withstand temperature changes and be inert to the effects of chemicals that are sprinkled on roads in winter.
- It is advisable to purchase moldings from a reputable manufacturer.
- There should be no gaps between the molding and the threshold, otherwise the thresholds may corrode.
Luggage rack manufacturers
Gutter racks have been produced since USSR times. But due to the bowl-shaped shape and the small number of points of contact with the load, Soviet designs have sunk into oblivion. Although they can be found today as a rarity or an “unkillable” platform for transporting agricultural products.
- A typical representative of that era is the BelAZ gutter rack, which is still produced in Belarus to this day. Options for four and six supports differ slightly in load capacity. The total figure is 50 kg. Dimensions 1.3x1.05x0.21 m. Cost 1,200 and 2,500 rubles depending on the number of supports. Consists of 4 single and 4 paired black metal tubes. They occupy transverse positions. Perforated silver plates are screwed to the ends as side edges. The trunk's potential is limited by design.
Currently, luggage devices are made of lightweight, durable alloys using an anti-corrosion coating.
- from Rostov-on-Don is popular for its universal designs, but does not shy away from mounting on gutters. The basic model consists of six parts:
- Paw. Part of the support from the roof side.
- Clamp. Second part of the support.
- Pipe crossbar. It is made of square steel profile.
- Plastic plug. Before threading the crossbar into the rack, the plug is removed from the crossbar.
- Wing with nut. Main fastener.
- Rubber backing. She puts it on her paw.
Load capacity 70 kg. Price from 450 to 900 rubles depending on the length of the crossbars. An excellent budget option, but at speed it shows poor aerodynamics - it is noisy.
- The Ant trunk is no different in appearance from the previous one. But the price of 1,750 rubles is explained by a 2-year warranty.
Luggage baskets are installed on the Semerka. They create the necessary volume for small-sized personal items. But boxes on 2107 are a rare phenomenon. If only this is a car that has undergone exterior tuning. Then the shape of the airbox is combined with the curves of the car.
Video about installing a roof rack on gutters
At the end, two main rules should be added for installing luggage accessories on the drains of a VAZ-2107:
- Maintain alignment from the windshield and rear window.
- Tighten bolted connections evenly.
And also take care of the roof and operate the trunk in accordance with the instructions.
Body parts of the VAZ 2107 are of welded and hinged type. The first ones are connected using welding points and additionally reinforced with an arc. Attachment parts can be connected using bolts. On the VAZ 2107, body parts conventionally belong to three zones of the car: the front, middle and rear. Let's find out what their purpose is, how they affect the geometry of the body, its aerodynamics and whether they can be modernized.
VAZ 2107 body repair
Almost all experienced VAZ 2107 owners know the technology of body repair. This allows them to save on service station costs and extend the life of the body. The repair involves a number of measures to improve and modernize the skeleton.
For body work you will need the following tools.
- A chisel with a sharp tip.
- Bulgarian.
- Clamp or pliers for holding new parts in place before welding or bolting.
Installation of plastic wings on a VAZ 2107
The main task of the wings is to protect the interior from dirt and stones entering through the open glass when driving. In addition, they improve aerodynamics. It is the wings of many cars that are most often restyled and take on a more streamlined shape. The wings of the VAZ 2107 are an element of the body and imply the presence of an arched cutout for the wheel. They are attached to the body by welding. Sometimes, to reduce the weight of the car, the front metal fenders are replaced with plastic ones. Moreover, plastic is not subject to corrosion. On the other hand, plastic fenders are less durable and may break in a collision.
It is not difficult to purchase a plastic wing for the VAZ 2107. You can even do this through an online store with home delivery. Before installation, you must first remove the metal fender. To do this you need:
- Use a sharp chisel to disconnect the wing at the welding points.
- Pull out the wing.
- Using a grinder, clean off the remains of the wing and welds remaining on the body.
To install a plastic wing, you need to perform the following steps.
- Apply a layer of special automotive putty to the joints between the plastic fender and the body.
- Secure the plastic fender with bolts.
- Wait for the putty to harden.
- Remove the mounting bolts from the wing.
- Remove excess putty from the edges of the wing that was squeezed out during installation.
- Lubricate the wing with a layer of graviton and laminate.
- Putty the entire structure and paint it in body color.
Video: replacing the front wing of a VAZ 2107
I would not recommend installing a plastic fender. Yes, it allows you to lighten the body, but at the slightest collision of the car with other cars, you will have to change the part again. Many Japanese, Korean and Chinese cars have such plastic parts installed. Any minor accident forces the owner to order expensive repairs.
Welding the body of a VAZ 2107
Typically, damage to the body of the VAZ 2107 is associated with corrosion or is a consequence of an accident. In these cases, it is optimal to weld with a carbon dioxide semi-automatic machine, which uses wire to connect individual elements. Electrode welding is not recommended, since it is almost impossible to make a high-quality seam on the body with its help. Moreover, electrodes can burn through thin sheets of metal, and the device itself is large and does not allow working in hard-to-reach places.
Threshold repair
It is recommended to begin restoring thresholds by inspecting the door hinges . If the doors are sagging, it will be extremely difficult to establish the correct gap. It is also inappropriate to restore an old threshold corroded by rust - it is better to immediately replace it with a new one. It is recommended to perform the work in the following order.
- Cut off the outer part of the threshold with a grinder or chisel.
The threshold amplifier can be made independently from a metal strip. It is necessary to make holes in it in the middle of the tape with a hardened drill every 7 cm. You can fix the part before welding with a clamp or clamps.
When welding a threshold, you must perform the following steps.
- Weld the reinforcement with two parallel seams - first from below, then from above.
- Thoroughly clean the weld seams to a mirror shine using a grinder.
- Try on the outer part of the threshold. If there is a discrepancy, trim or bend.
- Remove transport soil from the new threshold.
- Coat the inside of the threshold with an acid or epoxy compound.
- Secure the threshold with self-tapping screws.
- Hang the doors.
- Check the gap size.
The new threshold must be located strictly in the door arch, not protrude anywhere and not drown. After a careful inspection of the gap, welding of the outer part of the threshold begins, doing this from the middle pillar in both directions. Then the threshold is primed and painted to match the body color.
Video: replacing thresholds and repairing pillars of a VAZ 2107
My brother-in-law is a bodybuilder. He always advised me and my friends to pay attention to the thresholds. “Remember, the car is rotting from now on,” Vadim said, lighting a cigarette during a break, pointing with a yellow finger at the bottom of the doors. I was convinced of this from the experience of operating the “Seven” when I was repairing the body. The thresholds were completely rotten, although the remaining areas remained untouched by corrosion.
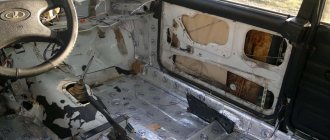
Underbody repair
The underbody is more exposed to aggressive environmental influences and mechanical damage than other elements. The poor condition of the roads also has a noticeable impact on its wear and tear. Therefore, the bottom often has to be completely digested. You can do this yourself - all you need is an inspection hole or overpass and good lighting to inspect the bottom. Tools you will need:
- gas welding or semi-automatic welding machine;
- metal scissors;
- Bulgarian;
- straightening hammers.
Wings
The front fenders on the VAZ 2107 are a separate body element with an arched cutout for the wheel. They are fastened by welding, although on most modern cars the fixation is carried out using plastic or metal fastening elements.
The main task of the wing is to protect against dirt and stones from under the wheels getting into the interior through the open glass when the vehicle is moving. The front wings are located along the engine compartment.
In addition to these functions, the wing plays an important role in the aerodynamics of the vehicle. It is not for nothing that designers working in factories and factories of famous automakers constantly subject this body element to restyling. They try to give the wings the most streamlined shape in order to reduce the rate of counter resistance or CRL.
The rear fender is also attached to the body by welding, just like the front fender. Fixation is carried out to the side of the body, the rear panel and to the floor of the fuel tank (right). To strengthen the wing, amplifiers are standardly installed on the part from the inside. The right wing is equipped with a filler flap for the fuel tank.
Instructions for replacing the front and rear wings on the "seven"
The front wing, due to its location, is often exposed to external influences and is soon damaged. Find out how to replace it yourself. Here's what to do:
- Remove the hood, bumper and other body parts that impede access from the car;
- Identify by eye the spots of spot welding. They are located in the following areas: at the installation site of the headlight, near the engine compartment on the gutter and in the door connection area;
- Take a drill and cut off the welding spots.
Advice. If the drill does not “take” welding, you can use the welding method of tearing off points.
- Using a chisel with a sharp end, disconnect the points connecting the part to the front of the car, the bottom and the pillar;
- Remove the wing;
- Using a grinder or the same chisel, knock off the remaining parts on the body.
The new wing is installed like this: first it is secured with a clamp and welded in spots, temporarily. The clamp is removed, compliance with the gaps is checked, and only then the part is finally welded to the body.
With some differences, the wing is castled from the rear:
- First, the trim in the trunk is removed, in the cabin the rear seats are dismantled;
- The wing is cut off with a grinder. In this case, it is recommended to deviate from the factory seam by 1 cm;
- Use strong pliers to grab the remaining metal on the body and remove it;
- Carefully inspect the arch and, if necessary, repair it, with mandatory primer treatment;
- The new wing is installed like the front one.
After welding work, be sure to grind the seams with a grinder and cover them with materials with high protective properties. It is advisable to coat the inside of the wings with anticorrosive.
The cost of a wing usually starts at 850 rubles.
Video on how to repair an apron and replace a wing
Hood of VAZ 2107
VAZ 2107 owners often modify the hood of the car. First of all, the lid stop, which was made at the factory in an extremely inconvenient way, changes. First you need to remove it from the latch and only then close it. On the VAZ 2106, the same stop is designed much simpler and more functional.
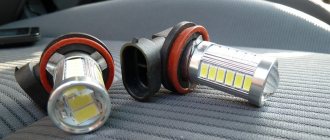
Installing an air intake on the hood
An air intake or snorkel is often installed on the hood of the VAZ 2107, which improves the appearance of the car and helps cool the engine. It is mounted so that air flows directly onto the air filter. Sometimes additional pipes are installed to the main air intake to increase cooling efficiency.
The snorkel is usually made by hand. In this case, it is better to use durable plastic or metal as a material. The air intake is mounted as follows.
- A U-shaped hole is cut in the hood with a grinder.
- The cut out part of the hood is bent to form the snorkel profile.
- Triangular metal pieces are welded along the edges to cover the ends of the part.
- The hood is puttied and painted to match the body color.
When cutting the hood, it is important not to touch the stiffeners provided by the design. Otherwise, the strength of the body will noticeably decrease.
Hood lock
Sometimes car owners modify the hood lock of the VAZ 2107. If it does not work well or fails, the mechanism is dismantled. It is recommended to first outline the lock with a marker - this will avoid adjusting a new or restored lock. The mechanism is removed in the following order.
- The hood opens.
- The lock cable clamps come out of their seats.
- The bent end of the cable is straightened with pliers. The fixing sleeve is removed.
- Use a 10mm wrench to unscrew the lock nuts.
- The lock is removed from the pins.
- A well-oiled new lock is installed.
When replacing the cable, it is first disconnected from the lever handle. This is done from the salon. Then the cable is pulled out of its sheath. Nowadays, cables are often sold complete with a sheath. In this case, when replacing the old cable, it is pulled out along with the casing.